


Ok, I’ve decided to dole out some of my needlework stash – and I’m going to test different ways of doing it. This is my first attempt – let’s see how it goes over! I’m going to collect combination of threads, trims, and nick-nacky things (like embellishments or beads) in no particular theme (see the photo). To get “rid” of them, I thought I’d propose a simple contest…
This is the deal: I’d like to hear your favorite needlework tips and tricks. What do you do when you stitch (or before or after you stitch), that helps you get the job done with better results?
I’ll take the legitimate tippers (threading your needle, for example, is not what I’d call a legit tip), put the names in hat, and draw a name. I’ll let you know who won, and you can contact me with a name and address for mailing.
If this goes over well, I’ll revisit the idea every now and then this year – I’m thinking once a month. For the kickoff, I’ve put together the following little lump of stuff, all neatly stuffed into a ziplock bag and ready to mail:
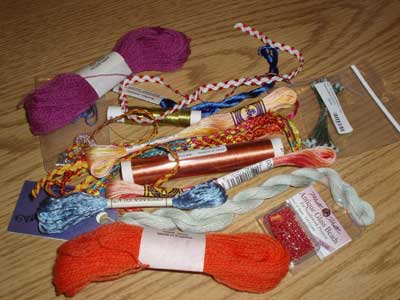
There are lots of goodies in there…
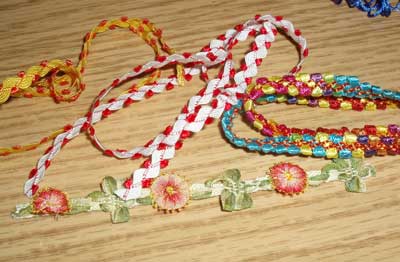
Some little pieces of trim, including about 3.5 inches or so of Mokuba ribbon. You can read about how I bought the ribbon, and learn from my mistakes, if you want!
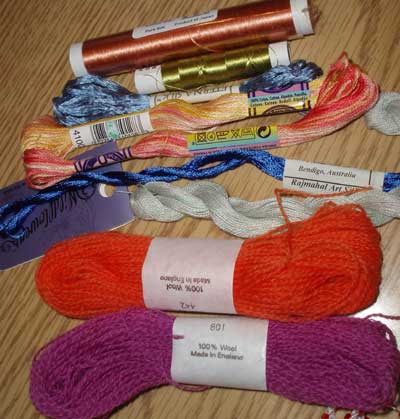
I’ve thrown some great threads in, since this is the “kickoff” and I wanted it to be something above average. There’s a spool of coral Japanese silk from the JEC, a hank of Caron Collection watercolors, a spool of Piper’s silk (same thing as the True Embroideries silk that Helen Stevens recommends), two skeins of DMC color variations, a skein of Rajmahal art silk (combination silk and viscose), a skein of Eterna silk, and two skeins of Appleton crewel. If you’ve wanted to try some different threads and haven’t had a chance to get your hands on any – here’s your opportunity!

And everyone likes embellishments – so there’s a little pack if tiny Mill Hill beads in a beautiful deep coral-ish red, some little sparkly heart buttons (Valentine’s Day is around the corner!) and some wire things that can be used as either stames in flowers or buds in a spray.
So, go on – don’t be shy – leave your tips in the comment section below!
I should set a deadline – how about next Tuesday, January 22, at midnight my time (CST)?
Let the tipping begin!
(Yes, I’ll ship overseas – the least expensive air-mail possible…. note: not responsible for mail delivery difficulties, customs, or any misadventures…)
I always keep my projects in metal tins that have everything ready to go meaning scissors threads ( sewing or crocheting) and everything else I need. If it is a quilt project all the pieces are cut and in little bags to keep them neat inside the tin encase it should dump out while traveling. I have about 6 of these ready at all times so at the drop of a hat I can grab and go.
I always interface silk velvet before I use it as the base for my stitching. Fusible lightweight knit is the kind of interfacing I prefer. It makes the notoriously evil velvet as docile and sweet as can be. This works on any wiggly, loosely woven silk, too.
I also always interface each crazy quilt block, after it is pieced, on the back before I start stitching. This give more stability and is not an issue for ease of stitching.
That is a nice looking stash there!
When I start a needlework project, I cut a piece of manila folder approximately 2 inches wide and the length of the folder. Then I punch holes for as many different floss/thread needed for the project. To identify the floss, I write the names of the color next to the holes. I cut a few strands of floss ( 12 – 14 inches )and hang them through the holes and carry them with my project. It becomes so much easier and convenient because the floss don’t get tangled and also after pulling out one or two strands from the floss as needed, there is a place to hang the remaining strands back.
I have all my fancy fabrics in clear rubermaid tubs, I have also stored my thread in drawers and beads in tubes all sorted by colour. So before I start a project I pull all the same colour families out and put together an asortment of materials. If Time is at a premium I place these all in a shoe box size tub and it is ready to go next time. Depending on the stage I am in making my block I remove from the tub the supplies I no longer need and store them sorted by colour for ease of locating them next time.
I use a fabric ort bag that attaches to a base. The base has an attached pincushion and magnetic strip. (Quilt shops often have them.) I made mine from a kit using some sampler type fabrics.
THEN, I put a plastic sandwich bag inside the ort bag and it’s much easier to empty out!
I keep an old film canister in my work tray for any old or broken needles. When it is full I discard it. This saves any old rough needles going back in my needlecase by mistake. Nice idea for the giveaway – very kind, and lovely things! Thanks
Im a beginner and most of my stitches I learned from mary’s videos and my grandmother 😉 so I guess this is advice for beginners, but when using dark threads and or fabric try to stitch before dusk and when using the lighter colored threads and or fabric try after dusk …in the long run it makes it a whole lot easier on your peepers and that advice you can use for pretty much any needle craft ….oh and to keep your threads at there best always wash your hands before use or storage trust me its nessasary!
Well, Mary, I don’t know if this qualifies as a legitimate tip, but I get the husband and kids off to bed, then spend a bissful couple of quiet hours by myself, just me and my stitching.
Let’s see – I have a couple hints/tips.. If I decide to add lace to a block after it has been pieced – I used a seam ripper and carefully open a whole at either end of the seam that will recieve the lace and insert the ends of the lace into the wholes (about an inch in).. keeping lace pinned down until it is stitched over.. I also pin the holes the lace is stuck in until it’s embroidered..
Tip#2 – when I am running low on inspiration and it seems all my combination stitches look the same – I browse the CQ yahoo groups I belong to (and blogs of CQ’ers) to get some new ideas
Tip#3 – I am going to try this but haven’t done it yet – keep a stitch diary – either the actual stitch on a scrap fabric or a simple sketch to refer to while deciding what seam treatments to use on a block
I bet all sorts of people come out of the woodwork when you have a giveaway.. I did something similar recently – half the people I didnt even know.. all your goodies look great and I would be pleased to get any of them 🙂
Despite the barrier of the language and the shyness due to this I have a tip:
One of my bigger concerns when I embroidering is transfer the design to the fabric.I use dressmaker’s carbon paper to do that.Always remain some lines appearing after embroidering.Well,I discovered that common alcohol removes completely without leaves vestiges of the lines made with this method.I use a swab absorbed in alcohol and rub carefully over the lines that remain.The advantage of alcohol is that it evaporates and it doesn’t leaves smell.Try it and proves.
Sorry about my english.I hope you have understood.
Valquiria
Hi Mary well this tip is the only one I have for newbies and you might not consider it a tip but the thing that has helped me the moset is to conitually watch your tutorials and as a newbie myself, since I am a hands on person, that has helped me allot to get to know allot of the stitches I do. You give us access to them all the time and for as many times as we need them and to repetition is the best teacher. I have never even experienced half of the stuff in your pkg. so it might not be fair for me to win anyway but I just wanted all the newbies to know to watch the videos continually because it has helped this newbie so much. Thanks for all the time and effort you put into your site it is very much appreciated.
stash4stitch@bellsouth.net
I just posted but for some reason I could not add this so my little tip is when doing beading on your cq I leave my spool of nymo in a little ziplock baggies and just the end sticks out to where when I need it I do not have to worry about it falling all over the place it stays in that little baggie and I thread the needle right from there. Sorry for the re-post but I guess I hit send or something before this was added.
I find using the Large Blue Ziploc Bags with with the built in handle a useful tool for collecting the items that I use when I am planning a new project.
Then when I am ready to start that project I have everything together and “whew” no searching! While the projects are waiting to be worked on they have a nice place to hang in a closet.
I have Parkinson’s Disease & in order to thread a needle when my hand is shaking, I lay the needle down on a table with the eye extending over the edge. I now am able to thread the needle with my non shaking hand!
I enjoy reading how everyone does their applique. I love doing applique but I have no set way of doing it. I use needleturn the most. I mark the background then make a freezer paper copy of the pieces. I always have several projects going at once so I trim them and put them in a plastic bag so they don’t fray and when I need them I mark that piece and remove the freezer paper and put the freezer paper back in the bag. I keep each bag marked as to the project and block so if I ever want to use that block/project again I have all of the pieces ready to go again.. I always finger press around each piece after removing the freezer paper and before pinning it to the block.
At the same time I am working on a project that the pieces are all fairly large so I am using back basting on it. I have tried back basting on smaller projects but I have not been satisified with the results. Since I am self taught, I am probably doing something wrong.
On another project, I am using a blanket stitch with the thread matching the fabric/needleturn combination because it is a very large complicated project–for me anyway–and since it is for a Christmas wall hanging. I don’t want to put all the extra hours in needleturning.
After rambling on I guess my answer is I have no favorite. I love them all. I just decide with each project what I think will work the best.
Take care,
Nolene
I wrap my hoop with old interfacing; cut and / or tear into abt 1 inch or so strips, wrap by overlaping each wrap abt half and then at end couple small stitches to secure from undoing. I use the non adhesive type.
I use glad wrap press and seal on my keyboard it keep items from falling in the keys such as sewing needles, threads, beads, and other things such as liquids. So far working great for me. much nicer then trying to get out seed beads, etc……
I am relatively new to hand work, but what is working for me is to plan out the project and gather all the materials in one box and keep them together. Plan – being the key word. I particulary enjoy CQ work – so I mark stitches, audition trims and thread colors. I find I can always add to the project if need be.
hi Mary……I do so enjoy your blog and learn some too! Here’s a hint.
I’ve been working on a bit of mini needlepoint i.e., doll house size on #42 silk gauze. It has umpty-ump colors, each threaded into its own needle. There they sat, all cozy and close together on the pin cushion, getting their threads all tangled up with each other. Terrible mess.
Suddenly, a “eureka” moment. the arm on my Daylight lamp is 1/2″ wide and 19″ long. So I put a strip of self-stick Velcro on it and there sit those needles, room for all to spread out and keep their threads to themselves
hi Mary…….I have enjoyed your blog and learned quite a bit too. Here’s a hint.
I’ve been doing a bit of mini needlepoint, doll house size on #42silk gauze. Umpty-ump colors, each with its own threaded needle, all sitting there on the pin cushion with all the threads getting terminally tangled.
All of a sudden, a “eureka” moment. The arm on my Daylight lamp is 1/2″ wide and 19″ long, so I put a strip of self-stick Velcro there. And now all those needles have plenty of room to spread out and keep their threads to themselves
I have learned the hard way. When working with darker threads on light fabric, cut the thread and secure it under the stitched area. Start over in each new area. Stray threads can make unsightly shadows on the finished worked.
Another thing I use is the old AOL tins they sometimes used to mail their CDs in. I glued felt in the bottom of one and use it for beading. If I have to put the project down, I can just put the lid on and not worry about tipping all the beads out of an open tray.
If you are like me, you have numerous projects going all at one time. I have found that the clear square scrapbookers totes are perfect for storing my projects. I can keep my pattern, templates, pre-made backgound blocks, prepared applique pieces, threads, etc. in them. They stack neatly and I can easily see exactly which one has what. They also come in different depths, so if you have a larger project it will all fit. Best of all, you can grab one and go–always having something to work on when you have a few minutes.
Your giveaway idea is great. I love reading all the tips! I’m eyeing that spool of what looks like Japanese Embroidery silk in your giveaway…..
1. I use velcro to attach my scissors case to my lap frame (peel and stick velcro). The scissors sit nicely in the case.
2. My lap frame has extra holes (for changing lengths, etc). I put a nut/bolt in the extra holes and hang things there – e.g. my thimble/trolley needle, carabinier clip with floss in plastic baggies.
3. I use flexible bandage material (veterinarians have used this for years) to wrap around the outer edge of stretcher bars. This keeps anything from snagging on the edges and provides a spot for parking needles easily.
4. When I’m having trouble threading a needle, I put a little saliva on the end of the thread, and also on the eye of the needle (just put it in your mouth for a sec). This seems to make the needle eye and thread ‘move’ towards each other.
5. Glade ‘Scented Oil’ candle bases are magnetic, and make great needle/tool parks on a table.
6. (this may have been posted already). When staying at a hotel, I save the shower caps, and use these as a protective cover over projects on hoops/stretcher bars. (these caps can also be used to cover shoes when you travel)
I use a snap together travel valet in my ‘to go’ bag. It also works great for beading.
What a great question! 🙂
My tip is to bing both rings of your embroidery hoop before starting a project. Run double sticky tape around the hoop and then wrap with calico/bias binding until all the wood is covered and secore the end with a coule of stitches..
1. Cut strip’s of magnetic tape and mount to a clipboard and label with color number. Keeps your threaded needles in one place and tangle free. If using a pattern clip the pattern to the clipboard when done working for the day.
2. I also like to start a stitch knot free, using one strand and threading the ends through the eye start the stitch and insert needle through the loop to complete the stitch.
Before I sit down to work for the day I spend a half hour or so threading needles- I’ve got a a pin cushion for each color and many many needles- perhaps I’ll thread 10 for each color I want to work with.
I can work continuously without having to rethread!
Hello there! I found your blog when I googled a search for certain embroidery stitches. Great blog!
My best tips are:
1. have my materials ready to go, since my time is very limited once I get all three kids to bed
2. keep everything in my sewing bag when we travel.This is one of my best times to do handwork. I get a lot done!!
3. have good lighting at all times.
4. stop when I’m tired. If I push myself, I make stupid mistakes.
These aren’t expert sewing tips because I’m very much a beginner, but they save me a lot of frustration.
Thanks!!
cheeseinmyshoe@gmail.com
When I am working on a series of small projects (like the bookmark swap I have signed up for), rather than trying to embroider on a block 2.5×6.5 inches, I piece all the strips together to make a block 11×7 inches. That gives me enough room for 4 bookmarks, and I can embroider them in a sort-of sampler method, then cut them apart and continue making the individual bookmarks.
Judy
When transferring a design by prick n’ pounce, if you don’t have any chalk, or can’t be bothered to grind it up, talcum powder already nice and finely ground, and leaves your work smelling nice. I used Lush talcum powder which is made of natural ingredients.
I also like to find historical projects on the internet, and trace the design off the downloaded image by drawing around the outlines on the back of the print with a transfer pencil, and then ironing it on to white linen. I’m currently working on an 18th Century pocket, which is a nice combination between the original design, and my own inspiration in terms of colour choice, and enlarging the design and adding elements to make it bigger.
Finally, allow you to introduce you to my meme of making, which is a really fun way to keep a variety of projects on the go. In your blog, offer to make something for the first five friends who comment. ~something uniquely tailored to that person, as long as they post the same and pass it on to the next five people (You can do swapsies as long as you bring some new people in, my meme, my rules). You can also offer people the opportunity to declutter instead if they are not feeling creative, but still would like one of your originals. then really think about your friend, and what they would like in an embroidery from you, that reflects their interests and what they would use.
Cheers
Su
Love your blog, Mary!
When I know I will be working with one color spooled thread I like to save time by threading many needles directly on the spool.
Another tip: When transferring a design for beading or embroidery, I often draw out the design with pen onto a sheet of clear dissolvable fabric. Then I place this over my ground fabric and put in a hoop. It’s easy to sew right through both. When finished, just rinse under running water and only your embroidery remains.
I’ve been stitching for over 30 years, but just recently have figured out how to strip my thread without tangles.
After I cut my 18″ piece of 6 stranded floss, I hold both ends up. The end that is more splayed (spread out) is the end to start pulling the thread from. If you can’t tell, tap on each end gently and see which one fans out a bit.
Pull one thread at a time (I pull straight up while letting the rest of the floss hang down) and let the remaining threads fall back down before pulling the next thread.
Before I learned this, half the time I’d pull from the wrong end and get a big, tangled mess.
Probably everyone knew this but me… oh well, too soon old, too late smart!
hi just found this site, could not help but put in my 2 cents worth in.
1. I wrap my embroidery hoop in white wool yarn, it keeps the fabric put better then any thing else i have tried.
2. when I finish a book mark that I don’t want to line, i iron it to wax paper then when it cools peel off the paper, no fray and no hard edges.
I discovered that desire to embroider was not enough even though I had some knowledge and helps. In joining one of Queensland’s Embroidery Guilds I was transported to another place—incredibly inspired and learned so many new skills. Also finding many embroiderers who have become real friends. Just lovely. A step to be reccommended.
Focus. It is often too easy to drift downstream by a flood of creativity leaving one sinking in a sea of projects. Stay the course. One task at a time will keep you afloat.
Using stitches to create a medium/larger successful design; choose a stitch eg running and use that left to right curving if you like over your chosen design/embroidery. Do it in the same colour though you can vary the threads for interest. This is your Structure on which the remainder of your stitched design hangs. Now go back in with your mark-making from your sketch using any stitches you like, laying on the colours of your choice. You can be as ‘wacky’ as your like and it will all hang together because you put the structure in first. Hope readers find this helpful X
I really love the video tutorials. the instructions are so easy to follow and I’v learn’t so many new stitches thaks to you. Thank you Mary.
I don’t know if this will be a good tip,but when working with wires for stumpwork petals etc, I put the loop to be embroidered facing the middle of the hoop and the wires facing the outside rim of the hoop. I anchor these ‘stem’ wires with masking tape. Stops the ends of the wire getting caught on hands and thread.
Also, instead of having to make material covers to stop the top of the embroidery getting dirty from the top of the hoop and hands, I use clingfilm all the way over the top of the embroidery and under the top of the hoop. You can then cut a hole just around the piece to be embroidered. No dirty marks!
Brenda – UK
I realize this was for 2008, but would like to share a tip for something I came up with you will hopefully find as helpful I did. Staple the bottoms of zippered bags placed top side down one above the other so they slightly overlap to 3 ring notebook dividers and store inside notebook. You can label the individual bags and/or the dividers as to contents. You can also staple swatches of material in similar fashion for use as needle assortment holders. Add a pencil bag for scissors! Make a closeable cloth bag with short tie strings or loops along one side for storing small and medium sized hoops, etc. Can even create a different notebook for each project. And don’t forget to decorate!
I came up with that while in college and newly wed when money was super tight. However, I continued using the idea long after. You can even pad and cover the outside like a photo or scrapbook and add additional pockets as well as a multi-pocketed roll up/fold up with various sized pockets with zippers, buttons, ties, snaps, or velcro to close each pocket both inside and out. I’d get notebooks with the clear label pocket on the spine and leave it accessible so could change out labels naming the projects or general contents. Anyway, it’s affordable on any budget and tons of fun since you can get really creative with it.
OOPS! Forgot…wanted to also say that you can even create a photo frame on front to display or hold pattern designs too … or simply to change out with different samples of your work.
Anyone whose ever made or received a wedding photo album as a gift knows what I refer to for certain. Simply insert a sheet of clear photo plastic-glass as a protector.
When using a double thread, I always start with a loop – slide the thread through – leaving no ends to weave in. Great for small areas…