


I’ve managed to get at least one of every element in the Spring Garden Corner design embroidered so you can see what stitches I’m using, in case you want to embroider the design yourself and don’t know what stitches to use. Keep in mind that there are really no absolutes on this kind of project – you can use whatever stitches you want, and whatever stitches will work!
I didn’t plan out my stitching before I started – I pretty much worked whatever embroidery stitch came to mind as I got to any particular part of the motif. This has worked well overall, except in one area that I picked out. I’ll tell you aaaallll about it…
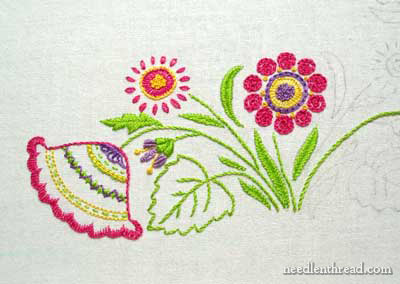
Here we are so far – the colors are pretty bright and cheery…
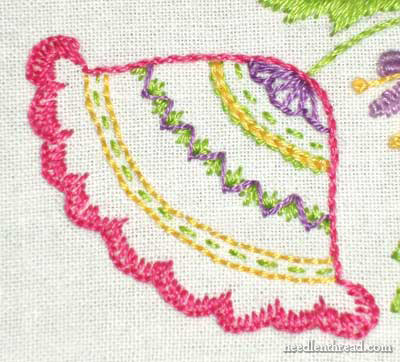
Here’s one of the “tulips” up close. I’m doing the two end tulips in pink for the outline, but the middle (corner) tulip has a purple outline.
Concerning the buttonhole scallops on the edge, I suggest penciling in the shape of the inside of the scallop – it’ll help keep your scallops a bit more even. I didn’t bother, but I probably should have.
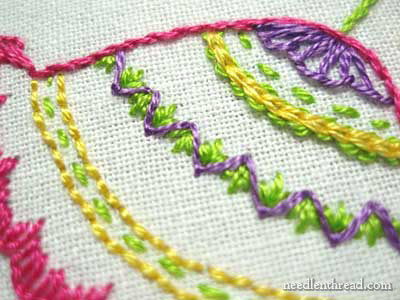
In order from left to right, you’ll see two backstitched rows in yellow, with a green running stitch between them.
The next line is a purple fly stitch following the zig-zags on the pattern, and between the zig-zags, three straight stitches kind of fanned out to fill the valleys of the zigs and zags.
The next line is chain stitch in yellow, interlaced with green.
Then you see another green running stitch – that line’s not on the pattern, but I stuck it in there while I was stitching…
And finally, at the tip there, you’ll see some buttonhole scallops worked far apart at the base (where the scallops are on the design), but closed at the top.
For this little guy, work the buttonhole wheel first, leaving a large-ish hole in the center. The center is filled with French knots. A chain stitch line is worked around the outside of the buttonhole wheel, and the little petals are daisy stitches.
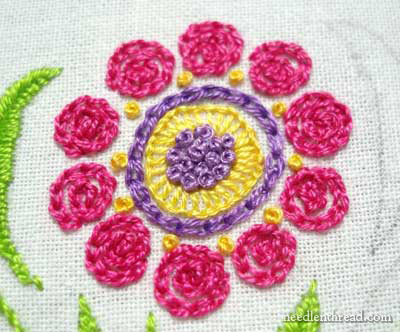
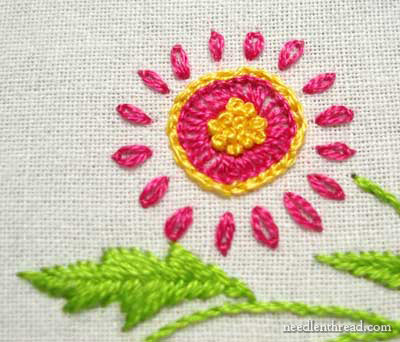
This is the larger flower, and this is the one I tried something different on and then picked out. I was going to satin stitch the round petals, but it takes too long and it’s too solid, and so I changed my mind. Start with the inside – the buttonhole wheel. The center is filled, again, with French knots, and outside the buttonhole wheel is another chain stitch circle. Next, work the petals, and then work the single French knots (they’re the yellow ones) last.
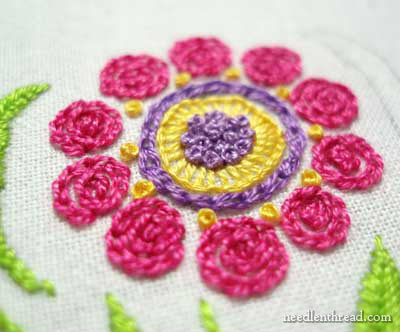
I ended up working the petals in a chain stitch spiral, starting on the outside and spiraling in. I didn’t work the spirals really close and tight – I didn’t want it quite that solid.

Ok, this thing is really weird. I don’t know what I was thinking, but this is what it ended up looking like. The easiest way to do this bud thing would be to work large daisy stitches for the flower buds and leave it at that. I worked bullion knots for the two side bud petals, then the middle one is fly stitch, worked vertically and close together. The stames are long straight stitches with a French knot at the end. I couched over the long straight stitch with the same thread, to secure it. On towels, it’s not a good idea to have longish stitches floating about…
The green part of the bud is satin stitched in three sections. The two outside sections slant down towards the middle, and the inside section is stitched vertically.
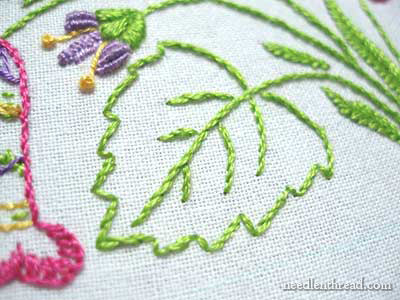
The large leaf is worked in stem stitch, just like the rest of the stems. Stem stitch the longer parts of the leaf outline, but where the leaf juts in to the middle, just use a little straight stitch. The veins are also stem stitched.

All the other leaves are worked in fishbone stitch.
So there it is!
Thank you all for your very kind birthday wishes yesterday! I had a nice birthday, and your good wishes made it even better! Thanks! If you haven’t signed up on my birthday give-away post yet, please check that out and join in the fun! I’m going to send one lucky commentor a surprise birthday package to help me celebrate!
Also, just a reminder that The French Needle is running a 10% off special for readers of Needle ‘n Thread through April. Check out their kits and charts! They have some really beautiful stuff! (By th
e way, I’m not affiliated or paid by The French Needle – I’m just pointing out a good resource for embroiderers!)
Hope you have time for your needle & thread today!
I love love the colors in this! It’s so cheery =)
Mary,
Thank you so much for posting about your process on this project. In my own work, I’m trying to puzzle through the mystery of “when to use which stitches” and it really helps that you described everything. Thank you!
I second what mub said. I love the colours. They’re so Easter-y and Spring-y. I like the design, too. Thanks for posting it.
I love it all but am particularly smitten by the chain stitch spiral petals. Very nice touch IMO.
I too am still trying to figure out when to use what stitch so that was very helpful for me as well. The colors are great fun and the texture created by the different stitches increases the brilliance of the colors. Very lovely.
Clever, clever! Love the texture!
Can’t wait to see the finished project! Can’t wait to try it myself! Belated Happy Birthday!
WendyBee
I love the bright colors in this!
Iam repeating what others have said – lovely colors!!! Iam going to try this my own way.
Belated b’day wishes,Mary.
Hugs,
Deepa
Mary,
I may have missed it but what type and size of threads are you using? If floss, how many strands?
The design and colors are so uplifting.
Thanks,
Susan
I LOVE the colours in this…they are very similar to the Indian Garden pillow I stitched….but so much less work! Not to mention more fun with all those stitches…I love the look of those leaves in fishbone stitch….is there a diagram for that stitch that isn`t a video (I`m on dial-up…blech!)
I LOVE the colours in this…they are very similar to the Indian Garden pillow I stitched….but so much less work! Not to mention more fun with all those stitches…I love the look of those leaves in fishbone stitch….is there a diagram for that stitch that isn`t a video (I`m on dial-up…blech!)
I love your tulips. They are gorgeous!
Dear Mary
Wish you a very happy birthday.
Anyday, a surprise gift.
Uma
This post is so helpful! I’m new to embroidery and really enjoying learning the different stitches. I’ve purchased your kitchen towels sets and am working on one now. What type of thread did you use here? It has a beautiful sheen and I think I see a twist in it. Also, what size and type needle? I LOVE your website. Thank you so much.
Hi, Barbara – I used DMC stranded cotton, two and three strands, depending on the thickness I wanted. And I generally use a #7 crewel needle for this type of stitching.