


Last week, we discussed different stitches that can be used for filling larger spaces. I brought the subject up because lots of folks ask whether or not they should fill this particular (large) space with satin stitch, and I wanted to emphasize that satin stitch is really not an ideal stitch for covering a large space, unless the satin stitch is somehow couched or held down by other stitches.
The difficulty is the notion of “large,” I think. After all, there’s large, and then there’s Large. It’s pretty obvious that I’m not talking about Large, as in table-cloth size or something of that nature. The term large being rather relative, let’s take a look at a small design that’s actually “large” and that just didn’t work with satin stitch.
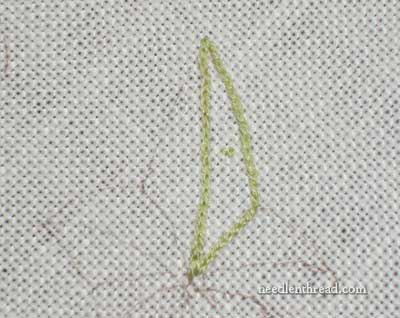
The design above is drawn on the spot sampler I’m working on. It comes from Mrs. Grace Christie’s book, Samplers and Stitches, and it’s included on this sheet of little designs for stitch exploration that I took from that book. The drawing in the book was actually much larger than the present drawing on the design sheet – I scaled the design down, because I knew there was no way, at the book size, that it would work well for satin stitch. (Keep in mind that Mrs. Christie doesn’t indicate size of the piece – it is just a drawing in her book used to demonstrate what satin stitch looks like – so that’s not a “mistake” on her part!)
If you print out the design sheet, you’ll see that the leaf marked “satin stitch” is not all that large. And in fact, the stitching areas on the leaf are half the width of the leaf, as you can see below.
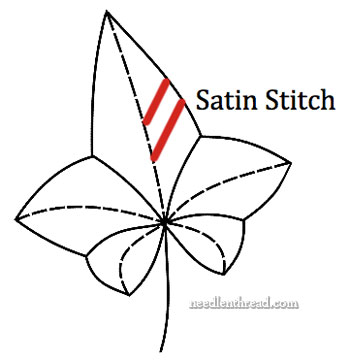
The leaf is supposed to be stitched in the direction of the red lines in the image above.
So half the leaf on my sampler ends up being about 1/2″ wide at its widest stitching point.
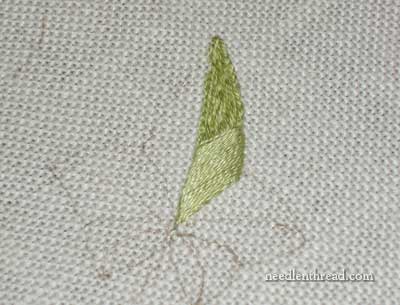
I outlined the satin stitch area with split stitch, and I filled the area with long split stitches, in three strands of floss. Then, using one strand of floss (because satin stitch looks better when you use one strand of anything – whether it’s a thick pearl cotton, or a tiny strand of silk), I began satin stitching.
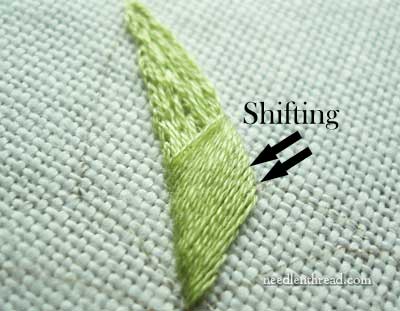
You can see in the photo above where the threads are shifting. Well, you can’t actually see them shifting in the photo, but they are moveable. The satin stitch is just too long, despite the fact that it is well padded.
Now, I could have pulled the stitches tighter, hoping that tension would make up for this shiftability, but in fact, that would be a mistake, too. For one thing, too much tension on the thread would make it very difficult to keep a consistent, smooth edge. The tension would also pull the fabric out of whack, and that just wouldn’t look good. So tension is not the answer.
I could use a much thicker thread here (such as pearl cotton rather than one strand of regular floss), and get a Much Better result on the satin stitch. This would work. But I’m not working with anything other than stranded cotton on the sampler, and using more than one strand would not be the answer. When working with more than one strand of floss for satin stitch, I’d use a laying tool to get the stitches to lie flat. And once the laying tool is employed and the stitches are lying flat, well – there’s not that much difference between using one or more strands, except that they’re all coming out of the same hole.
The answer, in my mind, is simply this: don’t use satin stitch on this piece. Sometimes, satin stitch just won’t work, even if the space being filled wouldn’t be called “large” at all.
So on this little design, instead of satin stitch, I’ll be using an alternative, like bokhara couching, with two or three strands of floss. In fact, I think I can use bokhara couching here and work in a pattern of veins in the leaf, to good effect. That’s my plan, anyway….. unless, of course, you have a better idea! If so, I’m all ears – feel free to leave a comment below!
Thank you for explaining that! I have always found satin stitch to be a bit of a puzzler as far as how long is too long!
Mind you, on some Japanese style embroideries, they have satin stitch that seems to be very long (that’s if it is satin stitch!).
Is something special being done in this case?
Thank you.
Elaine
Cheshunt, UK
Hi, all –
Thanks for your input. One thing I should’ve mentioned (kind of touched on it at the end…) is that fabric and thread have a lot to do with the success of satin stitch. If the fabric is too loosely woven for the type of thread (size, especially) that you’re using – that is, it doesn’t “grip” the thread – then you’ll have problems with a decent satin stitch of any length. When working with a more loosely woven fabric and finer threads, your best bet is to back your fabric with a layer of good muslin. This gives the threads some more support.
Elaine – Thanks for your question – it’s a good one, and I think AnneG answered it already. She’s a pro at Japanese embroidery!
~MC
Hey, Mary, I usually do Japanese Embroidery where the rule is no stitch longer than 1 cm without some type of holding stitches. We use up to 4 flat silk strands at a time and use a tekobari laying tool. We use all kinds of holding such as latices or even stitches with very thin threads on top, crossing 3 threads to hold the satin in place. I’ve had the same problem with shifting, though, with monograms, and have found that I need to do more long and short especially over padding. Thanks for the lessons, AnneG in NC
Hi Mary,
I had that same question about a needlepoint
project I will soon start on, one of these days.
The stitches are all long satin stitches and I
was concerned about the very topic you mentioned, satin stitches not laying flat and
moving around. It was suggested to me, I have
not tried this method, after stitching the first satin stitch, insert the needle with thread under the stitch in the middle, anchor the thread with a small back stitch, proceed to
stitch the second satin stitch, repeating the
anchor stitch underneath that stitch. It should keep the satin-stitch taut and the the
anchor stitch will not show.
Teri
So is it that the space is too wide and would be so in any shape or is it the direction and shape so it might work in a different situation at that length?
If you use a laying tool with multiple stands and get it to look fantastic at the moment, I would guess the longer strands will shift and bunch a bit when the fabric is handled. All that hard work down the drain.
Yes, thank you both Mary and Anne.
Do you have a blog Anne so we can see some of your work?
Japanese style embroidery is so beautiful.
hi mary,
excuse my ignorance, but just what is a laying tool?
thank you,
terri sue
Thanks for the advice on satin stitching Mar. I have tried to use it for a filler on “relatively” big spaces and it really bombed ! Especially when I tried to “save time” by using multiple threads to hasten the process. All it did was make the finished product look like bands of “rope” (with spaces in the middle) ! Not so good. Thanks also for reminding me that satin is most effective with a SINGLE thread.
Judy in Pittsburgh
My personal choice for that leaf would be raised stem stitch. Done with the foundation stitches laid along the veins of the leaf, I think it would produce a nice look.
Thanks, Mary. I do Japanese Embroidery, but am by no means a pro. I’m trying to finish Phase IX and X right now. I don’t have a blog, but here is my Flickr page with pictures. http://www.flickr.com/photos/29637656@N05/
You can see some very long satin stitch (we call it weft direction or horizontal in JE).
On the icon with the sheep the red garment is about 5 inches wide and I did it just like a satin stitch with 4 strands of flat silk, then tied it down with the lattice on top.
Mary, I like your comment about backing fabric. Good padding really helps, too.
Re laying tools: Hedgehog Handworks, one of Mary’s advertisers, carries a European style laying tool. I use a tekobari all the time. It is about 5 inches long, very sharp and made from carbon steel. You can see one on the Japanese Embroidery Center web page. I almost always use a laying tool. They really keep even embroidery on garments in place and it doesn’t twist even when I use say 4 strands for smocking. Of course, those are very short stitches, but the trick is to keep the threads flat and not twisted on each other at all.
Mary, Sorry for so many posts, but wanted to avoid being too long. As for the leaf, I would start at the tip and make the stitches angled and packed in, but I really like the idea of raised stem stitch. That has a lot of texture for a leaf.
I have seen on a number of blogs where people mention using laying tools.
I think I can second-guess what you try to achieve with them, but Mary …. should you ever be short of videos to do ( 🙂 … thought not!) a video showing how to use one would be great 🙂
Thanks as always.
Elaine
Hi, Elaine – Actually – it’s on my list! 🙂 One of these days, I’ll have the time reconvert the “studio” (aka “glorified garage”) back into a filming studio. It’s moving up on my “top priority” list, so that’s a good sign! ~MC
Mary,
Hope you don’t mind me using your site to compliment AnneG on her work? I have just looked at her Flickr page and just want to say …. Wow!
Elaine
It’s no wonder I hate (used to?) satin stitch! I mostly learned embroidery on my own, from instructions in kits. BIG mistake, I’m learning. They never mention outlining, padding, backing with muslin, using 1 strand, etc. And I thought I was doing something wrong. OK, I was, but it from ignorance, compounded by incomplete/incorrect instructions. It wasn’t until I found *gasp* whole! books! (pre-internet era) on embroidery, that some light started to glimmer that it wasn’t totally my lack of skill. But even with the books, I learn still more from your posts, and from the comments. Thanks to all of you!
If anyone is thinking about giving an embroidery kit as a gift to a beginner, PLEASE add a decent set of satin stitch instructions & hints. It might make the difference between someone thinking they aren’t good at it, or loving it.
I am so glad I read these hints on satin stitch today. I am working on a kit right now and have been avoiding the satin stitch because it never comes out right. I had never heard to use a single thread or a laying tool before either. Thanks so much. I can’t wait to try it.
My Mom passed away in May and I found a quilt she had started. The finished squares are floral baskets, appliqued & embrodiered. The alternating unfinished squares are butterflies & flowers. I can applique & embellish with embrodiery, but she wanted part of the butterfly wings satin stitched. I tried that but the result is not good, loose stitches for large area. I’m going to try the couching stitch, but I would like something simpler and less time consuming. Any suggestions at all?
Hi, Ilene – What about Roumanian couching, or Bokhara couching? Bokhara especially will give you a solid filling like satin stitch, with only a slightly noticeable variation in the surface. There are videos for both here on Needle ‘n Thread, if you want to try one or the other – they’re both great for filling larger areas that won’t work with satin stitch. Hope that helps! ~MC
Hello Mary I am doing a medieval R in satin stitch I am a little nervous I saw one of your videos were I believed you back stitch a little outline around the part your were going to satin stitch. What I am scared of is i am 51 and I haven.t satin stitch since I was 18. I am us silk lame petite on a linen hankie I do not care how long it will take me I just want it perfect. My question is where do I start on the R and also on the needle sine I am going through linen. Thank you Mary It I just want to let you know it is a honor when I get your help! Sandra
Hi, Sandra – well, without seeing the R, it is somewhat difficult to explain where to start. You should start away from the end or tip of the area you’re stitching, though, to make sure that you set in a good angle and can keep it while you stitch towards the end. Then go back and stitch on the other side of where you started, working towards the other end of the area. You’ll want to use the split stitch to outline, and then stitch the satin stitch over the split stitch line. It works better than the backstitch, for a smooth edge.
Mary, sorry adding to my last question.I am getting different answers from different store owners. I do not know if I should use a blunt needle or sharp needle to stitch through the linen hankie. I am sorry I jumbled up my sentence in the last email
Thank you,
Sandra
Definitely a sharp needle, Sandra! You’ll want a crewel needle (also called “embroidery” needle, on some packages). Size of needle depends on the type of thread you’re using. Let me know the type (and number of strands, if more than one) and I’ll tell you what size needle to use. You can also buy them in packages of assorted sizes, like 3-9. That would pretty much cover anything you’d need.
Hello Mary again I am using Rainbow Gallery Petite Silk Lame for the Renaissance R on the Hankie Is It possible to send you a picture of the R through here and what file format would I use
Thank you,
Sandra
You can, Sandra. Just send a jpg. I’m not familiar with RG Silk Lame, just so you know. I’ve not used it, so I’m not sure what type of thread it is or what size…
Mary I am doing the R part in Satin stitch and was advise to the vine in two strands of splendor in the reverse chain stitch. I have bought many of the petite silk lame to try to match this up this hankie is for a wedding present. If you have a p.o. box that use so the public do not bother you. I would be happy to send you a couple of cards if you do not mind the colors I do not like. the next message from me will have the jpeg thank you Sandra
The problem is that the vine is part of the letter – there’s no separation between the vine and the letter itself. I can look up the thread…easier than sending it along.
Hi Mary this the picture of the R
http://www.fromoldbooks.org/Shaw-Alphabets/pages/065-alphabet-end-of-15th-century-letter-R/065-alphabet-end-of-15th-century-letter-R-q85-337×371.jpg
Thank you,
Sandra
Wow. That’s going to be tough to do in satin stitch. Are you sure it must be in satin stitch? Are you working in colors or in white? What about long and short stitch? Might be easier? Kind of like the P in this article: http://www.angolostefania.it/main/imparaticcio-di-cifre/
Mary, I paid for a stitch guide by a well known designer. Now I am so confused I spent so much money on this one little R I just want to make it beautiful for a girl thats like my daughter. I am very confused about the long and shot and do not think I would use the silk lame for that. I tried to have some bling that was the silk lame and splendor was slightly a darker blue.
This hankie was suppose to be some thing new and blue. I am going to cry now! Sandra
I didn’t realize it is a kit, Sandra – I thought you were just trying to work through your own stitch decisions. If it’s something designed already, with a stitch guide, you should just follow the stitch guide and the instructions in it for satin stitch, etc.
Mary I am going to stitch the white inside the black I am going to check the jepeg
Sandra
Mary I check It is right picture, I am crying I do not think I like the reverse chain stitch on the vines I can not believe I bought a stitch guide and spent so much money on this I am so confused.
Thank you,
Sandra
Mary the vine is done in two strands of splendor
Sandra
It wasn.t a kit a just show the sent the designer the R and the Hankie and Shop in California suggested what to use for thread, So I sent everything to the designer. I sorry I did not like the reverse chain stitch for the vines and I am sorry I was questioning about because I got the detail of the stitch guide through the email. I hope you do not think I am wasting your time, Please do not think that I am just confused what I got for the stitch guide I thank you so much . Like I said it is a honor to get your help
Well, it’s kind of difficult to give too much advise on stitch choices and so forth without actually seeing the piece. You can definitely do satin stitch – but I think it would be somewhat difficult. How about trying it on practice fabric first?
Mary, I will try a sample, but please forgive me if you feel I wasted your time. When I get done with the sample, can I send you a link of what you think of the Satin stitch on the R?
Thank you,
Sandra
Absolutely!
Hello Mary That was a beautiful link with the different letters using the long and short stitch did not think it was going to look so beautiful. Just so you know you were right a professional embroider that does embroidery by machine said it would be impossible to embroider the R in satin stitch and the vines were to hard for someone as inexperienced as me. So first I going to work on your tutorials on lettering and work my way through your website. I do not have shops or classes in my area maybe if it is not to harsh of winter I will travel to Illinois. It’s hard to find just embroidery classes too anymore. I thank you for all your time. Sorry for all you time I have wasted
It’s never a waste of time, Sandra! I’m always happy to help out when I can! Best of luck on the project – let me know how it eventually goes!
Dear, Mrs. Corbet! I still have problems with tension because my edges still turn wonky, but I do have to admit, in very small areas I’ve used two-strands of loss and gotten some interesting shading results and beautiful coverage! May I send you a picture?
You sure can! This comment should come to your email as well, with my email address on it. You can use that address to attach photos. -MC