


Last time we looked at the Medallion project, I was venturing into the monogram area, working long & short stitch filling over felt. At the time, I saw long & short stitch as a good answer to the whole “filling the monogram” question – it provides a solid fill relatively quickly and it’s a fairly forgiving stitch.
I don’t regret the decision to go with long & short stitch at all. But one thing I didn’t bargain for was the fact that stitching that many stitches through felt and linen and backing fabric can be pretty painful – and I’ve got the holes in my thumb and finger to prove it!
So far, I’m pretty happy with the outcome and eager to get the central monogram in the design finished.
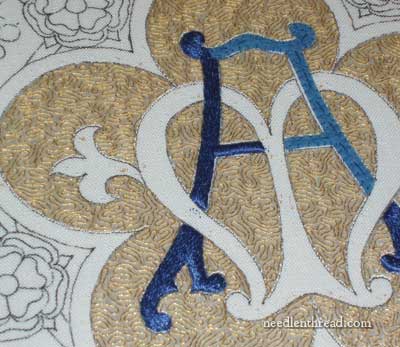
Here, you can see the left side of the A filled up with long & short stitch.

The embroidery is worked with one strand of Soie d’Alger. This creates a smooth surface with the long & short stitch – not quite as smooth as satin stitch, but almost. There’s just a hint of texture (more like a sense of stitchiness) in the surface of the stitching, but overall, the effect is smooth.
As far as color goes, out of the four shades of blue used in this project, I’m using the second to the lightest shade on the A. The M will be worked in the lightest shade. Between these two shades, there isn’t that much difference, so there isn’t much of contrast – the change in shade is very subtle. The reason I didn’t go for high contrast in the two letters that make up the whole monogram is that I want to keep the central monogram looking like one element, rather than like two different elements overlapping each other. The gold outline that will eventually surround the lettering will separate the overlapping parts of the monogram, but from a distance, the whole thing should look like one element, rather than two.
You can see that the felt lifts the lettering up pretty well, letting it stand out from the background in relief. For the direction of stitching, I followed the flow of the letter, except for the horizontal bar in the middle of the A and at the top of the A, where the stitching is worked vertically over the bars.
Next time we visit this project, I’ll show you the completed A, and after that, I’ll move on to the fleurs de lis on the sides of the M before tackling the M. The fleurs de lis will incorporate some subtle shading and will not be worked over felt – but more on that later!
Well, that’s progress so far! Can’t wait to finish the whole center area and move on to the outside edge and the goldwork & silk roses! My deadline for the whole project is the first week of April. Will I make it? I guess we’ll see!
All the articles on the Medallion Project are listed here in one index, so if you’d like to see the project develop from concept into reality (with a few bumps and bruises along the way), feel free to check out that list of articles!
If you’d like access to all the tips and techniques discussed in the Medallion Project, including complete step-by-step coverage of the Tudor-Style Rose, conveniently collected in one document, interlinked, referenced, and indexed, why not add the Marian Medallion Project e-book to your library? It’s packed full of all kinds of embroidery tips for undertaking a project like this, all in a convenient electronic format for easy searching.
Looking awesomer and awesomer! Sorry about the holes in the fingers, are thimbles not working out?
In looking at the last photo, did you trim the edges on the felt so it was rounded, or is it the stitching that is giving that rounded look? Or was the felt not thick enough to worry about stitches falling off the cliff?
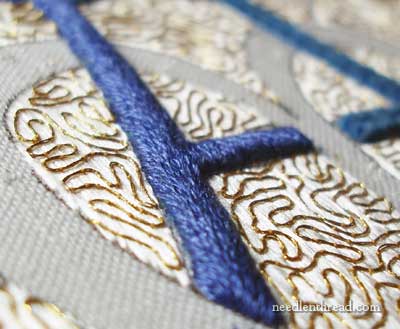
Hi, Gail – It’s actually the fact that the felt is “soft” so it rounds out when the stitches are worked over the edge. For the long edges going down the A, I worked the stitches coming up on the outside of the felt, then going down inside the felt, in order to cover the edges adequately. There will be a gold outline around the letters, so the edges won’t show quite as much…. ~MC
Thanks for the update! Your continued progress on this gorgeous project is eagerly anticipated.
Mary, this piece is looking better and better all the time and I am in awe of how beautifully it comes together. This is the kind of work I would love to do. I really enjoy watching your progress on this piece, it is really inspiring.
Mary,
Your work is amazing. I could never do such fine embroidery.
As far as hurting your fingers when getting the thread through–have you ever used pliers to pull the needle through. It takes more time but can save your fingers.
Just a thought…..
Once again, beautiful work…and I have every confidence that you will finish on time.
It is so very lovely. Can’t wait to see the next step. Jana
Such beautiful work!
Beautiful!
Mary, that is looking just stunning. I am sure the recipient will be delighted with it.
Love it. Mary, about how many mm’s wide is the crossbar of the A? Also, did you stitch that in 1 or 2 stitches, top to bottom? Thanks, Anne
Hi, Anne – Well, I haven’t measured the cross bar, but it’s in two stitches as far as the long and short stitch goes. I’d say it’s about 3/8″ high, and about 3/4″ in horizontal length. When I get out to it again, I’ll measure it! ~MC
Wow, that is stunning! It made a big difference having the padding in there.
Dear Mary
It’s looking beautifulller and beautifuller, amazing, I love the lift that the felt makes and the your stitching is beautiful.
I know what you mean about sore fingers I completed a leaf of the pomegranate goldwork project that I’m attempting, it took 4 hours to complete a leaf. After stitching and unstitching my fingers ached. I’ve posted pictures in the photo gallery if you want to take a look.
Regards Anita Simmance
Hi Mary,
I was wondering exactly why the stitching into the felt is so hard this time – is it just the sheer quantity of it, or is it anything to do with having interfacing on the felt, do you think? Only you mentioned that it was easy on the pomegranate project and I was wondering if you cut the felt with interfacing for that too?
I really hope it isn’t the interfacing as I’m hoping to try that method soon!
Ah, thanks Cynthia – I forgot that I hadn’t shown the full A finished!!! 🙂 Yes, if you look at it that way, I guess it was a little more than a smidgeon. I feel so much better!
Anne!! That’s a very good question. Actually, the pomegranate also had interfacing on the back of the felt. Keep in mind this is the absolute lightest fusible interfacing – not heavy stuff – so it’s not really the interfacing. I think it’s more the shape of the piece. The narrowness of the felt pieces makes it difficult to stitch in those small spaces, through the felt and the linen and the cotton. So I think that’s where the difficulty is really coming in. It’s a matter of manipulating those stitches to keep them on the felt shape, going in the right direction and filling up the whole space fully, so that no felt peeks through. It takes some “manipulative” stitching….
~MC
Ah … that’s good news! 🙂 Mind you I’m going to be doing narrow bits too … hmmm … oh well, I’ll do some samples and see how I go. I hate using a thimble so I might have to use a different method after all!
This pieces is amazing – I love the vermicelli work too but I don’t think I’d have the time or patience! 🙂