


Here’s a little update on the behind-the-scenes project in silk and gold that I’m working on. It’s for publication in a book (2014), and I’ll tell you more about it (and the book – I’m just contributing, not writing it) closer to publication time. When I was asked to contribute a project, at first, I was a bit hesitant. But now that the project is this close to being finished, I’m glad I participated. I’ve learned a lot!
Because the piece is for publication, I can’t really show you the whole thing. But I can show you snippets, and I can even troubleshoot some aspects with you, and discuss different techniques involved. So today, I’ll show you a technique that’s called “stippling” in art, but in embroidery, we just call it seed stitch or seed stitch filling… but if we want to, we can call it stippling, too.

Seed Stitching the Background
Stippling in art is marking the canvas with dots. The dots can be used to convey the whole picture, to shade areas, to decorate edges – it just depends on what the artist wants to do with dots.
In embroidery, we can achieve an effect similar to stippling by using tiny seed stitches. We can vary the density of the seed stitching from very dense to barely speckled, to produce a sense of color gradation or shading.
In the piece I’m working on, I wanted to create a “barely there” sense of golden parchment-like color, with a little more intensity close to the edges of the focal element in the design, and with a little less intensity further away from the element. So I used tiny seed stitches, in a very light golden color, and I grouped the tiny seed stitches closer together around the edges of the bird, and spaced them farther apart as I moved away from the main element.
This gave me just a hint of a pale parchment gold in the center of the design.
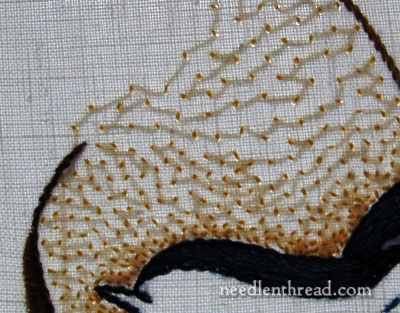
Here’s a creepy image – the linen is held up to the light, so that you can see the silk thread passing from tiny stitch to tiny stitch, all over the back of the work.
When seed stitching like this, it’s best to avoid building up heavy amounts of thread on the back by crossing over large areas as you speckle the fabric with stitches. Rather, try to follow a sensible path, filling in the area as you move across it and not just moving randomly all over the place. Occasionally, if you have to jump a little way across the back to another area, run the thread underneath the backs of the stitches already there, to keep the thread from hanging loose on the back of the fabric.
If you follow, as best as possible, this sort of path when seed stitching, you’ll enjoy two results: 1. you won’t have long threads building up thickly on the back of your fabric; and 2. you’ll save thread. When working with silk, I definitely tend to keep the latter in mind!
Adding Gold and the Order of Work
Once all the silk was finished on the piece, it was time to start adding the gold. When working with silk and real metal threads, normally, the majority of the silk embroidery is done first, and then the metal threads are added. I say normally, because this isn’t always the case. It really depends on how the metal threads are used. But in this particular piece, it made sense to finish all the silk first and then tackle the gold.
Why stitch the silk before the gold? One reason is to protect the silk threads. If your fabric is covered with metal threads, while you’re embroidering, the loose silk working thread could very easily catch on the gold. Then there’s also the consideration of the design progress. Gold normally “sits on top of” the rest of the design. In Western embroidery, the norm is to stitch the farthest-back elements in the design first, so it makes sense that the gold, which is usually the accent on top of everything, is done last.
There are exceptions, of course. If the gold is part of the background of the design, it might be worked earlier than silk elements in the rest of the design (this happened with the Medallion project background). And when the gold is further outlined with silk (which happens quite a bit in ecclesiastical embroidery), then the silk outline would definitely be stitched after the goldwork.
Fix the Things that Bug You!
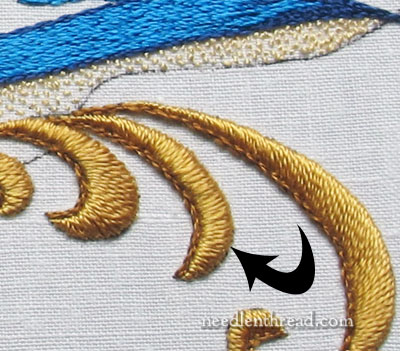
In the photo above, the arrow points to an element that bugs the bajeebies out of me! That element there just does not smoothly “curl” like it’s supposed to. It looks stumpy – the stitching doesn’t flow, the satin stitch looks lousy, and there’s something lumpy going on on the right side of the element a little above center.
At first, I thought this would improve once the surrounding stitching was complete. I figured the addition of the gold around this area would mitigate my negative reaction to this element.
But Every Single Time I look at the piece, my eye is drawn to this element. I don’t know if it’s psychological – because I know I’m dissatisfied with it, it pops out at me to torture me – or if it really is as noticeable as I think it is!
But it doesn’t matter! Whatever the reason, if I have that kind of reaction every time I see it, then I know I have to fix it.
It’s better to fix something like this before any goldwork threads in the area are worked. It’s just easier to cut out plain old silk threads and remove them, without metal threads around.
I’m in the midst of fixing this right now. Once I finish reworking that element and adding a little goldwork to that area, the piece will be finished! So I’ll show you the before & after on this element a little later.
So that’s where I am on this project, within just a breath of finishing! Can’t wait!
Any questions, comments, suggestions? I’m all ears – feel free to use the comment form below!
I honestly don’t see the mistake! But then again I’m only 12 years old and haven’t done any embroidery since I was 10. I Really Really Like your website though. Please keep up the good work!
Mary, you are truly gifted and a true artisan in the craft of embroidery! Thank you so much for breaking your beautiful projects down to smaller lessons and observations, such as todays post to teach us so much about the process. I teach Fiber Arts to my high school students and I’ve directed my students to your site to encourage them to explore all there is to see and learn, and they now come into class excited about what they have seen and discovered from you! You bring this art to life for so many of us, and it’s better than any lesson I could create for them. So I thank you for sharing your beautiful creations and inspiring not only me, but the next generation too!
Dear Mary
Thanks for this post I love the way you used the seed stitch to create different effects and I love the goldwork, I wouldn’t have noticed the stitching mistake. Thanks for your advice on different stitching techniques it’s very helpful. The project looks beautiful I can’t wait to see the whole piece.
Regards Anita Simmance
I am probably the last person to advise you, as I rarely embroider these days, but to me the whole section looks odd. I would redo it from the start. It would appear that after the first lovely curve, with the satin stitches flowing around, it then goes flat and straight! Your stitches are parallel with each other, not gently curving around the feather; check the long one next to it to see what I mean. Also the two edges become slightly closer to each other, and are parallel with each other for a little way, before widening to curl around. It creates a boxy effect in the middle.
I hope I have explained this right and you understand what I mean. I am very envious with anyone who has the sight and talent for this sort of delicate embroidery and your work is beautiful! My eyes and fingers conspire to make it hard for me to thread a needle let alone co-ordinate them to make such tiny perfect stitches, but I enjoy and appreciate the patience and talent that goes into making fine embroidery like this. I look forward to seeing the finished piece!
Hi, Caroline – Yes, that’s right. I’m re-doing that whole section…. MC
Mary,
I’m always so glad you show us the mistakes that bug you and that you then go fix them. It inspires me to be patient with my own mistakes and their fixes every time. I’m just not a “fix your mistakes” kinda gal by nature, but I know my work gets better every time I go fixing things.
IMHO, that is the most valuable lesson you’ve shared with us over the years. And you’ve taught us plenty!
I just love it. Thanks! 😀
What you have shown so far is gorgeous….can’t wait to see the entire thing.
Thanks for the continued “peaks” into this project. The seed stitches are so lovely to look at! I love the colors. Looking forward to finding out more about the whole project and publication. Do we really have to wait for 2014 to see the entire project???;)
I’m so glad that you are being asked and accepting to have some of your work published. We need our stitching leaders to continue to publish and have their work shown so that the rest of us have models to work from and share as we develop our skills and help others. When we see your name in print, we can tell our friends that we correspond and “know” you. Congratulations and thanks for sharing your success with the rest of us!
I’m so intimidated by seed stitches. No idea why. Can’t wait to see this completed. Hope your weekend is/was great!