


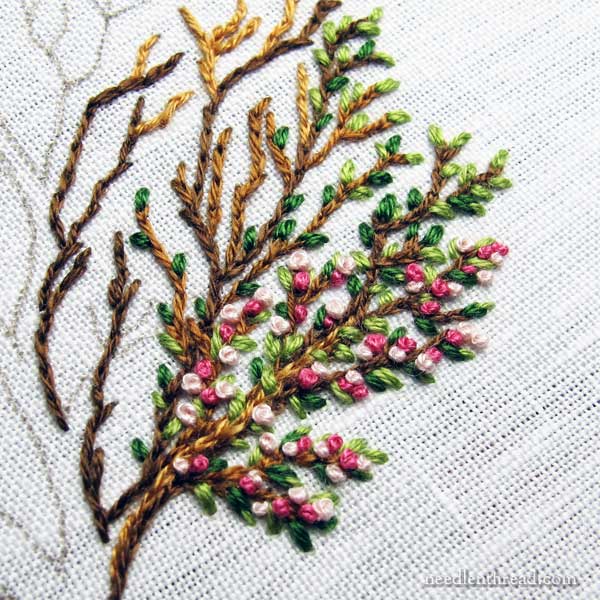
My little secret pleasure this week has been working on this embroidered tree. When I’m supposed to be doing Other Things, I find myself picking this up and putting in just a few (or so) little stitches.
I overcome the guilt by telling myself that at least I’m accomplishing Something.
Besides, it’s fun to watch it bloom!
Because I’m using a non-divisible thread on this wee tree (specifically, coton a broder #25), I’ve been playing around with different ways to change the size of the French knot blossoms.
I thought I’d share some tips with you on how to successfully vary the size of French knots when you’re working with one thread.
Now, it might seem a no-brainer, working big French knots and little French knots on the same project. There are lots of ways you can go about adjusting the size of the French knots you’re creating, but the most reliable, stable way is usually to change the weight of the thread you’re using.
For those who have difficulties with French knots, or who achieve accidental inconsistent results with them (when you want consistent results), there are a few ways you can ensure consistently good French knots. One of these is to constrain your knot-making procedure to two wraps on the needle.
I know, I know! There are many stitchers who are not two-wrappers, and that’s ok! I’m just putting out a suggestion here for folks who have difficulties achieving consistently successful French knots.
So, two wraps only, despite the size of the knot that you’re trying to achieve.
If you want to decrease the size of the knot, decrease the weight of the thread – use two strands of floss instead of three, for example, or use a finer thread altogether.
Similarly, if you want to increase the size of the knot, increase the weight of the thread – use four strands of floss instead of two, for example, or a heavier thread altogether.
While some stitchers advocate the three-wrap knot, I generally don’t. Two wraps are enough for me. But if you want three wraps for a heavier knot, sure. Go for it!
But normally, I’d say don’t go beyond three. The more wraps you add to the knot, the more unstable it becomes, and the less likely you’ll be able to control it and to keep it secure, especially in post-embroidery finished use. If you want a knot that really stands up off the fabric and is very textured and heavy, but quite stable, try something like a drizzle stitch with only three or four wraps on it.
But this all begs the question: what if you’re not using a thread that comes in different weights or that allows you to increase or diminish the number of strands? What if you’re using a non-divisible thread that only comes in one size in the particular color you’re using?
Or what if you simply aren’t into changing threads out when you want a bigger or smaller knot? (I’m definitely not. Who wants to keep changing threads?)
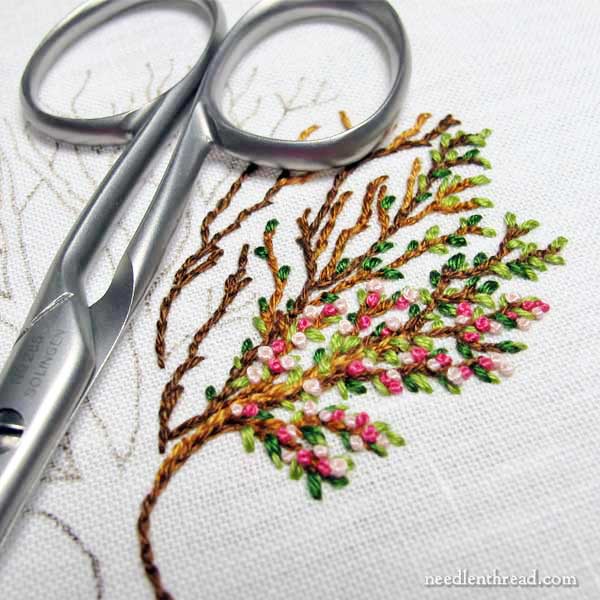
Before we go any further, to give you some perspective on the size of the knots we’re talking about, these are my 4″ embroidery scissors next to the tree. The scissors look huge. So the embroidery is pretty small, but it’s not microscopic.
When I zoom in on the French knots below by cropping the photo, I just want you to know that the knots are not as big as they look and that the up-close view is why you’ll see a general fuzziness to the embroidery. It’s not that the embroidery looks fuzzy to the naked eye, even when you’re up close to it. But when you get really close to it with the camera lens, you’ll see the thread fibers.
Nothing like pitching a few excuses ahead of time, eh?
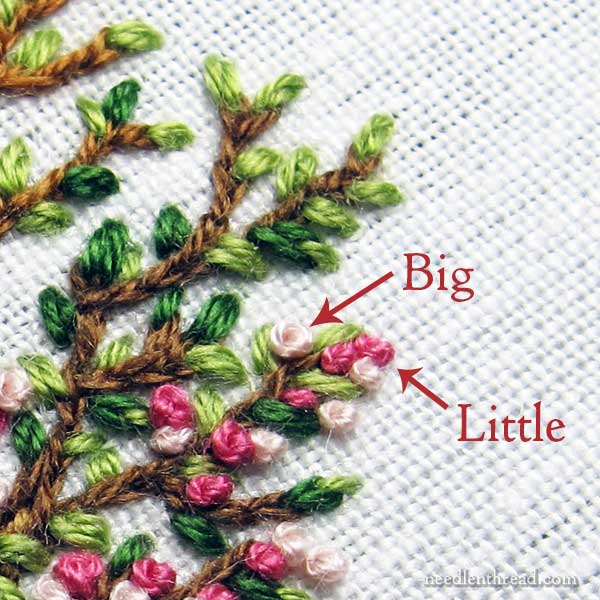
So, here they are. Some big knots. And some little knots.
The difference in sizes is not accidental. I wanted a bigger knot where the big knot is, and I wanted a cluster of three tiny knots where the little knots are.
I don’t switch my thread in situations like this, when I’m working a whole lot of knots in the same colors and threads on the same project. And I don’t change the number of wraps (though feasibly, you can diminish knots to tiny by using one wrap, or increase them to larger and loose with three wraps).
Instead, I change two things to help me achieve the size knots that I want.
1. Increase the Tension on the Working Thread
For smaller, tight knots, I increase the tension significantly on the working thread as I pull the needle and thread through the wraps, to make sure that the wraps really hug up to the thread and make a tight little knot.
The only way this can work successfully without causing repeated heartache and grief each time you make a knot is by using a milliner needle, so that the eye passes easily through the tightened wraps and by being absolutely certain you’re not going down into the same hole in the fabric whence your thread first emerged.
The latter point is very important whenever you’re making a French knot, but it becomes even more important if you’re making a tiny, tight knot. If you go down in the same hole that your thread originally emerged from, a tiny tight knot will most assuredly pop through to the back of the fabric.
If I want a little knot that doesn’t look as tight, then I would decrease to one wrap. But for buds on a tree, I want some tight little closed knots, and increasing the tension on the knot works well to bring that about.
2. Change the Size of the Needle
Instead of switching thread, when I want plump but loose-ish knots, like the light pink one indicated by the arrow in the photo above, I switch the needle I’m using. Using a slightly heavier needle will make a larger knot, without having to rely on loosening up the wraps around the needle too much and risking a mess.
The latter approach might seem a bit extreme, but it works really well for creating consistently sized plumper knots. Just use a plumper needle!
Stitch Purposefully
Gosh, that’s a lot of rambling about French knots.
I guess the upshot is this: when you want your stitches to do something specific, think about them. Stitch purposefully.
Instead of mindlessly stitching a bunch of French knots, for example, think about the effect you’re trying to create with the French knots, and determine what adjustments you can make with each stitch, to bring about the effect you want.
So, those are my French knot tips for the day. I’ll try not to be tempted away by the tree this morning – I’ve got a couple Bigger Things to finish, to share with you soon.
See you on the morrow!
Mary, what would I do without you?
I’m currently doing a lot of French Knots and the 2 books I’m learning from both say only 1 wrap for a French Knot and if you want a bigger knot, use more strands not more wraps (although one of them says you can use 2 wraps max if you really need to).
But I was getting much more attractive knots with 2 wraps before I read those books, so I thought I must have been doing it wrong and changed to just 1 wrap.
Now I’ll go back to 2. Thank you.
Also, on the subject of knots, would you ever recommend the Colonial knot instead of a French knot and why?
DUH! I do this all the time in knitting and crochet, change the needle or hook size for different effects. I never even thought about doing it for embroidery. Thanks so much for the tip.
what an interesting post! thank you, Mary!
I love French knots, and always use the tension trick, but never thought of using a needle in a different size! what a witty solution!
I usually wrap only once (I know) but I always use 1 ply for counted embroidery on high counts of fabric.. if I used more wraps on a regular basis all the details would look out of proportion.
your tiny tree is absolutely adorable, it must be a joy to watch it grow one stitch after the other ❤️
Mary, Your blog is so fantastic! There are some really great tips in this article for changing French knot sizes! Thank you for that.
Thanks again for sharing with us. (BTW, your tree is beautiful!)
Okay, this was brilliant and made perfect sense. I normally do 2 wraps, but I would always increase the number of wraps to get larger knots – increasing the threads make so much more sense! Thank you for sharing this.
I’m usually working with stranded floss, so my go to method for changing the size of knots is just to use more or fewer strands. I hadn’t thought to change the tension or the needle. Thanks for more great ideas for me to try the next time I’m making knots 🙂
For some reason I’ve never considered making larger and smaller knots all in one project. I like the idea. As for size difference, I’ve only used more strands of cotton floss – single for a tiny knot, 2 or 3 for a chubby knot.
One question: would a Colonial knot make a larger or smaller knot than the French variety? That’s assuming you’re using the same thread and 2 wraps for French. If Colonial made larger knots, that’s another way to change size without changing thread, number of wraps or needle.
some great tips there, really interesting to read. x
Excellent tips. Why did I never think to change the needle size? This was a very helpful post, thanks Mary.
Dear Mary
Another great article, I love french knots but never thought to change either the thread or heavier needle or tension for thicker knots and the reverse for smaller knots that makes so much sense. I love the tree it is really colourful with the french knots and you can see the difference between the thicker and thiner knots and I really like the different colour leaves as well, it’s lovely. I don’t blame you for your secret pleasure and I know what you mean when you create something and can’t stop embroidering especially when you have other pressing things. Thanks so much for sharing the tips and techniques above on the french knots I shall certainly use this method in my projects that require french knots, thank you.
Regards Anita Simmance
Mary —–
I love this tree! I want to embroider this tree!! I need to embroider this tree!!!
Will you be telling us how – or sharing a pattern?
Thank you, Mary!
omg! I never thought of changing needles! What an excellent idea. Thank you! I am loving watching your tree ‘grow’.
Happy World Embroidery Day, Ms. Corbet!
Mary, I really look forward to reading your wonderful emails – lots of lovely tips and things to see – – but every now and then you absolutely hit the nail on the head for me – – and French Knots is it!!!!!! I’ve just actually checked my Needle Box to make sure I’ve got Milliner’s needles so that I can be off to do some practicing. Thanks so much, as always, for great information!
I enjoyed the post today (as usual). When I finished reading, I laughed. It occurred to me that what we have is thread, needle, and fabric — and look at ALL the things we have to think about to make a tiny dot!! This is my life!
“Stitch Purposefully”. Words to live by! Thank you for another wonderful article!
Mary, I love your little tree. I’m enjoying watching it bloom too! Will you please show it to us when it’s finished, too? I love all your projects; your embroidery is exquisite, and I love this site!
MERCI Mary, and a happy WORLD EMBROIDERY DAY too!
Mary, this was a wonderful post! I will be using each of your “tips” when I use french knots on my project later on today. I have a tendency to wrap 3 times…sometimes they are neat and sometimes they are sloppy. I will have to work on keeping my tension the same and will assuredly be trying the change the needle tip. I honestly had never considered doing that one. Amazing how the easiest techniques can be the ones we never try or think of. Thank you for sharing and have a wonderful creative day!
Love this post! I just had to let you know how much I appreciate your blog. It is always so informative even if it’s not a subject that of interest to me right now. Who knows, it may spark an idea for something I’m working on, or may become my favorite thing at a later date. Thanks for all your hard work!
Wow, I never thought of changing the size of the needle; thank you for the perfect tip!
I love your tree!It has been many years since I have done any embroidery, looking at your’s is making me want to do some, especially The Tree. Thank you so much for sharing.
Sister From the South,
LindY G
I use one wrap for French knots for nice consistent knots with consistent tension. For a bigger knot, as you mentioned, I either vary the thread, or….. Colonial knots.
Thank you for this tutorial. I have always had trouble making consistent French knots. Once I learned to make colonial knots, I gave up on the French ones. A colonial knot is bigger than a single wrap of a French know. It’s a little bigger than a double wrap–all things being equal, thread and needle and fabric.
I’m so enjoying this tree, Mary. And I love the french knots! Excellent discussion on changing the size of the knots.
Are you going to be posting the design of the tree? My college age son just asked for a particular stitching which includes a tree, and this one would fit perfectly.
Mary, Thank you so much for this! I’m not sure why it never occurred to me, that there are other ways to do this, besides simply adjusting the tension. It’s the only means I ever used, and had begun to hate French knots, because they were TOO consistent.
I haven’t been able to take time to stitch for some time (largely because of a move that too many others helped me pack for, leaving my supplies scattered in so many boxes, that I still haven’t found them all).
Aside from the great teaching moments you always offer, there is always a plethora of your work to look to for inspiration, and I’m very grateful for that – but this little tree? I have a HUGE embroidery crush on this one! I really love this little tree, and can’t wait to see what you’re going to do with it. Thank you!
Carla
I learned a new word: PLUMPER NEEDLE. Thank you for the time you spend on your beautiful embroidery and post. I will use this technique to embroider large knots in front of subject and small knots in upper portion of subject to show depth in my picture.
So glad your website found me! I recently took up embroidery again after a 40 year pause and found I still use the same 3 or 4 basic stitches I learned as a child. Who knew there was so much more to learn! Thank you for this… you are very clever and I love to read your blogs.
Thanks, Jeanne! I’m glad you’re enjoying Needle ‘n Thread!
Thank you for this helpful post! I’ve been trying to increase knot size by increasing the number of wraps, and the results have been disappointing. A larger needle has created much prettier, neater French knots!
Great words of wisdom as always.