


The double herringbone stitch creates a band of interwoven herringbone stitches. Now, this is an easy stitch for creating a decorative band of embroidery, but it’s not quite as straightforward as it seems, so if you want to get that interlocking, woven look to your band of double herringbone stitches, read the tips below and watch the video for clarification. It’s definitely worth getting the stitch right, because it’s a really nice looking stitch!
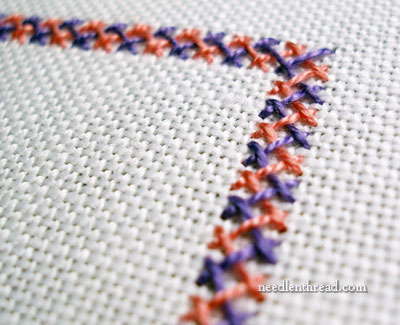
If you look at the photo above, you can see that the band of double herringbone stitch is completely interwoven. There’s no one thread that passes over two threads – the thread movement is always “over-under-over-under” if you look at the individual stitches and how they lock together.
Unfortunately, in several more recently published stitch dictionaries, there’s a little discrepancy in the way this stitch is created. The resulting band of double herringbone made according to these recently published books is not completely interwoven. Double herringbone is supposed to create a completely interwoven line. You’ll see how to work it in the video below to achieve that interwoven line.
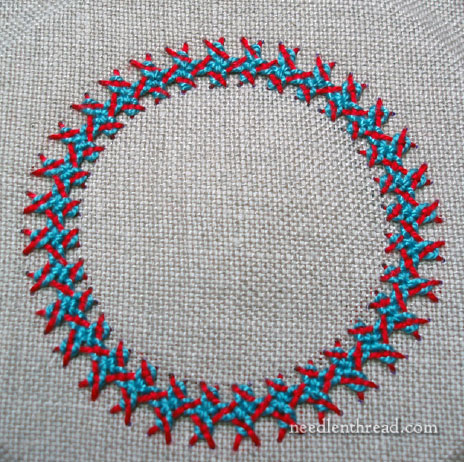
The double herringbone stitch is the foundation for the interlaced herringbone, which makes a gorgeous decorative band or border.
Stitch Play Printable Available
If you’d like printable instructions on how to work the double herringbone stitch, you can find them in my Stitch Play Printable on Interlaced Herringbone. This Printable (which is delivered as an auto-download PDF) includes not only how to work the double herringbone (in step-by-step photos, accompanied by diagrams and thorough instructions), but also all the information you’ll need on how to work the double herringbone (and the interlaced double herringbone) around corners, in circles, and so forth. It’s a thorough tutorial booklet, covering everything you need to know from starting and ending threads to finishing a beautiful band of stitching.
Here’s the video. Have fun with it!
Do you want more inspiration & information on hand embroidery?
There are all kinds of reasons to sign up for the Needle ‘n Thread daily newsletter! Check them out and sign up today!
If you’d like to learn other embroidery stitches, you’re welcome to check out my collection of hand embroidery videos here on Needle ‘n Thread!
If you like what you see on Needle ’n Thread, if you want to be a part of keeping the website thriving (and free of annoying network advertising), why not become a patron on Patreon? Check out my Patreon page here, where I’ll occasionally add special needlework bonuses for patrons.
If you shop on Amazon, you can support Needle ’n Thread without any extra expense to you by visiting my Amazon Recommendations page here, where you’ll find books and sundries for the needleworker available on Amazon.
Hello, this is a great service.
went to herringbone, great! But wnet to double herrinbone and no SOUND.
Is this viedo libary available on a CD?
double herring bone stitch video is not available for ur site. plese help me.
i like your site very much…..
i like your stitches….
Can the Double Herringbone be worked the same way ion counted cross fabric where we work over a certain number of threads (ex: over 8) on 36 and 40 ct linen? In surface embroidery, you just pick up a piece of fabric, but in counted cross, we have to stitch over an exact number of threads for it to come out even. It is a beautiful stitch. I have stitched it a few times in cc, but am going to look in my stitch dictioneries, to see if they show the over-under, under-over! Thanks for updating your stitch library; it is the best on the entire web! Even though I don’t do surface embroidery, Ilearn something new every day!
wonderfull site i am so impress .what a brilliant method !i can’t express my happines when i know about this .any one can learn embroidery easily from this site who realy want to learn. thanks for this step.
I’m very happy to get you on this site! I’m new to sewing & embroidery. By watching you on video, I got everything i’ll need to carry on. Thanks so much.
Hi Mary, Can you come up with a Swedish, Scandinavian design for a doll on an apron or blouse sleeve cuffs, collar and front with beads? Thanks Elaine
Thank u
I liked it ,I am learning the basics of embroidery
I need free embroidery designs if you have them.
Thank you
Hi, Sandhya – you’ll find them under “patterns” in the main menu on the website. Hope that helps!
Thank you for doing these stitching tutorials. I have been enjoying your website for awhile now and have wanted to practice some of these stitches, but didn’t know on what. Stitch time is a treasure so I wanted to stitch with a purpose. Decided to stitch 3 little words by Lizzie Kate. Have 2 done. I used the vandike stitch to frame the saying on one, and the backstitch one the other.
Hello Mary, I just came across your site — it’s amazing! Thank you for all of your hard work! It’s becoming increasingly difficult to find information on older stitch techniques etc such as Colbert embroidery. I enjoyed reading your comparisons. Thank you!
This is such a gorgeous stitch. May I ask how you made it in a perfect circle? Did you trace a circle then estimate placement or did you do it systematically and if so how…? It appears that you have a system for stitch placement. I will try to work it out from your photo but I’d love to know how you did it.