


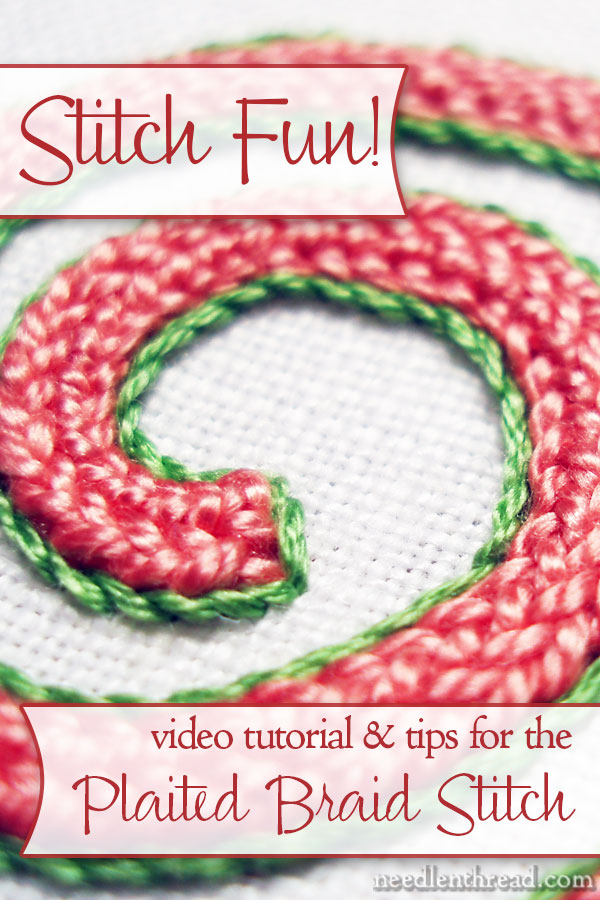
Oh, the plaited braid stitch! It is a beautiful stitch, but unfortunately, for some reason, many stitchers are intimidated by it. Let’s alleviate that intimidation, shall we?
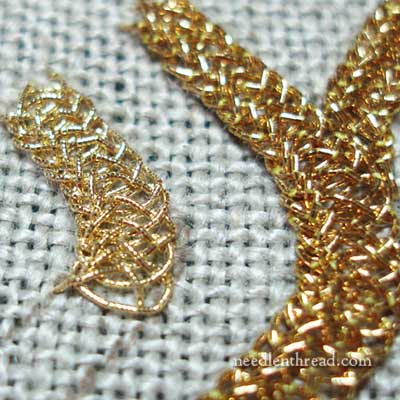
See, plaited braid stitch is often presented as an historical stitch that is “only” used with metal threads in historical re-creations. I say pooh-pooh to that! Why should such a gorgeous stitch be used only in historical contexts? Sure, it’s been around for a long time! But why aren’t we using it in modern applications as well? Possibly because the instructions for the plaited braid stitch presented in most stitch dictionaries tend to be confusing, making the stitch difficult to master.
There are also several variations of the stitch, along with many opinions on whether it should be worked towards you or away from you, horizontally or vertically, with this thread or that thread, using the right hand or the left hand, using this type of needle or that type of needle – and all of these opinions lend to the confusion. They also tend to make the stitch seem inaccessible for the beginner
And that is another thing to which, like Madeline facing the tiger at the zoo, I say pooh-pooh!
While an absolute beginner who’s never stitched before probably wouldn’t launch in to hand embroidery with the plaited braid stitch, if you know some basic stitchery, the plaited braid stitch really is just as simple as any other stitch made up of various movements.
So, to help you conquer the plaited braid stitch, here’s a short video on how I work the plaited braid stitch. In the plaited braid stitch video, I’m using perle cotton #5 and a #22 tapestry needle, and working on linen.
So that you can clearly see the movement of the stitch, I’ve worked it rather loosely. The key to a beautiful plaited braid stitch is correct tension and correct spacing for the thread you’re using. Once you understand the movement of the stitch, with a little bit of practice, you’ll be working your own plaited braid stitch in no time!
Here’s the Plaited Braid Stitch video:
Plaited Braid Stitch Printable Instructions
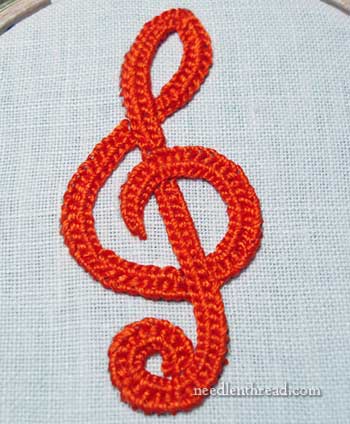
There’s not a lot of time in a how-to video to cover various aspects of the stitch, so I’ve created a Stitch Play Printable for Plaited Braid Stitch that takes you step-by-step through the stitch with both photos and diagrams, and also demonstrates how to work the stitch for the right handed embroiderer and the left handed embroiderer.
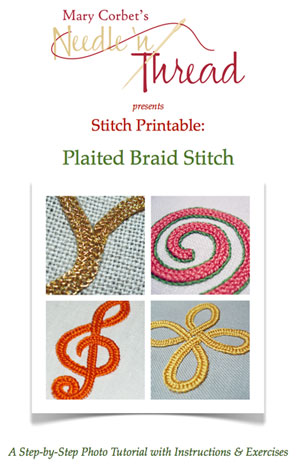
The Plaited Braid Stitch Printable includes information on materials (fabrics, threads, needles); instructions for starting and ending threads, for working intersections, and for working wavy lines and curves; tips on stitch size, thread types, and line width; four practice exercises to help you master the stitch; three extra knot work designs for further practice; and a complete list of resources for fabrics, threads, and needles.
You can find the Plaited Braid Stitch Printable in my shop, available for download today, so that you can master the plaited stitch right away.
You can find heaps more how-to videos for hand embroidery stitches here on Needle ‘n Thread, too, if you’re hankering to learn more stitches. If you’re looking for other in-depth Printables, feel free to visit my shop, where you’ll find other Stitch Printables available for download.
As always, if you have any questions, don’t hesitate to leave a comment below or drop me a line!
I hope you enjoy the video and the printable!
Looking for inspiration & information on hand embroidery?
There are all kinds of reasons to sign up for the Needle ‘n Thread daily newsletter! Check them out and sign up today!
If you like what you see on Needle ’n Thread, if you want to be a part of keeping the website thriving (and free of annoying network advertising), why not become a patron on Patreon? Check out my Patreon page here, where I’ll occasionally add special needlework bonuses for patrons.
If you shop on Amazon, you can support Needle ’n Thread without any extra expense to you by visiting my Amazon Recommendations page here, where you’ll find books and sundries for the needleworker available on Amazon.
Thank you, Mary! The plaited braid stitch is a beautiful addition to the stich videos. I’m keeping the curtains drawn, placed a piece of paper on my doorbell chimes so they won’t ring, and I’ve programmed my phones calls to go straight to voice mail so I will have no interruptions while I practice today.
Hi, Charla – That sounds ideal. I should follow your example! I might get more done!!! Hope the practice session goes well – if you have any questions, drop me a line! ~MC
That was a GREAT video. I might have missed it, but what metal threads do you like to use for this stitch.
Thanks. You are such a great resource for the stitching community.
Hi, Mary – there are several different metal threads that work well with this stitch. I like #4 or 5 passing thread best, I think, and the 371 wire thread. -MC
Hi Mary,
In short – you ROCK! 🙂 Thank you for everything you do and all the time and effort you put in to helping others learn.
Hi, Cheryl! Every time you pop up on here, I go giddy with jealousy. I absolutely LOVE PEI!!!
I’m glad you like the instructions! Thanks for the note!
~MC
I agree with Cheryl. Thank you Mary, you have a knack at making intimidating embroidery accessible, and even better, enjoyable!
PS: I also love PEI!
WooHoo! You know, I’ve meaning to meander over to Ye Olde Shoppe here to pick up that gallon of printables, and today will be the day! 😀
LOL! Thanks, Sheila -Ye Olde Shoppe has just been waiting for you! 🙂
Well, that has to be the easiest shopping experience ever! Easy Peasy, popped up in my email a minute after I hit confirm on PayPal. Your instructions look great! Can’t wait to dig in. Thanks for everything, Mary! Ye Olde Shoppe is excellent!
Thank you for this excellent (and fun!) addition to my stitching library!
Glad you like it, Cindy! 🙂
Thank you for making this available. This stitch gained some notoriety in re-enactment circles a few years ago. It’s good to see a clear explanation of its movements. How did you come up with the first movement? That’s a new addition to the stitch and gives a nice evenness to the start.
Hi, Alex – I think (not certain) this is the way Leon Conrad “cracked” the plaited braid stitch years ago. It shows up in some stitch dictionaries and books using this method now, but actually, in the stitch dictionary I’ve seen that uses this start method, the right handed version of the stitch is backwards (it would only work with a left hand), and the left handed version is for left handed stitchers, so in that book, you end up with two left-handed versions, each stitched from a different direction, but still only workable with the left hand. Any time I’ve seen the stitch worked this way, it assumes working with the left hand. Since the majority of stitchers, though, are right handed, I figured it was time to flip the instructions and make them right handed (no offense to left handers!) In the printable, I’ve included diagrams for both, though.
Another thing that I’ve not seen with this stitch is how to make it easy to access that center hole on the second pass in making the “pretzel” – that’s the trickiest part of the stitch, really. I think leaving that loop in the working thread when you make the first pass on the “pretzel” guarantees an easier approach not only to the stitch (entering the center hole when you pass in it in the second part of the “pretzel”) but also to getting the tension correct.
Anyway, once the movement of the stitch is understood, it’s very easy to adapt the stitch to the right or left hand, or to work the stitch on a stationary frame that you can’t turn while stitching. There’s a definite, easy rhythm to the stitch once it gets going, which makes it really fun to work, and to work quickly.
~MC
Thank you for showing us how to do this stitch. I am thinking this stitch might look awesome embroidered in a pattern around the neckline of a blouse of some type. Would you have any patterns for that type of application?
Hi, Robin! I agree! I’ll do some digging and see what I can come up with! ~MC
Dear Mary
Thanks so much for this long awaited video. I’ve just bought the stitch play printable and I will sit down now and read through this exciting stitch I’m thinking of using this for my present project so will have to try and see.
Thanks
Regards Anita Simmance
Thanks, Anita! You’ll have to let me know how it goes! Hope you enjoy the stitch! -MC
Dear Mary
Just a question would Gold Tambour #7 be alright to use for this stitch has I have 30 meters and thought I could use that.
Thanks
Regards Anita Simmance
Yes, but it has to be a very narrow line – I’d say no more than 1/8″…
Hi Mary,
Thanks so much for this video. I have tried to purchase the printable but seem to be in an infinite loop with Paypal. Either the payment(s) are going through and I’m not getting a message confirming the purchase, or its not going through at all. Its possible I’ve now bought it a number of times!!! Anyway – can you check all is in order. I’ll let you know if I receive a printable version by email.
Thanks
Evelyn
Hi, Evelyn – it has not gone through, so you might wait a bit and try again. I’ll drop you an email…
Thank you Mary, I was waiting for this.
Another challenge for me.
Have a nice day
Alet
Hi Mary, I downloaded the Plaited Braid Stitch Printable – such wonderful instructions! But I can’t seem to open the video on this page. Could you send me the link? Thank you. Jackie
I solved my problem (well, my husband did):-) Internet explorer would not open the video, but I got it open by using Mozilla Firefox –I guess we need to be smarter than our computers! Sorry to have bothered you about it 🙂 and thanks again for the great teaching you do!
Jackie S.
HI Mary,
Thanks so much for the video on the plaited braid stitch. I’ve been loving it for some time, but am wondering if it could be applied to Ecclesiastical work? What comes to mind are designs that have the obvious parallel lines like the piece you posted photos on here: https://needlenthread.wpengine.com/2012/08/19th-century-rose-in-silk-gold.html
In theory, would the plaited braid work or be appropriate going around the oval of the rose for example? Would love your input, or that from anyone else…..
Hi Carrie – yes, definitely. I have been pondering the same thing….
Are there restrictions (maybe traditions would be a better term) on what stitches can/cannot be used in Ecclesiastical work? My knee-jerk thought is unless it’s a stitch that’s prone to snagging or wear, use it if it gives the desired effect. And if it is prone to snagging and wear, don’t use it on items that get worn or handled. Then again, I’m not involved in thaty type of needlework.
Thanks for these videos. I refer to them all the time. I learn better by watching the stitch being made that reading how to stitch.
Thanks
Sandy
Mary, thank you for this instructional video. I am deaf, but have no trouble figuring out the stitches from watching you stitch them. This is the first time I noticed that you have captioned the video and I just want to say Bravo!! I appreciate your efforts on that so much and I am sure other people who are hearing impaired will appreciate it too!
Thanks a bunch!!
Dawn C.
Hi,Dawn! Thanks for your comment! I’m glad the closed captioning is helpful – I’m working on updating all the videos with it. At this point, most of the new ones have correct captioning, but I still have quite a few to finish and correct. Now that I know they are useful and appreciated, I’ll work faster to get them all finished! Thanks for letting me know! -MC
G’day Mary,
Once again the bones are revealed to simplify the whole, even though nothing of the visual intrigue of the stitch is lost. There’s something about seeing this stitch so clearly ‘instructionalised’ that is like a very hopeful promise. Kind of, like when life seems to be unraveling, it CAN be repaired, one stitch at at time, into something beautiful and gainful. If life seems full of misplaced needles that are found, painfully, when we think they’re the last thing we need or want, choose a blunt one, and some unraveled life thread, (don’t worry about the type or colour) and make braid. The rhythm, fascination and distraction of getting it together and seeing results just has to nurture positive thoughts.
Real and mental stitching are good for the soul.
I hope you don’t think I’m preaching, I’m really just talking to myself. Actually helpful too.
Thank you Mary. Cheers, Kath
Thank you so much Mary. I’ve bookmarked your instructions for later purchase. I can see using this on the edges of box lids.
Thank you, thank you, thank you. I have been poring over the newish book (I think by Jacqui Carey) going ooh, aah, but not actually understanding much about it. Now that I have seen you do this in front of me it is like a ‘eureka’ moment. It really doesn’t look so difficult after all. Don’t get me wrong, it doesn’t look like a walk in the part either, but somewhere between there and rocket surgery. I will practice it this evening and if you hear distant screams you will know that I got it all wrong – again!
THANK YOU THANK YOU THANK Y0U THANK YOU THANK YOU THANK Y0UTHANK YOU THANK YOU THANK Y0U THANK YOU THANK Y0U THANK YOU THANK YOU THANK Y0U THANK YOU THANK YOU THANK Y0U THANK YOU THANK YOU THANK Y0U!!!! I finally think I’m going to get this thing – everyone was saying – it’s not that complicated (yes it IS!!!) your wonderfully clear and conscise video really confirms that sometimes I NEED to see instructions in action before I can understand how it’s done…Oh, did I say thank you?
Ah que lindo,gracias por esto tendre que verlo muchas veces pero lo voy a elaborar,muchas gracias nuevamente.
Great video, Mary – now I can really see why this stitch is a thread hog. It sounds like this is a candidate for a book all to itself, similar to the Montenegrin stitch book.
Mary, Thanks for this great discussion of plaited braid stitch. I’m working on a piece that has a boatload of it (in gold thread) and was really having trouble getting the pattern correct.
p.s. That top photo has caused me to crave watermelon. Yummy color combination.
muchas gracias, la verdad esta muy bueno el video, muy bien explicado. pondre en practica esta puntada tan bonita. de nuevo mil gracias
I am so PLEASED!!! With your excellent tutorial I got this elusive stitch down in less than 10 minutes. Hooray! Thank you for the most lucid directions. Joan B.
WOW! Absolutely stunning and something I think I’m definitely going to give a try. Thanks so much for the great video instructions! 🙂
Bonjour
votre version imprimable m’interresse mais je ne comprends pas l’anglais est ce qu’avec les photos je peux comprendre
J’aimerais bien que tout vos livres et explications soient un jour en français
Merci et bravo tous vos ouvrages sont magnifiques
Je suis une fidèle de votre blog
amitiés Marie Christine
Si vous avez quelquechose de spécial à traduire je pourrais le faire pour vous avec plaisir.
Jackie
It is very pretty but I have trouble with it because I am doing a circle I think?
I would appretiate help
Natalie age ten in FL
Love your site. and have taught myself so many sitches with your videos, better that a class! My mother who is french was asking me: any chance of having your site, video in other languages? some embroidery sites have this option.
regards.
v.Marks
Hi, Veronique – there’s an option to translate into various languages part way down the left column on every page of the website. You can also drop the URL into Google translate and view the site translated into whatever language you wish. Hope that helps! -MC
Hi Mary.
The plaited braid stitch is a wonderful video…just like all the others I’ve watched. I’ve been practicing it this afternoon. What else is a person to do but embroider under an electric blanket with a nice cup of tea when it’s -3 degrees, -20 wind chill and 12″ of new snow. Looks like Kansas is about the same as Michigan today. Just downloaded your printable on the stitch which was super quick and easy! I plan on using the stitch with your Celtic knot monogram letters and knew it would be very useful. Lots of curves and stops and starts. Need to practice those now.
Thanks for all the work you put into your blog. I don’t think I would have started stitching again if you hadn’t made it so much fun.
Keep warm
Kerry
Hola
Quisiera saber si es posible obtener los PDF
Descargables en español o en francés
Me encanta vuestras publicaciones
Gracias
Merche
Thanks, Mercedes! Right now, no, I don’t have translations available. Perhaps in the future – we shall see!
I would be glad to translate some of the posts people want in French, if you would like.
Jackie
Hi, Jackie! Thanks! I’ll let you know! Coordinating translations might be a bit more than I can handle right now, though. For blog posts, there’s the standard translator in the side bar – I know the translations aren’t perfect (! to say the least!) but they’re pretty helpful. I’ve thought about translations for the e-books and whatnot, but that’s a lot of work, not just for the translating part, but for the formatting and layout. It would be a big chunk of extra work that I don’t really have time for right now, but I’ll definitely look into it for the future. Thanks again!
You are very welcome. You do so much for us, it would be my pleasure to help.
Loving this stitch! However, I’m having some difficulty when two lines meet, or when an existing line I’m working splits into two lines. Do you have any tips on how to make things seem more seamless?
Can #4 Gilt Smooth Passing on Silk Core be used for plaited cord stitch and how much is needed per inch? I have just finished reading your printable version (excluding the practice bits).
Yes, it can. It’s a little stiff to work with, and you have to make sure you’re using a large enough needle for when it passes through the fabric (I’d experiment with chenille needles). How much per inch depends on the width of the braid and the tensioning on the stitch. It can vary quite a bit, so the best thing to do is practice it first with a different thread, and once you have the stitch movement down, to try different line widths and different tensioning with the passing thread, until you get the look you want.
Many thanks. The video is really clear after reading the printable version.
I might try later the #16 metallic braid Au Ver a Soie.
Today at our EGA chapter meeting we were taught the plaited braid stitch. I had seen your video so I felt I had a head start. The instructor’s directions were not too clear and she said her version was a mirror image of yours which proved to be confusing. She enjoys studying and designing along the lines of European and Elizabethan themes and the plaited braid stitch is incorporated in a correspondence course piece.
The question I have is about your examples of plaited braid that appear to curve across themselves. Is that done by starting and stopping or does the braid cross over itself?
Thank you for your wonderful instruction and sharing of your beautiful work.
Anne
Hi Mary, I am doing the “More Than A Rose” course in early 17th c. English raised work.” with a group from my EGA Sand Doller Chapter in Daytona Beach FL. that is offered through EGA. My question to you is, I came across your video instruction on the Plaited Braid Stitch that is done as part of the design in the project. The way you showed how to do the stitch was much easier than the way the instructions show in design book. When I went back to your blog site on the stitch, it does not show the video and I had to, or chose to , purchase your instructions. Why didn’t the video show on your blog the second time like it did the first time? Will it show on your purchased instructions? Do I have to download the purchased instructions? I love our site and have learned many things from you. Thank you for all of your hard work. Dotty
LOL I just went back and low and behold, there is the video. Dotty
Fixed it today!
I am enjoying your website so very much. Who knew all those stitches were out there????
I’m making an altar frontal using (I thought) celtic bias strips, but the twists are much too small. Embroidery! thought I. Metalic thread! What do you have on working with metalic threads? I still do not know the stitch I’ll be using, but something with “bend” and ‘the right width’.
Any help would be appreciated. Thanks.
Carolyn
A new stitch, how to embroider from string to silk.
I have many books, great reads and glorious pictures.
Mary Corbet’s site, where it’s all laid out for me.
Why should I pay $69 for something I can get for free.
Apparently Mary you are not quite known to all the world, pity.
I totally agree with your sentiments. I look at Crafty sometimes and even bought a design. I am just about over drawing my own, besides there are some really lovely designs out there.
Love the braids, and that orange is divine. I did say to you sometime ago when you commented on the orange coloured thread, there are no horrible coloured threads.
They just haven’t found their home or place.
Winter here, sewing is slow the hands are cracking. More talking that sewing for awhile.
Thanks Mary.
Thanks for sharing
How do you work the points of the designs, like how it starts in the treble clef on the inside?
Mary,
So excited to have found your website. I am a needlepointer with embroidery at heart. I always try to combine the two in most of my canvases. Am interested in trying the plait stitch for a spiral. Is it possible to do this stitch that decreases in size? Thank you for any help
Diana
It would become increasingly tighter, but yes, you could do it. There would be more space in the stitches in the outer part of the spiral than in the inner. I think it would be easier to start on the inner part of a spiral though, so you’re not running into previous stitches on both sides of the stitching as you work inwards.
The Plaited Braid stitch is so beautiful and I am thankful to finally have a tutorial that I can follow with ease…I sometimes have trouble with printed instructions..they seem confusing to me..you have a wealth of knowledge and you share so much freely, that too in these troubling times is a blessing! Thank you so much!