


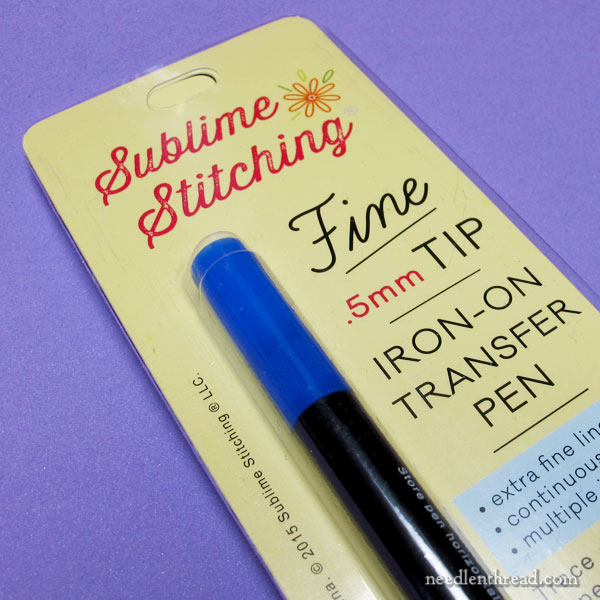
The other day, I got a little package in the mail from Jenny Hart of Sublime Stitching.
Nestled inside was one of her new fine-tipped iron-on transfer pens.
You know me – I’m always game to try a new embroidery product, especially one intended to make the transfer process easier.
So I set about playing with the pen, thinking I’d eventually write a review of it.
The more I played with it, the more I thought I better write a review sooner, rather than later. After all, it’s always better to be aware of things ahead of time, than to wish you had known before it was Too Late.
The embroidery transfer product industry is a funny thing. There are, after all, heaps of specialty pens, pencils, printable interfacings, films, plastic grids, and so forth that have been marketed with the express purpose of making the design transfer process for embroidery easier. They all practically promise the perfect solution.
The fact is, though, that few of them actually work with a high level of satisfaction. They all have their drawbacks in some form or another.
For me, the perfect solution would be the Think System – that is, the ability to wish the design right onto the fabric, and voilá! There it is!
Since that’s neither possible, probable, or in any way attainable, instead, I gravitate towards transfer solutions that give satisfactory results with the least amount of grief or risk.
The cons of iron-ons
I’ve shied away from iron-on transfer pens and pencils for several reasons:
1. When it comes to pencils, they rarely transfer a nice line that’s easily visible.
2. When it comes to pens, the design line is too visible – it’s usually thick, heavy, and dark, making it difficult to cover well with stitches.
3. The iron-on process is more reliable with small designs; the larger the design, the more difficult to get a really accurately placed and transferred design.
4: If you mess up on an iron-on transfer, you’ve pretty much wasted a piece of fabric, because the lines are permanent.
There’s always a but…
All that being said, I’m open to exceptions! So let’s look at the Sublime Stitching iron-on transfer pens and see how they work.
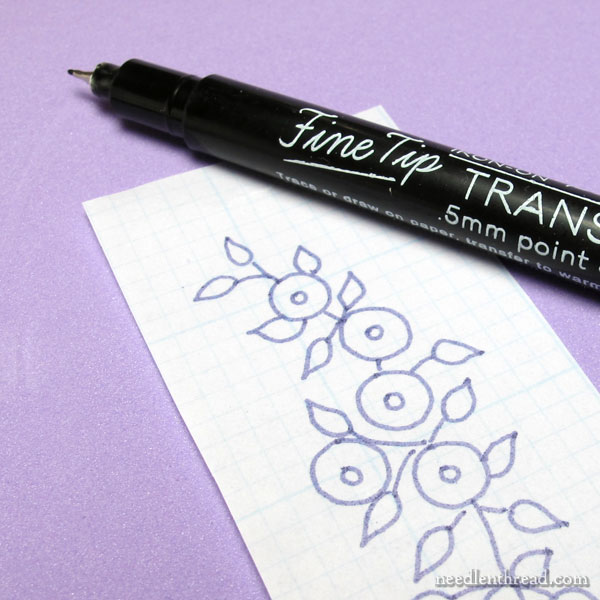
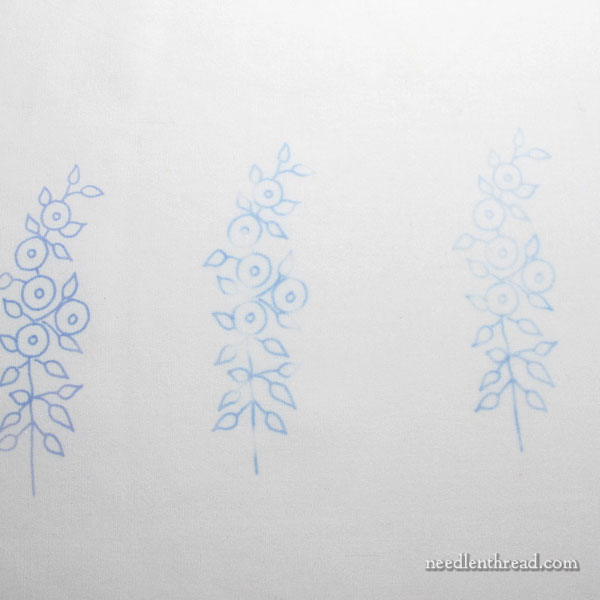
To use the pens, you trace a design onto tracing paper. In this case, I didn’t have any tracing paper right on hand, but I had some drafting vellum, which is the same thing, only with a blue grid on it. I used the back of the drafting vellum (or the unprinted side).
Notice that the lines are, in fact, nice and fine! If you were tracing the same lines with another popular iron-on transfer pen out there, you’d not end up with lines so fine.
In addition to the line width, there’s another Big Difference with the Sublime Stitching pens. They’re a continuous flow pen, like a regular micron pen or fine tipped marker or the like. There’s no shaking or depressing the point to get the ink flowing. You use the pen just any other pen, and it writes just like any other pen.
So those are two jolly points in favor of the pen.
I know, I know! But how does it transfer? Because that’s what it’s all about, after all.
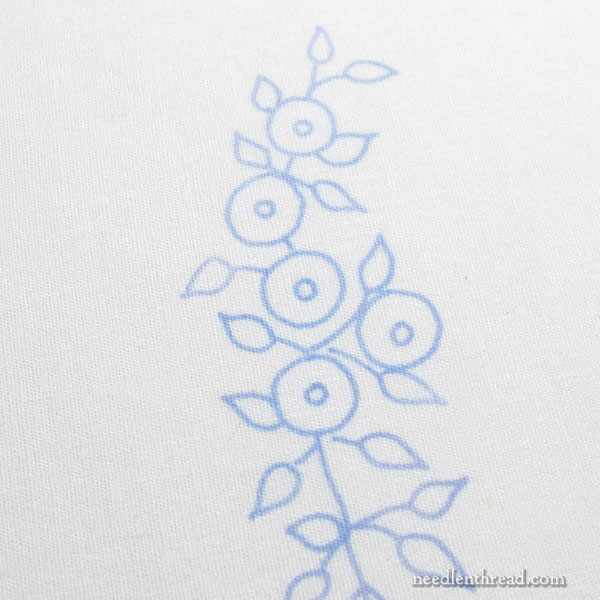
To test the transfer, I started with a high-quality cotton muslin.
Following the directions, I pre-heated the fabric. The instructions aren’t super-specific, but I just ironed it using a dry iron on the cotton setting until the fabric was good and smooth and hot.
With the fabric hot, I placed the transfer ink-side-down onto the fabric and held the dry iron on it for (again, the instructions aren’t specific) about 10 seconds, counting 1-mississippi-2-mississippi, up to 10.
When I removed the iron and the paper, I felt that little tinge of gratification. Well done, Jenny Hart! said I.
Above, you can see the results of the first transfer, which I think it came out really well. The lines can easily be covered with two strands of floss.
More than one transfer
According to the description on the pen, you should be able to get several impressions from one drawing, so I tested that.
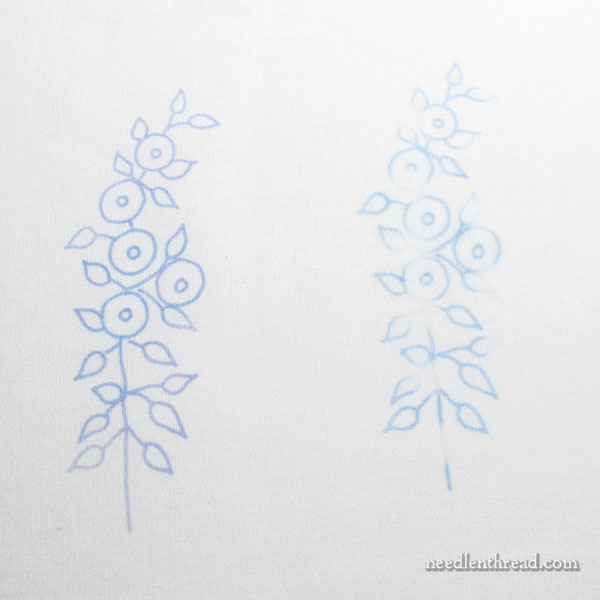
I re-pre-heated the fabric and tried a second time. Since this was a second impression, I held the iron on for 12 seconds.
The second impression was not so good, but I think the blank spots are from the little steam holes in my iron. Overall, it’s not that bad of an impression – I can still see the lines enough to stitch over them.
Let’s try a third time.
The third impression, held for 13 seconds, was a little worse (on the far right), but in fact, I can still see the lines. I could stitch them, if pressed.
How about four?
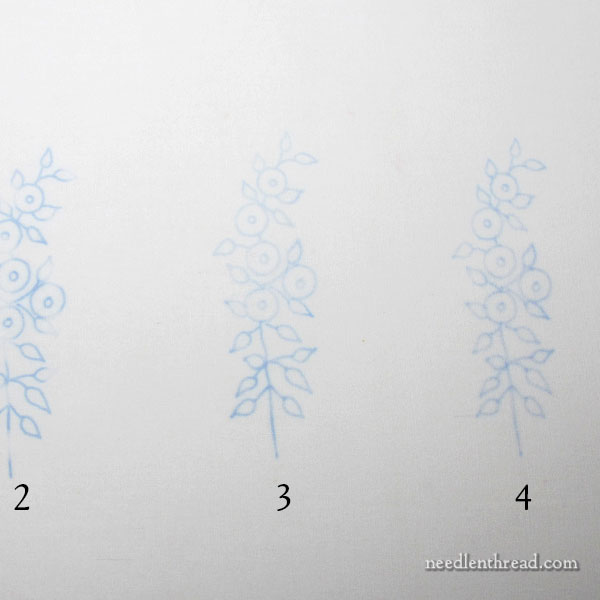
While the fourth impression, held for 15 seconds, seems to be a little darker than the third, it’s also very blurry. The lines are no longer sharp; they’re fuzzy, like ink on damp paper.
But still, the fact that it managed four visible impressions is pretty…impressive!
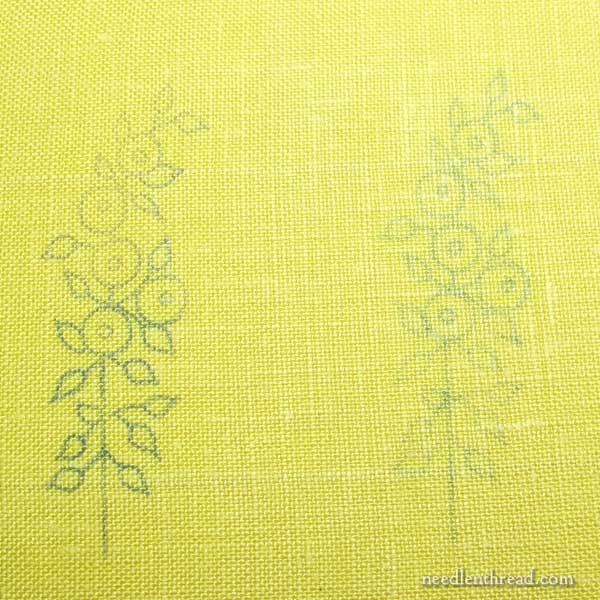
Let’s try linen!
Cotton is not my fabric of choice for embroidery. I’m more of a linen gal, myself.
So, I figured I should try the pen on linen.

On a new sheet of paper, I traced out the pattern again, so I was using a completely fresh transfer.
I pre-heated the linen for a while until it was good and hot, and made the first impression, holding the iron on for 10 seconds again. The photo above is the result.
The top part of the design did not transfer so well, but such is life when dealing with iron-on transfers. They’re not always consistent. I have a very good iron, so it’s not necessarily the iron. It could also be my technique, I suppose. I held the iron in one spot the whole time, as the design is small, but I didn’t give any particular weight to it. And it could be that the iron had moved into a cooling cycle, so the top part of the plate was not as hot as the base… whatever the case, that’s the first impression on linen.
The second impression on the linen (on the right) was not as good as the second impression on cotton. The lines are much softer, not nearly as sharp and clear.
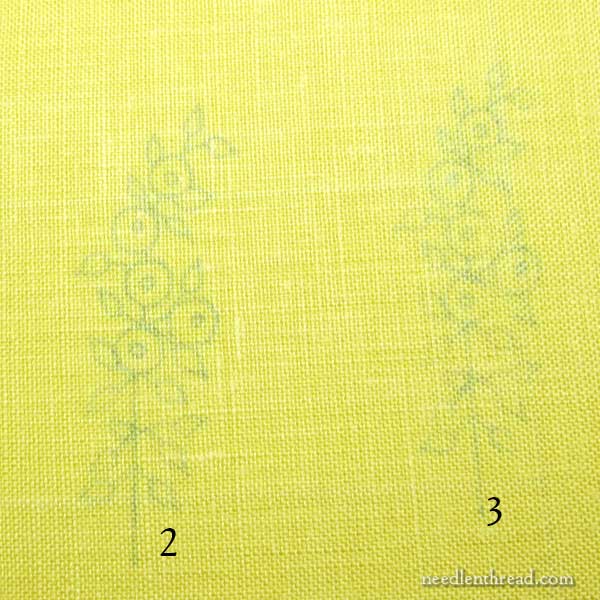
And the third impression on the linen (on the right, above) is not really usable.
Pros and Cons
The pros for this particular brand of iron-on pen are numerous:
1. The tip is very fine.
2. The flow system is like a regular pen – no shaking required!
3. The first transfer is crisp and clear, and getting a second transfer (and even a third, depending on the fabric) is feasible.
4. The lines are fine enough to cover easily with two strands of floss.
5. The lines are not dark-dark. Even with the dark blue color I’m using (the pens come in different colors), the blue ends up being kind of a grayish-blue on the transfer. It’s a nice, all-purpose color for iron-ons.
The cons:
1. Like any iron-on, it works best with small designs; large designs can be difficult to place and transfer accurately all over.
2. Like most iron-on solutions, it is permanent, so if you make a mistake in the transfer process, you can’t undo it.
3. The pens are a bit pricey, at $6.50 each, though you can purchase a combo pack of all five colors for $25, which gives a little bit of a break on the price.
The Nutshell
Yes, these are a pen I’d have on hand for quick transfers. I think they’re worth getting, especially if you do lots of small projects with a fair amount of detail.
I’m probably not one to go for the colored varieties (I can’t see the point of the green or orange, for example, though I think the red might be nice for redwork). I think the blue is a nice color and would work as a general all-around color for most projects.
I don’t know (I’m curious, though) how the colors work on dark fabrics. For example, I wonder if the orange works on black? I sort of doubt it, because the ink doesn’t transfer entirely opaque, but that’s something I may explore further.
If you’re keen on the idea of iron-on transfer pens, these are definitely the ones to go with!
Before it’s too late…
Last time Sublime Stitching had these in stock, they sold out lickety-split. If you’ve been seeking an iron-on transfer solution worth getting, then I’d get one sooner rather than later.
You can find the pens available here on the Sublime Stitching website. No affiliation – just letting you know they’re available!
Mary,
Can you create a transfer design then wait a few days before ironing it onto fabric? Or does the ink on the transfer dry out if one waits? Noelle
Hi, Noelle – I don’t see why you couldn’t wait before ironing. The ink wasn’t wet when I finally did the ironing, but I’ll test that to see if an extended amount of time would make a difference. I don’t think it will….but we’ll see!
Thank you for such a timely review – I found out about these about a week ago and have been hemming and hawing about them, but having seen them in action I’ll definitely get them!
Hi Mary, This pen is what I’m looking for to do my very first design transfer. Im a rookie at this so I’d like to ask what’s probably a basic question: how do you go about keeping the transferred design true to its original orientation , ie left stays left, right stays right vs a mirror image of the design?
You have to flip the image before you trace it, or trace it in pencil then flip it and trace the back then iron the ink side down, pencil side up. Any of those approaches will work, and they’re definitely necessary if you’re transferring any kind of text.
Sometimes, I iron the pattern (from Sulky pens) on the back of the fabric so that after it is washed it will not be visible on the front. Just an idea, though, I have not really had trouble with them because I test the fabric in the washing machine first. I have also done large patterns. I did one that was four pages. I pinned the (trimmed) pages to the fabric so that they would not move around as I moved the iron. As for price, the Sulky pens are no cheaper than those new ones. I will certainly try these if I happen to see one. 🙂
Thank you for reviewing these pens. I have been getting newsletters that show them, but have been hesitant because I haven’t had very good luck with iron on pens and you are right, they are pricy especially after adding shipping. I’ll probably give them a shot.
I was wondering, do you recommend the Sublime Stitching floss? I like some of their sets of colors which come with about 6 colors. Thanks
Yes, I’ve used them, and they’re fine – they have the same feel as DMC floss…
…but does it wash out?? That was the ultimate question I had and no where did you mention that. I have used the red transfer pencils for years. If you do your embroidery within a reasonable time, the patterns wash right out completely. If you let it sit for 20 years, not so much. How about this product?
Hi, Holly – I did mention that, under the cons. They are permanent. If you make a mistake in the transfer that you can’t cover with stitches, you’re pretty much out of luck. That’s one of the major cons for most iron-on products. But at least this pen is quite fine and makes a thin enough line that’s easy to cover.
Hello,
just a fast comment to let you know that it is possible to print directly on your material as you wish you can do.
You need to use Freezer paper, you can buy that in any grocery store. You just iron the freezer paper on the back of you fabric and its gonna stick on it, then you just cut it the size you want and you can use it in any inkjet printer.
Me I m lucky I do own a large format printer so I can make design up to 42 inch wide and no limit on the length but there is a lot of 11×17 inkjet printer that sold for really cheap that you can use…
Many thanks for this review – and great timing! My sister just promised her grand-daughter that I’ll embroider her a bag. Fine, happy to do so – but I have 5 great-nieces and 3 great-nephews and if I do one I have to do 8! Your letter sampler book will be getting a workout sooner than I’d expected, and I certainly don’t want to be pricking-and-pouncing that many patterns.
I understand the think method; Music Man is my all time favorite movie. But, who is Jenny Hart?
Jenny Jart owns Sublime Stitching. They specialize in what I’d call “fun and funky” embroidery patterns, iron-on transfers and other supplies for embroidery crafts.
I looked at the Site in your link to Sublime stitching. It says the transfer ink doesn’t work on Black fabric.. So you do not need to experiment unless you really want to. Cheers, Janice
Mary,
Q&A… Did you move the dry iron up and down on the fabric, across or just held it still?
A…What I found (not using these pens) is that the heel of the iron is heavier, hand pressure, and weight of iron. I have found that moving the iron around, the lines can get smudged and wider. For best result two hands are better than one.
As you lay the iron onto the transfer, use the other hand at the front of the iron to add pressure.
Not a lot. Could spider the transfer. But I find I get a more even overall out come.
Pros & Cons..
Buying in bulk is not always advantageous for the purse.
The amount you save is minimal and never having used the pen before, you do not know what the shelf life is like.
How many transfers are you going to make? remembering that the life of the pen is stated before it has been opened and used.
Opening the pen you have allowed the air to come in contact with it, and when you put it away it will still be subject to its surroundings.
What you have done is broken the ‘vacuum’ air tight seal.
I would buy, 1 only as needed and let the schools buy in bulk.
It is false economy.
I even used the food vacuum sealer. Just to help with the intruding atmosphere.
Buy 1-one only, first.
Mary
I still prefer a lead pencil, blue or brown but they must be kept sharpened.
If the item has to be washed after being worked, I have used, before sewing the item a light spray of either hair spray or spray starch over the transfer. (never on silks) cotton and linen only, this tends to help the pencil not to rub off.
Apart from that, happy sewing. I don’t fold my work when complete. I have a box to keep it flat, cover work with acid free tissue, shiny side down. ..Depending on the fabric. Heavy, I still use tissue but I use a tube. I have a shoe box that can hold the rolls. Named and dated contents.
I love storage, never enough though. I have used rolls out of everything. I do use these for little kits, Trish and Hazel’s little ones fit nicely, even with the threads and beads.
Thanks Mary always interesting.
MM
I have just come under the spell of sublime
Stitching’ transfer pen. I found I got the best transfer not only preheating the fabric but by backing the fabric with parchment paper so the ink did not bleed thru. Got a much better line. Worked well on a dark fabric with a yellow pen.
Darcy Walker
Good tip, thanks Darcy!
Thanks, I do small embroidery on wedding hankies. I’ve been trying many pens and pencils.
I also use rubber stamps and pads in pale colors that don’t soak thru.
Have you tried Sticky Fabri-Solvy. Printable? You print the pattern to the Fabri-Solvy. Press it to your fabric and after embroidery is finished it is soaked off. What is your opinion?
Yes, sure have. It works great for cotton towels and similar projects. I probably wouldn’t use it for anything that involves silk or wool, or really “fine” embroidery, but just for everyday stitching with cotton, it works fine! I’ve written about it – or the earlier version “Transfer-eze” here on Needle ‘n Thread.
How do you get the transfere marks out of fabric when done? I tried just washing
in the general way but still had the ink marks faintly present.
Thanks,
Beverly
On many transfers, it requires several washings. I always advise covering the lines completely with embroidery, in case the transfer does t come completely out. Of course it also depends on the method of transfer, the type of ground fabric, the type of threads, and so forth…
Does this ink wash out.. I need to transfer somethings ut can not find one that will wash out.. Thanks
No, it doesn’t.
The Sublime transfer pens are now $6.75 on their website.
Question on the Sublime heat transfer pen…
How long do they last? I bought one a year or so ago, never opened it until today. Wanted to trace the purple posy tape measure design. The pen is totally dried up. What experience have you had with these pens? Thanks. Kathy
Hi, Kathy,
These types of pens do dry up, I’m afraid. If it was not used in a year or so, I’d be surprised if it wasn’t dried up. My experience with the pens has been good – but, when I used them, I used them pretty regularly. Eventually, the one I used dried out and I had to buy a new one. So they don’t last forever, but they do last through many projects.