


Hand embroidery employs lots of different basic embroidery stitches, but when it comes to filling in, the two most popular seem to be the satin stitch and the long & short stitch. To achieve good results with these stitches, practice is required. Here are some simple directions to get you started on them.
The Satin Stitch
The satin stitch holds its own as the most beautiful of embroidery stitches when done well. It is used in many embroidery applications. I’ve included below two photos of satin stitching. These are not necessarily techniques for the beginner, but it’s always nice to have some “inspiration” – as with any embroidery stitch, practice makes perfect!
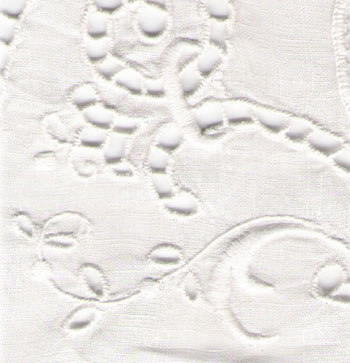
The photo above is of whitework, in a combination of cutwork and satin stitching.
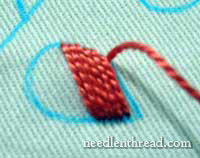
This is a close-up of a piece of linen covered with Italian cutwork, satin stitching, and inserts of needle lace. To stitch the “swoosh” at the base of the image, I first outlined the shape with a tiny backstitch. Some people use split stitch for this outlining. The instide of the outline is then filled with straight stitches running perpendicular (more or less) to the final satin stitched layer. Using #40 coton a broder, I satin stitched over the straight stitches. Note how the direction of the satin stitching turns with the design.
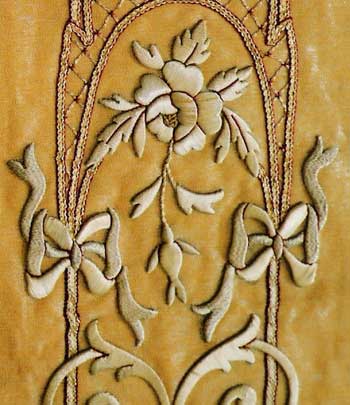
The photo above is of goldwork – satin stitching in gold thread on cloth of gold.
This is certainly not a beginner’s technique. This is a photo taken of a relatively old piece of work (not done by me!). The gold thread is satin stitched over a kind of cardboard. It is actually softer than cardboard – almost like a cross between mat board and dense wool felt. I couldn’t move the stitches apart to see precisely what was used, since the piece is not mine. I include the picture here so you can get a sense of the beautiful effect of satin stitching in gold.
The Basics of Satin Stitch
Satin stitch is basically a series of straight stitches taken right next to each other, close enough to cover the fabric underneath, but not too close as to butt up next to each other and cause bumps. The idea of satin stitch is that your stitches look smooth – like satin.
There are several difficulties in satin stitching that need to be overcome by practice, and I’ve addressed each of those below:
Uniform edges: when you satin-stitch, you want the edges of the space you are covering to be even. Practice will help you achieve this. Don’t hesitate to take out stitches that don’t produce an even edge. You will be better pleased with the overall results if you patiently work on getting the edges of your shape even. A hint: when you transfer your pattern, be extra-careful for the areas that are going to be satin-stitched. If the edge of your transfer is “off” (if your pen wobbles as you draw the design, etc.) then your embroidered stitches will also be off! You can also make yourself familiar first with stitches like the fishbone stitch or buttonhole. Practicing on these will acclimate you to neat edges.
Here’s a point on which stitchers differ. Some stitchers say that satin stitching does not require you to stitch an outline of your shape before you proceed to stitch over the shape. Other stitches claim that an outline is very helpful for neat edges and indispensible to the satin stitch. I believe both, depending on what you’re doing. Stitching a tiny outline of back stitches or split stitches on the lines of the shape you are going to satin stitch can be very helpful. Even in very delicate work, this one tiny outline does not take away from the delicacy of the work. The trick is to use one strand of floss, either back stitch or split stitch over your outline, and then satin stitch over the edges of the outline you just stitched (not inside the outline!). I do this with practically anything I satin stitch, with the exception of very small circles and tiny bars. Other than those two shapes, I can’t think of any time that I don’t use an outlining stitch along my pattern.
Spacing: Satin stitches that are too close together buckle. Stitches that are too far apart show the fabric and lose the desired effect. So, spacing is important. When you begin to practice satin stitching, choose a fabric that has a relatively even weave, and choose a thread that will cover the space between one fiber in the fabric and the next. Try, for example, something like a loose weave linen, and use tatting cotton or perle cotton, or a larger size coton a broder (that is, a lower number, like 16). Try to aim for one stitch per fiber in your fabric, but if this is too far apart, you may have to split the fibers. If it’s too close, you may have to work over 1.5 fibers or 2 fibers, etc. Try it with and without an outline (mentioned in #1 above). See what you like best. As you practice, try different shapes – like the “swoosh” in the whitework above. Try circles. Try tear-drop shapes, etc. Follow the stitch instructions below for different shapes. Strive to keep your spacing even and to insure that your threads are lying flat. Practice, practice, practice!
Stitch direction: It’s important to know in which direction to stitch. For example, in the whitework above, the stitches don’t run down the length of the “swoosh” – they cross over the “height” of it. Also, notice the direction of the stitches. They don’t continue straight up and down, always parallel to the side edges of the fabric. They “ease” themselves around the shape. As you work around curved shapes (like the swoosh), you’ll have to fan your stitches out – that is, at the top of the design, there will be more space between stitches than there will be at the bottom of the design. The direction of your stitches change as they move down the design around curves. However, when you’re stitching a rectangle, bar, square, line, or any squared shape, there should be no real reason for your stitch direction to change – unless you’re trying to achieve some strange, different effect. The stitch direction should remain the same over the whole shape.
Stitch Directions
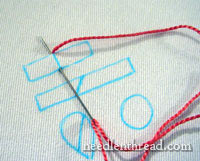
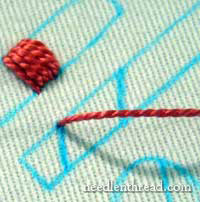
For these directions, I’m using cotton twill and #5 perle cotton. The concept is the same, no matter what fabric and floss you’re using. Keep in mind that satin stitch is not meant to cover huge spans or large shapes. Your needle should be able to cross the shape comfortably. The photos below show the “sewing” method of embroidery – that is, your hand does not go to the back of the fabric to work the needle. Everything is done from the front of the fabric. You can use the “stab” method just as effectively in satin stitch. It helps to have your fabric in a hoop or frame.
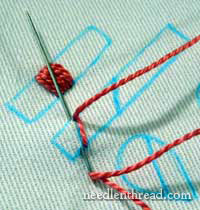
Notice that the stitching begins in the middle of the shape and works to one edge. Then you go back to the middle and work to the other edge. These are illustrations of two basic shapes. I didn’t pad or outline these stitches at all, but you could run a small outline around the shape if you wanted to, and you could even pad the shape by stitching straight stithes underneath, perpendicular to the direction of the intended top layer of satin stitches.
Stitching a horizontal bar shape, with perpendicular stitches
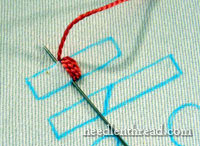
Stitching a horizontal bar shape, with diagonal stitches (recommended)
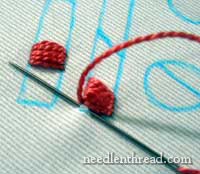
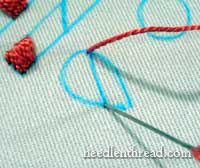
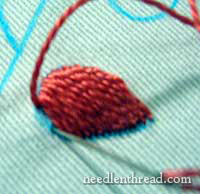
Stitching a petal or tear-drop shape, using diagonal stitches (recommended):
For more information on Filling Stitches, please visit the following posts:
Basic Embroidery Stitches: Filling Stitches, Part I
Basic Embroidery Stitches: Filling Stitches, Part II – Seed Stitch and Stem Stitch
That goldwork is really pretty. Thanks for the detailed instructions on satin stitch. I think it’s easier to do over smaller spaces. Satin stitch shouldn’t be used to fill big spaces. I’ve seen some people try to fill huge spaces with satin stitch, and they end up with loose, messy stitching. When it’s done right it’s really pretty. Oh, the other thing about satin stitch: it looks so much better done by hand then when its done on machine. Just my opinion!
Wow! this goldwork is absolutely gorgeous! It ***really*** makes me want to pick something up with a similar design and make a tablecloth…..
Thank yo so much for posting these hints and very clear photographs. I’m starting to embroider again after many, many years away from it and I feel much more confident having looked at your tips.
hi, can you show the back of the stitch as you do it? is it the same? do you always stitch middle to outside? then go under the stiches in the back then do the other side the same?
This is a great resource! I am a quilter and a needlepointer but did embroidery years and years ago. After reading about Mary Queen of Scots (seriously!), I’ve gotten interested once again in embroidery. Not the dopey little kits that you see at (rare) craft stores these days. This website might even get me to create my own project. Thank you so much.
I’ve had the embroidery bug lately (those sweaters I’m knitting are on hold right now) and found your excellent information on padded satin stitch. I knew the basic concept but you helped me take my work up a notch. Thank you, Mary!
I’wiil try to do the same.It’ very pretty and easy ,thank you for your idea!
Wow you are a real artisan!
thankyou for the inspiration.
I hope to give it a go and with lots of practice – and a good embroidery frame i might get a result.
loved the site.
really pretty!
AX
Do satin stitches work the same way when applied to knitted pieces?
Hi, Kait – Yes, they do. You want to choose a weight of floss or yarn that will give good coverage, if you’re satin stitching on heavier knits. Also, you need to be careful with tension. It’s easy to pull too tightly when embroidering on knitted goods, causing them to pucker.
Good luck!
Thanks so much! I’ve been trying to figure out how to do this for a while, so this was really helpful! (:
Thank you for the tips. I am trying to complete a tablecloth I started before I was married, more than forty years ago. I have forgotten the subtleties of embroidery, but will persevere. The best tip I have taken from your post is to practise on other stitches than satin stitch. My hands are getting shaky, so this is a bit too ambitious for me, but my daughters have expressed interest in my finishing it. Thanks again Kait.
Thank you for the tips. I am trying to complete a tablecloth I started before I was married, more than forty years ago. I have forgotten the subtleties of embroidery, but will persevere. The best tip I have taken from your post is to practise on other stitches than satin stitch. My hands are getting shaky, so this is a bit too ambitious for me, but my daughters have expressed interest in my finishing it. Thanks again Kait.
Sorry. Mary, I would like to thank YOU for your instructions. A senior moment, obviously!
Anne
Thank you for the very clear instructions – I’m off to try 🙂
Barbara
I am going to use this stitch to make my Ugly doll, that I made, accessories.
Thanks for all the help
Troubled Emborderd
Thanks, once again, for an excellent article that clearly explains things.
I am very interested in the goldwork piece. I want to do some goldwork accents on a coat of arms I’m designing for my husband, some of which would be best in a satin stitch, but I haven’t been able to decide what kind of gold thread would work. Most of what I see look “broken” and won’t look flat like the thread in the piece above, if you know what I mean. I know you didn’t stitch it, but can you guess what kind of gold thread was used? Or can you recommend one to try? I sure would appreciate it. This one has had me stumped for a while.