


Embroidery stitches can be very basic or rather complex. Perhaps you are intimidated by learning “all those complex stitches” so that you can create a beautiful embroidered masterpiece. But don’t be put off! You can create beautiful things with the simplest of stitches. Here is a project I am currently completing that employs only three types of stitches.
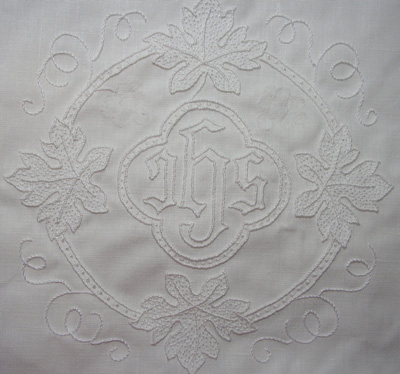
The item below is a piece of church embroidery. It is a pall, which is a square linen “pocket” that usually has a thin cardboard insert that makes it stiff. The pall is always made of linen, and it is generally all white (white on white embroidery), although you can often find colored palls made for special occasions. That is, the embroidery or the image on the top of the pall may be colored, but the pall itself is linen, and especially the back of the pall, which rests on the chalice.
Even if you are not interested in church embroidery, you can see by this example how very simple stitches can create a beautiful finished product. You can apply this concept to anything you want to embroider!
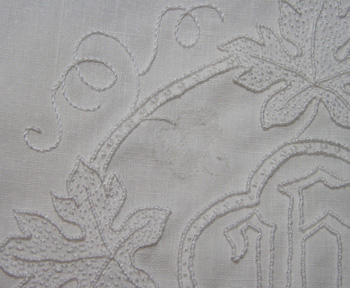
First, the main outlines in the whole design (so, the outlines and veins of the leaves, the double outlines on the circle and on the quatrefoil, and the outlines of the letters) are all done in a whipped backstitch, using #20 coton a broder. I embroidered the backstitch first, and then whipped the same type of thread through all the backstitches, forming a kind of tiny “rope” effect for all the borders. This was simple, fun, and relaxing. I didn’t have to sweat over complicated stitches. The backstitch is so simple! Overall, you want to make certain that the stitches are as even as possible, but even if they are occasionally a tiny bit “off” – no worries! The whipping with the finishing thread covers up a multitude of sins!
The inside of the leaves are filled with seed stitches, or seeding, in #40 coton a broder. These are tiny straight stitches which, for the most part, I have taken in the same direction, following the normal “growth” of the leaf (the directions of the veins).
The curling vines at the top of the pattern are stem stitched in #40 coton a broder.
Between the double outlines on the circle and the quatrefoil, I have stitched double seed stitches – that is, two small straight stitches originating and ending in the same hole in the fabric – in #30 coton a broder.
The grapes were actually a bigger problem than I realized. When I originally drew the design – copying from Church Embroidery and Church Vestments by Lucy Vaughan Hayden MacKrille, I clustered the grapes together instead of sticking with the original “stylized” bunch of grapes, where each grape was separate from the other. But because of the closeness of the individual grapes, the satin stitching on them did not look as good as I would have liked. After mulling over them for a while, and working two clusters, I changed my mind and picked out the stitches. This was no small task after having stitched about four layers of padding under each grape! To my dismay, the stitching had taken its toll on the fabric, and the resulting mess in the fibers of the linen had to be covered up, or I’d have to start all over again! Frustrating!
So I washed the linen to get my marking lines out and to establish the extent of the damage. With a little bit of adjusting in the design, I was able to re-draw the grapes (stylized as on the original). I will transfer these onto the linen, and re-stitch the grapes, covering up the distorted fibers in the linen with coton a broder #30. I would use #40 (much finer), but I noticed that the Anchor #40 that I have is a lot brighter white than the DMC #30 and #20, with which the rest of the pall is stitched.
So, in the end, I think it will turn out “ok.” The finished pall will be stretched tight over the cardboard insert, and an small edge of needle-lace will be stitched around it.
The point is —– you CAN stitch something that looks elegant and skillful using some of the simplest embroidery stitches out there.
Try it!!
If you’ve done similar projects that use simple stitches for beautiful results, feel free to share your ideas!
Dear Mary (Teresa),
I love your simple White on White design for this pall. I know you don’t have this on your site as a free pattern, but would you be so kind to share this pattern with me? I can’t wait to get started with it. I got the linen cleaned and I have hunted down the DMC, unfortunately not coton a broder as Joanne fabric doesn’t carry it, but no one will know but you and I.
Hoping to hear from you soon.
I just love your site, it has spurred me on to do some projects.
In Our Lady,
Sister Christopher Margaret, MICM
Hello, Sister! I will e-mail you shortly. I just need to find the pattern! (It will take some digging, as it’s been a while since I’ve used it!) Glad to hear the website has inspired you – but I strongly suspect your real inspiration comes from somewhere else! I’ll be in touch soon – hopefully before the day is out. ~MC
might i ask for the pattern for this pall, as well. it seems a more “do-able” first project for our son’s ordination. what are the dimensions for the pattern of a pall? would you please include the sewing directions for the pall? i did see the pattern for the red
Xstitched cross in your earlier pall.
thank you so very much.
karen reisenauer
Hi, Karen – the pall pattern is posted under “pattern” here on Needle ‘n Thread. If you scroll down to church embroidery, you’ll see it there. Here’s a direct link to that list: https://needlenthread.wpengine.com/patterns#patchurch There are several other patterns there that would work really well for a pall. Hope that helps! ~MC
Hello Mary,
Sorry, I just emailed you earlier tonight and asked about the pall you made. After relooking on your web-site, I realized that it’s not for a pall that I need your help, but a veil. Do you have any advice in this? Thank you! Marie
Hello,
This is beautiful and inspiring!
I will be doing some white-on-white embroidery for our church linens, and I am wondering what you use to transfer the pattern. Most markers seem to be permanent and I do not want any residual color showing.
Thank you.
Blessings, Sally
I think a regular HD pencil is best, personally! Go light with it, and don’t sketch – long clean strokes are best. These water soluble pens are not always reliable, in my experience…
MC
Thank you so much. Will trace with a pencil.