


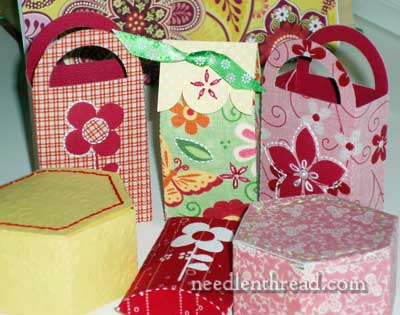
As promised, here’s my write up on how I made this group of small gift boxes out of fabric, paper, and a wee touch of embroidery. You’ll notice I’m using the Silhouette cutting machine that I reviewed yesterday, as well as Silhouette’s Clean Cut fabric interfacing. Lots of photos ahead!
Can I do This Without a Machine?
Without a cutting machine, it’s still possible to make little gift boxes and bags. You just have to find a pattern that works! I can’t share these particular patterns with you, because they belong to the artists who created them, but there are other options out there that focus on cutting boxes from paper. An example would be The Gift Box Book by Gerald Jenkins and Ann Wild, as well as More Gift Boxes by the same authors.
Both of those books feature printed gift boxes ready to cut out, as well as templates and hints for designing and creating your own templates. You can always trace the box designs in the books to use with other paper or fabric. As for adhering the fabric to the paper, the process probably wouldn’t be as quick and painless. I don’t know of any fusible interfacing that acts the same way as this “Clean Cut” interfacing from Silhouette acts. So you might have to resort to fabric glue or something similar, which can get a little messy and time consuming. I haven’t had a chance to work out a completely “by hand” fold-up fabric & paper box, so I can’t advise you on this as well as I’d like to – but maybe there’s a reader out there somewhere who has successfully and permanently adhered fabric to paper and can share a method?
I Used a Machine
Although I spent a lot of time making the boxes, much of the time was working with the Silhouette and getting familiar with it. In fact, to make one of these boxes, if you keep the embroidery to a minimum – just an accent here and there – all told, it might take about twenty minutes to half an hour, depending on how much detail you put into the box, and that includes cutting time with double passes on the machine.
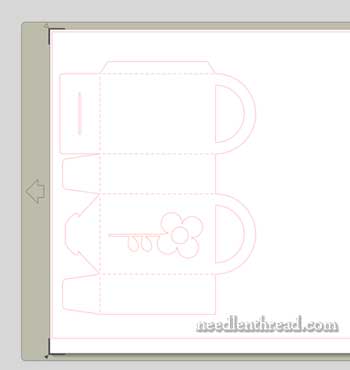
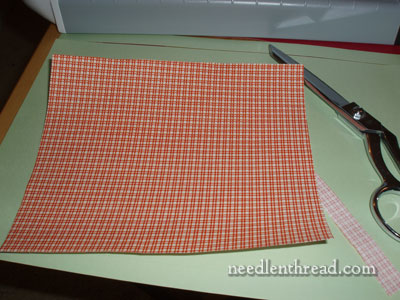
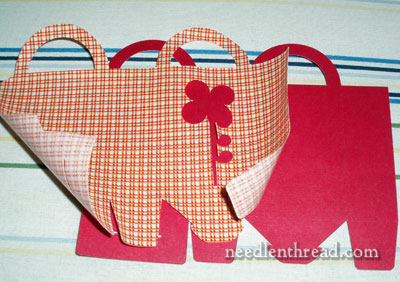
The first order of business was to decide on a box design. I liked this one best – it is more of a “gift bag” than a box, but it has the sturdiness of a box once both fabric and paper are fused together. I cut the plain box, without the flower, first, out of textured card stock, with the card stock turned texture side down on the mat. This would assure that the textured side showed as the outside of the box, where the fabric was removed to reveal the flower design.
Once the plain box was cut, I found a single flower design and positioned it on one side of the box. Now I’m ready to cut my fabric!
I cut out a piece of the Clean Cut interfacing that was about 1″ larger all around than the design I was cutting. I positioned the interfacing on the back of the fabric and ironed it on, using the cotton setting, and holding the iron down for about 8 – 10 seconds. It gets pretty hot! Because I was using a small plaid design, I made sure that I lined up the interfacing square with the plaid design, as best as I could.
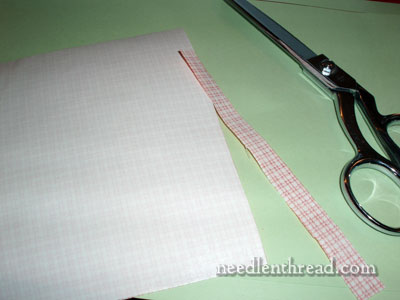
Once the interfacing was totally adhered to the back of the fabric, I trimmed away all the fabric up the straight edge of the interfacing. Incidentally, I cut the interfacing originally with a paper cutter (which worked great!) and later, I realized I could actually trim the fabric to the edge of the interfacing very easily with the same paper cutter. At this point, though, I was using scissors.
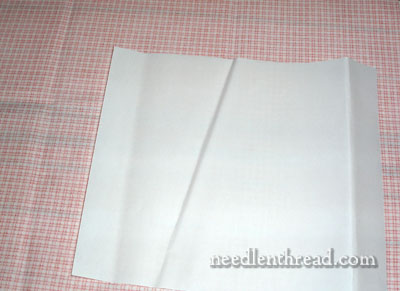
There’s my fabric square. You can see that it’s pretty stiff at this point, as the paper backing is still on the fabric.
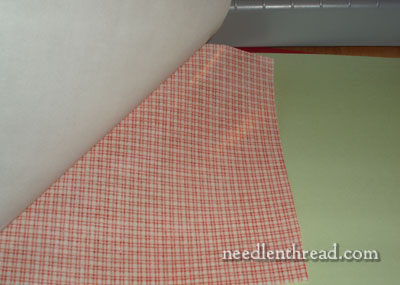
Before putting the fabric on the mat for cutting, the paper backing gets peeled off. See the shine on the back of the fabric? It’s almost like a thin coating of rubbery vinyl, very plastic and rubbery feeling, not sticky, and though it makes the fabric feel thicker, the fabric is still very flexible. That overall coating of plastic is more or less melted to the fabric – you can’t peel it off. (I tried, just out of curiosity!) It becomes, in a sense, part of the fabric. In case you’re wondering, the coating does not alter the look of the fabric; it retains its color and brightness.
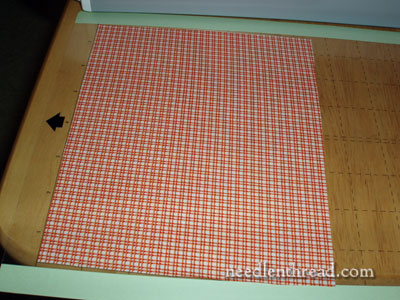
Next, the fabric is smoothed onto the cutting mat, face up. It’s ready to be loaded into the machine and cut.
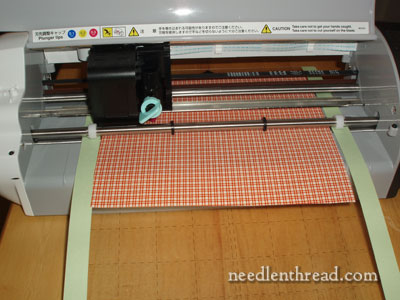
And there’s the machine, doing all the hard work!
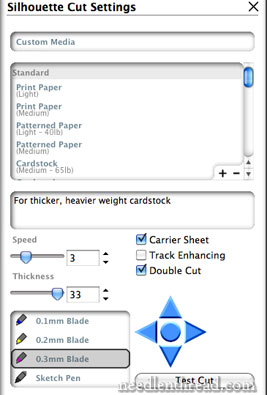
For cutting the fabric, I chose the thickest setting, slowed the speed of the machine down, and chose “double cut” – so the machine passed over the fabric twice and cut it precisely in the same place on both passes. Pretty neat!
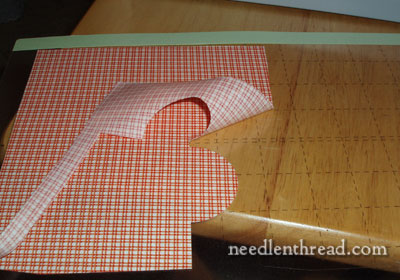
The Moment of Truth – and the Fun Part! How good was the cut? It’s time to peel away the excess fabric from the cut out design.
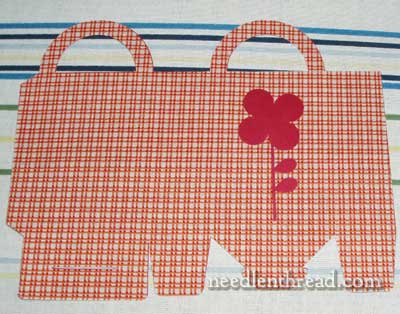
Perfect! You can see the “voided” flower area – that’s where the card stock will show through.
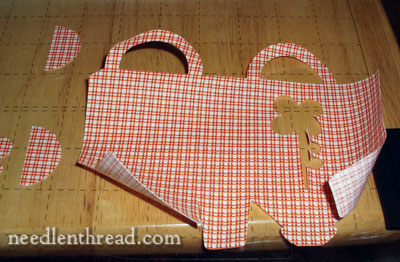
And, not to waste the flower that was cut out, it can be adhered to another project!
Back to the ironing board with the card stock shape and the fabric shape. I have a really ugly ironing board cover.
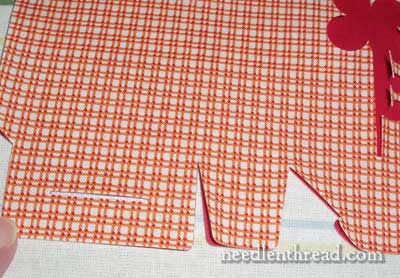
I lined up the fabric (face up) on top of the card stock, matching up all the edges so that the fabric would fuse together along all the same lines as the the card stock shape. Not only are the edges cut out, you see, but all the scoring lines have been cut as well, which makes for very easy folding.
Using the cotton setting, I pressed the iron straight down onto the fabric and card stock and held it for about 3 or 4 seconds. I was careful not to move the iron back and forth, but just set it on top, so that the fabric didn’t shift on the paper.
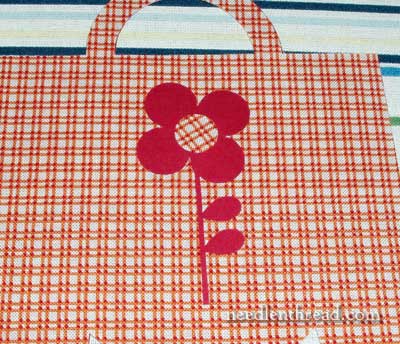
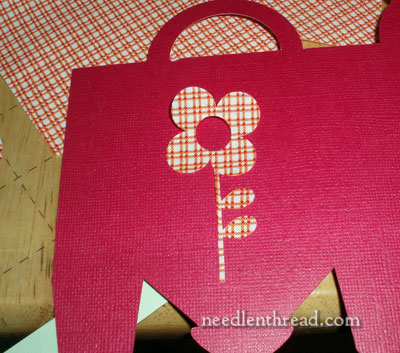
Ah! And of course, I couldn’t forget the big fat dot in the middle of the flower! So there’s the body of the gift box – paper and fabric fused together nice and smoothly – no bumps, no air bubbles. It feels like one product – paper-backed fabric – rather than two fused together elements.
So that’s the beginning of making the little gift bag box. Tomorrow, I’ll show you how I embellished the boxes and then very easily folded them up into their three-dimensional shape.
Funny how writing about it makes it fun, all over again! I can see the Silhouette coming out again very soon, to whip up some other projects. Birthday gifts in advance? Little fabric Easter baskets?!
Hi Mary, That’s really a neat machine. The question you asked at the top of your article is can you do this without a machine, and I wonder if you would do this without a machine, now that you have tried it? I look forward to seeing the way you embellish the boxes.
Hi, Sarah – Come to think of it, you’re right. I probably wouldn’t do the same thing without the machine, now that I’ve done it with one! Especially with the extra step of cutting the fabric and fusing it, I don’t think I’d take the time to make one box completely by hand with both fabric and paper. Maybe just with paper, though….
Thanks for your comment!
~MC
Mary,
What a great way to make coordinated storage boxes for a childs room…crayons, small doll accesories. Also would be great for make-up brushes, cotton swabs and other small items that tend to get lost. The Easter baskets sound cute too…now you see why I have wanted one of these versatile machines for sometime. The possibilities get my brain spinning!
Very interesting and I don’t have a choice. I have to make the box without the machine if I want one, as it is not available here.
Hi Mary
I am not familiar with the specific machine or interfacing product you are using. I have a Pazzles cutting machine and it will also cut fabric using a product called Wonder Under available at any fabric store. The interfacing you are using looks a lot like Wonder Under. Pazzles also sells a cutting mat specifically for fabric – super sticky.
Great write-up Mary, I have really enjoyed it.
New ideas are always buzzing in my head and lately I was trying to find an easy way of cutting out wool felt “cleanly”.
Do you think it would work well with that type of fabric or even ultra suede.
I can see that it works beautifully with cotton like material and would do wonders for applique designs.
Love the fact that you can do your own designs, that’s awesome! I really enjoy designing …
I’m sure the software works on Windows as well.
Wondering about the cutting blade … how often would it need replacing … I realize that would also depend on the fabrics or papers used.
I love the little boxes they are really cute.
Wish they would drop the price a bit to fit into my budget.
Thanks for all info it was interesting and very helpful!
Hi, All – Thanks for your comments! It’s always fun to come home from work and find them waiting! 🙂
Kaethejean – The interfacing is not “webbed” like most iron-on double-sided interfacings (like wonder-under). It makes a kind of melted plastic coating on the back of the fabric, that can’t be picked or peeled off. I think you could probably still cut iron-on interfacing with the machine (haven’t tried it yet), but whether or not it would adhere as cleanly and smoothly to the paper is another question. This stuff also makes the edges where the fabric is cut with the machine perfectly clean – no extra little shards of fabric coming off or anything like that. I think that’s because of the melted-like quality of the fuse. I’ll probably eventually try the machine with other interfacings to see how it works, just out of curiosity. Of course, if they muck up the machine, the company probably won’t stand behind it, whereas they do, if using their products. I know, I know – it’s a marketing ploy – but it really is nice interfacing!
Suzanna – I haven’t tried it yet on felt or ultra suede. Silhouette sells a “flocked” heat transfer material that feels like ultra suede, and it makes very nice transfers onto fabric and paper. But I haven’t tried the machine on regular ultra suede, without the heat transfer backing. Some day, some day….! I know what you mean about the budget. Normally, this isn’t something I’d splurge on, either, as it doesn’t figure heavily into my own regular hobbies. It’s certainly fun to have, and like I said above, if I were really into these types of paper crafts, I’d probably budget for one. But – on the bright side – the give-away coming up will at least guarantee one person a freebie!
Justine – I haven’t tried a Pazzle… they are Really out of my price range! But they have lots of nice options for cutting, embossing, piercing, and so forth – it looks like a neat machine!
Jayashree – it’s fun, but again, it’s not 100% necessary. Similar things can certainly be made with a simple pair of scissors or craft knife!
Magpie – the machine doesn’t cut large boxes, but the concepts could be applied to larger pieces, I think! There are some great patterns on the Silhouette site for small Easter baskets – I was thinking about trying one in fabric, but they are a little more complex than the gift boxes. Lots of filigree. Still, it would be a great way to put the cutting machine “to the test” on something really complex.
Well, I’m off to stitch for a bit before supper! The sun is finally shining in Kansas, and it makes me want to get things DONE!!!
Thanks again, all!
MC
While i am not interested in the machine for myself(way too many things going already!) i do think it’s pretty cool.And of coursI can see how this could be addictive, especially if you love boxes and pretty containers! What makes the particular interfacing so special? What properties does it have that make it more suitable than , let’s say, double sided iron on interfacing… or maybe is it that nothing goes through the machine as well as their own product?
kaethejean
Hi Mary,
I am wondering if quilt basting spray would work for adhering paper to cloth? Given that you wouldn’t be washing the box the basting spray might become permanent. I have never tried it for anything other than cloth on cloth. It also occured to me that you might be able to use vliesofix to stick cloth to paper, perhaps another thing to try? I think if I was going to attempt either of these methods by hand I would probably stick the fabric to the paper before I did the cutting out with scissors (my cutting isn’t fantastic so I doubt I would be able to cut two shapes so exactly the same!)
Thanks for the interesting possibilities!
Love how that works, would sure be a sore hand saver.
Debbie
Mary with you having to sell the machine you gave your Mom for Christmas don’t forget to share this easier machine with her. Maybe this machine would be easier for her to use. You seem to be having so much fun. I am watching for the giveaway.
Thank you for showing the step by step. It’ll probably be the only time I’ll see how works this machine. This is a great machine.
Now you gone and done it! Now I have to get out my Cricut machine,scrapbooking paper and floss and make some of these! hee hee Thank you for expanding my craftiness I am always looking for something new to try!