


At long last, I’ve lassoed the supply list for the Bee-Jeweled Pincushion project and, after a bit of a struggle, fought it to the ground.
Below, you’ll find the supplies I used on the sample version of the pincushion and on the various in-progress sections that you’ve seen along the way. I’ll include substitutions that I had to track down for some parts, and a few suggestions for other possibilities.
I do have more supply kits coming out, and I’ll try to keep at least some stocked on the website after the initial demand is met. At this point, much depends on supply availability.
If you haven’t started on your pincushion yet, I think it’s a good idea to see what you can find locally in order to save on shipping. You might not be able to find the exact match on the beads, but you might find a nice array of colors of 15/0 beads at local craft stores, in the jewelry section. You might also find a usable bee charm there.
If you are shopping online, peruse online shops that have a wider variety of offerings – for example, if you’re looking for beads, try to find all the beads in one place, and see if they have any bee charms that will work for the accent on the pincushion.
I’ll suggest some online sources below for beads.
Fabrics
Linen
I used linen as the ground fabric. It is a plain-weave linen with a high thread count, called Manuscript Vellum in the US. If you’re not in the US and you have access to Graziano linen, look for Graziano 6262. If you have my Natural Linen Sample Pack, it is included in that pack of fabric. The size is different, but the whole project will fit on the piece in the sample pack.
If you don’t have access to the linen above or you want to make a substitute, look for a natural colored linen in a stone-ish color, or in a very light oatmeal. The weave should be full enough to support free-style surface embroidery. Lower count linens made for counted thread work probably won’t do it. While you could back lower count linens with another fabric, when it comes to finishing, you may find it difficult to manage both fabrics and the interfacings.
You can read more about fabric on this project in this article on fabric and set-up.
Interfacings
I used two weights of Pellon non-woven, sew-in interfacing (not fusible): Pellon 50 heavyweight non-woven interfacing and Pellon 926. If you are looking for substitutes, look for a medium weight, non-woven, flexible sew-in interfacing and a much stiffer, less flexible (as in, if you bend it, it will crease) sew-in interfacing.
Threads
Floss
I used DMC stranded cotton (6-strand floss in the US) for the embroidery threads, in the following colors:
703, 986, blanc (white), and 3838.
Three of those encountered a supply chain glitch shortly after we started the project, and I had a hard time getting ahold of 986, blanc, and 3838. For the 986, you can substitute any dark grass-green (compare it with 703 and look for something darker than 703 that looks good with it!).
For blanc, you can substitute B5200 or 3865.
For the blue 3838 (which is the star color on the piece, in my opinion), you can substitute 3807 or even 792. But the 3838 looks pretty darned good with the Manuscript Vellum, so if you can get it, do.
Bead Thread
I used nanofil thread called Fireline (6 lb), which is a fishing line, to sew on the beads. It tends to be expensive. You can find it in the fishing section of various sporting good stores, Walmart, Target, and the like. You can also buy it from beading stores and pay even more for it. Or you can substitute the floss colors that match the beads (it will look slightly different, but not bad!). Or you can use a fine white sewing thread. Or a fine natural colored sewing thread, if you’re using natural colored linen.
Three yards of Fireline are included in the kit – it’s enough to do the whole project if you follow the order of work that we follow here.
Sewing Thread
For finishing, you’ll need a spool of all-purpose sewing thread in a natural color that matches your ground fabric.
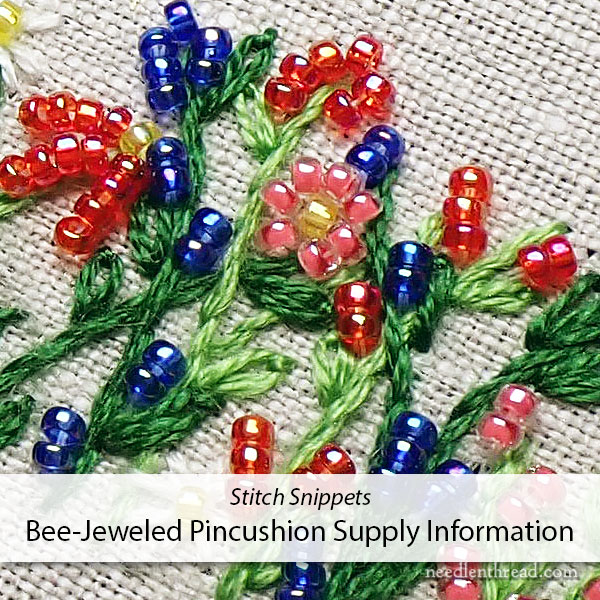
Beads & Charm
I used 15/0 Miyuki seed beads (round / rocaille) in a blue, pink, red, and yellow.
These are the color numbers of the beads that I used and their general description of color and finish, which unfortunately sometimes changes from one seller to the next:
Blue – 15-0177 – Cobalt blue transparent rainbow. If you are substituting, look for something in cobalt, preferable with a slight multi-color finish – this one sparkles in purples and reds, depending on the how the light catches it.
Pink – 15-0204 – Bright coral color-lined; also described as inside color-lined pink grapefruit OR 15-2200 coral color-lined luster. If you are substituting, look for a coral pink that has a nice sparkle to it.
Red – 15-0254 – described as transparent red rainbow finish or translucent red rainbow finish. Look for a true fiery red, transparent bead with a rainbow finish or at least a good sparkle to it. On this particular bead, you get a bit of a blue, a purple, and a maybe a touch of green and orange sparkle. It’s a fabulous red!
Yellow – 15-0252 – Transparent Yellow Rainbow. There are not a lot of true bright yellows in Miyuki 15/0 seed beads. If you are substituting, look for a bright lemony summer yellow, transparent, with a nice sparkle in the finish.
Where to Find Beads
Some bead suppliers in the US: Caravan beads, Fire Mountain Gems, Aura Crystals, Potomac Beads – all of these have websites that you can search for, and they sell beads in various size packages. You’ll only need the smallest packages for one pincushion, and even then, you’ll end up with plenty left over!
Charm
The bee charm that I used is made by TierraCast, which only sells wholesale. You can find this charm (referred to as a bead, because you sew through it – it’s used on jewelry) available through Etsy sellers if you search for “TierraCast bee bead.” You may also find it at some of the bead stores recommended below (FireMountain Gems sells lots of charms and similar jewelry-making beads, for example). The bee comes in a variety of finishes. I used Antique Gold.
If you are substituting – look for a cute bee charm! Or a bee bead! The bee I used is just over 1/3″ high (body) and 2/3″ wide on the wing tips. (9.5mm x 15.75mm)
Needles
I used a John James #7 crewel (also called “embroidery”) needle for all the embroidery, except the beads.
For the beads, I used a #10 Bohin short beading needle.
Board
You’ll need about a 4″ square of standard mat board in white, which, in the US, you can find in any framing section of any craft store. You can also use Bristol board. Sometimes, the mat board is only sold in huge pieces, in which case, it might be less expensive to have a 4″ square cut for you. I use the acid-free.
Now, about mat board. In the US, mat board is the board that we use when we frame a picture or something. It’s the decorative inset frame around the picture. It comes in a variety of thicknesses (and colors and textures and whatnot), and for some inexplicable reason (might have something to do with our non-metric approach to measuring, but let’s not talk about that…), we characterize it by “plies” – which makes no sense to the average shopper. 4-ply, 8-ply, blah blah. Standard mat board is approximately 1/16″ thick here, which, for practically everyone else in the world, that would be about 1.5mm, give or take a hair (to be exact, 1.5875mm). I think maybe “heavy card” might work as a description?
Fiber Fill
Polyfil, fiberfil, fiber fill, poly fiber fill. Fluffy stuff that you stuff into things. I used fiber fill (Polyfil brand) to stuff this pincushion. Half of me wanted to use ground walnut shells, emery, or something similar, but: 1. other stuff is harder to come by; 2. other stuff is more expensive; 3. other stuff would require building the pincushion differently – we would need more layers of fabric and we’d need to assemble it differently.
I decided to go with the K I S S approach – keep it simple, s….weety. So fiber fill it is! You can find it at craft stores, sewing stores, quilting stores, and so forth. It comes usually in Big Bags. (Think of how many pincushions you could make!) Sometimes, it’s available in smaller bags. And sometimes, we have friends, neighbors, sisters, etc., who use it more frequently than we do, and they don’t mind if we borrow a wad.
You can certainly substitute orts, scrap yarns, etc., as long as you have enough to stuff the pincushion pretty firmly full.
If you want to stuff with ground walnut shells, emery, etc., you’ll have to make the equivalent of two or three pincushions and assemble them differently.
That’s It!
That’s it. Sounds like a lot for such a small pincushion, but it isn’t toooo bad. If you have questions on substitutions and such, feel free to reach out!
You can find more information on this project – including design, step-by-step instructions, and so forth, in the Bee-Jeweled Pincushion Project Index, here.
Mary, I have a gazillion walnut shells. Normally when I make a pincushion I make a duplicate pincushion in percale or sateen cotton, fill it with shells and slip it into the other pincushion, using stuffing if I need to fill any places out. (I have one old pillow case out of percale that I’ve been using as the interlined stuffed bit).
Will this technique work with this project?
I purchased my Graziano through Elisabetta Sforza. I clicked on the link that says write to me. She paypaled me an invoice and in a couple of weeks my linen arrived.
So, you’ll need to make your inside pincushion filled with shells in the same shape. Then, when you construct, you’ll have to “build” the outer one around it. I’ll talk about that when we get to the construction – it should be pretty simple for you.
I ran out of the Fireline in the kit. Luckily I am a header and had beading thread I’d say the 3 yards of Fireline in the kit is not enough. It did about 75% of the beading.
Did you only make one pass on the flower line? It took me about 2 yards and 4”, so I rounded up to 3 yards.
I went through each 2, or 3-group of beads twice. They lay so perfectly that way. Perhaps that is why I ran out of Fireline. My end result, however, looks much like the photos of the sample you posted.
Yes, I usually pass through twice, too, and I often couch between beads, especially when they’re in a circle or in lines of multiple beads. You may have used a lot more beads than I did. I stitched the design twice and the most I used was 76″ of the Fireline.
Am rather in awe of how organised you are. Can’t imagine how you keep track of everything.
Binders. Started out with spiral notebooks in a journaling approach, graduated to a much more organized binder approach, in 1.5” binders. And then graduated from those into huge 3” binders. Binders = brain. I could never keep track just in my head, that’s for sure. And luckily for me, Anna is a stickler for that kind of organization, so she always makes sure the binders are up to date.