


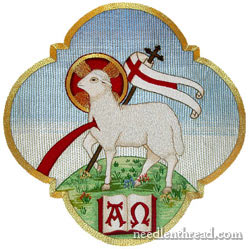
Here it is, at long last, after approximately 380 hours from start to finish – an embroidery project worked entirely by hand, in silk threads and gold. My goal was to finish by this past Sunday, April 1st, to deliver on Monday morning. I missed the deadline by one day, and delivered it Tuesday morning.
Continue on to see the close-ups!
This is an example of ecclesiastical embroidery. I’ve been giving regular updates on the progress of this project, and you can find them all in order here:
- Agnus Dei project underway
- Project Update #2
- Project Update #3
- Project Update #4
- Project Update #5
- Project Update #6
This past weekend, I finished the gold around the edges, the blood, and the finish work on the hill, adding grass and flowers.
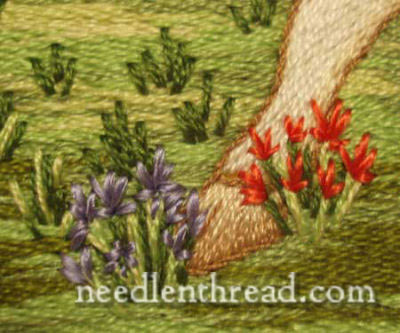
Here’s a shot of a few bunches of flowers around the foot. The flowers are worked in flat silk – some in Au Ver a Soie Soie Ovale and some in True Embroideries Sleave Silk from Helen Stevens. I was rather random in the creation of the flowers – I wanted the effect of wild flowers – not anything stylized.
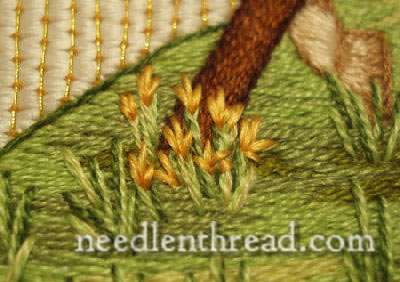
Here are the yellow flowers at the base of the staff. For colors, I wanted to mimic the brighter colors of spring rather than pastels. I thought the effect would be better, considering the brighter colors of the whole work.
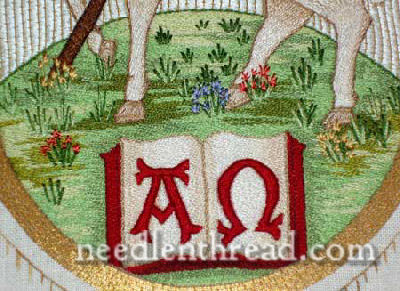
Here’s the whole hill. I didn’t want “too many” flowers – sometimes less is more! The tufts of grass are just straight stitches in two strands of Soie d’Alger. I combined two colors in some blades of grass, and in others, used just one.

The blood is part of the symbolism of the whole image – the sacrificial Lamb of God (Agnus Dei). It is worked in three colors of red, all in stem stitch.
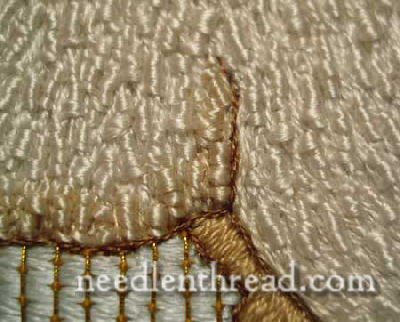
This is a close-up of the outlining on the lamb, above the back legs. I wanted a little definition in the body of the lamb, so I outlined it in stem stitch, using one strand of YLI silk in a grey-ish brown. I didn’t want a “bold” outline. YLI silk is fine and well-suited for delicate lines.
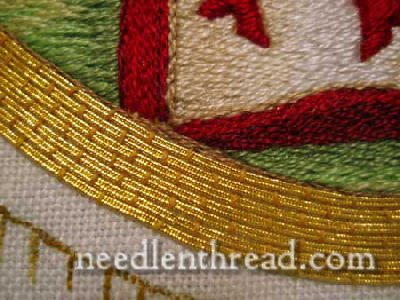
You can see here a close up on the gold couching, and, above it, part of the outlining of the inside of the gold. Using the same YLI silk – one strand – that’s used around the lamb, I outlined around the whole inside of the gold trim. I wanted a “hint” of a shadow and a finished edge. Underneath the corner of the book here, I worked two rows, since there was a small gap of white between the corner of the book and the gold. If I had thought about it in advance, I would have couched the gold in a definite ornamental pattern, rather than just a “brick” pattern, alternating the placement of the stitches over each row.
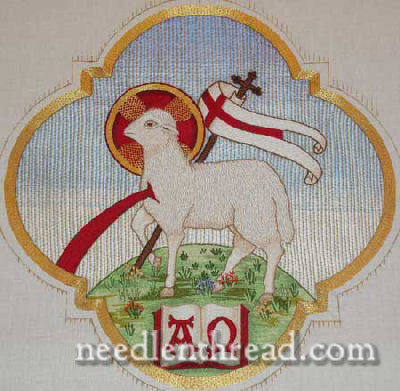
The finished product! You can see the original outline of the design still – I did not work the gold all the way to the line, as I thought it would be overkill. Besides, when I mounted it on the vestment today, I still had space for a red outline outside the gold. I’ll post a completed picture of the whole vestment once it is assembled.
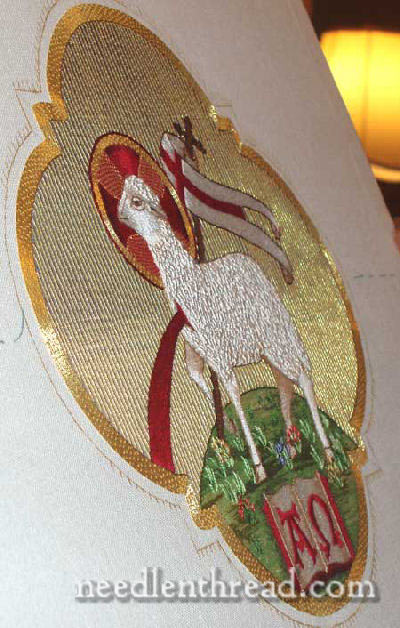
And finally, a long shot from the side, so you can see the gleam of the gold.
Now that it’s finished, I can move on to other projects. Whew! That was a challenge, but it was a lot of fun and a good learning experience. I hope you enjoyed the updates on this particular project. Next up – some quilt squares….! Which will be very relaxing! Thanks for reading and for your kind compliments and enthusiasm over the last couple months as I worked this project!
What a fantastic job you have done. Everyone will glory in the beauty of it. It was wonderful to watch your progress. Thank you.
Margaret
Your work is utterly beautiful. It’s been illuminating in so many ways to see you design and execute it. Congratulations upon finishing it, and thank you for sharing it.
Elizabeth D
Simply magnificent! Such a pleasure to follow your progress and see the final result. But how did you do the lamb’s body?
JoWynn
I’ve been watching this from the very first. It’s been wonderful to see it appear so beautifully.
I do some of H. Stevens’ embroidery too, so that was another interest of mine, to see those threads used.
Congratulations!
Truly beautiful work; such skill!
One question. How did you do the sky? Is the gold couched vertically over a painted sky? Or is there other stitching beneath the gold?
Again, gorgeous.
Thank you all so much for your kind compliments! Now that it’s completed, I find myself a little at loose ends…. I liked having it to do!
The sky is flat silk, in four or five different shades of blue – as I neared each color change, I started blending in one filament of the next color, then two filaments, etc.
You can read about the completion of the sky in update #3 in the list above.
Thanks again, I’m glad you all like it!
JoWynn-
The lamb’s body is first worked with Soie d’Alger in stem stitch. I set in my “shadows” first, getting the stem stitch lines started. Then I set in the rest of the stem stitch in white, trying to follow a “natural” vertical growth pattern for the wool. After the stem stitch, I took a flat silk (soie ovale by au ver a soie, since it has more body than most flat silks) and whipped small sections of the stem stitch. At the most, I’d wrap the flat silk around about 4 times. Occasionally, here and there, I’d work in some small rounded straight stitches.
It was all an “experiment” – I was trying to imitate this example of a lamb’s wool from an old piece of ecclesiastical embroidery. I made my bits of wool a little longer, I think, but overall, I like the outcome. The nice thing is that, although flat silk is rather whispy stuff, snagging on just but anything, once it’s worked into stitches – or at least, in these stitches – it “tightens up” and becomes secure and rather “hard.”
You did a wonderful job. It it beautiful. Thank you sharing.
Mary,
This is the most beautiful embroidery piece that I have ever seen, it looks like something out of a book. I would like to see more people do this kind of embroidery. It is truly a work of art and shows a great talent.
Mary, congratulations on a beautiful and inspiring work. I sent you lots of good wishes and encouragement as we watched your progress. Thanks for letting us watch. Perhaps I will get inspired to post my own progress reports on my work. Lovely, thank you.
Marilyn
I have been watching this since you started it. It is a stunning piece of handwork. Thankyou so much for sharing it, and the techniques you used. I hope the new owners have a real appreciation for what they have.
Thank you so much for describing the way you achieved the “wool”. I remember you inquiring about the piece that inspired you to invent this technique. You did what you speculated might have been a way of producing the wooly effect. With the glimmering silk, it looks splendid. The whole piece is magnificent. Thanks again.
JoWynn
What a stunning piece of embroidery! Thank you for sharing your progress and for taking time to answer questions.
Hey what a great piece!!! I must try the sheep out . The shaded effect in the side view is amazing!!!
Mary, Wow!! It is among the most georgous embroidery I’ve ever seen.
Many, many thanks for sharing your techniques. I hope your priest will treasure it!
Lavenia Boswell
Simply breath-taking! You are truly blessed with a wonderful gift! Thank you for sharing.
Very unique craftsmanship! You are extremely generous in sharing the work, the photos, the technique. Please tell me, did you design the piece by consolidating different images of Agnus Dei or did you use one solitary design? Would I be able to embroider this using your instructions, image, and recommended threads? Pax Christi,
Hi, Student08…
I gleaned ideas from several different images of the Agnus Dei, but I drew up the design myself and made my own pattern on vellum (a little thicker than regular tracing paper), so that I would be able to prick it with a needle to transfer the design onto the linen.
You’re welcome to do whatever you wish with it!
Enjoy the process!
Best regards,
Mary
Thank you, Mary, for explicit permission. I see now, (after reviewing your progress) that you are really a teacher who is experienced in giving instructions and illustrations. How perfect for me!
The ecclesiastical embroidery is truly outstanding! Pax Christi,
Only comment I have is WOW!! This is the most incredible piece I've even seen.
Mary – this piece simply takes my breath away!
Hugs,
Kerry
This is absolutely beautiful. Seeing the photographs of it has made my day. Thank you so much for sharing.
This is gorgeous and in the grand tradition of Ecclestiastical embroidery. I myself do historical re-enactment and specialise in researching historical embroidery. I love the way that you've gone for the goldwork background to make the whole thing sheen – and used the different types of gold for the background and the cartouche.
Do you mind if I put a link to this at my own Embroidery site (http://embroidery.bellaonline.com – I am the Embroidery editor there)?
Hi, All! Thank you so much for your kind comments about this piece. It was both challenging and fun to work, and I can't wait to start my next "big" ecclesiastical project in a couple weeks (once school gets out for Christmas vacation!) My favorite part of this particular piece is the wool on the lamb.
Hi, Madilayn – You are certainly welcome to add a link! I appreciate that!
Again, thanks for the recent onslaught of comments! And thanks to Margie of Country Bumpkin for publishing the piece in her webletter!
Best regards,
Mary
As a result of Margie's comment I found time to visit the area of this stunning piece of embroidery and how thrilled I am to see it. I read every update and during your comment on the sky section in Update 3 was taken by the fact that the sky looked darker to the left hand side – the "west" of the area. I could see why you altered it but it was stunning in it's original form. I often do small projects for people (always from kits as I am no designer)and when someone says "but this must have taken hours!" I liken it to putting my talents in the lap of Gods and never mind the cost. To be able to make such beautiful things is a true privilege and your project is so very inspiring, I am going to start my next one immediately and pressing the clothes for work can wait!
Thank you for sharing this project.
Gill, Winchester UK
Ms. Corbett,
I am in awe of your beautiful, stunning Agnes Dei. I, too, love ecclesiastical embroidery. Your God given talent has been put to good use.
Catherine
Gainesville, FL
Simply stunning stitching. I am glad that Margie added the link in her newsletter. I am waiting to see your next big project.
Mary
Thanks for sharing your work in progress unto completion. How very generous of you.
I love the symbolism of this project which you executed so well. I just love that you share your work as it is truly a "feast for the eyes"
Linda
Glastonbury CT
Hi Mary,
I have only recently found your fantastic website. I think via searching for videos on how to do stitches …… but such is jumping round the Internet, I can't now recall 🙂
However, I am so glad I found your site! I have spent some very enjoyable time over the last week or so (I think?) looking round but this piece of work really takes my breath away!
If I say it is stunning, the phrase just doesn't do it justice!
Thank you for taking the time to 'talk us through' how you did it.
One question …. I am sure I will find the page eventually but do you have a post where you show the embroidery on the finished vestment? Would love to see that.
Elaine
(Cheshunt, Hertfordshire, UK)
Hi, Elaine –
Unfortunately, I don't have a photo of the finished vestments. I delivered the medallion to the lady who made the vestments, and that was it. My part was done!
MC
Hi Mary,
Ah well, never mind! But thank you for replying.
Nevertheless, I'm sure whichever church is enjoying it feels suitably blessed. I envy them being able to enjoy seeing it during their services.
Elaine
It's really lovely Mary..
wish that i could create a piece like you, the inspiration is just great
Mehnaz
Thank you, this is breathtaking!
A joy to behold.
A magnificent work of inspiring holy art. I was just admiring the incredible details and absolute perfection. Truly, you are gifted and have dedicated yourself to working for the Glory of God. Congratulations and many blessings!
Thanks, William! I’d like to get back to another similar ecclesiastical embroidery project this year. Hopefully! ~MC
I’m just looking at this again, and wishing I had the skill to make something so gorgeous as this. I use your tutorials a lot as I try to get there, though!
Do you have any recommendations for getting started with ecclesiastical embroidery? I was just confirmed Catholic this Easter Vigil, and I would love to contribute to my parish in this way, but I feel a bit silly saying, “Hey, need any extra purificators?”
I know this is an old post, so hopefully you will see it. I have a rather silly question…how did you transfer the design onto the vestments? Do you just applique the linen on? Could you embroider it straight onto the vestments if you wanted to?
Sorry for the silly question, I’m sure it sounds dumb, but I can’t figure it out. Thank you so much for the WONDERFUL blog. Most of what I’ve seen is for machine embroidery, so it’s nice to see such a comprehensive hand embroidery site!
Hi, Lucy – It’s not silly! It’s a good question! For this type of project, the piece is cut out of the linen and appliqued to the vestment. In some cases, you can, of course, embroidery directly on the vestment ground fabric, but when working a medallion like this, it makes more sense to work it on a smaller frame, and then applique it. Hope that helps! ~MC
Thanks so much, Mary! You are so sweet to help so many people with all of this!