


I’ve been playing with embroidery on paper lately, because I’m making a sign to announce my summer embroidery classes. As I goofed around designing the sign, I thought about how simple it is to design your own embroidery pattern for paper. I thought I’d show you how to design something simple for embroidery on paper, using a small note card as a sample project.
Keep in mind that embroidery on paper should be done on at least cardstock weight paper. With the interest in handmade greeting cards these days, you can find beautiful paper available at almost any crafting center. I’m going to use just a standard piece of “parchment” (in green) card stock, bought in a pre-sized package.
Assemble your supplies first. You’ll need the following:
Ruler, pencil, pen (I use macron art pens in various sizes), graph paper (especially if you’re doing a geometric design), paper (if you’re not doing a geometric design, you can use regular paper to doodle out a design), a piercing tool, a piercing pad, and scotch tape.
Some shortcuts if you don’t have the specific supplies on hand:
Graph paper: if you don’t have any on hand, print it. You can print your own graph paper in different sizes right off the internet. Incidentally, that site also lets you print hexagon graph paper, which could be very handy for this type of project.
Piercing pad: Do you have any craft foam on hand – the kind that you use for kids’ crafts, that you can cut letters and so forth from? That’s inexpensive and perfect for this. If not, a couple layers of regular craft felt will work.
Piercing tool: I actually use the handle to my tambour needle, and I replace the tambour needle with a fine eyeless needle. You can also use a regular crewel needle that you embed in a cork (the eye goes into the cork).
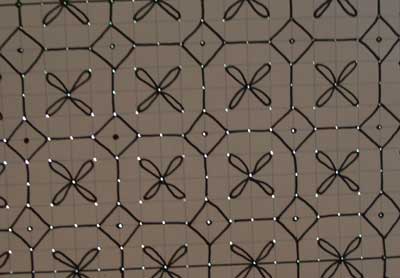
Now for the fun part. What do you want your design to look like? I’m going for something a bit bold and larger, and geometric, since I’m exploring possibilities for smaller hands.
Measure out and mark the size of your note card (or project, whatever it may be).
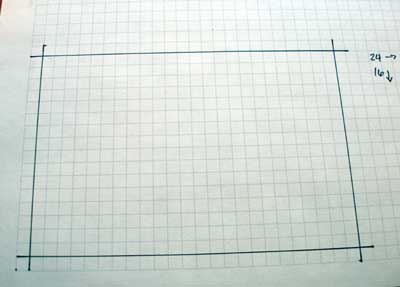
Decide on the width of the edge around the design and mark it off.
Originally, I was going to have a half inch all around, but I decided to reduce it to a quarter inch.
I left the original line there, because … well, because I was too lazy to start over! So I’ll just incorporate it into my design!
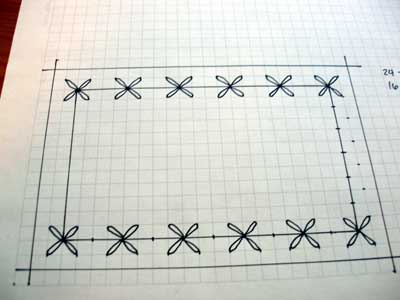
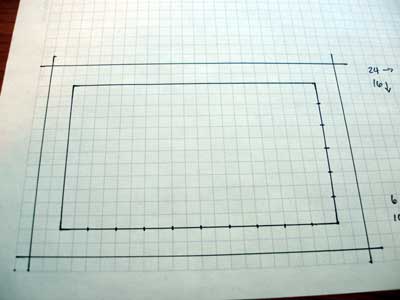
Daisy stitch works great on paper, and it’s a favorite stitch for kids, so I started with evenly-spaced daisy-stitch flowers. I could’ve stuck with just a decorative edge, but that’s kind of boring.
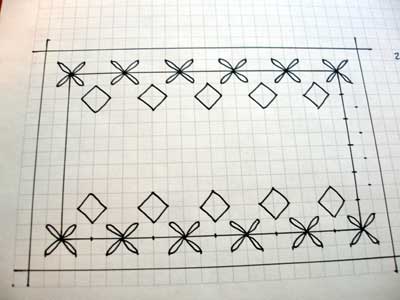
So I added some evenly spaced diamonds. These will be stitched with straight stitches.
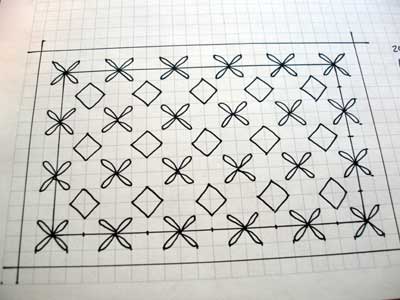
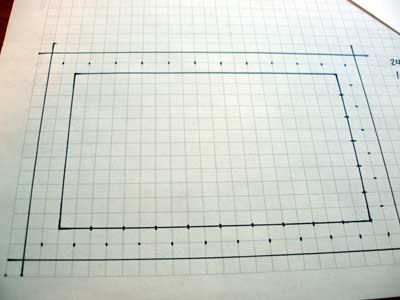
And since the card doesn’t have any text on the front, why not cover the whole thing? It’s still looks kind of plain, so…
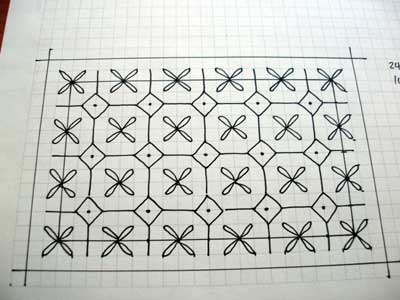
I added dots and connected some lines.
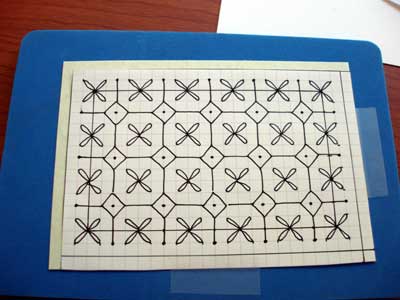
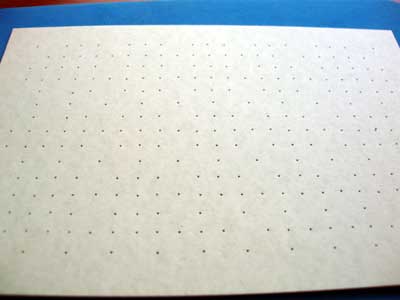
Cut your pattern paper to size (I made a mistake and cut mine a little short on one end, but that’s ok). Line up the edges with your card, and lightly tape a couple edges onto your piercing mat or felt or whatever you’re using…
Then, holding your piercing tool – or cork and needle – or tambour hook – vertically, pierce the pattern in each place where the graph paper lines converge with the pattern. Those are the starting and stopping points for your stitches.
To make this easier to see, I would suggest drawing your design with a lighter black pen, or with a pencil, and then using a red pen to put dots on the paper wherever you’re going to need a hole.
Make sure you put the dots (or pierce the paper) where the graph paper intersections are – not necessarily where your design is drawn. The graph paper intersections will keep the design symmetrical. In some parts of my design, I didn’t quite hit the intersections on the graph paper.
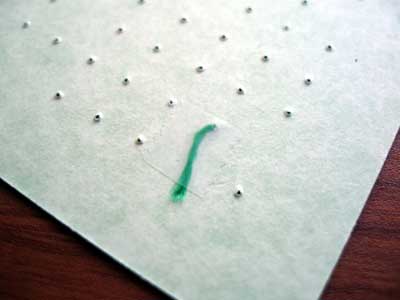
After you’ve pierced the card, hold it up to the window or a light to check your piercing. You can see I missed some spots on the left there. The paper pattern and the card stock will stick together, so don’t worry about the pattern shifting. If you haven’t peeled off the paper pattern, the holes are still stuck together.
Once it’s all pierced, peel off your paper pattern. It’ll be nice and bumby on the underside.
When you start a thread, you tape the tail to the back of the card. I cut up a bunch of tiny little tape squares and line them up on the edge of the table so that I don’t have to stop and cut every time I start a thread.
Remember that paper is harder on thread than fabric is, so you may have to change your thread out more often than you would with fabric. In fact, it’s best just to cut shorter lengths if you don’t want to waste thread.
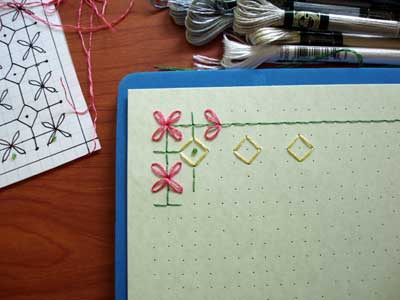
Keep your pattern close by while you stitch, so you can remember what the holes are for!
I used one strand of Satin Floss by DMC for the green lines, and two strands of the same for the pink and yellow. In the middle of each yellow diamond, I’m putting a little green seed bead.
Well, there you have it. It’s simple, and really, you can let your imagination go when you’re playing with this type of project. If you want to do something more “flowy,” like scrolls and vines and so forth, just remember that wherever a line of your embroidery project intersects another line of embroidery, you want to have a hole. I find it easiest to pierce the beginning, ends, and intersections of scrolly lines first, then to go back and pierce the wholes between those points, spacing them evenly.
I’ll be exploring this a little more as I prepare for the kids’ summer embroidery classes, so I’ll cover scrolly patterns and fonts a bit down the road!
I hope you find the tutorial handy! Ha
ve fun with it!
Hi Mary,
Thanks for the tutorial.It’s very useful for me.Thank you so much!
Valquiria
What a great idea! I went right away and printed graph paper…I have a million uses for that. And I love the idea of stitching on paper…I have nine nieces who may be interested in learning this way. Thanks so much for sharing. I found your blog about a week ago and I am loving it!
This is great! Thanks for the instructions! I’ve been playing with the idea that I could embroider something my godchildren have drawn, so they would have something to put on their wall that was made by the two of us together. (…And maybe eventually keep in a memory box or something… 🙂
Ruut
Mary, you have the BEST blog! Since I discovered it a month or two ago, I visit it every day AND read your emails. Always another idea or project, and always just the information I’ve been looking for. Please don’t ever quit!
The pen you’re using is a “Pigma MICron” pen, not “macron” or “macro.”
Google macro pen and you’ll get lovely close-up photography of pens. ^_-
I prefer Zig Milleniums for this sort of work, the ink is better than the Microns, and the tips don’t split and they’re not rigid. Less hand stress!
Mary, i am just getting into paper embroidery. i have been wondering how to make my own designs. i appreciate your instructions. i have a couple of questions for you.
#1- how did you get the floss to curve in the pattern you used as an example? it doesn't look like you pierced in-between. is it just loose? ..not pulled tight like a regular stitch?
#2- Have you tried making non-geometric designs? if so how do you create patterns for these?
Like i said i am just starting this journey so any appropriate links and help would be appreciated.
THANKS
JEL
Hi, JEL –
The stitch that's "curved" is actually a lazy daisy stitch, so it's got an anchoring stitch at the top of the loop.
Yes, I've designed some non-geometric things. It's just really a matter of sketching out a little design here and there. For paper embroidery, sketch out the design you want, and then pierce it evenly along the lines of the design, so that you have a place to stitch.
For most cards, I admit, I use patterns from Erica Fortgens's books, or different brass templates that I've picked up here and there.
Hope that helps!
MC
thank you so much. the use of templates makes so much sense for paper embroidery. i will look up Erica Fortgens's book too.
thanks for such a great site full of practical help for beginners.
JEL
Hi this is my first visit and i am most impressed. Living in Mauritius we do have to make our own patterns etc. Thanks for a great site and the practical help for beginners
Gail
Hi, your website is really amazing! I’m a beginner at embroidery but have done cross stitch before.
I’m trying to embroider letters on a small card and find that when I poke the holes to do a satin stitch, they interfer with one another and become a big hole! Should I stick with a single backstitch and big prints rather than small ones?
Hi, Yvonne – I’d suggest using a heavier thread (or several strands of thread or floss) and making the holes a little farther apart. That way, the thread will “fill” the space better, even if the stitches aren’t quite right next to each other. Also, you could just lightly fill the area by spacing the holes farther apart. You’d still get the sense of filling, but it wouldn’t necessarily be a complete fill with satin stitch. As long as the holes are evenly spaced, it will still look good! ~MC
Hi, Mary. This tutorial is wonderful. I belong to the Embroiderers Guild of America. I am going to teach a program to my chapter on combining paper and embroidery. This tutorial and blog would be fabulous in helping me do that. May I have your permission to re-draw and reproduce your design to share with the 25 or so ladies who will be in attendance. I will, of course, give you full credit.
Sure, that’s fine, Karen. Glad it can be of some use! -MC
Hi, just found your tutorial and found it very useful. I am just discovering handmade embroidered note cards and am doing research on how the back of the card will or should look like. I completed a small cardboard piece yesterday and I’d like to hide the stitching on the back so I will probably glue another piece of cardboard onto the back. how do you go about this issue? Thank you!
Stephanie
I just use the strip glue that you can buy in the paper craft section of any hobby store, and cut the paper or card to fit the back of the embroidered area, or the whole inside of that side of the card. I usually use decorative paper or card stock (something that coordinates with the card) and cut it out with a decorative cutting tool (like scallops), so it just fits inside the embroidered side of the card, and then use the strip glue just along the edges to hold it closed. I don’t glue over the embroidery thread or anything – just on the edges of the area to be covered.