


When I was embroidering that spring garden corner on the flour sack towel before Easter, I mentioned that I was using Q-Snaps. In the comments, a reader asked, “What are Q-Snaps?” I postponed answering (sorry!) until I could explain and show you what they are.
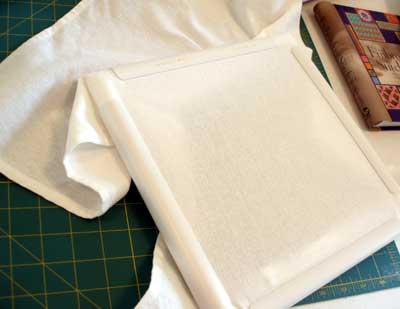
Q-Snaps = Embroidery Hoop, only different. Q-Snaps are frames made out of round plastic tubes, over which fit half-circular “snaps” of PVC-like plastic. The inside of the snaps have ridges that are supposed to grip the fabric.
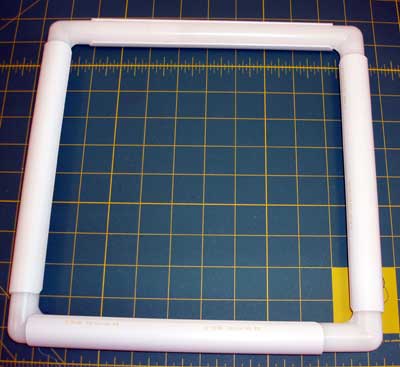
Q-Snaps are square. The inside of the frame is made up of corner pieces (somewhat rounded) that attach to straight pieces, to make up the square.
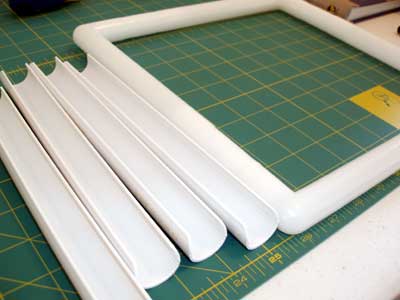
On each of the four sides, a long, tight-fitting, half-circlular “cuff” of plastic, ridged on the inside, snaps into place. These are the “snaps.” You can see in the photo above, the four snaps alongside the plastic frame.
To put the snaps on the frame, you just push them on. They hug the frame. In the photo above, the snap is not pushed all the way on yet – so you can see the ridges, and how they fit onto the frame.
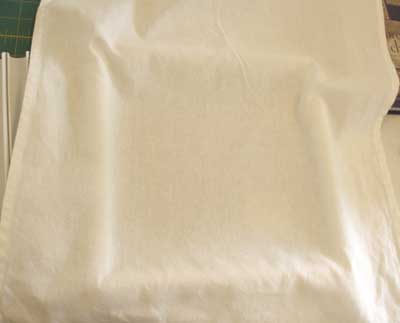
You mount your fabric on the Q-Snap frame about the same way you do a hoop – laying the inside frame part down first, placing your fabric over it, and then snapping the outside half-circle plastic snaps over the fabric.
Then, you “roll” the snaps outwards, to establish the amount of tension you want on your fabric.
Here, I’ve mounted a cotton kitchen towel on the Q-Snap frame, and rolled the snaps outwards to make the fabric flush with the top of the frame and to tighten the tension on the fabric.
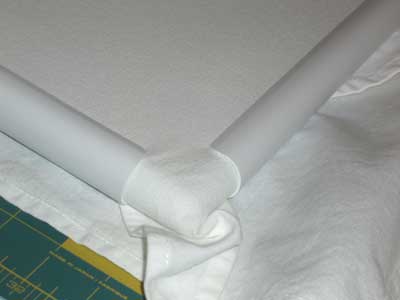
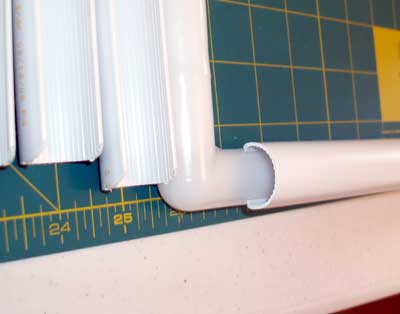
That’s a corner up close…
So, that’s a Q-Snap frame.
After using this 11″ square Q-Snap frame for the spring garden towel, I tried it on various weights of linen and cotton to see how it worked, and decided that, although I like it for the flour sack towels, I’ll probably stick with a hoop or stretcher bars for other fabrics.
What about you? Have you tried Q-Snaps? What is your experience with them? Do you have any tips or tricks for using them?
Hi Mary. My experience has been with slippage. Can you recommend what to put between the frame and the fabric before putting the snaps on?. Felt perhaps?
This is great to see, Mary! Just last night at my embroidery class, we were talking about Q-clips. (incidentally, I’ll be adding a link to this post in my resources section for the students. 😉
I like the *idea* of the Q-clip – being gentler on your fabric – but I’ve never been able to get my fabric quite tight enough for my taste. I like a pretty tight tension when I’m stitching, but I also warn that I have had one time where I actually put holes in my fabric at the screw area of the hoop because I tightened it so much.
Ooops! You only make that mistake once! 🙂
Great, informative post! Thank you!
I have used a Q-snap for embroidery on silk, before I had more information on how to use a wooden frame. The trick that I figured out to keep it (close to) tight enough, was to cut small strips of T-shirt knit and put them between the clip and the silk. Having additional weight of non-slippery fabric in there really helped, and it kept the clips from marking the silk.
What a great idea. Thank you.
Many many years ago I bought a wooden version of the q snap frame: two smooth sanded frames of wood, one about an inch larger than the other. It was called a Japanese embroidery frame specially designed for metal thread embroidery. To use the frame you have to wrap all four sides of both frames with a soft bulky fabric called bump. The trick is to get the wrap not too tight or too loose. Then place your fabric and backing fabric in the padded square frame just like you do for a standard round frame. You center the ground fabric on top of the smaller padded frame and place the larger padded frame on top. Gently press the frames until they are level. The padding holds the fabric secure and as taut as you like it.
It works very well for everything except high relief metal work and maintains stable grain lines also. If I were to use it with flat silk I would protect the completed stitching with a piece of silk fabric laid over the stitching. The bump cloth pad is a handy place to park needles. The frame is large enough to fit in a stand and light enough to prop on a table.
The joints of my square frame are beginning to work loose so I have searched for a replacement but without success. I wish I could find a wood worker who would make one for me. It’s a simple tool really.
Thanks for your comments!
I was going to elaborate on my experiences with other cloth (besides the flour sack towels…), but then I thought it would be better to open it up to others for their input.
The reason I won’t use Q-Snaps for other fabric (aside from the flour sack towels) is that they simply don’t give good tension.
I did try felt between the fabric and the bottom frame, and then again between the fabric and the “snap.” It was too complicated and bothersome to keep the felt in place, whenever I had to retighten or relocate the snaps. This sort of negates the whole “convenience” thing. That’s why, for other fabric, I’d just as soon use a good hoop or stretcher bars. I probably wouldn’t invest the $10+ for a medium to larger set of Q-Snaps – I’d rather spend a little more for a good hoop that will last and will give me the tension I like.
Still, for flour sack towels, they worked ok and really were convenient. I’d use them for those types of projects without a problem.
I love love love them! The best part is as a crazy quilter they fit to block sizes perfectly! So instead of trying to fit round on square you have square with square! So I have the whole set all sizes. For me tension isn’t an issue so I can understand why other needleworkers might pass on them but for CQ…beyond perfect!
I’ve noticed the Q-Snaps are extremely popular for Hand Quilters projects because you use a looser fabric tension when you hand quilt. I do love all the wonderful things out there that make our needlework the best!
Annie
I bought a Q-snap after discovering that the faint, pink aura on my red Holbein-stitch apron was not bleeding dye, but fuzzed embroidery thread from pulling the fabric taut in a round wooden ‘tambour’ frame. The Q-snap system of turning the clips to tighten the tension did solve that problem, well enough, but the tension really doesn’t stay consistent. Also, my next project is going to be on thinner fabric, and I’m afraid the Q-clips may cut into the fabric. I’ll be trying muslin scrap between the fabric and the clips, for protection.
On the whole, the Q-snap is interesting but not perfect.
-Sandy
I use white men’s handkerchiefs under the clamps of the qsnaps. They keep the tension much better. Using them also keeps your work clean since your hands aren’t really touching the linen anymore. They also protect the linen when you are removing the clamps.
~Pam
If you put a piece of plain white paper towel between the frame and the fabric, it will help hold tension better!
I just started using the ‘Q-snaps’ a few months ago. For some things… I love it! Especially my ‘grab and go’ projects. I wouldn’t use it for large projects or precise and fine projects but love it for bread clothes, pillow cases and such 🙂
~Sandi R
I just started using q-snaps on a project, the size I selected was small – 6×6 – and I was immediately shocked at how difficult it was to remove once it was on my project. Not to sound too stereotypical, but cross stitching is done by some mature people who do not have the hand strength that was required for me to take off the secure clips. The base fabric I’m using is a stiffer evenweave Adia 14 count – could that be the issue? Needless to say, tension was not an issue.
Hi, Maura – I suppose the fabric could be the issue. I don’t use q-snaps very often, and in fact, when I have used them, I’ve had to put felt over the bar and then the fabric and then the q-snap, if I wanted it to maintain good tension without having to roll the snap out every few minutes. I’ve found a combination of sliding them off the roller (as opposed to trying to pull them straight off) and pulling helps remove the snaps a little more easily. Hope that helps! ~MC
Hello,
I’ve used q-snaps off and on for years and really like them better than hoops or scroll due to their sizing and shape. I haven’t had trouble with slippage or tensioning but I also don’t stitch too frequently for long periods of time. I also always loosen the fabric when I leave the project. I generally use them for very large, soft fabric (like my perpetual Christmas Tree Skirt) or for small pieces that are hard to do “in hand”. I generally work Mirabilias and as they are fairly large, prefer to stitch in hand so that may be another reason why the tensioning doesn’t bother me.
I have noticed that the q snaps are great for hand-dyed or painted fabric where there may be shrinkage to the fabric. The higher count linens can shrink down a good bit and the qsnaps help define the holes better.
The only issue I have had (and it could be my imagination) but I think that they left a slight mark on the handpainted fabric I’m currently using for a Mirabilia Forest Goddess piece so I went back to doing the project in hand. I’m not going to chance the piece being ruined.
I am thinking of buying q-snaps, however, I “embroider” on crocheted fabric. Do you think it would work on fabric that thick?
most of what I make are blankets from worsted weight yarn if that clears up any questions.
Thanks for the show and tell on Q Snaps. I have a set and now that I know how to use them, it will be simpler. Right now I tape the edges of my fabric and then tape the edges to the snap – why you say – because first time I used them I put the snaps on over the fabric(rolled on to the frame) and had to almost break them to remove them(the snaps) I actually took off the side peices and slid the snaps off the fabric. I guess from your instructions one just lets the fabric hang over the bar and puts the snap on top then twists it back to hold the fabric. Thanks so much for the instructions, which did not come on or in the packaging.
Hi! I love your site! Thanks for the abundance of great information!
I was looking at your embroidery hoop info that you link via FB today. It mentioned binding. I thought, hmmm, maybe this would help with slippage of thinner fabrics on Qsnaps? Of course, it would waste the interchangeability function of your Qsnaps but maybe useful when you keep repeatedly using one specific size?
I LOVE my Qsnaps for my cross stitching! (Sorry, haven’t done any other embroidery, so I’m not sure how they work it other cases) They work great with Aida as it’s thicker material but yes, there’s slippage with thinner materials like linen. I just tuck a piece of paper towel under to add the extra thickness. It gets drum tight! (That’s why I wondered if binding might help)
I also leave my fabric on until I need to move it for the next area of stitching. Even when the stitched areas are under the clamps, I never experience permanent marks or distortion of the stitches as I did with hoops!
Just like hoops, you can buy different sizes. But the bonus is that they are interchangeable. You can also purchase extenders and make any combination of sizes you want!
There’s one thing in your tutorial above that I would suggest. It was a tip I found while researching Qsnaps online. Don’t place your fabric on the same “face up” way as you did your hoops. If you flip your fabric face down and then clamp and tighten you will find you have much better access to the back of your material. Why? I find it easier access for starting and ending threads. More comfortable to hold your Qsnap in hand. This way there’s less tendency to accidently loosen up your clamps while holding them. If you aren’t using the Qsnap in combination with a stand, then once you hold it in hand it’s the backside of the extra fabric in your hand instead the front.
One of my favorite parts of using Qsnaps? The covers or grime guards that you can make or purchase for them! You can tuck all your extra material into the cover. Your material stays out of your way and gets less dirty as now your holding on the the cover instead of your fabric.
I’ve also tried a knock off brand of them through Michael’s. They suck! Don’t bother saving a few dollars, the headache isn’t worth it. Lol
Thanks for the tips, Ramona! I have a few sets of q-snaps. What I’ve done is cut strips of wool felt and placed them in the snaps when mounting the fabric. Then I turn to tighten, and they stay tight. They’re removable and can be used with different sizes of snaps. It seems to work…but I don’t use them very often…. Thanks again for the great tips!
Please can you tell me where I can get the Q Snaps embroidery frames. are they available in Australia Thank you Maxine Perry
Michaels
I am using a Q-snap frame and I like it better than the usual hoops. It actually stays tighter than a hoop. I did have to had a very thin fabric to the bars to give the thinner fabrics an edge to grip, and with velvet fabric I should have used a larger frame to prevent a ridge. I would love to know how others make hoops keep the fabric taught.
any suggestions on where to order the cuff replacements for the frame. need 14.5 ” size
I have always had the side I will put the picture on be on top of the QSnap. Why is it “needed” to be done, or why do you do, it the opposite?
Hi, Kristin – I put the right side of the fabric on top of the q-snaps, too. Makes the most sense to me – then they aren’t in the way when you’re stitching on the front of the fabric.
Helpful information. Thanks for sharing
Hello I’m from south Africa, how can I order or where can I order a Q snap?
Regards Maria
Hi, Maria – I’m really not sure where you can order those in South Africa. You might try to contact Hazel Blomkamp or Trish Burr. They are both embroidery designers in South Africa, and they might have an idea where you could find them.
Yes I have used them, but prefer wooden hoops or the Morgan hoops. First the part that snaps on is very hard to get off. I have used mine for awhile and they have not loosened up. To remedy that I bought rug gripper strips, cut them to fit each side, place my material over that and do not need to use the snap on’s. The gripper stuff will not leave a residue on your material or the bars and your material will not loosen. I do a lot of punch needle and my fabric has to be drum tight. Also I cannot get the qsnap to work in the universal floor stand.
Final preference. Wood hoops where I wrap the bottom part with bias tape, or the Morgan hoops, which I also wrap with bias tape.
Are the measurements for the Q-Snaps inner or outer dimensions. I have a kit whose finished dimensions are roughly 5 3/4 inches square, and the cloth is 9 inches square. Would a 6″ Q-Snap be big enough to accommodate the whole design? Would an 8″ Q-Snap hold the 9″ piece of cloth securely?
I don’t think an 8″ q-snap would do, on a 9″ piece of fabric. The six would most likely require you to move them around to stitch the whole design.