


Following up on yesterday’s post about selecting a good hand embroidery hoop, here’s a little tutorial on how to bind the inside ring of your hoop in order to maintain better tension for a longer period of time.
Binding a hoop isn’t absolutely essential in embroidery, but it does have its advantages. When you bind at least one ring (I bind the inside ring), you supply a little extra friction to keep your fabric tighter, longer. Also, the binding adds a bit of protective “padding” that will make the hoop a bit easier on your fabric. And though binding seems as if it would be a time-waster or a pain in the neck, really, it’s very simple, and once it’s done, you don’t normally have to do it again. I have four hoops with the inner ring bound that I’ve been using for three or four years, and the binding job is just as good now as it was when I first did it. They work great! I’m glad I took the time to bind them.
That being said, not all my hoops are bound; I often work with hoops that aren’t. If you want to bind the inside ring of one of your hoops, here’s a little tutorial to show you how. Keep in mind that the tutorial focuses on the inside ring of the hoop. If you decide to bind the outside ring of the hoop, you’ll need to begin and end your twill tape on the outside of the outside ring. Binding doesn’t really work well on the plastic Susan Bates-style hoops that have a lip.
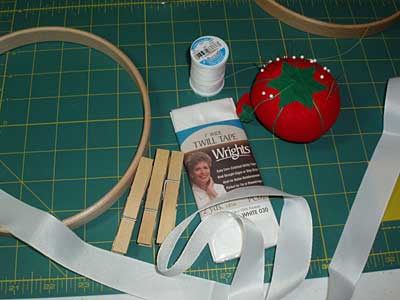
First, gather your supplies. I’m using the same Hardwicke Manor Hoop I spoke about yesterday (7″ round x 5/8″ deep). (By the way, it’s HardwickE Manor Hoop, with an “E” – seems I spelled it wrong …)
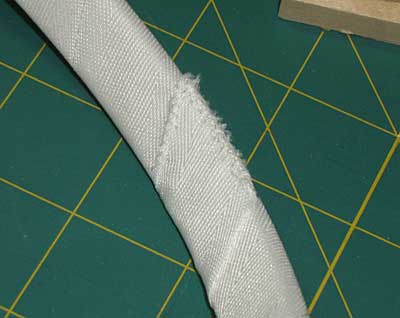
I’m using 1″ twill tape, the kind you buy in the notions section at a sewing store. It’s polyester. For better friction, I’d suggest cotton twill tape, but I didn’t have any on hand. Cotton twill tape is easier to bind the hoop with, too, as it’s not as slippery as polyester and it has a little more body to it. You can also use narrower twill tape, but the 1″ works well on the 5/8″ hoops. On smaller hoops – the 5/16″ ones – I use narrower twill tape.
Twill tape vs bias tape: I like twill tape better. You can use bias tape, but the folded bias tape has a noticeable edge where the fold ends, so you don’t get smooth coverage. Any overlapping or any spots of bulging thickness reduce the effectiveness of binding the hoop.
You’ll definitely want some clothespins to help you out, unless you have four hands. I’ve always wanted four hands, but since I haven’t managed growing extras, I just use clothespins.
You’ll also need scissor, sewing thread, and a sewing needle.
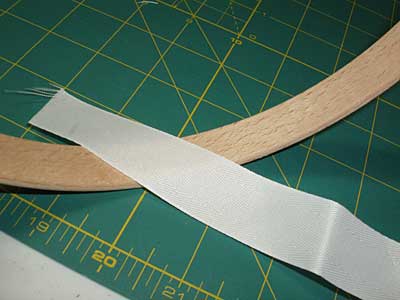
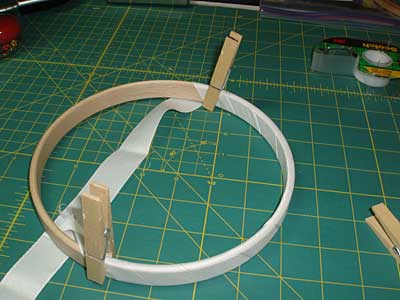
Begin by laying your twill tape at an angle across the inside of your inside embroidery ring. You want the beginning and the end of the length of twill tape to meet on the inside of the ring, because that’s where you’ll stitch them together, avoiding a bulge from your stitching on the outside of the ring, where it meets the inside of the outer ring of the hoop. (Wow…. confusing…!)
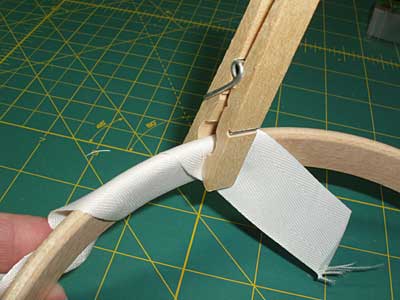
Wrap the twill tape around the hoop once to establish the angle needed for the tape to lay perfectly parallel to the wrap before, and then use a clothespin to hold the edge.
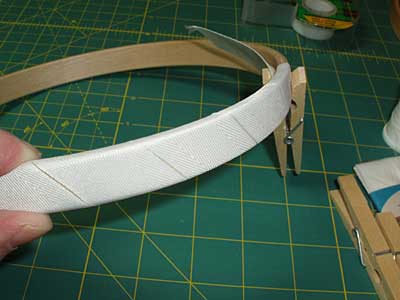
Continue to wrap the twill tape around the hoop, lining up the edges of the tape so that they are parallel and not overlapping. Pull the tape tight, and work with it to reduce any bulging or buckling. You want it to hug the hoop.
When you get to about the halfway point, if everything is looking good, go ahead and clamp another clothespin on to secure the tape at that point. This way, if you mess up a bit on the second half, you don’t have to re-wrap the whole ring.
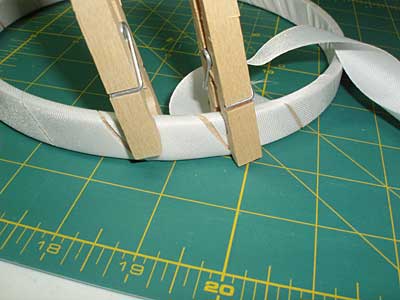
When you arrive back at the beginning of your twill tape, fix the end with another clothespin. You may have more space than you want between the wraps, or you may need to adjust to fit the last wrap in just right. Clamp the end with another clothespin, then work the twill tape around with your hands, running the hoop through your hands and shifting the tape around as you need to. You might have to tug a bit here and there, or twist the hoop in your hands a bit, adjusting until you line up the edges of the wraps as close as possible to each other and until wraps of the twill tape are hugging the hoop all around.
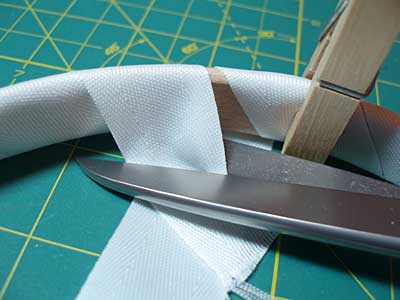
Undo the clothespin on the beginning of the wrap, and cut the extra off, so that the twill ends at the farther edge of the ring.
Then, take the end of the twill tape (it’ll be the end with the long tail) and finish wrapping it so that it overlaps the beginning of the tape. Don’t trim it just yet. Stick a clothespin on to hold both ends in the right place.
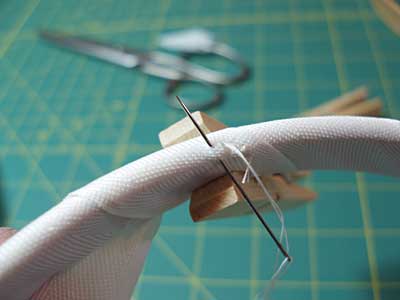
Then, take your needle and thread (with a knot in the end of the thread), and begin stitching over the overlap. I just use a whip stitch, and I stitch down the edge of the inside of the ring, through both pieces of twill, and then back again over the same path.
I also stitch down one side of the twill wraps, stitching two edges of the wrap together. Then, clip off the extra twill tape…
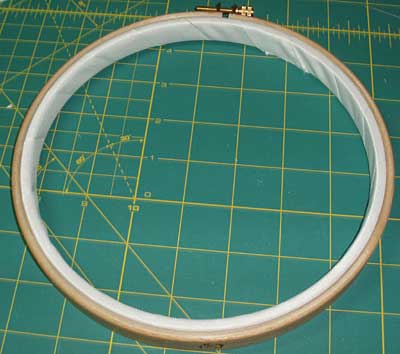
… and the inner ring of your hoop is now bound!
Try binding one hoop – I think you’ll like it!
Tomorrow, stay tuned for the first “action” installment of the Long and Short Stitch lessons. I’ll discuss materials, talk about transferring the pattern, give you the design to transfer, and show you my transfer and set-up process.
Incidentally, I’ve had a jolly awful time editing the first video, soooo… I gave up and will try again this weekend. I bit the bullet and invested in a new camcorder today, so you should be getting a better quality video, at any rate. But yikes! After hours in front of the computer yesterday, and practically all day today, I was ready to pull out my hair.
Instead, I shopped! My Mom always says, “Get your hair done and go shopping – you’ll feel better.” Her solution to every gal’s problems! And… she’s right! It worked! I can’t wait to get back to the whole video process!!
See you tomorrow!
Thanks for this tutorial, Mary. I never thought of using twill tape! I've used fabric scrap strips (I've never found the need for it to be neat, LOL!) I've also used the selvage edge of cotton fabric, which I guess would be comparable to twill tape.
Hi Mary,
Loved your tutorial on binding hoops. will try it just as soon as I get hold of the cotton tape this evening
Thanks for the tutorial, Mary! I just last week bound both hoops of a Susan Bates with a lip, ironically enough, LOL. Maybe because I bound both (with cotton bias tape, no less — against all the advice here) it's working pretty well. The hoop was totally unusable before binding. It wouldn't hold the cloth at all.
Hmmmmm… should I have mentioned that I ironed the bias tape flat before wrapping?
Nice tutorial.
Several years ago while taking Brazilian Embroidery classes I bound my hoops with strips of Pellon fleece, for extra cushioning. They are still in great shape and work well for my crazy quilting projects.
Mary, I will bind my new embroidery hoop as soon as it gets here. I have question about another tool/device I saw. I don't remember what website it was on but I know I got there from your blog one way or another. It showed how to make a "bib" for embroidery by taking square of fabric and cutting a circle out from the center a wee bit smaller than the hoop you are using. Then binding the outer edge and inner circle. Then you put it over the design before putting the outer hoop in place.
Do you use one of these? and do you recommend it?
Thanks again for the great post on binding the inner hoop.
Nestor
Excellent tutorial. Now, to find out what "Twill Tape" is in Dutch…
CC- try looking for keperstofband or keperband. Hema usually has it with their sewing notions, or else in the drapery department. If you can't find it, you can buy single-fold biasband and iron it flat. You may have to trim it to 2.5-3 cm if it's wider than that.
KatyDidde, thank you very, very much! I'm still trying to learn aspects of the language outside of the Inburgeringscursus – for some off reason, they don't mention sewing or embroidery at all in that!
(off topic to CC)
email me at hederaivy@yahoo.com
Look for a copy of Naaien is Niet Moeijlijk. Another great resource for sewing terms is KnipMode, which you can find on the magazine racks at most grocery stores (I got mine at C1000) There are usually cross-stitch magazines as well; the instructions are laid out so similarly to English language ones that it's pretty easy to figure out translations. One good one is Borduuren, which I think comes out quarterly.
Sucess!
I just bound my new hoop last night. A medium-size binder clip works well as a replacement for the clothes pin. It wasn't nearly as difficult as I thought it was going to be!
It’s a great idea!! It works!!!
Hey Mary,
This is a great idea. I should have thought of it myself! Your tutorial is so easy to follow, appreciate the pictures, too. I’m mainly a visual learner, so the pictures are very helpful! Love your postings and emails! Thanks much!
Thank you for this tutorial. I’m fortunate enough to own a wooden hoop that I remember paying a considerable amount for, around 1979. I still use that hoop today – I remember it was a quality one, that did not require binding. I also have a cheaper one, that I’ve been concerned about – this could be the answer. I’ll let you know when I get it done right!!
Thanks again! bronny
I stumbled upon your lovely web site, and now I am book marking so I don’t lose you. Thanks for the lesson on binding the hoop-wonderful idea!
I was always a non-hoop person, and still will be be, but sometimes I need one. Just got my new Klass & Gessman sitting frame and will bind the inner hoop. I need to use bias binding, since I couldn’t get twill here. I’m ironing out the folds first, so I don’t have the sharp edges.
Great tutorial.
Thanks.
Mary, thank you for all of the wonderful info that you so unselfishly provide. I am just in awe of your website.
Hello (again…sorry not to have had a response to my last comment to you!) Mary. Just today I had to bind an embroidery hoop, so when I rec’d today’s email from you and saw the link I went straight to it, hoping to find info that actually wasn’t there…do you have a formula or an idea for working out the length of tape required for a particular hoop, of say, 15cm in diameter? As I started to wrap the binding around the hoop, I wished I had been able to calculate just how much tape to cut off from the reel. I had to guess the required length and found I had taken too much, which of course is better than too little. Just wondering…happy wishes and greetings from Cape Town, South Africa. Toody
Yes, that reply is on the thread question on the testing post. I use 5/8″ twill tape for larger hoops. Lengthwise, you won’t need more than one packet. Here is the US they sell twill tape in the same place you find bias tape in sewing stores. You probably wouldn’t need more than a yard, depending on the size of the hoop. -MC
THANK YOU!! I’m a self-taught stitcher but have never known how to bind an embroidery hoop! What do you use? How to you do it? etc., etc. I was chatting with my daughter and she told me to Google it! “you can find out just about anything” she says…. so I did and you popped up! …again… Thank you!!
That’s terrific, Tracey! I’m glad the tutorial came in handy for you!
Hi! I’m a guy becoming interested in sewing because I want to do wearable electronics projects. You might be familiar with the well known electronics supplier adafruit.com. They make lights and other parts that can be sewn into clothing. I have no real sewing skill yet, but a neighbor who is expert tutored me for 2 hours, using a plastic embroidery hoop. She suggested I get a larger hoop. I Googled and found your article on embroidery hoops. I’m going to order a Hardwicke hoop and twill tape. My question is, do you think a beginner like me can successfully “bind” the inner ring of the hoop? I don’t mind trying again a few times if I eventually will succeed. Thanks a lot!
Hi Mary,
Thank you for your detailed instructions for binding inner hoops of embroidery hoops and for the rationale for doing so. I have several embroidery hoops that were my maternal grandmother’s and great aunt’s that have the inner hoops bound. I think that they bound theirs for the same reasons that you identified, to protect the embroidery fabric and to increase the tension between the hoops. They chose to use cotton strips, probably because that is what they had on hand.
They were very smart women who were true needle artists, much like so many women who came before us. To honor them I kept a hexagonal flower- garden style quilt that my grandmother cut out and started, that shows the change in hand-stitching and ability to fit the hexies together when she suffered a slight stroke. My plan is to finish the quilt, leaving all of her work intact, even that which many people would consider poor quality, as a way of honoring her and her sister’s determination to lovingly create quilts for their family.
I so appreciate your blog and its content. I have had slipage with my hoops, this will clear it up. Thank you again…K
What a great idea! I can hardly wait to try it! Thanks so much!
Mary,
Do you think 1/2 thick twill will work on a 5/16th hoop or is that too thick for binding?
Much thanks and Happy New Year!
Hi, Tracie – the half inch might be a little trickier for the thinner hoops, but it can work. You just have to fiddle with it to get the twill tape to lie smoothly as you wrap the hoop.
I just happened on this site and I like it. I refrained from buying the wooden frames because someone said that the fabric slips. Well, with a plastic frame with the lip it’s hard to tighten the material in it. I think your way will work better.So I thank you for this demo on binding a wooden hoop.
Dear Mary,
What size tape would you use for hoops 5/8 and 5/16?
Thanks!
The thinner the hoop, the thinner the tape. So for the thicker hoops, I’d use 1/2″ twill tape, but for the thinner hoops, I’d use the 1/4 or 3/8″ tape.
I’ve been doing embroidery sense I was 8 now at 73 I think you can always learn some new
thank you
Thanks so much for this and so many other posts. I have visited your site countless times for instruction as I’ve begun my stitching journey and I’m incredibly thankful for this amazing resource.
Hi Mary,
I searched for this Blog-entry in your Tips & Techniques section, but couldn’t find the link. So I hopped to this entry in hope of getting a hint, were it could be: https://needlenthread.wpengine.com/2009/07/embroidery-hoop.html
And I was happy for your link at the bottom of the text to this tutorial.
Is it possible to add this wonderful tutorial to your list of Tips & Techniques?
Hurray, now I can start to bind my new hoop an start a little project.
Have a nice day and thanks for all your time and energy, you put in this blog.
I have embroidered on and off for many years (i’m 77 years old) but now i will try to do it the right way–i AM ANXIOUS to read all u have to say on— embroidery for beginners —-thanks for the lessons
Thank you for this helpful advice.
Thanks for the tip! I’ve used masking tape for years on my inside hoops, using the same diagonal overlap method. I never thought about using binding tape.
I forgot some embroidery stitches and would like to see someone embroidering..
Hi, Nora – You can find a collection of embroidery videos here on Needle ‘n Thread: https://needlenthread.wpengine.com/videos
Never heard of this but will give it a try on my wooden hoops. Great idea thanks.
Bonjour,
Je suis une brodeuse française et j’avoue ne pas comprendre l’anglais mais malgré cela, j’aime votre blog riche de conseils, d’exemple, d’astuces etc.
Ce matin, je viens de visualiser quelques pages et, par hasard, je suis tombée sur ce post concernant la manière d’empêcher ma toile à broder de glisser sur le cerceau intérieur. Certaines de vos expressions me surprennent car dans ma langue maternelle, elles n’ont pas forcément le même sens, mais bref, j’arrive à m’y retrouver.
Merci pour vos précieux conseils que je découvre, je vais les suivre à la lettre et dès demain (lundi) j’irai dans ma boutique de tissus acheter du ruban en sergé de coton que je fixerai sur le cerceau de mon “tambour à broder en bois” car c’est avec ce type d’article que je rencontre un problème de tension de la toile à broder et cela m’agace beaucoup. J’avais décidé de renoncer à utiliser cet article justement à cause de ce problème, j’utilise actuellement un tambour à broder en plastic dont le cerceau extérieur est en fait une pince métallique qui maintient très bien mais laisse de vilaines marques sur ma toile, difficiles à faire disparaître même au repassage. Si avec votre méthode, je peux éviter ça, ce sera un vrai bonheur ! Pour être informée régulièrement par mail de vos prochains posts, c’est avec plaisir que je m’abonne (j’ai installé un traducteur automatique sur mon ordinateur pour pouvoir vous lire plus facilement) Belle journée à vous.
Marie3346
Merci, Marie-Thérèse! 🙂
Hand Embroidery is my first love, thanks to my grandmothers, I do quilt
some too. It is nice to see someone also binds their hoop. I just found
your web and am really enjoying going thru your articles. I belonged to
Embroidery Guild of America when I lived Pennsylvania and now am in Florida
and don’t have one, so finding you is wonderful. Thank You June
I wrapped my Hardwicke hoop with the twill tape and love the feel of it holding the fabric when I’m tugging around the edges to get just the right tension. Thanks for the great tutorial. Made it so easy!
I so love reading your tips and tricks that help you achieve wonderful results in your needlework. Your patterns are wonderful and the enjoyment you provide with works in progress is like being in a candy shop, you want it all.
Thank you for sharing your beautiful works, your time, talent, patterns and inspiration. All the best to you and your family. Take care and God bless.
Thanks, Teresa!
All wonderful, wonderful, tips. X
Thank you for the information! Do we just tack the beginning/end of the twill tape? Or is it necessary to go around the whole hoop the tack down the over lap?
The twill shouldn’t overlap. I clip it all around, then tack together the beginning and end, and then I pass around the inside of the ring and work a couple little stitches holding the adjacent edges of twill tape together.
What a great tip! So easy to do and it does make a difference. My work in the hoop stays tauter as I work.
When I got to the end and was ready to stitch down the ends, I applied Fray-Check to the raw ends of the tape. Nice and neat!
Thanks so much! Always learn something new!
Thank you for this great tutorial! I’m new at embroidery (and sewing in general) and am excited to try out my newly-bound hoop.
Thank you for the excellent tutorial on binding a hoop! I have been doing embroidery since my grandmother taught me around age 10. I completed a couple of larger pieces in the 80s and 90s, but am just starting back again now. I was traveling and decided to bring a small piece to work on, but I could not find clothespins anywhere, so I used binder clips from my work briefcase instead! Necessity is the mother of invention! My first hoop binding was a success! Thank you again!
Hi. I am new to embroidery. I have a question about embroidery tape. Is it better to use the cotton twill as mentioned here or could I use the adhesive type (like Edmunds EHT-1 Stitchers No-Slip Hoop Tape Yellow, 1/4-inch by 3-yard)? It looks easier to apply.
Thank you,
Kandace
Hi, Kandace – there are no “embroidery police” to tell you that you can’t use a product that you want to use. If you prefer it, use it! I find that the twill, once wrapped correctly and securely, lasts a lifetime, so I don’t really have need of the hoop tape.
First I want to say your website has been so helpful to me as someone who is brand new to embroidery! I also have a few questions…
1. The first is related to this post: Given the benefit, why don’t embroidery hoops come pre-bound? Are there situations where it’s better to use a non-bound hoop?
2. Do you have any recommendations for a good resource on embroidery/sewing terminology? I have almost no sewing experience so embroidery is really my intro to needlework in general and I find there are a lot of terms used in tutorials that I’m just not familiar with.
I know a few, like “tacking” (my mom has always loved to sew so I picked up a few terms from her) but overall I think finding some sort of guide or general reference list would be useful until I’m more “fluent” in the language of needlework.
3. On a lot of the embroidery blogs I’ve read so far, people talk about initially learning from a parent or a class. Do you know if most people still learn that way or is it pretty feasible these days to learn entirely via books and/or online guides (tutorials + videos)? I’m using this hobby to help distract me from ongoing chronic illness so taking a class isn’t feasible for me right now.
Hi, Chelsea,
I’ll try to answer your questions in a way that makes sense, without rambling too much! LOL!
1. Binding a hoop isn’t essential. It’s just helpful. Pre-bound hoops would be decidedly more expensive, given the time / labor quotient. The nice thing is, once you’ve put that time and labor into it, if you do it right, it’ll last and last! I’ve been using the same bound hoops for 15-20+ years. The key to any long-lasting hoop is to purchase a good quality hoop with good hardware and to take care of it. Hang it on a hook or lay it in a box or a drawer when not using it. Don’t store it propped on a an angle. Don’t over-tighten the screw. Things like that. And bind it with a good (fine) cotton twill. Don’t use anything super thick to bind the hoop, or it can distort the outer ring.
2. I’d recommend investing in a good stitch dictionary and reading through blog articles and the like, online. I’m not meaning to toot my own horn here, but Needle ‘n Thread is packed with a ton of useful information, and I am usually pretty careful about defining and clarifying terminology.
3. No. You don’t have to learn from a parent or a class. You can learn from books, online tutorials and videos and the like. I didn’t learn from my parents – I did learn counted cross stitch from my mom and my aunt, but that fizzled in my teens. I picked up embroidery in college, and I was entirely self-taught using books, spending a lot of time at libraries and museums and the like, and finally, when I was already well into Needle ‘n Thread, I took some classes with world renowned tutors, just to verify for myself that I wasn’t off track in my methods and techniques. Embroidery is not brain surgery or rocket science. There is really is no “only one way” to embroider. There are people who believe that there is only one way. But it is not the case. As long as you are achieving the outcome you want, discovering sensible ways to achieve the results you want, and enjoying the process rather than being frustrated by it (although it is not unusual to occasionally encounter frustration!), then that’s fine. That said, by learning from reputable sources, you can discover more quickly how to accomplish things efficiently, how to overcome hurtles, how to avoid mistakes that can be frustrating, where to find good resources, what materials work better for this or that, and so forth.
I hope that helps!