


When you’re setting up a hand embroidery project, the way you cut your fabric makes a big difference in the outcome!
The concept I’m discussing here – fabric grain – applies to any woven fabric, but when it comes to cutting on the grain, I’m demonstrating working specifically with linen that has a visible weave.
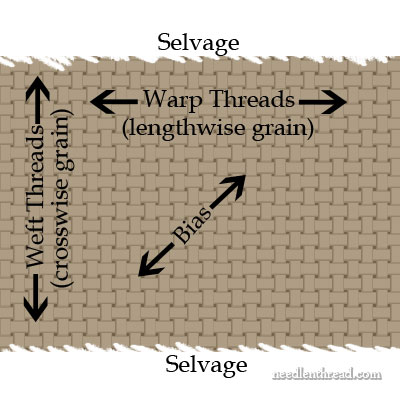
First, it’s important to understand the terminology and the basics on the structure of fabric. In the diagram above, the brown woven area represents a piece of fabric. When the fabric comes off the bolt, there are two sides of the fabric called the “selvage” running perpendicular to the bolt, establishing the width of the fabric. The threads in the fabric that run parallel to the selvage are the warp threads. These are the threads that are set up on the loom before weaving begins, running the length of the piece of fabric, into which the weft threads (perpendicular to the warp threads) are woven. The warp and weft threads are perpendicular to each other, and they establish the “grain” of the fabric. The warp threads are the lengthwise grain and the weft threads are the crosswise grain. When cutting diagonally across the warp and weft threads, you are cutting “on the bias.”
When fabric is cut along the warp and weft threads, it is said to be cut “on the grain,” and when you set up a surface embroidery project, it is very helpful (and ensures a better outcome) if your fabric is cut “on the grain.” When fabric is cut across the grain or on the bias, it is stretchier, and your embroidery project may end up warped and wrinkled if the fabric is cut on the bias. Yes, you can stitch on the bias – but if you cut on the bias and try to set up a project cut on the bias, you will not have “squared up” fabric – you’ll have something sort of stretchy and and your framed project can end up out of whack.
So, how to cut linen on the grain…
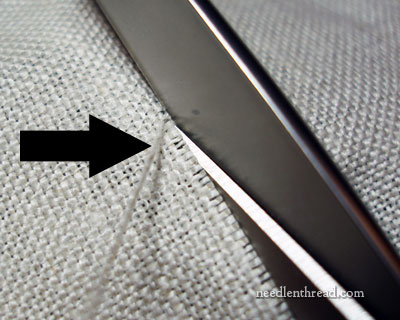
Measure the length of your fabric and take a little snip on the edge of the fabric to mark the size. Next to the snip, pick out the first thread of the linen. If you’re right handed, you’ll want to cut to the right of this one thread, and if you’re left handed, you’ll want to cut to the left of this one thread.
Hold onto the thread, and cut along the edge of that thread, holding onto that thread as you go. The thread will release from the fabric as you cut along the side of it. If you have a very long bit of fabric to cut, cut along this thread for about four inches, until you have a good length of that thread loose. Make sure you’re cutting right next to that thread and following the grain of the fabric. You’ll be cutting between two threads of fabric – the one you’re pulling on as you cut, and the one on the other side of the scissors.
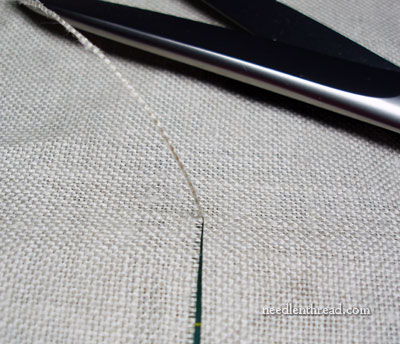
Once you’ve cut about four inches into the fabric, you’ll have a good four inch loose thread along your cut.
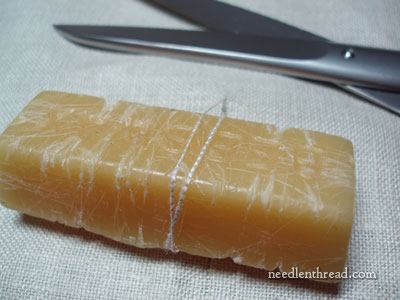
Now, you could use your finger to do this part, but I like to use a block of beeswax, because after a while, this can really hurt! If you’re cutting a lot of fabric, and you use a finger for this part, you can develop the equivalent of mini rope burns, and repeating the process frequently, the thread can eventually cut right into your skin.
Trust me. I know from experience! Please let me save you some pain!
But if you’re just cutting out one small piece of linen, your finger will work fine. But if you’re pulling out very long threads along the grain, or cutting out many pieces of linen, find something that you can wrap the thread around other than your finger! A stick of beeswax like the one above works great – though the thread cuts a little ways into it, the wax really holds onto the thread.
Wrap the loose fabric thread around the block of beeswax, and, pulling the thread straight out in the direction the thread runs (and keeping the beeswax as close to the surface of the fabric as possible so you’re not pulling up at an angle), gently pull (don’t tug!) on the thread until you feel it start to give.
If you’re working with a good linen, the threads will be strong, and they will stand up to the pulling without snapping.
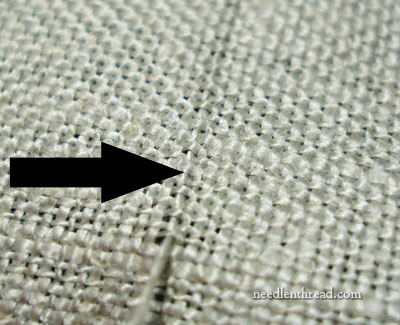
Pulling on the thread will make it very visible across the surface of the linen. You can clearly see the pulled thread in the photo above. Now, you can do one of two things. You can either cut along that visible thread (the thread has made a clear line for you and acts as a good guide for cutting), or you can keep gently pulling. If the fabric begins to gather up a bit, stop pulling and gently work the gathers out until the fabric isn’t puckered. This will move the thread further out. Once you feel the thread really start to give, you can pull a little more, until the whole thread starts moving smoothly out of the fabric. Pull the whole thread out, and you have an even more visible line along which to cut easily and quickly.
Once you’ve cut your fabric in one direction, do your perpendicular cuts the same way, right along one thread of the fabric.
In this way, you can ensure that your fabric is cut straight on the grain, that it’s exactly the size you want, and that it will square up well when the embroidery is finished!
This is how I cut 5 yards of linen into project-sized pieces. One mangled block of beeswax later, I had 145 pieces of linen, cut perfectly on the grain. It’s the best method I know of for achieving a clean cut on the grain with linen, without any waste.
If you know of another way to cut linen on the grain, feel free to share your tips below!
thanks for this explanation Mary. i’ve always wanted to learn the “pull a thread” method of cutting fabric.
This was the very first thing we were taught in needlework class at school. It is easy to see if the fabric is not squared up. And the next thing I always do is oversew the edges to prevent fraying.
There is another way, which involves very little cutting, but I would not recommend it!
You know, I always, always break the thread when I do this. I’m often using something other than fine linen, though, and I’ve never tried the beeswax. It might just give me the patience that a sore finger tends to drain away. Thank you, Mary.
On 64 count fabric or less I usually draw the lines with a mechanical pensil with 0.7mm leads. Holding the pencil firmly but without pressing too much, keeping it slanted and moving it along the grain (from left to right if you are right-handed), it is easy to follow the grain. If the pencil goes out of the trail between the two threads, it makes a small jump and a visibile mark, so it is easy to put it again in the right lane. Then I cut along the line. This is the quickiest method for me, and it works fine. With a bit of extra care, it can be used also on 72 count fabric. For higher counts, withdrawning a thread becames necessary…
I have straightened linen this way (minus the beeswax, just using my fingers, I just didn’t do a great length at one time) but I was curious about your 5 yd length, and that you cut it into project size pieces. How do you know what size that will be, unless you have projects already picked out? Karen
I have also always used more or less this method for cutting up fabric. What I want to know though, Stefania B. from Italy mentions 64 and 72 count fabric, I would love to know where to get hold of such fine counts, they would be perfect for my miniature embroidery!!!!
I found this very informative. Thank you for the clear instructions, helpful hints and images.
I learned how to prepare linen/evenweave for classes at a needlework shop I worked at. It is by far the “best” way to make sure things on grain. It allows for ease of finishing especially when framing or making a pillow/bellpull.
I serge or zig zag all the edges of my fabric before I start stitching to maintain the edges. Evenweave has a tendency to ravel much more than linen.
Also, if a shop doesn’t cut this way, I always ask for an additional inch or so when cut so I can even it up since I do most of my own finishing or framing.
This is absolutely brilliant! I have snipped very carefully (and going cross-eyed) with scissors – this method is SO much better!
I kind of do the same thing. But instead of pulling up on the thread, I actually pull that thread out of the fabric. This leaves a little channel that is easy to follow. If the fabric is long and I cannot easily pull the thread, I pull a small amount out, cut along the channel until I reach the point where I can more easily pull more of the guiding thread out.
Dear Mary
Thanks you so much for this very important post. I always wondered what it meant to cut fabric on the grain, I was very confused as to what the grain was and how I could avoid warped and wrinkled stitching. I’ve ordered some alabaster angel linen and can cut on the grain with confidence. Thanks Mary
Regards Anita Simmance
I agree the best way to cut fabric on the grain is to pull a thread and I love the beeswax idea. But, if you work with a linen twill, satin, or any finely woven fabric, it is almost impossible to pull a thread. With a good linen twill costing around 80 dollars a yard you need to be as accurate as possible. For these kinds of fabrics I use a – drywall square -. They look like a large L in shape and you need the drywall square’s long arms as many of these fabrics are 60 inches wide. They are not expensive and can be bought at any of the big home lumber stores. By laying the bottom of the L shape on the salvage and the left side of the L along the length of material you want to cut you get a perfect square. I mark with a permanent marker and cut on that line. Cutting a perfect square by measurement and using the salvage as a guide doesn’t always mean that the fabric’s warp and weft are in perfect alignment. While I do believe it is woven square, by the time the manufacture steams and perhaps adds a sizing to to the material it may cause the warp and weft to become out of alignment. So, even with a -drywall square- you may need to pull a few threads off your cut edge to get one full thread that runs across your cut. I always work in a frame so any misalignment of warp and weft are pulled back in place if I mount my fabric squarely in the frame. Course getting your fabric squarely in the frame is another challenge at times.
I haven’t been following the wonderful blog very long, but I am really tickled that many of the techniques I picked up from my mother and grandmother are as helpful today as they ever were. This is one of them, although rather than cut it, I picked out the first couple of inches of fiber before I pulled it out.
My grandmother and mother are smiling up on their clouds, smugly saying “I told ya so, girl!”
Thanks. 🙂
I pull and cut on a grainline just like you do. If I want a diagonal piece I cut the square on the grainline and then turn the square 90 degrees to be able to have the design lie on the bias point. The pieced seams are diagonal, but are still straight on the grain. This will keep the design from waving even if it is on point and doesn’t look square, the weft and warp meets squarely in the middle. The grain is still straight, but we are using the perfect bias line as top.
Those of us who sometimes tear cotton will discover that linen and wool will stretch and pulling the thread will stop that stretching as well as show us where the grainline is when we no longer have a salvage edge to find it.
Hi, All! Thanks for your comments!
To answer some questions and comments:
Debbie – thanks for the tip on cutting on the bias! Very good point!
I use this method even on high count linens, but Paula is correct – it doesn’t work on twills or satin weaves. In cases like that, an L square comes in quite handy for cutting. In my article on dressing a slate frame, I address the question of making a cut and then removing threads from the cut edge, until you have a straight edge to your fabric. You can find that here: https://needlenthread.wpengine.com/2008/07/dressing-slate-frame-for-embroidery.html Thanks, Paula, for the really good tips!
Jenn – My mom’s golden rule is “Your Mother is Always Right.” I’m sure, if my grandmother were still alive, her golden rule would be, “… and HER mother is always right, too!” Thanks for the chuckle!
Anita – I’m glad this helped you. You’ll find this technique works quite well with Alabaster Angel. (A Marvelous Fabric!!)
Julie – yes, when I can, I always pull the thread all the way out to make a channel. That’s explained at the end of the post. I’ve found that the better the linen, the more likely the whole thread can be pulled without breakage. This linen I’m working with is Strathaven Linen (in “natural”) and it is quite a nice linen. The majority of the time, I was able to pull the whole thread, from selvage to selvage – that’s 54 inches! I’ve never been able to do that on inferior linens, so it was a huge help in cutting this much linen!
For those who mentioned serging the edges of the fabric, that was my next step after cutting all the pieces, only I don’t use a serger, only because I don’t have one. I use a regular sewing machine, using an overlock stitch (and the appropriate foot). It works really well. For those who don’t have an ‘overlock stitch’ option on their machine (or an overlock foot) a zig-zag stitch right along the edge will also suffice. And if you don’t have a machine at all, then a whip stitch around the edge using regular sewing thread works fine, too.
Elga – in case Stefania doesn’t reply, Sotema makes some high count even-weave linens. Sotema is an Italian company, so perhaps that’s where Stefania finds her fabric. In the States, you can find Legacy linen in higher counts – 55 count for some of their Dower quality linens, and their ecclesiastical linen is about 72 threads / inch. The latter is not an even weave, but because the warp and weft threads in Legacy linen are practically equal in size, it’s close to an evenweave, working out at around 72/73, from what I understand. I use the ecclesiastical for surface embroidery more than counted work, but I have used it for some tiny counted work and it did work.
Karen – The cuts are for kits for some classes, so they are all pre-determined sizes. Sometimes, though, when I have a length of fabric left over, I do cut it into manageable sizes that would be useful for projects, even if I am not yet sure of the exact project. A 12″ x 12″ piece, for example (or even a 10″ x 10″ piece) is pretty standard for things I might work up for the website. Cutting several pieces in advance saves me time in the long run, and I can always find a use for the cut fabric! But in this particular case, you’re right – 145 pieces of fabric would be overkill in the same size!
Thanks again for your comments, everyone! Now I suppose it’s time for me to get to work!
~Mary
I always even my fabric like this. Want to see someone almost cry? Even up your $79/yd fabric only to find that it is off grain. This is the first time in all my years of sewing to find expensive linen off grain like this. I have no idea what I will do with this mess. Even if no one else knew the difference, I do. I have dampened and stretched. It cannot be salvaged. Maybe a crazy quilt. But I don’t quilt. Occasionally I just look at it, then turn around and leave. A sad story. But the moral is, if you find someone who sells good stuff, stick with them. Maybe we should start a “naughty” and “nice” list.
Louise B.
Stefania – thanks for the information!! Very helpful!
Louise – Ooooooooooooooohhhhhhhh. I’m trying not to cry, too! Whoa. That would make me angry, more than anything else. Any chance of returning it to the shop, explaining the problem? They should be able to send it back to the manufacturer and at least get credit. That would be so irritating! Consider yourself sympathized with! I’ve thought about a naughty and nice list, but my nice list would be ex-treme-ly short, I’m afraid! 🙂
@Elga from South Africa
Oops! I made a mistake in converting the number of threads per 10 cm into the count per inch… I should have written 40 and 45 count. Sorry for the big mistake!
There are a lot of higher counts linen fabrics in Italy, but they are not perfectly even: “444” from Sotema has 24 threads/cm in one direction and 21/cm in the other (the difference while working is almost inappreciable, anyway); “780” is almost even with 29 threads/cm and 28/cm but it is a very fine linen and you should work with a magnifier.
You can have a look at the range of this linen manufacturer at http://www.manifatturatessilesotema.it
I have used this method for years, being a patchwork quilter and having studied clothing constuction in college (may years ago!)
Now, what about twill weave?
doreen
This is such timely post. I don’t use beeswax. Must give it a try.
Hi Mary, I was just reading a post from you on Feb 7, 2007 where you mentioned a shop in Newport, Oregon called the Twining Thread. I live 2 hours from there and was an avid shopper when we went to the coast, where it sat less than 1/4 mile from the ocean. I was so, so disappointed when they went out of business.
I have since found a shop in Washington State called Threadneedle Street which I like a lot, even though I have never been there I enjoy looking at their goodies.
Louise (from the post above), I have an idea on how to save that $70.00 a yard linen. Just thinking about your problem gives me shivers. So… what if you cut the material the size you need and leave an extra inch or so all around and tacked it down while it was sopping wet. If you marked out a square on a board, or anything that would hold tacks, you could then pull it into shape as you tacked it down and it would dry that way. I do this when blocking needlepoint that has become out of alignment by the tent stitch. It works well so perhaps it will work for you. While I do not know, I suspect that it is the steaming/pressing process during manufacturing that presents this problem. Anyhow, it might be worth a try to save your linen.
I’ve never found a better way. I can’t say I’ve cut anything like 5 yards, but I want to thank you for the beeswax idea. It hurts when it’s a small amount to pull the thread sometimes if the weave is tight.
Mary and all,
I was told by an embroidery teacher that once the linen has been cut, the selvedge edge should be put parallel to the left side of the frame in order to limit distortion while stitching. What is your experience with and/or advice about this???
Hi, Linda – when I can, I use the selvage on the edge of the frame. It also saves fabric. But it’s not always feasible. More often than not, the fabric cut doesn’t come from the edge of the bolt, so there’s no selvage available. ~MC
Hello Mary,
Thanks for all the valuable tricks 7tips that you provide.
This was just a thought would a bar of soap be also used to pull a linen thread.
Haifa
This is brilliant! Not having learned from my mom and Grandma, I am catching up on these tricks. This makes so much sense and will be such a big help. Thank you!
Thank you so much for sharing this! I NEVER knew I should be doing this, I am happy to say I will be doing this in the future! Thanks to Craft Gossip for leading me to your website!!
A new way that I’m going to try when cutting is a knitting idea call steeping. This is simply sewing on both sides of the cutting line BEFORE you cut it. A straight stitch by machine, would be good or a back stitch by hand would work. Trying to edge stitch any material is not the easiest by machine or hand. I will try steeping when I need to cut any even weaves.
Boy, I sure hope this “old brain can learn new tricks”.
Oh, this was eye-opening. As a sewist, I am often cutting against the grain, and I have been doing the same with my Aida. Oops.
Sunny,
Even as a sewist you should lay your pattern pieces out on the straight of the grain. That is the point of the arrowed lines on the pattern pieces. These lines are measured to be parrallel to the selvedge edges or are placed on the fold which ideally is also a straight grain line off the bolt. You then cut the pieces in the shapes necessary to make the garment. If done correctly your stripes will run straight up and down and your seams will fall straight and not wrap around your legs or arms.
I pretty much do it the same as you Mary. I will admit, however, when I work with quilting cottons or am making simple kitchen items out of cotton,that will get worn out and used up, I do cheat and tear my fabrics. Light weight cotton fabrics used for quilt tops and toweling will tear on the straight of the grain, and can save you lots of time, but they will also stretch so I don’t recommend this method for formal embroidery pictures, pillows or hierloom types ofo things. For everyday useable items that will get washed in the washer and dryer routinely anyway, it just becomes too much work for something I know is going to end up distorted and freyed anyway.
Liked tutorial for cutting on the grain. Does it matter which direction you have your fabric (longwise vs. Crosswise)when you stitch on linen?
For surface embroidery, not really, as long as the project isn’t set up on the bias. But I usually keep the selvedge to the right and left (running vertical). It’s more out of habit than anything else – not sure that it makes that much difference, though, with surface work. Of course, if you’re counting threads, it can make a difference on not-quite-even-weave fabrics, that run, say, 33 threads x 32 threads per inch. ~MC
Thank you for taking time to remind me of these little, so important details. Just about the time I think I know it all, your articles remind me of little important things that are easy to forget or overlook in preparation of a project. Thanks for all your reminders – I need them!
🙂 Glad they come in handy, Sandy!!
Oh Mary, I wish I were as clever and talented as you! Since I’m not, I really wish you were able to make a video on this cutting subject because I’m just so confused! I’m a newbie but an trying my darndest to do everything by the book and up to par. I just can’t seem to figure this one out ):
Thank you for all your explanations.
I would like to know if we should place our embroidery pattern on lengthwise grain or if cross grain is appropriate too?
You can place the design however it works for the fabric – sometimes, for example, you might have a square piece of fabric, but your design is situated in the corner at an angle, seemingly “on the bias.” But that’s perfectly normal with surface embroidery designs.