


Damp stretching or blocking hand embroidery is one of the best ways to make ready a piece of hand embroidery for finishing or framing. I call this step blocking sometimes and other times, I call it damp stretching or damp blocking. The terms can be used interchangeably. The idea is simply that you are squaring up a piece of embroidery, stretching it out, and removing all the wrinkles, all at the same time.
I rarely take pictures of this process, because by the time I get to it, I’ve either finished taking pictures, or I’m not ready yet to take pictures. But it’s good to know how to do this, if you don’t already know. If you photograph your needlework, this is a wonderful way to get it ready for nice, clear, crisp photos.
Damp stretching in this manner assumes that your fabric is clean already. If you have stains or marks on your fabric, you should take care of those before blocking.
Especially if you’ve used a hoop for your embroidery project, blocking it afterwards is a must. Stretcher bar frames and slate frames and the like minimize the need to do this, but they don’t eliminate the need altogether. While you won’t have hoop wrinkles on a piece of embroidery that’s been stretched on a frame, sometimes when a piece is framed up, it could have been slightly distorted. Blocking will help remedy most problems of distortion, unless they are really, really severe.
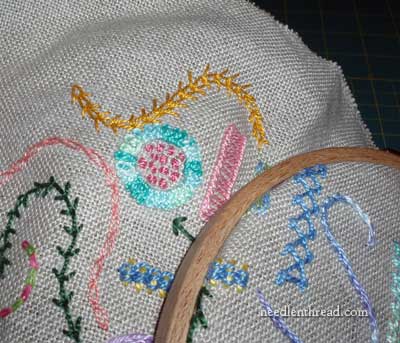
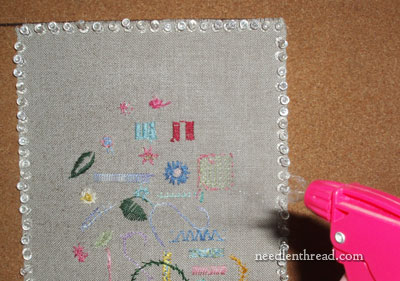
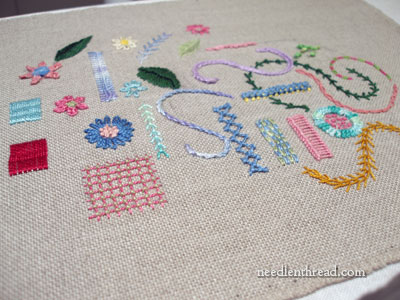
Above, you’ll see a piece of scrap fabric with some sample stitches worked all over it in different types of thread. The fabric is called Montrose 1775, and it’s a nice, natural, chucky-ish linen (an even weave) that’s great for historical samplers, but also works really well when working out stitch samples using heavier threads like perle cottons, wools, and so forth. In fact, what I especially like about this particular linen (made by Legacy) is that it is so sturdy. Picking out stitches is no problem on it – the linen is very resilient. You can see that the samples were worked in a hoop and that the fabric is rather rumpled. I plan to photograph some of those samples, but it isn’t ready for picture-taking … yet.
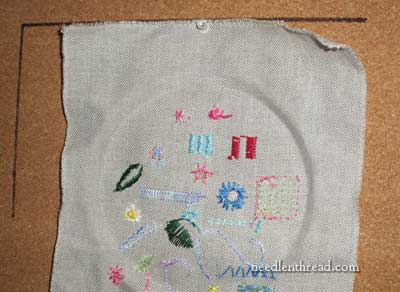
I do all my blocking on a large cork board that I bought specifically for that purpose. On the surface of the cork board are drawn (with permanent marker) many lines, dashed circles, and so forth, that act as guides while blocking. For blocking a piece of square or rectangular linen or cotton, I always start with one side along at least one straight line.
Incidentally, I know some stitchers who have very successfully used their ironing board cover to pin out a piece of embroidery, so you could always try that if you don’t have a cork board.
Whatever surface you choose to use, make sure your surface is clean.
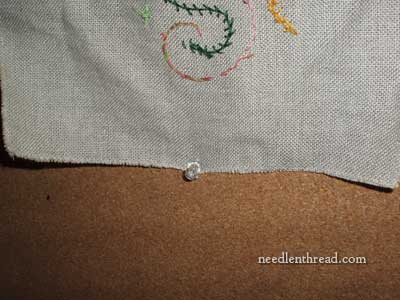
For pins, you can use push pins, tacks, sewing pins, and the like, as long as you have a good supply of whatever type of pins you are going to use. I find push pins the easiest to use for this procedure.
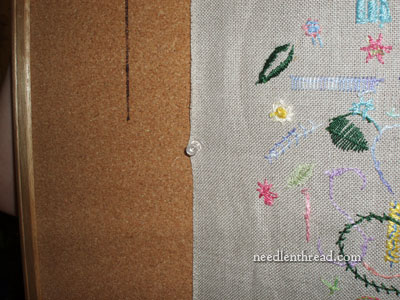
I usually turn my embroidery face down on the cork board, so that I’m working on the back of it. If you’ve used highly dimensional stitches, don’t turn it face down. Line up the top edge of your embroidery with a straight line, and push a pin into the center at the top edge.
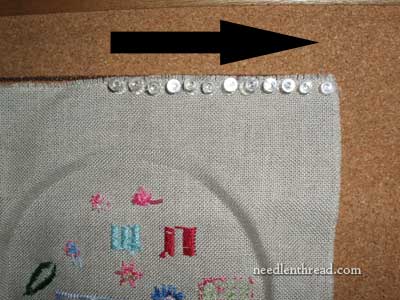
Pin out to the side edge across the top, keeping your fabric lined up with the straight line. You don’t have to pin as closely as I did, but you do want to keep the pins fairly close (every 3/8th inch, perhaps).
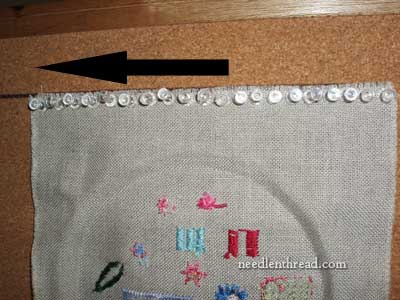
Go back to the center, and pin to the other edge of the fabric.
It’s important to work from the center out, so that you keep your fabric along the straight line and it doesn’t buckle up at all. You’re essentially pulling it out to the edges from the center point.
Once the top edge is completely pinned, move to the opposite edge (the lower edge) and start the process over again, beginning with the middle pin. As you pin the lower edge, stretch the fabric ever so slightly. Think in terms of making the fabric flat on the surface of the cork board.

Pin from the center to the outer edge, then go back to the center and pin to the outer edge.

This is what it looks like at this point, and you can see that some of the wrinkling is already alleviated. But we’re not finished yet!
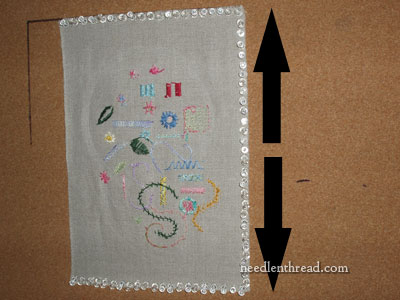
Pick either side and do the same thing, starting from the center and working to the upper edge and then back to the center and working to the lower edge.
When one side is finished, move to the last side of the piece. Here, you can pull the fabric again, creating tension with the opposite side. Repeat the pinning process.
At this point, you can see why I mentioned that you don’t have to pin as closely as I did on this particular piece!
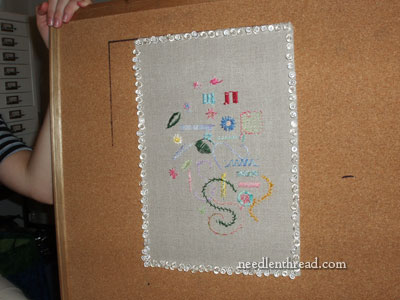
All pinned up and square!
Using a spray bottle set on “mist” (not a direct stream of water, but a light spray), spray the fabric all over.
Next, go do something fun and forget about the piece for a while.
When it dries – voilá! – you have a perfectly flat, squared-up piece of needlework, ready for photographing or for finishing or framing. All the wrinkles will be gone, the weave of the fabric will be where it should be, and you’ll be awed at the smooth beauty of the piece. It may seem like it takes “too much time,” but the finished results are worth it, and it’s a much more certain way of smoothing and squaring up a piece of embroidery, compared to ironing (which can warp the embroidery or crush the stitches if extreme care isn’t taken).
Hope this helps you with your embroidery endeavors!
You can find many more tips & techniques for hand embroidery right here on Needle ‘n Thread.
Hello Mary,
This is one of those “timely” posts for me as I’m about to prepare a project. I have a dilemma, though. The piece is stitched on linen twill in Appleton’s wools with insect motifs in silk thread. There are stains on the fabric that need to be removed. My question is: Should I stitch the silk thread motifs before or after hand laundering the twill, and before blocking the piece (17″x30″). Would appreciate advice/help!
Thank you.
Very timely for me as well…just finished a needle painted flower!
I recommend washing out the stains as soon as possible. The longer they are in the fabric, the more difficult they will be to remove or repair. If you are worried about losing design lines, place the piece on a photocopier before you wash it. This way you can easily replace them later.
Also, watch the amount of agitation you use when washing the wool. I find even the smallest amount of swishing of the material can cause Appleton’s to felt. I tend to treat the spot and then lay the entire piece in a pan of water and soap. On tough spots, I find repeated use of the chemical cleaner more effective than scrubbing.
Good luck,
Kimberly
Hi, Sharon – I think it depends on the silk thread you’re using. Will the colors run? If you wash the piece, will you lose your design lines? Can you spot remove the stains or does the whole thing need washing? If you’re not sure of the silk, I’d probably wash it first, as long as you aren’t going to lose the design lines… Good luck with it!!
Thank you Mary and Kimberly. I so appreciate you both taking time to respond. I will test the silk for color fastness first. The photocopy idea is great, Kimberly. The design was done in a Pym transfer pencil. The stains are mostly dirt-type, though there is one Pym-line fade “ring” around an insect motif that I’m not sure will come out at all. I plan to use a Woolite-type liquid soap to soak the piece and then damp stretch.
Sure thing, Sharon. Though I wouldn’t use woolite, personally. If you have to use a detergent, I’d suggest original liquid Ivory. ~MC
Mary,
I use stainless steel pins on my work surface. I have had trouble with other pins developing rust spots that I failed to catch before using them.
When blocking a sweater or needlepoint, I use a peg board and galvanized steel nails rather than pins. I find I have trouble with my straight pins bending.
Thank you, Mary! This is a timely post for me too, as I just finished a project and have been trying to decide the best way to deal with the fabric distortion. Your site is a wonderful source of information. Thanks again.
This looks much easier than the ironing method! The only drawback I can see is keeping a corkboard and enough pins or tacks together and stashed away, safe from those who would abscond with them for other usese 🙂 .
Knitters sometimes use stainless steel blocking wires in place of hundreds of pins, I wonder if there are smaller versions for needlework?
Hi, Gail – yes, I’ve seen the blocking wires. They sell rings, too, for things like doilies. I find pinning easier. You’d have to have a way to get the fabric onto the wire. If you have a box of sewing pins, they work, too! ~MC
Excellent information, as always. One question — does using this technique assume colorfastness of the threads? Or is it such a small amount of water that color runs aren’t likely? (oops, two questions)
Thanks, Mary!
Hi, Marilyn – The key is a very light mist. I’ve not had a problem with over-dyed running from this kind of damp stretching, because it really is just the lightest mist over the fabric. However, it doesn’t hurt to be on the safe side and test first! Over-dyed threads and non-colorfast threads can be tricky! ~MC
Thanks so much for this one Mary. It never occurred to me to do this, but it’s SO obvious. Reminds me of when my Grandmother used to pin her freshly washed lace curtains on to a big ( 5 by 6 feet ? ) “stretcher bar” to dry. The frame had pins sticking out of it all around the perimeter and it was a simple matter to tack the edges of the lace curtain to the protruding “pins”, stretching it as you went, till it was all “pinned out” and ready to dry in the sun. Some times the old concepts STILL WORK !! Thanks so much for this one Dear Heart. Happy and Safe 4th of July. Judy in Pittsburgh.
Thank you for this nice memory. I remember my mom doing her curtains that way. And those protruding pins were indeed SHARP.
I do my damp blocking on the back of our front door. It is a steel door, so I use strong magnets instead of pins. 🙂 Yes, I always use extra fabric so that if the outside gets damaged it can be trimmed away.
Dear Mary
Thanks so much for the article, great advice, I will definitely remember this post.
One question if goldwork is part of the design would spraying affect it?
Regards Anita Simmance
Hi, Anita – I don’t damp stretch goldwork. I always work goldwork on a frame, setting it up very carefully to avoid any distortion, and am very careful about keeping the work clean. You can lightly steam goldwork from underneath while it’s still on the frame if you need to, as they do with Japanese embroidery. ~MC
Love the idea of using a large piece of cork board! Thanks!
Mary,
I love your cork board idea. Can you tell us more about it? How big is it, what lines did you put on it, and can you post a picture of it?
Thanks so much!
Hi, Carmilla – It’s a very big cork board, just the kind you’d pick up at an office supply store. If you work primarily smaller projects, you can get away with a much smaller one. But I also use this to block my mom’s crocheted doilies after washing them, and some of them are large. Hence, the large cork board. A bigger cork board is difficult to store, though, so if you don’t have space for one, a smaller one will work for small projects. ~MC
Mary,
In the case the item is washable is it okay to hand wash the item to remove any oils or dust that may have gathered during the stitching process. Then while the fabric is damp to stretch it, pin and allow to dry. Or, does damp stretching an item that is damp to begin with allow for distortion?
Deb
Hi, Deb – Of course, if you hand wash a piece of embroidery (totally submerge it and get it really wet) then you’d just pin it the same way. I’d let it dry a little bit first, until it’s just damp, not really wet. I always find it easier to pin it when it’s dry, though. So even in cases where I wash a piece of needlework, I’ll roll it in a towel and let it dry, then pin it and mist it. But you can do it when it isn’t all the way dry yet, too. It’ll still work! ~MC
Mary,
As ever, you are superb in your blogging entries! I’ve learned so much about needlework in the short amount of time that I’ve read your site – it makes me wonder how much I’ve missed before!
Thank you for the information on stretching the work. It will be beneficial for me down the road. And now I have to look up the fabric you mentioned (Montrose 1775) You’ve gone and gotten me curious! Shame on you… 😛
Where did you get the idea to stretch your work out like that? It looks like a cork board? Like the kind one would use to pin notes and stuff?
Hugs and Love,
Jennifer
A fantastic description of what to do thank you very much Mary. Now my work is going to be neatly finished going forward!!
Cheers
Oriel
Thank you for making me wiser today! 🙂
A suggestion that sometimes works: KnitPicks sells “jigsaw” blocking pieces–foam rubber puzzle-shaped pieces about one square foot each. The pieces can be arranged into any needed shape, and store away easily.
Two issues: they only work for light blocking, so if you need to strong-arm your piece into shape you need something tougher. And the set is made for knitters, who think nothing of blocking a six-foot-diameter circular shawl, so you have to buy a set of nine blocks. Unless you’re recreating the Bayeaux tapestry or like to embroider really long bell pulls, a whole set may be overkill.
Dear Mary,
It’s so reassuring to know how experienced embroiderers treat their work after the needlework is complete, especially ones that produce such beautiful work as you. Other than items with metallic (thread, beads etc) and leather components are there any other items that you wouldn’t apply this damping and blocking technique to? Do you make sure that you use distilled water in the spray bottle for damping? Local tap water is very commonly treated and could contain chemical agents that degrade the fabric and thread, and if the water is not treated, bacteria can cause tiny brown speckled staining that only becomes evident with time. Also when washing articles make sure there is a final rinse to thoroughly remove cleansing products.
I take it that cleaning is only done when absolutely necessary. So close inspection of the work (with magnifying glass) before blocking is important. Is “original liquid Ivory” a pure liquid natural soap product? If this product is unavailable could we use a homemade substitute of concentrated dissolved natural soap flakes or a bar in water?
Thank you again Mary for another wonderful and informative article.
I can’t tell from your photographs what you have used, but I think the best pins would be the 3-prong ones that silk painters and the like use to pin the silk to the frame before painting. They do rust, eventually, but last a good long time and don’t do heaps of damage to the fabric and best of all, they don’t bend.
G’day Mary,
One of the things I love about your posts is that you don’t take any info for granted or presume we’d all know about it. You know, this method is how I was taught to stretch canvas onto a frame for painting…but, it’s never occurred to me to do the same with my embroidery. I can’t believe it has never registered with me. Thanks so much Mary.
Cheers, Kath.
Very helpful. I watched my mother block needlepoint for years but was not sure how to handle the more delicate fabric for finished embroidery pieces. It seems like you read my mind and give me hints just as I need them!
Timely indeed, and a great tutorial – thanks Mary!
Love your website and often refer to it. Thanks for the tips on blocking. Great tip about the corkboard. I have used a sturdy cardboard sheet covered with plastic.
Do you need to seal the corkboard in any way or cover it.
Very helpful post! Though I may have an idea to replace the cork board. When crocheting I use a large, thick styrofoam board (you can find those in any DIY, often used as insulation in construction work) and regular sewing pins with glass heads to stretch my work. To prevent flaking, I’ve sewn a wrapping from an old sheet. The styrofoam is immensely easier to handle than cork (and much friendlier on fingertips and nails).
I have enjoyed your last few post about preparing you hoop an fabrics for embroidery. I wrap my inner hoop for free motion embroidery but haven’t thought of it for handwork. I consider myself as accomplished in many forms of needlework, but there is always room for improvement and learning new ways of doing things. Thnk you for all your hard work.
Thank you for this great tutorial!
I once framed a cross-stitch project as a gift, and I didn’t know how to block it without crushing the stitches (there were millions of French knots). I framed it anyway, and boy, the creases in the fabric aren’t pretty. The recipient didn’t notice, but every time I see it…
Wish I’d had this tutorial then! Next time! 🙂
This is the first time I have seen a recommendation for blocking embroidery although it was routine when I do needlepoint. Thanks for answering my question about whether anyone ever thinks to block thei embroidery work.
The one suggestion I might add is to cover the board with a piece of ginham fabric. I use the gingham pattern to square up my work rather than having to draw the lines – and the gingham looks so pretty and cheerful!
Hi Mary,
Even though I wash my hands regularly when I am stitching, I feel the need to wash my projects before I frame them. I feel even stronger on this point since I just had my belongings in storage (not temp controlled storage either)for a full 12 months. After I got my things out of storage, cloth items (ie furniture, bedding,etc) showed stains from body oils and stains that I believe to be heat set. After this, I feel even more strongly about making sure my ‘heirloom’ pieces are cleaned before framing.
My question is, would you still recommend this method of blocking if I have to clean my projects first? I have just been cleaning my projects and ironing onto a layer of white terry towels (stitch side down)and then stretching onto archival foam core. Is there a better method? I do like the idea of blocking onto a squared off cork board,…
I look forward to any further insights from you.
One way to prep a piece for wire stretching (and I would wonder about threads pulling loose from the weave without a wire, frankly, as the piece dries and shrinks) would be to cut it about an inch larger than needed, once squared off, and then run it through the hemming foot of a sewing machine. Makes a nice little tube on each edge.
Hi, Mary, I’m relatively new to embroidery. I was wondering when you have a design that’s bigger than your hoop will it ruin the stitches to tighten the hoop over finished work or do I need to buy different size hoops for that?Thanks so much for all the tutorials & beautiful designs!
I have an embrodery design sewn onto a piece of canvas and I am wanting to frame it. I was thinking I need to put some kind of sealant on it to protect it from getting snagged. Have you ever done this?
Is it possible to use the damp blocking / stretching technique on silk fabric and threads?
I wouldn’t use it on silk fabric, necessarily, because the water spots may end up visible. I’ve damp stretched silk threads stitched on linen frequently. You don’t want to saturate the threads – just lightly mist the fabric. ~MC
Do I want to block my embroidered piece differently because I stitched it with “warm and natural” underneath it? I started stitching BEFORE I found your awesome blog, so who knows what I’d be doing in my life if I’d found you first! Any suggestions??
Thanks for sharing all your amazing knowledge!!
xoxoxo
Will the above stretching work for cross stitch on the heavier type of thick stitching material, not linen, – i’m not sure what you call the open weave cross stitch material! Finished work will then be for a cushion.
Thank you for your advice.
Regards
Helen
Yes, if you plan to wash your piece after stitching (Remember to test for colorfastness with threads!) you can block and damp stretch it afterwards.
i have just read your tips on damp stretching embroidery ready for framing. I have completed a needle painting embroidery of a large iris which has been framed once and I was hanging it almost in the dark because of the wrinkles. Please could you tell me if you think hot steam stretching would be better for my project as I have done my work on cotton satin with a backing of batiste so as you can imagine a very unforgiving combination (I will always use a high count linen in future).
The wrinkles are bad between the petals. I couldn’t have stretched it on my square frame while I was working it any more if I had tried!
I would be most grateful for your comments
Nerys Simpson
Hi, Nerys – Well, I hate to be the bearer of bad news, but it’s probably impossible to remove the puckering completely. If you’re confident that your threads are colorfast, you can try steaming it – it might relax the threads a little bit – but in my experience, if a center portion of the embroidery is heavily puckered (especially with needle painting, which is usually pretty dense stitching), you probably won’t be able to get the puckers all the way out. I think I’d try damp stretching first – pin it up as nice and tightly stretched as possible, and then spray it and let it dry. That may help a little bit.
Hi, thanks Mary for all the information and help over the years!!! I hope you are doing well.
Question: I have blocked and stretched my icon of St. Mark. There is no embroidered background-just the fabric. For the first time, I have a buckling problem, and I don’t know what to do. It buckles where the edge of the image meets the surrounding blank background.Obviously I worked too tight, and I didn’t know until too late. It got a little better after blocking, but still it’s there. I don’t remember the name of the fabric, but it is quite sturdy.
thank you
Hi Mary. I used your tutorial on damp stretching for a finished piece that I was framing. While it worked well to stretch the piece, I had a problem with the corkboard staining the fabric a bit when I sprayed it with water and let it dry. It also ended up with an odd smell that I imagine came from chemicals in the corkboard itself. Would this work with a piece of foam board, do you think? I also looked at your review on evertite stretcher bars, and while it looks like you’re using those to stretch before you stitch, would they work to block a finished piece.
Thanks so much for your website, it’s absolutely the best resource for surface embroidery!
Bonnie
Hi, Bonnie – if you work your piece on stretcher bars like the evertites, when you’re finished, you may not need to block it at all. Too bad about the cork board! I’ve not had anything like that happen, but I guess it depends on the cork board? I’ve had readers tell me they block their work by pinning it to their ironing board, so pretty much anything you can pin and stretch on will work. Oh, I’ve also had people tell me they save styrofoam blocks from shipping containers or the like, and use them, so there’s another idea. Depending on how much you spray it, foam core board my get a little soggy or maybe weak where the pins are in? I don’t know – I haven’t tried it.
After pinning the top edge is there some way to get the center of the bottom edge directly perpendicular to the straight top line?
Hi, Pam – You can always start by pinning the top center edge and the lower (opposite) center edge, to make sure that the piece is lying just right on the board. With the silk gauze, I find it pretty easy to line things up to make sure they’re square, because you can easily see through the silk gauze to line it up with the board. Since that area won’t be visible (the area where the pinning is), you could always draw a light line in pencil on the fabric, to help guide you.
Years ago, you could by a frame with tacks around edge to stretch and dry curtains on. I am looking for a stretcher more like 12″ X 12″ to stretch cotton canvas on.
I was wondering about this technique using a vintage crewel pattern. Is there a risk that the colors could run? Thank you!
I have slightly dampened a “new” white loopy/pile cotton towel and laid the towel on the right side of the work. I then roll, not tightly, the pieces together and let set for a short time to allow the piece to absorb the moisture. I have then gently pulled out using my blocking board but put the back side to the board and let the stitches fluff.
I have also steamed lightly placing the clean piece face down on a nice loopy cotton towel letting stitches fall into the loops/pile to avoid the “flattening” of the stitches then placing on my blocking board.
Have you ever had an issue with the dye in any of the threads running when you mist with water? I once had an issue with some brown wool thread. Some dear friends were able to help clean the project for me but it resulted in some of the colored yarns ending up slightly lighter.
Happy stitching,
Judy
Hi, Judy – no, I haven’t, but if you’re going to wet your finished work, it’s always a good idea to test the threads before you use them.
Mary, I love the idea of your corkboard, and wish you would post a picture of it and maybe even write an article with more details about how and why you designed it. Here’s what I’m thinking. I see your board is quite large and you say it has “many lines, dashed circles and so forth”. I’m wondering why so large and why so many different guide marks. Why a dashed circle? Aren’t we always going to be blocking rectangular pieces of fabric? And why that dash off to the right of your blocked piece? And assuming there is no risk of permanent marker transferring to your fabric, why not just have one large square/rectangle with a large circle drawn inside, for example? I know you have good reasons for everything you do and I’m curious as to the reason for those various marks. I expect that you work with some very large pieces, but I don’t think I would ever work with anything bigger than 24 x 36 (which I have done in a crewel work piece).
Hi, Judy – it’s just a large cork board in a frame, that I purchased – like the kind you’d see in a classroom or office space. I use the lines to help me square things up, but they aren’t essential. The circular lines are mostly because my mom also uses it to block crocheted doilies, which is one reason why the board is so big. If you don’t create anything large, then a large board isn’t necessary, but the size has come in handy for blocking several pieces at once. I’ve not had a problem with the ink coming off on anything, but I don’t pin on the ink, just right below the line.
Dear fellow stitchers, I do basically the same technique for needlepoint. Instead of a cork board I use a large, old fashioned, pull-out bread board from a house. A friend drilled holes every 1 inch after I marked the board with a fine pencil. I usually wash the needlepoint in sodium laurel sulfate, cold water, rinse well and roll it in a terry towel. Use only brass brads to stretch if out. They won’t rust. If it doesn’t stay in line I rewet with plain water (spray bottle) and let it dry slowly. A third time p.r.n. (if necessary). If you’re resurrecting an antique piece test for color fastness. Dry clean p.r.n and spray with cold water after it’s on the board. The original stitcher will be smiling down at you.
Dear Mary, I came across this page while searching for what to do with a distorted embroidery. My piece depicts a window, and when I took it off the hoop part way through just to check how it would look, the window frame was no longer straight but slanting to the side quite noticeably. It seems I hooped the fabric incorrectly so that the warp threads were not straight. My question is: is this something that could be remedied by blocking? Or should I abandon this project now before I put any more time into it? I’d be really grateful for any advice! Best wishes, Charlotte
It might be able to be righted with blocking, Charlotte. You can go ahead and try blocking it now and see how it works out. If it straightens, then you’ll know you won’t be wasting time stitching it. It won’t hurt it to block it and then re-hoop it and stitch on it again, and then block it again later.
Thanks so much Mary, I really appreciate you taking the time to reply! I will give the blocking a go and see how I get on ♡
Hi Mary. Thanks for this very helpful article. One thing worries me: is there not a possibility of the cork board discolouring the linen once it becomes damp? Another question is how thick is your cork board.
I do enjoy your daily mails which are very informative.
LeslieAnn
Thanks for this great site! I just made a pet portrait piece that was incredibly shiny, but after washing it and blocking it on cork (without scrunching it), the stitches look misshapen, shrunken and dull. I used DMC floss, luke warm water, and Dawn soap as I usually do. Is there anything I can do restore the sheen of my piece? A vinegar rinse? Block it in the hoop to get even more tension while drying?
Thanks for the article about blocking I’m going to try this method.
I love this idea. Much better than ironing, I would think.
I embroidered my granddaughter a piece, a hummingbird w/musical notes in its wings, for graduation. When I was finished I decided to wash it. It was done with DMC cotton floss. After allowing it to dry, I noticed the green in the hummingbird had run. It looked like thread showing through from the back. I was sick. I tried everything to get it out, but was unsuccessful. So, I made another one. I decided to frame the original bird anyway and loved the way it looked in the frame, but you could definitely see the stain. The second bird was better, but after framing it, I just didn’t like it as well. I ended up giving my granddaughter the original bird, stain and all. I was sorely disappointed, but she loved it.
I’ve found over the years that color run usually happens in certain circumstances:
The water is too warm, or
a type of detergent or soap prompts the dye to run, or
the piece is left to soak in the same water (that’s too warm or has the wrong soap in it) for too long, or
the piece is ironed when it is still damp, creating hot steam that causes the thread to run, or
the piece is dry but is ironed with a steam iron.
I rarely if ever use detergent or soap when I have a to rinse out a piece of just-finished embroidery, and I always use cooler rather than warmer water. I try to avoid leaving it in the water too long. If there are very tough stains, I’ll do whatever it takes to get them out, but always with cooler water and, if I must use soap, I usually use something very mild. And I never use a steam iron.
But over the years, and after many similar problems, I’ve learned that prevention is better than cure. If you prepare your fabric ahead of time, and then keep your embroidery protected from stains at all costs while you’re working on it, you should be able to avoid soaking altogether.
Can any Dimensions kit be blocked this way, on the instructions sheet it says dry clean only, can you help me
Yes, most kits can be blocked this way, as long as the fabric isn’t prone to spotting (like a silk, for example). I would probably block face down, and then I’d make sure that the water I’m using is cool or room temperature (don’t use warm or hot), and that it sprays in a Very Fine Mist – you don’t want to soak the threads or the fabric – just the lightest mist, and let it dry completely.
This really works well! My embroidery turned out so much better than with the iron. Thank you!
Should I block before of after hemstitching a panel?
It really depends on where the hemstitch is, if it’s decorative or functional. Are hemming with it? Or is it part of your embroidery? Do you have more embroidery to do?
If you’re asking about the sequence in Sweet Marguerite, block after the interior embroidery. You want your fabric blocked and stretched before you set up your hem.
Mary,
Do you recommend damp stretching for silk ribbon embroidery? Any advice you can give will be greatly appreciated.
Diane
Working on the Harvest Hues. What if you used stick n washaway to stitch thru? If I get the piece wet, will that start to “melt away”? I still need to see the leaf outlines to cut away and turn under. Also, any tips on how to make it easier to turn under the oak leaf? All those curves…!!
Thanks!
On the oak leaf, you’ll just make small snips into the seam allowance area, just as on the plain leaf – only they’ll be more frequent.
You you used a wash-away stabilizer, baste through along the leaf outline with an easy to see sewing thread, so that your outline is visible for you when you rinse the piece and remove the wash away stabilizer. On the oak leaf and similar – with lots of curves – I’d keep the basting stitches small and relatively close together. (Basting stitches are just running stitches.) Then, rinse away the stabilizer (assuming your finished with all the stitching). Once the fabric is thoroughly rinsed, lay it flat on a towel and cover it with the towel and press out as much water as possible. Then let it sit and dry most of the way. While it’s still slightly damp, though, that’s the time to block it.
I’ve used your technique several times with successful results. Now I am making a tiny all silk thread purse on linen and I want to know if it’s OK to use your technique on the silk threads.
I think it depends on your silk. I would do a test run. Generally, though, I find I can damp-stretch silk embroidery without a problem, as long as I go light on the spray and there’s no heat involved while things are damp. But I always think it can’t hurt to test run any technique like that, if you’re afraid there may be negative results.
I’m so glad I found you! I’m new to hand embroidery. I spent weeks practicing stitches, starting after Christmas. It was to be a gift for my baby granddaughter, expected early March, to hang on nursery wall. I started my first piece —an owl from a kit. It was ok but not as nice as I wanted. So I embroidered another one just like it tracing pattern on embroidery cloth in an 8” hoop. I was much happier with this owl. Baby girl was born in March & I’ve spent lots of time traveling from Texas to CA to see her. My plan was to frame it in time for the Aug 24 baptism. It’s July & I was disappointed to see lots of puckers! Probably in hoop too long?
I’ve started the stretching blocking technique on cork board. Amazed how many puckers straightened out! Just sprayed with water & will continue when it is dry. I was despairing that it looked too amateurish. I think your technique has saved my project!
Yay!! That’s great to hear! I hope it turns out well!