If you’re just beginning to embroider or even if you’ve been at it for a while, the Portuguese knotted stem stitch is a nice outline stitch to master. A little more complicated than basic stem stitch, this knotted version produces a thicker, rope-like line. Here are some illustrated instructions.
The Portuguese knotted stem stitch is worked from left to right or bottom to top (opposite for left-handed embroiderers). Begin as you do for a stem stitch.
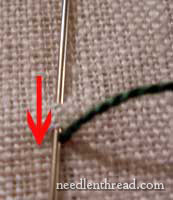
Bring your needle through the fabric, then take it down the length of your stitch, pointing it back towards the place you emerged. In the illustration, you’ll see that this is done using a “sewing” method – you work on top of the fabric, without having to go to the back. This stitch can be worked with or without a hoop – personally, I usually use a hoop, but when I’m using the “sewing” method (as opposed to the “stab” method, where your working hand goes to the back of the fabric to get the needle and put it back through), I don’t necessarily keep the fabric drum tight. A little give in the fabric helps with the “sewing” method of embroidery.
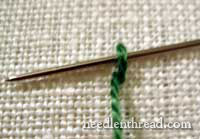
You want to keep the thread to the right of your needle when you draw it through, so that the working thread ends up to the left side of the stitch. Take the needle underneath the stitch you just made, without picking up any of the fabric. Do this twice, both times in the same direction, so that you are wrapping the thread twice around your stitch.

After you’ve wrapped the thread twice around your first stitch, you’ll take another stitch, just as you did the first, progressing up the fabric the length of the new stitch, and emerging where the last stitch went down into the fabric.
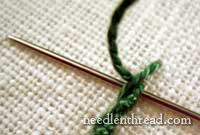
Now that you have more than one stitch, you are going to wrap your thread twice around the both stitches – the base of the former stitch (after the “knot” that you made on top of the first stitch) and the middle of the new stitch. Take your needle under both stitches twice so that the working thread winds around the stitches twice. See the photo above and below for illustration.
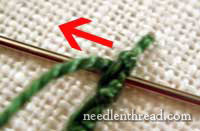
Notice how the needle passes under both stitches and does not pick up any fabric. This is done twice. In the photo above, one pass has already been made, and this is the second pass under the two stitches.
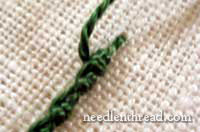
Continue along your line in the same manner, going forward the length of the stitch, pointing the needle back to where your last stitch went down into the fabric, keeping the needle on the left side of the stitch. Pull the needle through, then, going from the right side, pass it under the two stitches twice, and then proceed to your next stitch.
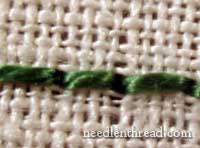
On the back of your fabric, you’ll see a line that looks like backstitches.
Have fun with it!
You can find more stitch directions here.


Dear Mary Corbet,
You lessons are really simple and easy to learn for a starter like me and I enjoyed learning all the stitches that you have shown.Idont know how to thank you for this.
Mrs Anitha Edison
dear mary,
i never knew learning from the net was so easy. ur website has so much to offer and in about a month i have learnt so much.i am so thankful to u for introducing me to such a creative spare time activity.
Anitha,
You can find a Mary's video tutorial on this stitch here: https://needlenthread.wpengine.com/2006/11/portuguese-knotted-stem-stitch-video.html
Dear Mary,
I am sri lankan girl. I don’t know how to do embrodary. But your instructions help me to learn that. Thank you very much.. Triple gem bless you…. (I am buddhist..)
Is this a special needle? How did you get the yarn thru the fabric don’t you have to have a needle with an eye? How long is the needle used? Thank You, Anna
It’s just a regular embroidery needle with an eye….
Hi Mary,
Your website is so useful. I am from India. I was a working woman all these years. I would have loved to learn embroidery but because of lack of time on my hands I was not able to do us. I would have definitely subscribed to your course but since I do not possess a credit card I would not be able to make the remittance to you. However I enjoy looking at your work and the neatness it most appreciated. Embroidered work should always look neat on the back too.
God bless you for all your work and kind regards,
Carmen
Mary, you have excellent videos and tutorials. Your site is bookmarked, and I use it frequently. Thanks! Thanks! Can you tell me what kind of floss you use for the Portuguese knotted stitch. I am using the stranded floss and yours looks like a single thicker strand. Will it work with three strands of floss?
Hi, Sue – it’s perle cotton. I’m not sure what weight – probably #5. I use perle cotton for many of the videos, because it is easier to see the movement and look of the stitch in the video, but you can work the stitch with any kind of thread, really!
Thank you for your wonderful tutorials on mastering the beautiful art of embroidery. Much appreciated!
Kindest regards from Brisbane Queensland Australia, Charlotte