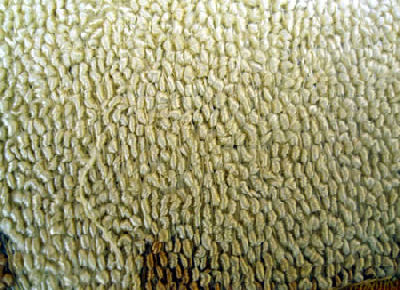
Here’s an interesting close up on an embroidery stitch. Off the bat, I said it’s a bullion stitch, but as I keep inspecting it, I wonder…
It occurred to me that it may not be a bullion stitch after all, although I can’t think of how else this look was created. So I thought I’d throw it out here to readers and see if anyone has any other ideas how this wooly look was created. It’s obvious that there’s a layer underneath of either long and short stitch, split stitch, or stem stitch, and that the “loopy” part is stitched kind of in between and on top of this first layer. Could the embroiderer have looped the thread over the “ridges” formed by an under layer of, say, stem stitch, leaving a loopy space using a laying tool or something of that sort? Or do you think it’s really all bullions? Anyone? Anyone??

If you can figure it out, I’m all ears!!


I can’t see the photo really close but could it be something like in ribbon embroidery you make a straight stitch and then whip it? That would create a bullion type effect wouldn’t it?
It may be a whipped stem stitch. I might try a loose uncut turkey work or even couching that was worked so it would puff up a bit.
Marilyn
it could be made by a needlepunch tool and the sort of thread used may have caused it to twise.
Hi, all! Thanks so much for the input! I’m pretty certain this is just regular flat silk. Perhaps it is loosely whipped around the foundation stitches. I’m going to play with possibilities today to see if I can imitate the look. Then I’ll let you know!
it is not a bullion as they do not “dangle”, there are other stitches: velvet, I don’t think it’s turkey, is it on canvas or material?
Hm. I don’t think they’re actually dangling, but they are somewhat open-ended here and there (like a tube), which made me think it was not bullion.
It’s worked on material, not canvas.
If you’ve got any suggestions, please let me know!
This looks like a small pillow that my grandmother had me make when I was about 4-5 years old. Now, 50 years later I remember that it was probably a bullion stitch. The stitching underneath were stitched guidelines for doing the stitches on top. This top stitch was done with six strands of silk floss. My grandmother was from Wales.
I remeber they used to have kits where you could make rugs with what now seems like crochet but not quite you had these plastic hooks and some very cut short thread but it looks like they did the knots differently than I remember. It’s very unusual. I borrowed a book from the library about embroidery and that looks like the bullion knots that were in the book I made one and it didn’t dangle or hang am I doing it wrong?
bullion stitches?
I think you are right with the name bullion stitch. I learned this a long time ago from an old nun, while helping her with some Jacobean embroidery. Simply make a long straight stitch and weave around it making sure each loop lies neatly side by side, untill the long stitch is covered, then take the needle to the back and continue with another long stitch. The direction of the finished stitches can give subtle shade effects especially if silk thread is used, and different textures result, depending on how many strands are used. The pic looks like a little wooly sheep!
i think that this either a stem, outline, or back stitch and then you whipped sections of it very closely together to make the effect.
it could be bullion knots
Hi Mary, Just came across this, could it be chained bullion stitches, or long legged bullion or detached bullion
Hi, Shirley – Thanks for the input! I ended up reproducing it fairly closely by stitching a ground of stem stitch filling (shaded) and then taking a flat silk and whip stitching around the stem stitches with the flat silk. It came out identical! I was glad, because that many bullions for filling would have driven me mad! I tried bullions, but wasn’t satisfied with the look. You can see the results on my Agnus Dei project in the “Pictures” section of the website. Thanks again for leaving a note and for your input! ~MC
hI, I THINK IT IS FRENCH KNOT. plz let us know what is it.
It looks a lot like a stitch we use for a hook.
Normally we find it hard to get a metal hook holder/fastener though the hooks are easy to get. Make a single satin stitch using regular stitching thread except it is loose so that the hook can go through. Go back and forth a few times for strength and then whip it. I have seen it being used on a square pillow case for creating a bee. It had yellow and black embroidery threads used for the effect.
I feel it is chained bullion stitch
Best wishes
vani