


This embroidery project has me fully occupied! I have been working around the clock, trying to meet an impending deadline, and finally, after this week, I’ve got the sky in (more or less). Here some photo updates of this project, which includes lots of teachniques: needlepainting, Italian stitch, goldwork, couching, etc.
Worked in semi-flat silk in very long satin stitches that will eventually be couched over with gold passing thread, the sky in this project consists of four colors of blue in a gradiant going upwards. You can see it in the photo below:
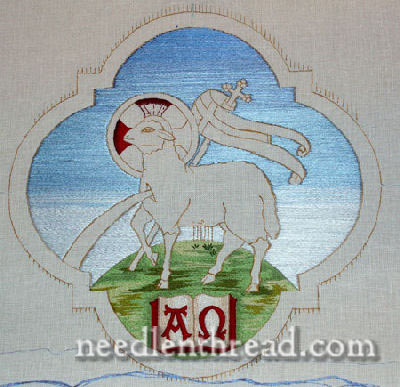
Overall, I like the effect, but there are some adjustments that I will be making this week. For example, considering the gradiant from light blue to medium (the first color change going upwards), the change is too sudden, and the right side of the design does not match the left as well as I would like it to. So I will blend some of the medium colors into the light and some of the light into the medium, hopefully correcting the problem.
You can also see a few buckles here and there in the silk. That is the difficulty of working in such long spaces of satin stitch. Normally, you wouldn’t cover this much of a distance in a continual strand of thread. But since I will be couching over with the gold, this will secure the silk. In the meantime, the silk is in a precarious situation, and the slightest thing can catch it: hands, fingernails, loose threads lying on the work – the whole endeavor is rather strenuous when it comes to taking care of that silk!
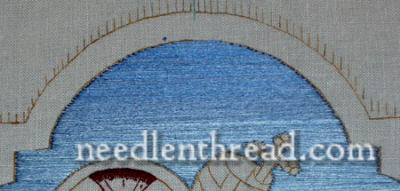
My favorite part of the sky is the very top. I like the way this gradiant worked – it looks natural, and the blend is very gradual. I also like the color of blue here. I’m not super-keen on the very light blue at the base of the design, but as it works upwards, I like it better.
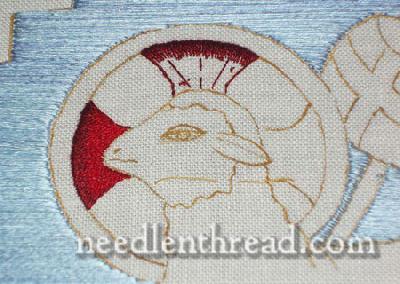
I began working on the nimbus, or halo, while I was waiting for the rest of my silk to arrive. The red portions of the halo are worked in long and short stitch, in three shades of red. the outer, darker shade will provide a slight “shadow” when the goldwork is done around the outside of the halo.
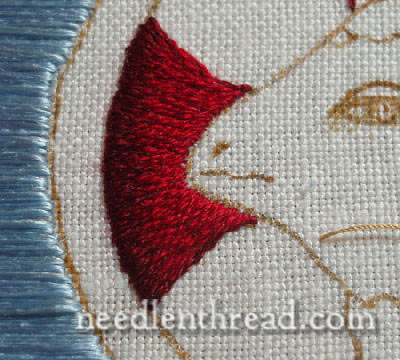
A close up on the long-and-short stitching. This technique is not as difficult as it seems, although beginners seem to shy away from it. Once you get the basic technique of long and short stitch down, you will find it’s really a very “forgiving” stitch. You can sneak stitches in here and there to even things up or fill in tiny spaces, etc. I love this stitch!
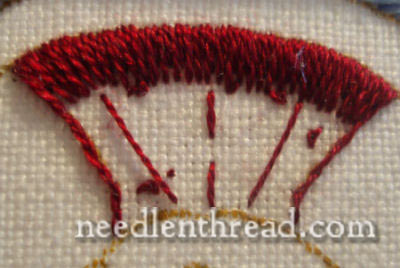
And here’s another close up on the beginning of the long and short stitch on the halo. The longer stitches worked in the middle are my directional stitches – you can mark these on with a pencil, but I occasionally stitch them in with one of the shades of thread I’m using. I can cover them up completely or work them into the color scheme, depending on the design.
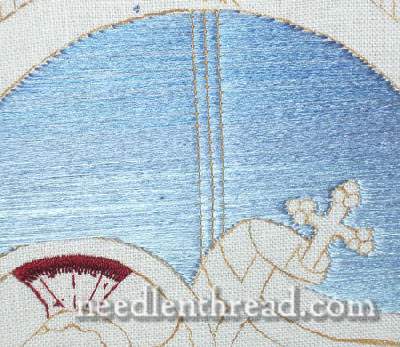
And, finally, the beginning of the couching over the silk. To keep the spacing even, I originally marked off quarter-inch sections around the top and bottom of the quatrefoil. However, approaching it this way, I’d have to stretch my gold passing down the length of the design and match up the marks. I didn’t like that idea because it seems to me that it may lead to waste. So instead, I’m counting off the threads in the linen (it’s an even-weave) in the middle of the design and at the top of the design, and lining the passing up this way.
Before couching, I run my couching thread (Au Ver a Soie 100/3 in gold) through beeswax to give it extra strength and to protect it from the gold.
So there it is so far. I’m certainly open to any suggestions or constructive criticism!! Thanks!
Mary, this is wonderful. You are surely making good progress, too. I am not as critical of the blue gradient as you are. I think once you get the gold on it the blending will be much less noticeable.
I am keenly interested in your project because I’d like to copy it for my own church, maybe later this year. I love your idea of “shadowing” the gold. I may try to to the same in reverse for the lamb, that is, use lighter blue around the lamb outline to emphasize the radiance of the subject. I will be able to see how you did it and benefit from your experience!
Marilyn
Thanks, Marilyn! I’ll post the pattern eventually – I need to either photograph it or take it somewhere for scanning, as it’s too big for my scanner.
I’m glad you like it. The lighter blue around the lamb is a great idea! It’s too late now for me to change this one, but you’ll have to send an update when you do yours.
Thanks again!
Gorgeous, very inspiring in every sense of the word…
Dear Mary, Your website is a treasure trove. I am teaching myself thread painting from books and just received a couple of kits from Tania Berlin. You are so correct when you say there is a difference, they are so informative for a beginner and it is great to have the correct threads for the project. Have just finished stitching your pattern (the one with the rooster) I did it on hesian for a rustic look and it has turned out wonderful. Stitched it with gloriana silks.
But thank you so much for your teaching I love it.