


Our embroidery guild is producing some embroidered baby quilts to raffle for fundraising. I didn’t have time to contribute to the production of the embroidered squares for the boy’s quilt, because I was working on a huge project with a looming deadline. We found we were two squares short, somehow, for the girl’s quilt, so, thinking it would be nice to have a relaxing and “fun” embroidery project (that wouldn’t really take too much time), I set up the two squares. This particular square I’m working on right now has plenty of seed stitching in it.
I found this butterfly embroidery pattern on Needlecrafter, I believe. There are some excellent free embroidery patterns available on that website.
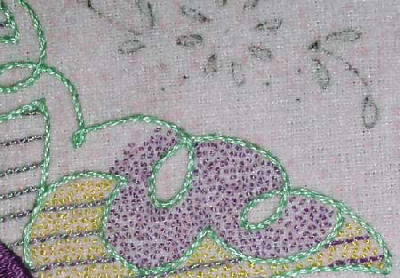
So I started out with this little butterfly, and as I was working on it, I realized I wanted more color. The design is stitched on a pink quilter’s flannel. I wanted to go with the pastels that are in the rest of the quilt fabric, but the whole design didn’t seem to stand out too well if only outlined. So seed stitch seemed like the perfect option for a light filling.
Here’s a photo of the square so far:

One of the little lines in the top wing is squiggling a bit: a good lesson – remember, when you transfer your design, if you draw it inaccurately and don’t correct it, it WILL show up in your stitching! So I may take that out and correct it… or not. We’ll see how noticeable it is when all is done.
Speaking of transferring designs, being pressed for time, I cheated on this one! I opened the design up in my photo editing program, reduced it to fit within a 6-inch hoop, and, holding the fabric on my monitor, traced it onto the fabric! Now, a word of advice: if you have an LCD monitor, be very, very careful if doing something like this!! You could damage it. I didn’t, but I realized I easily could have!
Here’s some of the seed stitching up close:
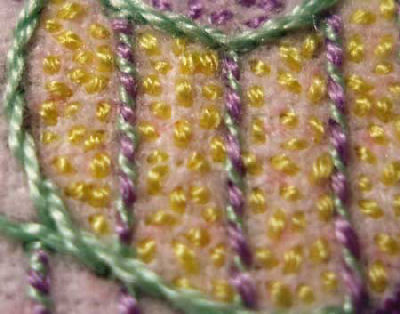
That’s the inside of the wing. The lines are stitched in a whipped backstitch, using two strands of purple DMC for the base line in backstitch, and one strand of the green for the whipped running stitch. The whole butterfly wing is outlined in stem stitch.
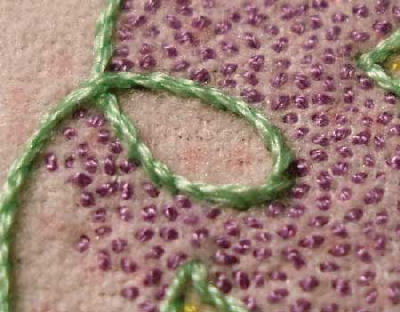
You can see the medium purple seed stitching here – it’s the same color on the head of the butterfly’s body, which is worked in satin stitch.
I like using seed stitch for filling this kind of an area – it adds a “light” filling that almost looks as if it’s dry-brushed in. Granted, the yellow reminds me a bit too much of cornmeal. But overall, I like the effect! Fun stuff with simple stitches!
Your needlework is gorgeous! I've been Googling images for inspiration and I think I've ended up on your site around a dozen times. Time for me to bookmark! I may try seed stitch. I've never seen it actually applied anywhere before and your butterfly is wonderful.Thank you for inspiring me today!