


If you’re relatively serious about embroidery, you probably have a good selection of favorite tools on hand – those things beyond needle, scissors, and hoop. Here’s one of my favorite tool investments – and it doesn’t cost much!
The EZ Tack-It kit is quite handy to have – so much so, that I have two kits! I came across another one while I was shopping a few months ago, and bought it to keep on hand.
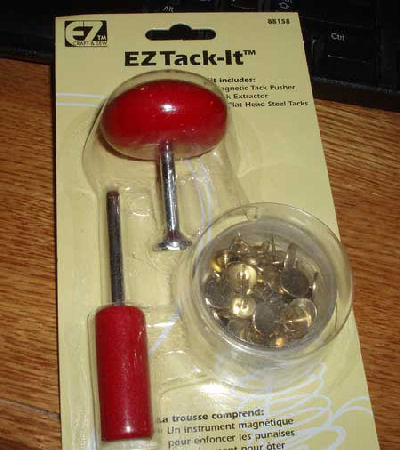
The EZ Tack-It is used to assist you in setting up embroidery projects on stretcher bar frames.
Unlike scroll frames and slate frames, on stretcher bar frames, you tack your fabric all around the edges. I like stretcher bar frames a lot, because they provide excellent tension and are quicker to set up than a slate frame. My preferred stretcher bars are Evertite stretcher bars – they cost a little more than most, but they last forever, and with them, you can adjust tension on your fabric even after the fabric is fully mounted, without having to remove and re-tack the fabric.
So this is how it works: you assemble the four sides of your stretcher bar frame. If you aren’t familiar with these things, they come in packs of two sides in a given length, and you can assemble a four-sided frame by buying two packs that will accommodate the dimensions of your project. You can buy them at many specialty needlework shops. Online, you can find them at different embroidery shops, like Needle in a Haystack. They’re pretty inexpensive ($2.00 – 3.00 / pair).
Don’t confuse them with canvas stretcher frames, which are much wider than these! But – well, to be honest, I’ve used the canvas stretchers, too. You can find those in the art department of hobby stores. They aren’t as nice as the embroidery stretcher bars, and you do end up wasting a bit of room on your fabric, because the frame itself is a good inch or so wider than the embroidery stretcher bar frames. Still, in a pinch, canvas stretchers will work.
Anyway, back to the Tack-It. You’ve got your frame assembled, and you’ve got the fabric for your project ready. I always suggest pre-shrinking if you need to.
You want to know where the middle of the top (horizontal) side of your fabric is, and this is where you start tacking – in the middle of the top edge of your fabric. You pick up a tack with the magnetic tack pusher (that’s the big round red thing in the kit), and you insert it into your frame in the middle of the top bar.
I prefer tacking on the side of the bar – the outside edge of the frame, but you can also tack on the top of the bar, or even on the back of the bar if need be.
Tack your fabric from the center to one outside edge, then go back to the center and continue across your fabric to the other outside edge of the frame.
Each of the tacks should be placed no more than half an inch apart on the frame. I generally place mine right next to each other, though that means I use a lot of tacks.
Once one side is finished, move to the opposite side of the frame, doing the same thing. Pull the fabric taut as you tack the second side, but you’re not going to get drum-tight tension, since you’re only working on the second side.
Then you move to the third side and repeate the process, pulling your fabric to keep it taut and even. Be careful, though! You don’t want to warp your fabric. Just pull tight enough to establish good tension.
When you do the fourth side, you end up with drum-tight tension. A frame mounted like this will keep good tension for a long time. I’ve been working on my silk work sampler, for example, for almost four months, and the tension is still perfect. When I worked the Agnus Dei piece, I never had to readjust or fix the tension of the fabric.
The Tack-It kit makes it really easy to push the tacks into the frame. The handle of the magnetic tack pusher fits in the palm of your hand, to give you good, even distribution when pushing the tacks in. The magnetic tip keeps the tacks in place while you’re working with them. And the extractor makes it easy to pull out tacks if you need to.
Best of all, because your tension is good, you are not likely to end up with puckers in your fabric when you remove it from the frame.
I store my Tack-It kit in a jar, with an abundance of extra tacks. The kit comes with 60 steel-topped tacks, which is enough for at least one large-ish project. Since I generally will have more than one project going at a time, I have extra tacks – I just bought regular “brass” thumb tacks from the hardware store. They work fine, and are a lot less expensive.
You can find the EZ Tack-It kit online at several places, Lacis being one (in California). In Canada, Tanja Berlin carries them. In the States, they run $10 for the kit.
I just now found your site and I appreciate it so much. I am now retired and have gotten back in to crewel after many years of not stitching. I feel like a beginner again but really enjoy the work. I find the site very helpful. I have gotten most of my current work from the Phillipa at the crewel store in the UK. Her projects are really great.
Anyway thank you very much I will stay tuned.