


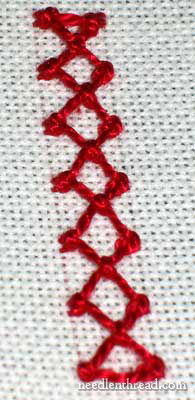
Knotted Diamond Stitch is the latest addition to my video library of hand embroidery stitches! It’s a decorative band stitch that’s easy and quick to work, and looks great!
The knotted diamond stitch makes a decorative band of diamond shapes between two parallel lines. It can be worked horizontally or vertically. It would make a great seam treatment in crazy quilting, it could be used as an edge treatment on a towel, or for lines in band samplers. I was thinking it would make a neat edge border around the outside of a card, for paper embroidery, but I haven’t had a chance to try that yet!
You can build on the stitch, too, by adding other elements to it – like French knots or colonial knots in the centers of the diamonds, or daisy stitch petals coming off the points of, or placed in the “V” between, the diamonds.
Some hints which I touch on briefly in the video:
I find the stitch faster to work if you lay your thread on the fabric in the correct arrangement, rather than wrapping the thread around the needle for each knot.
When you work from the right to left (forming two knots, one on each side – you’ll see it in the video), lay your thread down in the shape of a “C” (equivalent to wrapping your thread over and around the needle counter-clockwise).
When you work the center knot coming back (from left to right), lay your thread down in the shape of a “G” (again, you’ll see this in the video) – this is equivalent to wrapping your thread over the top of the needle, and back around, clockwise.
It also helps at first to mark off even spacing for the “X” that’s formed by the stitch, until you can judge it by eye.
I’m using perle cotton #5 in the video (and in the photo above). It’s a nice thread for this stitch, although it works well with other threads, too.
Here’s the video:
Do you want more inspiration & information on hand embroidery?
There are all kinds of reasons to sign up for the Needle ‘n Thread daily newsletter! Check them out and sign up today!
You can find more videos in my collection of how-to videos for hand embroidery.
If you like what you see on Needle ’n Thread, if you want to be a part of keeping the website thriving (and free of annoying network advertising), why not become a patron on Patreon? Check out my Patreon page here, where I’ll occasionally add special needlework bonuses for patrons.
If you shop on Amazon, you can support Needle ’n Thread without any extra expense to you by visiting my Amazon Recommendations page here, where you’ll find books and sundries for the needleworker available on Amazon.
Mary, the video is very clear for me, and the commentary excellent. The only suggestion is I’d like to see a example of the finished stitch sample before I begin my own attempt. I’m a very visual learner, and I need to see what I’m aiming for before I begin.
Hope this is a helpful comment,
Hooroo,
Christine
http://missmuffettwo.blogspot.com/
Love it! I’ve scheduled a link to this post to go live on my blog Sunday morning (Central USA time), August 3. Thank you so much for this resource!
Denise
http://needlework.craftgossip.com
Thank you so much for all your videos. I’ve been following along since the beginning, and I know it’s taken a lot of time. I refer beginners to your site constantly! This stitch is one I haven’t seen done before, so I loved seeing it. You make it look so easy. =) I’ll be trying it soon on one of my moms cq blocks, I’m sure!
Thank you very much. It’s a great job. I have learned so much from your vidio.I am eager to know the fancy stiches with stones.
Thanks a lot .With god grace long life with good health to do this service.
Ranee.J
this is awesome…
I have just place a link to your videos on another forum. Someone was thinking of taking up embroidery and this was the best site I thought of. Your videos are so easy to follow, even for a beginner.
Thank you! I'm glad you find the videos so helpful!
MC
Beautiful work thank you
OK, I know this video is rather old, but I figured this would be the best place to post my question. Is there any way to connect this stitch into an unbroken circle? I’m stitching a word on a larger project at the moment and I’d like to use knotted diamond for the O in my word. I have a few ideas to try, but if there’s an established way that works well I’d like to know about it! Thanks,
Alyssa
Hi, Alyssa – I think you’d start the stitch with the anchor stitch, and pull the stitch down to make that upside-down V at the top, and then work the stitch as normal, and end at the anchor stitch area, with a V meeting the upside down V. You might have to “fudge” the beginning and end – just to get it to look like the rest of the line, but I think it can be done. Remember that the inside of the circle will be closer spaced than the outside as far as the knots on the edge go. ~MC
I am caught up to this variation and that United diamond stitch. I don’t understand how the head is added. My needle is too thick for the head to thread while stitching. Plus when do you add the bead? So confused already, LOL
Spell check, I needed to check the check.
Hi, Oriole – I’m not sure what you’re asking, exactly. What do you mean by the head of the stitch? And what bead? I’m not using a bead in the knotted diamond stitch.