


Sometimes, it’s not necessary to iron an embroidery project, but sometimes, you just can’t avoid it! When working white-on-white with linen, using a hoop, it’s likely you’re going to have to wash your work, which means you’re probably going to have to iron it, too! And, if it’s something that needs to be sewn up for finishing, chances are, you’re going to have to iron it several times.
That’s certainly all the case with the linen pouch I’m making. Not only did I have to wash it (quite a bit!) after finishing the embroidery, but I had to iron it several times during the sewing and turning process.
So the question is, how do you iron a piece of needlework that has embroidery on it, especially when the stitches are somewhat dimensional. Remember, I used the Palestrina stitch on this pouch? The beauty of the stitch is in its raised knots – to crush those with ironing would be a shame.
First thing I do is lay out two flannel pads, both made of 4 pieces of soft flannel, which I cover with either a clean sheet or pillow case, or (saved Just for Ironing), a flour sack towel. Good flour sack towels are perfect for this – in fact, if you have a small embroidery piece, you could just fold up a clean flour sack into about four or so folds and use it.
I place the flannel pads on my ironing board and cover them with the flour sack towel.
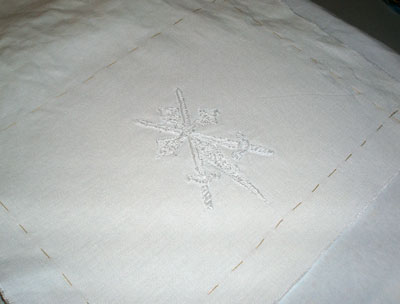
And then I put my needlework piece face down on the flour sack towel. Iron on the wrong side – the back of the needlework.
I iron using the setting for the fabric, but taking into consideration the thread used for embroidery. For example, here I used cotton thread, so all’s well – cotton and linen work well together. But a fine silk probably wouldn’t take the heat as well – had I worked this in silk, I would have been a little more cautious.
Iron over the back of the work – including over your embroidery – until you’ve removed the wrinkles. I usually don’t use steam at this point, unless the linen is really wrinkled!
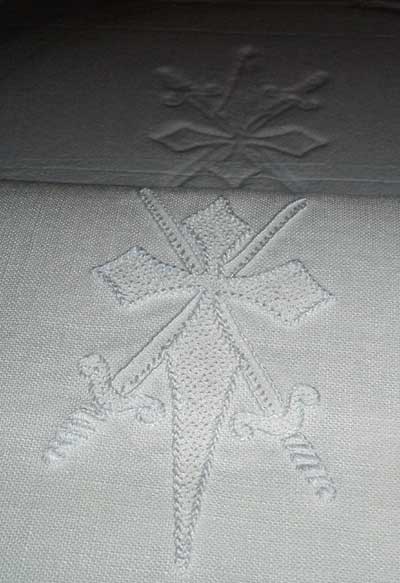
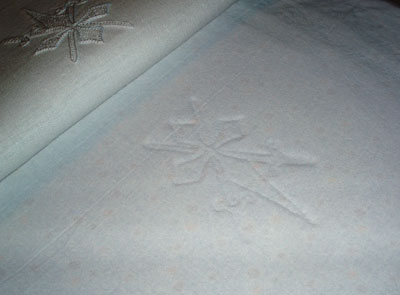
That’s the impression mirrored in the background. The embroidery withstood the ironing really well – nary a knot crushed.
That’s the embroidery for the pouch, all ironed up and ready to sew. Next, I’m going to show you how I made the cord and tassle, and talk a bit about buttons. Yes, buttons.
Hope you’re weekend was a pleasant one! For me, I’ve got a couple little touches left on the pouch today, then I need to clean up the studio – which is a Royal Mess – and then I plan to revisit an unfinished project that has some COLOR in it, or at least get it out and ready for stitching when I can snatch time after work hours this week. Ahhh… COLOR – I can’t wait!
Hi Mary, your white-on-white project looks lovely. I think the crown may have made the design to heavy looking.
Your project looks beautiful! Would you also recommend to use a thick towel to iron such projects or using flannel is better.
The reason I don’t like to use terry cloth towels – like thick bath towels, etc – is that, when ironing linen, they tend to dimple the fabric. I prefer a smoother surface, so I use a cotton towel over flannel. It’s always worked for me! You can also fold a sheet a few times and use it, too…
Hi-Mary, If you use a loop terry towel it may dimple. Try using a cut pile plush towel or a needleboard. The pile will stay upright, filling in spaces as allowed. Also, do you know that you can purchase a v-e-r-y tiny iron? Nancy’s Notions sells a cute tiny iron attached to a wand. It is a GREAT tool to have and not expensive at all.
Hi, Laura!
Yep, I have a tiny iron – it’s on a wand of sorts. I think it was only around $15 or $20, and it is handy, though I don’t take it out much. I suppose I should!
I’d like to see a super-adjustable tiny iron come onto the market, where you can move the iron into any position on the wand. That would be handy!
Thanks for the tip on the cut pile towels!
Merci de faire partager de si belles choses .
ou puis-je trouver les modeles ????
I am working on a obi out of yellow satin and a mixure of normal floss and satin floss. The yellow was thin so I had to back it with a white fabric. I had to take the hoop off some time ago and I noticed that it all scrunched and and wrinkled. Was wondering how to fix that, would just ironing work?. I am currently in a section that will be hidden in the folds of the obi. Would like a to figure out how to fix it before i go much further.
Well, I’m not sure you can fix it, but you can try blocking it when you’re finished, using this technique: https://needlenthread.wpengine.com/2012/07/damp-stretching-blocking-embroidery.html – that’s assuming it hasn’t been made up into the obi yet. There are different things that can cause puckering. One is stitch tension – if you’re pulling your stitches too tightly. Sometimes, the problem with puckering is how you’ve mounted your fabric in the hoop, and whether or not you’ve pulled it so that it is warped in the hoop (pulled more in one direction than the other). If you make sure your hoop is mounted so that the hardware is either at noon, 3 o’clock, 6 o’clock, or 9 o’clock, that can help keep the fabric on the straight of the grain. Then, if you need to tighten your fabric, pull at those places, and look at the weave and make sure it isn’t warping towards a given direction.
Hi Mary, HELP!
In your August 8, 2008 article, Ironing your Needlework Projects, you mentioned that you usually don’t use steam to remove wrinkles unless the linen is really wrinkled. Well, I received a piece of 32 ct. Belfast hand dyed linen with some stubborn creases and wrinkles in it. Can you recommend the best way I can remove the creases and wrinkles? Thank you.
A lot of the process I use will depend on your stitching preferences. I prefer pre-rinsing my fabric, because I don’t like stitching with sizing in the fabric. Also, if you’re going to iron in any serious way, you really don’t want sizing in your fabric, because it can speed up scorching. After doing an alternating hot-cold-hot-cold rinse, where you let the fabric soak in hot water until it’s tepid and then rinse in cold and then replace in hot, then rinse in cold (this takes care of shrinkage and rinsing out sizing), roll the fabric in a towel and press the towel to remove excess moisture. Let it dry (hang it if you want) to not-quite-dry (you still want it damp) and then iron it. This will normally remove folded creases. If you don’t have time to iron it before it dries, put the rolled towel with the linen in it, in the freezer. Iron it when you have a chance. Just make sure you let the fabric sit a minute or two out of the freezer before unrolling. I often find that freezing the linen like this increases the iron-ability of the fabric. If either of these don’t work, dampen the fabric again, mix a 50-50 solution of white vinegar and water, spray that on the creased areas, let it sit about a minute and then iron it. The vinegar will often relax the fibers enough to remove the creases.
Hello Mary,
I’ve just finished my Leafy Tree, which I blew up 40% to see it better (aging eyes!) on a less than ideal linen–not tight enough really, so my stitches were harder to aim. Anyway, it is a bit dirty and before I iron and block it, I feel I need to wash it…what should I use? do I let it soak in lingerie wash for a few minutes? An hour? Something else entirely?
thank you for this lovely challenging project.
Laura
I would let it soak in cool water. Risky to add soap at first, but if it doesn’t soak out as well as you want, go with the gentlest soap you have.