


After stitching all the lines on my current embroidery project, the next step was to add some seed stitching. I figured filling in certain areas in seed stitch would accomplish two things: it would add some texture and it would make the prominent parts of the design stand out. And so, I proceeded to stitch thousands of tiny seed stitches.
There’s nothing at all complicated about seed stitching! Some books show seed stitch as two tiny stitches stitched as a pair perfectly parallel to each other, randomly covering an area. I only use one stitch, personally, stitching tiny single stitches randomly to fill an area.
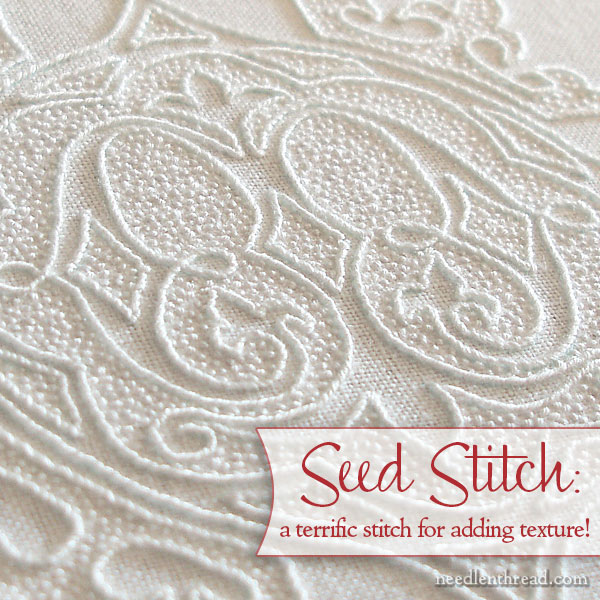
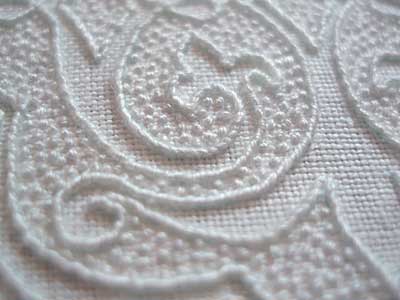
Above, you can see clearly see how the simple seed stitches – which are just tiny straight stitches randomly worked to fill the background are – add a lot of texture to the embroidery.
By leaving the monogram part of the design voided, the texture of the seed stitching makes the smooth surface of the monogram area (outlined in whipped backstitch) really stand out.
Once you get the feel for the spacing, seed stitching is a breeze!
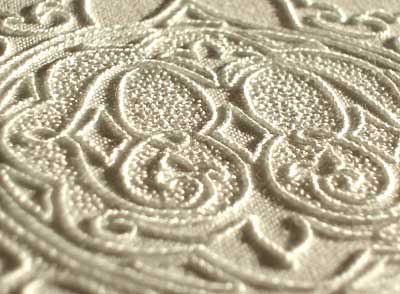
In the photo directly above, I worked my way through much of the seed stitching in the design and then managed to take a picture in “natural” light as the sun slanted in.
The shadows formed by the raised lines of the whipped backstitch help make the whitework embroidery not only beautiful, but noticeable. It’s this combination of texture and contrast that really makes whitework embroidery so beautiful.
You can really see the bumpy texture of the stitching here. For the outlines on the project, you may remember that I used #20 coton a broder. For the seed stitching, I used #25 coton a broder, for two reasons: 1. I ran out of #20 (which really narrows it down to one reason, I guess – it’s not as if I had a choice!) and 2. I figured the finer thread would look better. I had planned on using #25 for the seed stitching, anyway. What’s funny is that I ran out of #20 coton a broder for the outline exackitackily as I finished my last few stitches of the outline. I had about 4″ of thread to spare when finished. I’ve never come that close to running out of thread before!
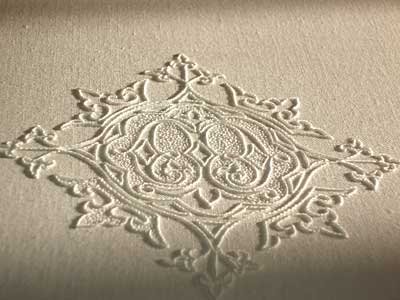
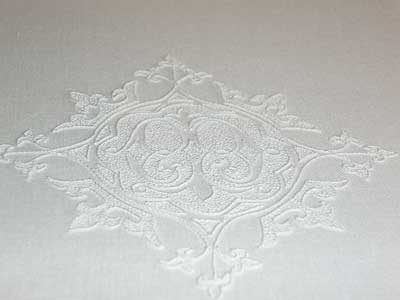
Here’s the whole central medallion finished, and one crown (lower left).
My favorite part of the design are these scrolls and fleur de lys tips surrounded by the seed stitching. I think it looks ok, don’t you? I mean, I don’t want to say, “Golly, am I good, or what?” because that’s not what I’m thinking! I’m just glad it came out looking pretty nice. There’s quite a bit of chance involved in that, you see – I really had no idea that the seed-stitched background would be successful. It was just a hunch, and once I started, I knew I was stuck in it, so I had to finish. I was glad that it worked out!
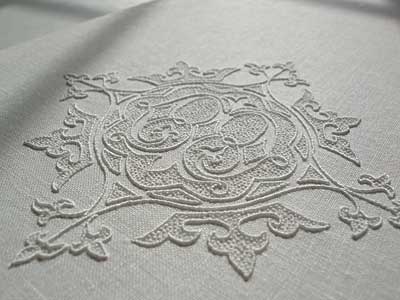
From a bit of a distance, here’s the whole piece with the seed stitching done.

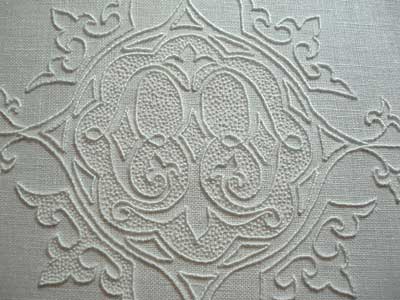
This is more what you see without the bright light, and here, the central M is pretty clear.
Another disadvantage of seed stitching… not to be negative here!… is the finger hole. The finger hole? Yes, the finger hole!
I ended up with one of those tiny little needle holes in my middle finger on my right hand, which is the finger I generally use to manipulate my needle. Oh boy – you know, one of those teeeny holes made by the eye of the needle, which the eye miraculously finds, no matter how hard you try to avoid it! There’s nothing quite like it when the back of your needle slides on into a little hole like that.
You know what my solution is? Oh – I know you’re thinking, “Wear a thimble, dummy!” But no, no…
Super glue! I put a dot of super glue over the little hole and let it dry. It works great!
Ok, so that’s the seed stitching, done!
And the lesson learned: never underestimate the power of a very simple stitch to produce nice results (fairly easily!) in whitework!
As much as I love color, you make whitework look so elegant and interesting. I tried a piece over twenty years ago and my young wild-haired patience got the best of me. Needless to say I'm sure that piece was eventually trashed as it was never finished. I just might have to give it a go now that I've slowed down some. Thanks for the inspiration, as always.
Tammy
Mary,
You do exquisite work. This is breath taking beautiful. I can't wait to see it all done. I could stay here all day looking at all the beautiful pictures of all your work. Have fun on your vacation.
Mary,
The seed filling does make this pall look very beautiful. I like doing this stitch probably because I cannot get a nice look to my satin stitch. I did the seed stitch in a initial but found it to be a little tedious because I think the initial was too large. Thank you for sharing your progress on this project.I was hoping to see how it turned out. Maria in Kansas
Mary, don't ever say anything about not being good, because 'Golly, you ARE good" (and don't let yourself say otherwise). This is another of the pieces I would just love to be able to touch (after I washed my hands of course!). Have a great holiday!!
Hi Mary,
Your whitework project is simply amazing. I plan to try a small piece soon. Thanks for the inspiration
Your work is beautiful! Great tip about the Super Glue…those little holes in finger tips are very painful!
What beautiful craftmanship! And so inspiring. Thanks for posting and have a wonderful vacation.
This is stunning! All those simple stitches exquisitely executed in white on white add up to a masterpiece. I look forward to the finished pall
What an incredible work! Congratulations from Nicaragua
Celestine
Mary,
This is just so pretty, you are truly an inspiration. I know you've mentioned you use Alba Maxima by Legacy for this piece. If I want to try this technique, what other kind of linen I can use? I am a beginner, hope the question I asked make sense.
This whitework piece is absolutely marvellous, I cannot stop admiring your work.
As for the finger holes, I had the same problem when stitching sashiko (I am a great fan of this Japanese style of embroidery). A really painful thing. Now I've started using these self-adhesive thimbles (http://store.quilting-warehouse.com/082375.html), I usually cut them in halves, and they work great.
Thanks, all! Glad you like it. Here it is, early Wednesday morning, and I still haven't finished adding the lace!
Thanks for the tip on the thimbles, Marmotte! I'll have to look those up!
Judy, you can use any light to medium weight linen with a higher thread count.
Thanks again for all your comments!
Mary, it is amazing how the seed stitch makes the background recede! Such a simple stitch, but so effective…
I love the finished design on the pall. The seed stitch just makes it!
Isn't it funny, you used very simple stitches and the outcome is really quite dramatic. And it also looks like you loved doing this design.
Thanks for the example that simple stitches can be elegant too.
Mary this piece is magnificent ! ! Just shows how any simple process, repeated, can render a "thing of beauty" ! ! This is why I'm hooked on your website….Thanks again…Judy in Pittsburgh
Your white work is sure inspiring and the pictures show the stitching real good. I hope you have a great vacation. I am new to all this blog stuff so if I want to send you a picture of some embroidery felt projects how would I go about it? Just e-mail it? Keep up the good work.
Thanks for the super glue tip Mary!
I tried a thimble and it just didn't do it for me. I then found some of those leather ones and they were still too loose and too much of an obstacle for me.
I think I'll give super glue a try for my next project!
Hi Mary, this look so lovely; but what is a pall?
Hi Mary,
I was wondering if you are going to show pictures of the completed pall. The one you did right before your cross country trip. I've been anxiously awaiting to see it.
Hello again Mary,
Here I am, still slowly making my way through your blog, and loving every minute. I even got to share a tip I picked up here at work today, and felt like a total pro doing it!
I am currently working on some small pieces for display in the shop (I work in a craft shop!), using a range of simple embroidery threads to jazz up a counted cross stitch pattern I have designed.
Long story short, I am in awe of your whipped back stitch, and will unpick some progress I made today in favour of this glamorous look you’ve achieved here.
Thanks again,
Melissa
*embroidery stitches, using embroidery threads.
I thought you wrote “fixed the brakes on the hummer” and I just couldn’t picture you driving a Hummer though I could imagine you fixing the brakes. Dyslexia can be fun sometimes.
This is such a beautiful technique! Will this work well to simulate a pattern-specific brocade on fashion fabric?
Hi, Azalea – I don’t think highly textured stitches like this would be what you want to simulate brocade. I think a flatter stitch would work. But if you’re talking about stitching on top of a design woven into brocade fabric, in order to add texture to the fabric design, yes, I could see that working.
This is wonderful!!!!
I have been exploring mono chromatic work for a while and find it almost irresistible. Really enjoyed the grace of this design.
I don’t understand why, no one has left any comments concerning such beautiful work, that you have created and taken the time to display, for all of us.
Again you have done such beautiful creations!
Thank you, for these.
Thank you! 🙂