


Ashley, of Oooooh, Silk! (Update Aug, 2011: website no longer exists) though relatively new to embroidery, undertook to embroider, in Holbein stitch, a coif. She is going to tell you all about the adventure…
I was inspired by history to learn blackwork (Holbein stitch, double running stitch). I play in the SCA (a medieval/renaissance reenactment group) and have slowly come to dabble in the beautiful fashions that were present in the mid to late 1500s (about that time that Holbein was painting his lovely portraits featuring blackworked cuffs, collars, and clothing). I thought they were gorgeous pieces, but I didn’t really see myself doing it until I looked through Janet Arnold’s newest Patterns of Fashion book. Her meticulously researched book of patterns, illustrations, research, and pictures of 16th century costuming made me realize that if I ever wanted to take myself seriously as an Elizabethan enthusiast, I had to learn embroidery. The full color photos of blackwork, pulled work, and insertion lace beckoned to me, and I had to have some of my own.
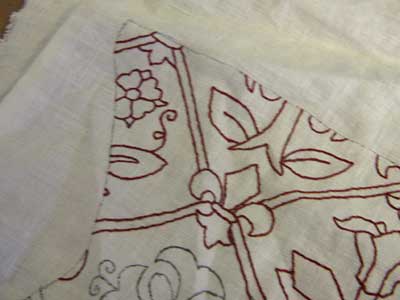
The pattern was created by Laura Mellin, part of a series of headwear patterns from museum or other 16th century sources, usually dating between 1590 and 1620 (when Elizabethan and early Jacobean embroidery was most popular). While several of her patterns have beautiful and (to my eye) highly complicated botanical and animal designs, I was struck by the “Genevieve” pattern, a fairly simple grid work of lines and fleur-de-lis surrounding isolated flower motifs. Thinking that it would be a good starter piece, I purchased the pattern at a local SCA function.
For the fabric, I used a rather unusual source at our local thrift store. My husband and I are still going through our Poor Newlywed phase, so I really didn’t have the budget for the really expensive linens for the project’s ground, and I didn’t want to use the discount linen typically available through the internet, since it tends to be very low quality. Still, I couldn’t bring myself to spend so much time working on a project and end up with something substandard and incorrect to the time period I was going for. It was a magical day when $5 men’s shirt appeared in front of me at the local DI, and I was so impressed with the quality of the fabric (not perfect, but certainly better than I’d seen commercially) that I immediately knew it would be perfect for the coif.
After ripping out the seams, it was a simple matter to stabilize the fabric with wax paper (applied with a hot iron, another tip from Laura Mellin) and transfer the pattern using a micron pen. I congratulated myself for finding a garment that exactly fit the pattern, with just enough room for hoop space and seam allowances!
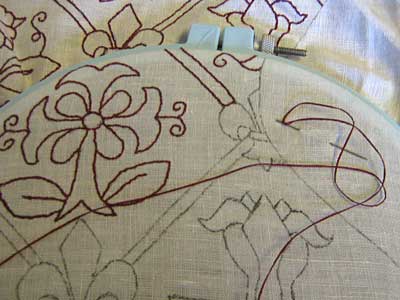
I am using two strands of RG Splendor silk floss for the embroidery, conditioned with beeswax. I find that the Splendor shreds a bit more than the DMC cotton floss I was used to so the wax goes a long way to keep it smooth and workable. The size of the coif meant I could not easily mount the project on a scroll frame, and while I would have loved to get a good slate frame and even tried to build a simple wood frame, in the end, a simple (and cheap) plastic hoop became the best and most economical option. I was worried at first that it would damage the blackwork or cause odd stretching, but so far it seems to be fine. It also makes it highly portable – I carry it in a gallon size zip lock bag with the thread, wax, scissors, and spare needles, so I can work on it any spare moment I have.
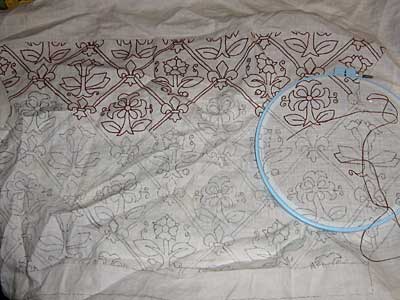
In working on it, I’ve come to love seeing the design appear as I work. The curlicues and loops of the flowers have become some of my favorite parts to work. The one thing I haven’t liked, I have to admit, is the grid work. I’ve found straight lines in double running stitch to be one of the hardest portions of this project, especially in places where my transfer might not have been the greatest (a ruler would not have been amiss in the transfer phase, I realize after the fact). It’s much easier to do the flowing naturalistic designs, and flaws in the stitching are far less noticeable. Sometimes I have to ‘reward’ myself with flowers after one or two passes at the grids. Couching might have been a better option, but by the time I realized that I was already committed to doing them in double running stitch (i.e. I didn’t want to pull out what I’d already done and start over).
Even with the difficulties, I’m really enjoying this style of embroidery. I love the idea of making a project better than the sum of its parts (in this case, about $15 in materials and a whole lot of time), and ending up with wearable, historical art. If I keep up my current progress, I hope to be able to finish it by the end of the year.
If anyone is interested in Laura Mellin’s embroidery patterns, they are available through Reconstructing History (reconstructinghistory.com).
Hi Ashley, that's beautiful work. Are you counting the threads for the double running stitch? How, exactly, does that work on the diagonal?
Thanks for sharing.
How cool! Thanks for the links. Wow, a whole new embroidery adventure for me! I can hardly wait to try the wax paper trick.
Thanks for sharing!
Lin Taylor
Very nice stitching. Will be a great coffin 🙂
to Jill: I'm only counting insofar as I'm trying to keep the stitch length even, since the pattern is drawn right on the fabric — roughly 2-3 threads per stitch, with slight tweaking as I approach diagonals. I have done some counted blackwork before, it seems to work better for the long, repeating geometric designs, like on Jane Seymore's blackworked cuffs: http://www.elizabethancostume.net/blackwork/seymour.html
Thanks for the feedback!