


When hand embroidering faces in a needlepainting style for ecclesiastical embroidery, the saying “less is more” often produces the best results. Today, I want to show an embroidered face up close and point out a few things about it.
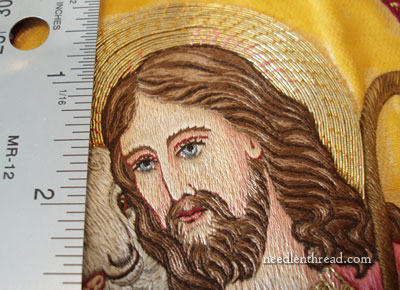
This close-up is of a piece of embroidery from an old vestment, probably from the early 1900’s. The design and embroidery are not necessarily the “best” examples of ecclesiastical work, but they’re not bad. The design is very simple; the color choices and the stitching are relatively basic.
But what’s interesting about the face is that, with the ruler next to it, you can put it in perspective as far as size goes. It is very small, and they eyes, which are clear, are really tiny.
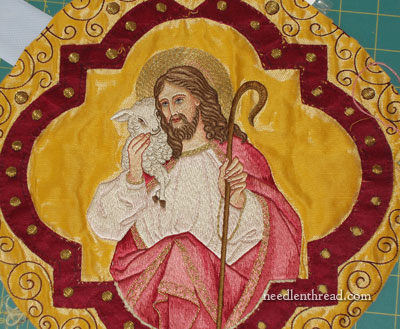
Embroidery on vestments is meant to be seen from afar, so the question is, how can such small embroidery be seen clearly from afar. True, the details can’t be seen. But from far away, the image itself is still recognizable: we recognize the form of Christ, the Good Shepherd, we recognize the hair, the bearded face, and the eyes.
From farther away, the features of the face are still visible. From even farther away (from the congregation’s view in the church), while the details aren’t clear, the face would still clear. Why is that? Let’s look at the face very close:
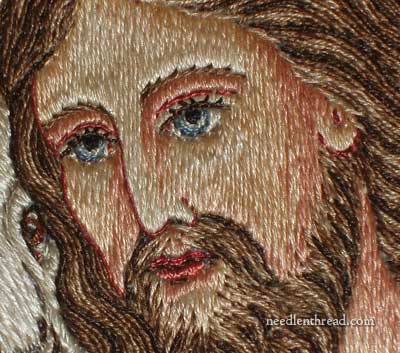
From examining the piece up close, it seems there are four color tones for the flesh parts of the face: a dark pink, a medium pink, a medium flesh tone, and a light flesh tone.
The dark pink-ish red outlines the main features: the sides of the face on the left, the ear on the right, the nose, and the lines above the eye lid. The medium pink works in the shadows on the sides of the face by the hairline and the beard, below the eyebrows, and on the left side of the nose. The medium flesh tone takes care of the top of the hair line and the lower parts of the cheeks, and the light is everywhere else. Notice the “bulge” right above the eyebrows. The area is slightly (ever-so-slightly) padded with horizontal stitching. The very end of the nose is also slightly padded with horizontal stitching.
Notice that the stitches at the base of the eyes, though worked in the same color of flesh tone that surrounds them, add depth under the eye because they’re stitched in a different direction, so they catch the light differently.
Another point to notice is that, overall, the face is very simple. The stitcher didn’t try to work in all kinds of shades – just the shades necessary to mark out appropriate shadows.
If this face were meant to be on an item that would be viewed up-close (say, a picture hanging in your living room), it would not be “bad,” but admittedly, it wouldn’t be the most attractive face up close. The pinks, the reddish lines above the eyes, the red around the ear – these would all seem a bit strange.
But when embroidering something that will be viewed from farther away, you have to think in terms of the viewer’s perspective. And amazingly, the strange eyelashes, the dark pink lines right above them, the puffier light pink above those, and the reddish outline on the ear all work together to make the face visible from farther away.
You can see another example of faces from ecclesiastical embroidery in the post featuring a chasuble with the Crucifixion depicted on it. If you think the darkish pink on the piece here seems strange, note the greens in the faces on the Crucifixion chasuble!
That’s something to think about when stitching: is this piece going to be viewed up close and personal, or will it be viewed from a distance? It makes a difference in the way you approach the stitching!
G’day Mary,
You’ve covered this so clearly and helpfully.
For someone who has been a fine art student and used to paint regularly (used to, but still very interested), it is not only excellent revision but also very constructive to have it put into a needlework context.
Appreciate your first-rate efforts.
Thanks, Kath.
This piece is amazing! I would love to embroider like this. I embroider everyday but am so elementary compared to this piece. Thanks for sharing, Mary.
Very good discussion. Did you know that Access Commodities has “Flesh Tone Silk Thread Kits” available for 5 different complexions. They are collections of specially dyed Soie D’Alger (the 7-stranded floss) and are perfect for shading skin tones. Tricky business, but your tutorial is really helpful.
Hello, Mary, and welcome home! This information is invaluable; I truly enjoy the technical advice to achieve certain perspectives. Thank you so much, as always, for the time you spend for our benefit.
Dear Mary, It’s been a while since I’ve commented. A crazy busy summer organizing a Family Reunion for the 4th. Thank God that’s over. Now back to “my” fun. This installment of yours is, again, dejavu, because I’m putting people into the pastoral scene I’m working on for a Christmas Gift and was puzzling over how to do the faces !! This isn’t the first time your wonderful gifts of installments have been right on target for me…..spooky but so much appreciated…….thanks again……Fondly….Judy in Pittsburgh
hola mary”que impresion,,que creatividad
luz sombra,exelente,,creo el material esta muy bien elegido,,,
gracias por mostrar esta tan linda tecnica
lidas
Loved this post Mary. I recently ordered an amazing book from Amazon France that I posted about on this blog post…
http://plays-with-needles.blogspot.com/2010/07/french-ecclesiastical-embroidery.html
It’s got amazing pics and right up your alley…