


Linen is my all-time favorite fabric for embroidery of every kind. I love linen! And I like all types of linen – even weave, plain weave, twill, damask – you name it! If it’s linen, I’m bound to like it. What I especially like about linen is that it is not “fake” looking. It’s a real fabric with a long and noble history, and, if it’s good linen, it always looks great.
One characteristic of linen is that, in the weave, there are often “imperfections.” Unlike Aida cloth (usually cotton), Lugana (cotton & viscose blend), and other mechanically perfect fabrics, linen will often have variations in the fabric that come from the spinning or weaving process. The better the linen, the fewer these variations, but even in the best linen, you will sometimes run across irregularities.
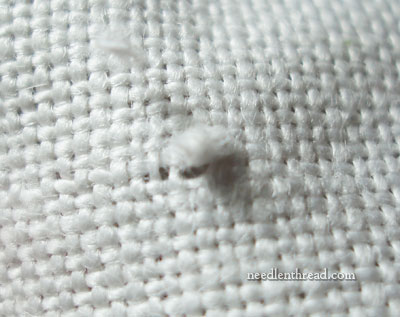
One such irregularity in linen is The Slub.

The Linen Slub can take on different forms. Sometimes, it might just be a little thickening of the woven thread, due extra fiber creeping in during the spinning or weaving process. Sometimes, it might be a whopper of a lump on top of the fabric, brought about by a knot in the fiber during either the spinning or weaving process.
When the slub is simply a thickening of the thread, it’s pretty easy to dismiss. But when it is a lump on top of the fabric – especially a fuzzy lump – the temptation to pick apart the slub and trim it down can be irresistible. There are times when it is necessary to try to eliminate as much of the slub as possible, but often, you can trim the excess fuzziness around the slub and just leave it there, stitching over it eventually (or not, depending on what your design dictates).
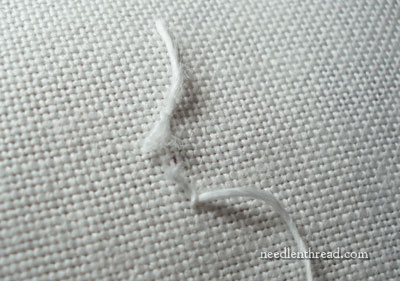
When I came across the above slub in one of the pieces of linen I’m setting up, I am afraid that I dove in picking it with a bit too much fervor.
I trimmed off the fuzz around the slub, and then I started picking and prodding and pulling and picking and prodding.

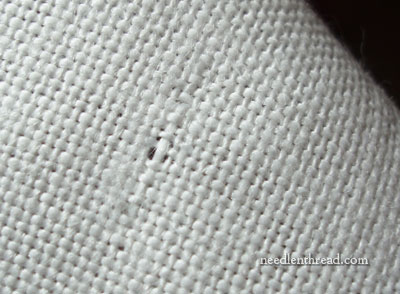
Eventually, I managed to do what I didn’t want to do. I removed so much of the slub that I actually divided the thread of the fabric. In the photo above, the arrow points to the break in the thread.
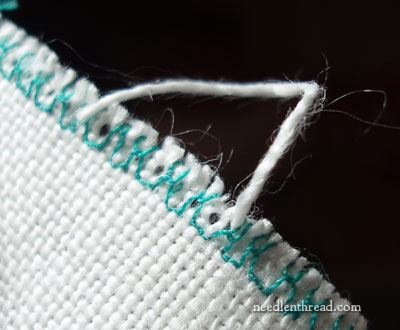
The damage, however, is not irreparable. I betook myself to the edge of the linen, and carefully removed one of the threads from the edge of the fabric. This was made a bit more difficult by the fact that I had neatened the edge of the fabric with machine stitching.
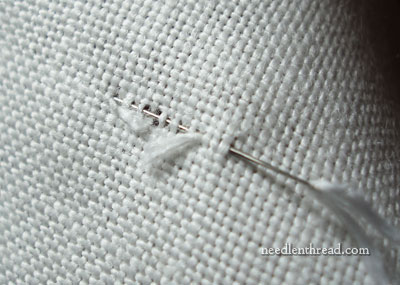
I threaded the fabric thread into a needle, wove the needle through the space where the broken thread was…
… and managed to fix the area where the break was. There’s still a bit of a distortion there, where the slub once was, but this will be less noticeable with a little tweaking and once the area is stitched over.
On the back, you can see the tails from the different linen threads. These, I’ll trim down a bit, leaving about a half-inch tail, which I will carefully stitch over whenever I get to that point on the fabric.
So that’s how I took care of a linen slub and a subsequent break in the weave of the linen.
Probably, the best original course of action would have been to trim the fuzziness around the slub and stitch over it as it was, without poking and picking at it. Still, if you ever find yourself in the same situation – or if you ever accidentally clip a thread in your linen – now you know how to fix the break.
What do you do about slubs? Do you ever find yourself picking at them? Or do you just leave them be? Share your tips in the comment section below!
Thank you for sharing the info about slubs in linen. I am new to the joys of linen and it was a great help to see the photos.
Ahhh … The Slub!
I’ve done both the picking and niggling and getting carried away and creating a hole thing, and I’ve done the total ignoring thing when it comes to slubs.
Every time I ignore them, and think ‘I’ll just stitch over this and no-one will notice’ I live to regret the day. Even if no-one else notices once the piece is finished, I DO!
So, I’m with the picking and niggling group.
cheers
Janie from Downunder
Like you, I LOVE linen! But it does have it’s problems; wrinkles, slubs, often a piece of the stem left in from the retting process and sometimes in older linen there are color variations in the weaving process. Even with all that, linen is a most wonderful fabric for embroidery! Twill linen is getting harder and harder to find but it does seem to have less slubs than tabby weave. I most often leave the slub in and try to plan where it will lay in my piece of work and just trim them up a bit. When working with a wool thread I do believe the texture of the wool makes the slub less noticeable. But, if my piece was to be done in silk or a fine cotton I would cut it out and weave in another thread. I am anxious to see what you have planned!
This is a most timely post – thank you. I haven’t had any overly large slubs lately but my tendency is to pick at them – and now I know how to fix any future over-picks.
Is it a low quality linen that will actually have pieces of “straw” woven in? Sometimes I have pulled those out with some consequences – but now I will weave in some threads.
I find some of the charm of linen is its slubs, however if they are as large and fuzzy as the one you illustrate, I would try to clean it up a bit. I do like most linens, even with their imperfections, but I also have to admit that I just can’t warm up to the twill. Even for such traditional techniques as Crewel I will opt for a flat weave. That diagonal just seems like a distraction from the design to me.
wow that looked like surgery.
i just bought linen for the first time. I love the way it looks and feels.
Lynanne
It may be beneficial to try working the slub to the wrong side of the linen before doing any trimming. One can use a needle or a very fine metal crochet hook. I usually find that this will eliminate having to trim and reweave the area. When stitching, one can usually work over or around the slub easily since it is on the wrong side of the fabric.
I tend to “groom my linen before starting to stitch a section. I’ve found quite a few threads tied together after a break, and looking like a slub. Others are thick slubs where the woof or weft was not spun correctly, and others are just plain slubs of extra fiber. Whatever, I carefully pick them out, using the neighbor threads to even up the weave. I tend to stitch over the repair, and by the time I finish, it looks like it was stitched over perfect linen. Like you, I lurve my linen!
When I was weaving, I learned how to handle these types of situations and they were fairly consistant with your methods. The only addition I would make is to re-weave about an inch on either side of the break. This makes a more secure and stable area, especially if you are not stitching over then broken thread.
I usually try to trim the slub or pull it through to the back. I do hardanger and have cut a thread I didn’t want to so therefore I rewove it as you did for your fix. it will blend in and smooth over. I fact I had to weave more than one thread at one time and was sweating that one out. It turned quite well and no one was any the wiser. Nothing can compete with linen. Just try to repair threads on another fabic like you can linen. Thank you for all your hints ans lessons.
“even weave, plain weave, twill, damask …Unlike Aida cloth (usually cotton), Lugana (cotton & viscose blend), and other mechanically perfect fabrics,”
Would you be able to do a post one day talking about the different types of linen?
You’ve focused on individual types in the past, but I don’t remember finding an ‘overall’ big picture of the different types (maybe just I haven’t found it?)
Mary Corbet you are the best. I had pulled out some scrap linen to make some coasters for the Christmas bazaar, and the slub was driving me crazy. I put slub in your search box and there are all the answers I need. Thank you so much. I so admire that you are self taught, as well! I always thought RSN was the bees knees, but you are my hero: there is hope for me yet!
1st I take the eye of the needle and trying push it in to the other side of the fabric. But most the time I take a curved needle and some very light fishing line, whip it and suck to the other side.
Excelent info. Thank you!
How do you deal with machine defects like those ugly lines of thicker material that appear in random points in low quality (well, today – ALL quality) linen? It wasn’t a thing when I was a child in the 1980’s, so I am positive it was an unacceptable level of defect prior to then. Any fabric I have from my grandparents era is lacking ANY defect, and they were not wealthy, so it isn’t a price / quality issue of that era if poor people had flawless linen.
It’s just a quality CONTROL issue of this era where people who produce linen have zero quality controls in place and just truly don’t care, in the same vein with which on purchasing power tools one must immediately degrease, clean, and regrease them due to iron filings and contamination in the grease used that will cause catastrophic damage and ultimately destroy the tool it is meant to preserve within a matter of a few weeks of solid use (although to be fair I think they do this on purpose, you can run a magnet over the old lubricants to see how evil the company in question is, many just use rotten old engine oil from their trucks complete with microplastics, lumps of metals, you name it).
Is there a way that I can remove it at home? Or should I just try and find bits of linen cloth that are in the clear and make my own clothing from that? I just want to buy a nice linen shirt to work with on my rural property, but I am sick of hideous deformities in the weave it drives me nuts how irregular it looks. I want one nice work shirt. If I have to make it myself I guess I will. But if there’s an easy way to “fix” the low quality material of today could you please share that?
Hi, there – Slubs are actually characteristic of most, if not all, linen. The difference is how bad the slubs actually are, and how visible they are – and that depends a lot on the quality of the spinning and the weave. Good linen, with a nice weave and a smooth hand, etc., is expensive. If I were looking for linen clothing that was pre-made, I’d look for something sourced out of Europe rather than the middle or far East. Hope that helps!