


The design for this pall, which I’ve embroidered several times, has always been a favorite. I’ve had lots of requests for a copy of it, so finally I managed to drum up a tracing. I’ll share it here, with some ideas on different ways to stitch it.
In an earlier post on this embroidery design, I discussed the stitch choices I used when I embroidered it the first time. I had a problem with getting the grapes right, and had to re-do them, but in the end, the pall came out well. The photos from that project are pretty lousy, though – I’ve learned a lot about photographing whitework since then!
The design is taken originally from Lucy Mackrille’s book on Church Embroidery & Church Vestments, which anyone interested in ecclesiastical needlework should have in their library. Fortunately, you can find the book online for free. If you visit that link, it’ll take you to my review of the book, where you’ll find further links to the book in four parts, each part a separate PDF file.
In the book, you’ll find two images of this design. Here’s one, in whitework, which inspired my stitch choices:
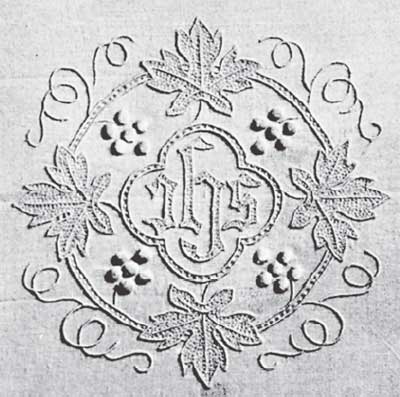
The only differences in the stitching would be that the outlines in the above image were most likely done in overcast stitch, which would increase the stitching time quite a bit. I used a whipped backstitch on mine, stitching very small, even backstitches, and then whipping each backstitch to make a distinct line that sits up above the fabric (like an overcast line would), but without requiring the same amount of time for stitching!
I didn’t pad the grapes, as the embroiderer did in the image above. In one version of this design that I stitched, I satin stitched the central lettering, which gave a bit of continuity between the lettering and the satin stitched grapes. There’s lots of room here for different interpretations of the pattern!
In Mackrille’s book, there’s also this version of the same design:
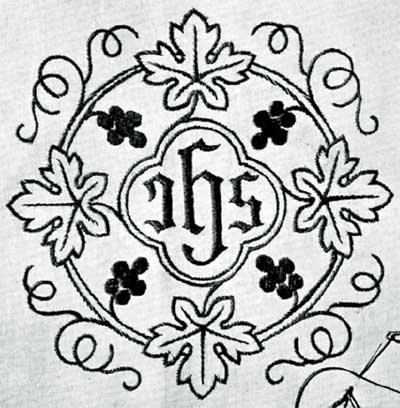
The book is in black and white, but the text explains that this pall was embroidered on white linen, using red cotton thread, and mostly stem stitch, with the exception of the satin stitched grapes and the satin stitched central letters. I actually want to try this – a red on white version of the design. I think I would probably use silk (I’m thinking about Soie de Paris, actually).
I love the way the stem stitching in the tendrils on the corners expands and contracts around the curves – very pretty effect! I’ll have a post up later this week on how that is done.
So, for those interested in church embroidery, there you have one of my favorite designs for the small linen pall that’s used on the altar to cover the chalice. Here’s a PDF version of the design, which prints at just slightly smaller than 6.25″ square:
IHS & Grapes Pall Design (PDF)
Interested in more church patterns? Check out Church Patterns: Book One – a collection of over 120 patterns suitable for church embroidery, and also for other arts & crafts endeavors (appliqué, paper crafts, painting – you name it!).
I love this pattern. Thanks for sharing!
Glad you like it, Angie!!
I’ve been wanting to try making a pall 🙂 I think it would be really neat, and I love what you’ve done with them 🙂 I just need to figure out the construction 😀
Thanks for posting this 🙂
Here’s the link to the post where I explained the construction part of the pall: https://needlenthread.wpengine.com/2010/08/hand-embroidered-pall-finishing.html Hope that helps! ~MC
We have several palls in this pattern at church. They are all white on white and very old. The inside boards have poked through the corners and each has become soiled on the edges. I am slowly replacing them with new palls. Some of the old ones were stitched on old pillow case fabric (there are remnants of stamped patterns inside). What fabric do you typically use for palls?
Hi, Kathleen – white linen is the traditional fabric used for any altar linens. Palls, however, can be made of other fabrics, like silk, as long as there is a linen square attached to the back, so that the linen is what comes in contact with the chalice. The linen square should be tacked onto the back of the pall in such a way that it is secure, but at the same time, can be easily removed (by snipping away the tacking stitches), so that the linen square can be washed when it needs to be. Hope that helps! ~MC
I just love this! I may go ahead and make one, even though I am only faintly affiliated with one of the local Catholic churches. It just looks like it would be so very enjoyable to make. I take it you wash the linen before stitching? But then, does linen shrink the same way cotton does? Does anyone make these out of cotton or are they always linen?
So can you tell us what happened to the gold embroidered pall that you made? Or am I asking an embarrassing question? I realize there are lots of questions in this comment, but I am curious! It shows I’m paying attention, something a teacher should always appreciate.
HI, Cynthia – yes, sometimes they’re made on cotton. Um. Well. They can be made on cotton. Rubrics generally call for linen, but people pretty much do what they want these days. Linen does shrink – not by inches and yards, of course, but it does definitely shrink. I usually pre-shrink mine. But some people prefer not to. I just like to know exackitackily what size I’m working with, so I don’t have any surprises when it comes to making the thing up.
Oh. The gold pall. That. Well.
(Do you really want to know?!?!?!)
Ok, I’ll tell. It’s sitting in a little bag right now, about four feet away from me on a shelf. It’s not finished. The insert is in, the last seam is not sewn, and the lace is not on. It was one of those things that didn’t come out exactly as I planned, so I wasn’t completely satisfied with it. I set aside, thinking I’ll come back to it in a bit, and be pleasantly surprised by it. “Oh. It’s not as bad as I remember! In fact, I kind of like it!” When it gets to that point, I’ll finish it! 🙂
The design is so beautiful. A friend of mine does church embroidery and I am going to mail this to her.
Thank you. This would be gorgeous on the skirt of a christening gown.
I never thought of that, Martha – but you’re right! And you are just the person to make the gown and do the embroidery! Your baby gowns are gorgeous!! Thanks! Mary
realy very very use full hand made designs,thank you so much,becase i am making hand made vestments,stoles,if you allow me i will send my hand made designs (yours drwing)