


This is as Absolute Beginner’s Tip – it’s something most embroiderers learn relatively early in the stitching game. But if no one has told you to do this and why you should, it’s good to know!
Neatening the edge of your fabric before you transfer your embroidery design is a step you will never regret. Forgetting to do it, though, can lead to lots of little irritations. And that’s the reason I’m bringing the point up today. Who needs little irritations while embroidering? None of us!
When we talk about “neatening the edge” of embroidery ground fabric, we’re talking about doing something along the edge of the fabric to secure the fabric threads so that they don’t shred during the whole stitching process.
You see, there’s nothing worse than stitching along in relative bliss, not realizing that the outer edges of your fabric are secretly unweaving themselves so that they can make their way surreptitiously to the back of your embroidery and cause knots and all kinds of other mayhem.
Another reason to neaten the edge: it keeps some fabric types from rolling or warping along the edge.
Certain types of fabric benefit from going a step further. Silk satin and similar fabrics that roll on the edges can be attached to strips of twill tape, which will secure the edges, keep them straight, make it easier to frame up, and make finishing a Whole Lot Easier.
So it’s a good practice always to neaten the edge of the fabric before you progress with other steps in your project set-up.
Neatening the edge of your fabric before you start any embroidery project is relatively simple. And if you have a sewing machine or a serger, it’s super-duper simple!
When I use a sewing machine, I use my overlock foot and run the edges of the fabric through the machine, overlocking the edge. That’s my favorite way, and it works up really quickly. You can also use a zig-zag stitch right along the inside edge of the fabric, or if your machine doesn’t have any of those settings, you can use two lines of straight stitch, one inside the other, slightly off-set.
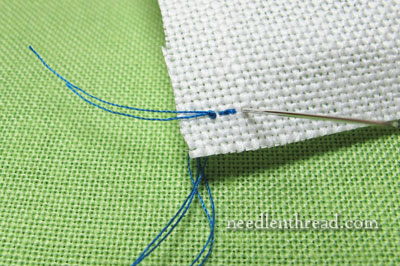
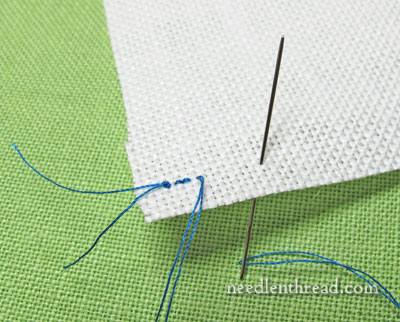
But you don’t need a machine to neaten the edge – you can do it by hand using a simple whip stitch. When I do this step by hand, I use regular sewing thread doubled in the needle. I start on one corner of the fabric with a waste knot, followed by a couple little backstitches (pictured above).
How deep you go into the fabric with the whip stitch depends a little bit on the type of fabric you’re using. If you’re using an even-weave linen, you’ll want to work about five threads or more into the fabric. If you work right along that last fabric thread or two, you may end up actually pulling those out with your whip stitching, so it’s best to go into the fabric a little way.
On plain-weave fabric, normally a quarter inch in will do just fine.
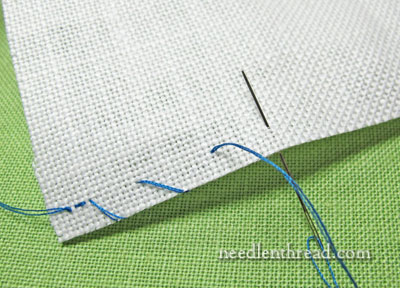
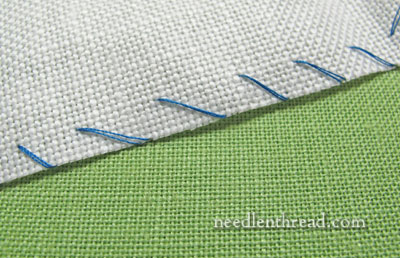
The whip stitch involves entering the fabric from the same direction with each stitch, so that the thread “whips” around the edge of the fabric.
This is what the typical whip stitch will look like along the edge of the fabric. Once you get used to doing this step by hand, it really doesn’t take all that long.
To get over any mind block about neatening the edge – that it’s a pain to do or a waste of time – just try to consider it part of the whole process. If it becomes habitual, you won’t even think about when you set up your future embroidery projects.
As they say in that world-famous maxim: A Neat Edge makes a Happy Stitcher.
Looking for other tips & tricks for hand embroidery? You can find a whole list of them under Tips & Techniques in the top menu here on Needle ‘n Thread!
This is all true and sound advice Mary. Don’t ask me how I know!!!!
LOL! Probably the same reason I know! For some reason, I completely skipped the step last project I set up, and I’ve been regretting it every since! But I’m too lazy to take it off the frame! So I figured since I was kicking myself for failing to follow my own advice, I’d hopefully save other people the same frustration…
Hi Mary, I always use the zig zag stitch on my machine before doing anything else. I find that the linen really frays. I have also used Fray Check on small pieces. It seems to work well. Would not use it on a medium to large piece. Very good advice.
Dear Mary
Thanks for this tip I never start a project without referring to your website and ever since I started embroidery I’ve used your web site for tips on needlework. It does make a difference to neaten the edges as the material frays very quickly if the edges are not stitched as I’ve experienced. Thanks for the tip.
Regards Anita Simmance
Oh the things I am learning to think! I learned how to use a sewing machine so as to improve efficeincy in set up of embroidery. I’m not convinced that using a sewing machine is faster than whip stitch for me, yet.
Yep, I know what you mean, Kathy! My machine isn’t always set up or easily accessible, so hand stitching the edge is often faster than getting out the sewing machine. For one piece of fabric, whip stitch is generally the way I go. With the machine, I usually do a whole stack of fabric pieces at one time when I’m doing edges. That way, I don’t have to visit the machine too often! And I end up with a nice pile of fabric pieces for projects or website demos…
And for anyone thinking “what about tape?” – it might be OK for a small fast inexpensive project. But be warned many tapes will dry out, fall off and leave crustycruddy adhesive on your project. Others can turn to a gummygooey mess. If you are planning on trimming, it might not be an issue. But if you are needing every last inch of fabric, stitching is the way to go.
I know of some people who use masking tape along the edges. I would much prefer whip stitching.
Valuable tip, Mary. Thought I’d share a related method I’ve been using lately. I hand embroider TINY designs and make them into jewelry such as a brooch or pendant. Since the square of fabric to be embroidered is so small to begin with, I take a square of drapery lining and fold it into 4ths. I cut a tiny tip of the inside corner, open the square up flat, position the embroidery fabric over the tiny hole I made when I cut the corner, then machine stitch a border around the embroidery fabric to adhere it to the drapery lining. The opening in the lining allows me to further trim the lining so the embroidery fabric is centered and in position so as to only stitch through the embroidery fabric. Now it’s ready to hoop or frame. When finished, I cut the embroidery fabric away and do the finishing. Think of it as sewing a frame around your project with a window in the middle. Sounds complicated but it’s not, just hard to describe in a few words!
Hey Mary! After you are done with the project, would you take the stiches out?
Normally, the project is cut down after it comes off the frame, for finishing…
I know not many people sew clothes any more, but finishing/dressing your edges is also a good place to practice some of those edge stitching techniques that we do not always use every day. Whether by hand on embroidery or especially when machine sewing on garments it will also keep your stitches from unraveling in the dryer and keep your clothes lasting longer and looking more professionally made. Thanks Mary.
Oh, I run into tons of people who still hand sew. It may not seem popular, but you notice it if you get involved in the right circles. After I got into historical reenactment, I’ve seen that you can’t really function without knowing how to sew — especially by hand! In some groups it’s acceptable for newcomers to have something machine sewn, at least to have garments to wear. But eventually it’s seen as advancement if you know how to sew by hand, and do it within a certain century’s methods. I’m trying to learn the differences between modern and historical hand embroidery, so there’s a good chance I’ll keep preparing my linen by hand. I enjoy the freedom of manipulating fabric by hand anyway. I do machine work when I just want to knock something out for saving time. But when it’s a *real* project it’s hand sewn!
Hi mary,
Thanks for a very helpful tutorial. I always forget to do this. I had the same problem with my embroidery, i was doing, so i stopped it now i am restarting it and i’ll never make the same mistake again. Make mistakes and learn and its a lovely gift, the scarf and the embroidery is lovely too.
Maybe some day, Mary…
I’m too lazy… 😀
I prefer to handle the fabric super carefully, or to use aida that doesn’t fray that much.
G’day Mary, thanks for this reminder. Greatly needed for me as i’m sometimes tempted to jump right in, even thinking I’ll get a start and come back to finishing edges. Nope, doesn’t work that way, the getting back has a way of staying back and then the nuisance part starts.
Cheers, Kath
Since I’m a self-taught embroiderer, I never thought to whipstitch the edges. When I was just starting to learn (35+ years ago) I used to use MASKING TAPE (can you imagine??) on the edges to keep them from raveling. Then I “graduated” to Fray-Check. Thankfully I abandoned that practice fairly early on.
I’m currently working a sampler on linen and after reading this post, I spent a half hour last night and whipstitched the edges. I’d already had some problems with raveling so this is a very welcome thing to know. I learn so much from your blog. 🙂
This is an unbelievably important step in most sewing. I think someone else has mentioned about neatening seams in clothing, which reminded me of something I did a few days ago. My mother was a dressmaker back in her young days (1940’s), working for a small manufacturer. Of course her sewing was always impeccable and she tried so hard to pass it on to me. I try. Anyway, my sister gave me a strip of fabric she had torn off her wedding dress (1978) which our mother had made and sewn matching voile daisies around the hem. So I had this piece about 4-5 inches wide with all these gorgeous daisies on it to deconstruct. Would you believe each daisy was individually sewn on, as close to invisibly as is possible. Then onto the strip of fabric with hem – the side seams had been neatened by machine, an even eighth of an inch all the way, and the hem was sewn up with slip stitch, again invisibly. How many people would do that these days? The side seams would probably be overlocked/serged and the hem machine stitched or at very best, blind stitched by machine.
Sorry about the long rave. The fact is, neatening is important. I do a bit of crazy quilting, and after piecing a block I often find some of the fabrics, especially silks and organza, will fray like crazy. And of course while it is being embellished, it is being handled a lot, turned, turned and turned again, so I tend to buttonhole down the outside edges of the block to the backing. Sure it takes time, but it saves such a lot of bother in the long run.
Thanks – kick up the bum to neaten the edge of my current project!
Hi Mary,
Before i start on a project on a blank canvas, I usually fold 1/8 in. around the material and baste around in long stitches. Is this prep work ok too?
Sure, that works! I don’t generally fold my edges, just because it takes more time, and also because if a hoop is involved and I have to hoop over an edge, it adds bulk. But that’s just me! ~MC
I have some fabric that might be called Aida and/or binca and found that (a) it could not realistically be worked without neatening the edge and (b) the edge was difficult to do, the fabric is very stiff. Much to my dismay I tried and failed to overlock it on my sewing machine and at the moment it’s got a variety of awful, non-neat hand stitches on part of the edge. I rather lost enthusiasm and have been wondering whether to stitch some cotton tape over the edge or even bias binding so that presumably I would be able to use my machine after all. I draw consolation from the fact that if I ever do a piece of work on it that’s neat enough, the edge would be in the frame and not seen at all. I bought a pack of stitching off cuts and so have several similar! Right now I want to just go out and buy some linen to work with, I may have given up on it.
My grandmother was a dressmaker,too, and my mom, a home sewer learned from her and taught me always to straighten the fabric before doing anything else. Neatening for embroidery would be the next step. This makes the framing up and especially the finishing easier, nicer, and more professional. It annoys me (a little) that sellers of fabric so often cut it way off-grain, and that usually leaves one with a piece of fabric of smaller dimension than one paid for.
I just started embroidery as a past time for socially distancing at home, and the fabric I bought is fraying like crazy right out of the package. This is my first time doing the whip stitch so hopefully I can do it right. Thank you for the tutorial!
You are a lady after my own heart. I always reckon that preparation is part and parcel of my stitching. It is the same with gridding the fabric. I know if I don’t do it, then I am setting myself up for trouble with a capital T. Sorting threads, beads is also part of the stitching process, as is photocopying the original chart, though only if in monochrome of course.
Hi Ms. Corbet! I primarily work on cotton because linen is prohibitively expensive for me. Is this procedure good for cotton as well, or is there something else I should do to prep fabric for needlework?
With cotton, I prefer neatening the edge on a sewing machine, either using an overcast stitch (which requires a special foot) or just a regular zig-zag.
This was a very helpful post, thank you Mary! I never knew or thought about neatening the edge when I first started embroidery, and the fraying strands getting tangled in my work drove me mad! Now I use pinking shears to prevent fraying, but after reading your other post on how to cut linen on grain, I’m wondering if this method messes up the grainline. So far it’s been working pretty well for small pieces and I’ve not noticed a difference. Thanks again for the wonderful articles!
Hi, Anne – If you’re cutting along the grain with your pinking shears you shouldn’t have a problem. I cut with pinking shears quite frequently. They are very helpful!