


I love the word “ruched.” And I especially love it when it’s used in context with ribbon. Ruched ribbon – the two words just sound right together!
What does ruched mean? It means gathered, frilled, or pleated.
Ruched silk ribbon looks pretty neat, and it’s a great way to add some dimension and texture to the surface of an embroidery project.
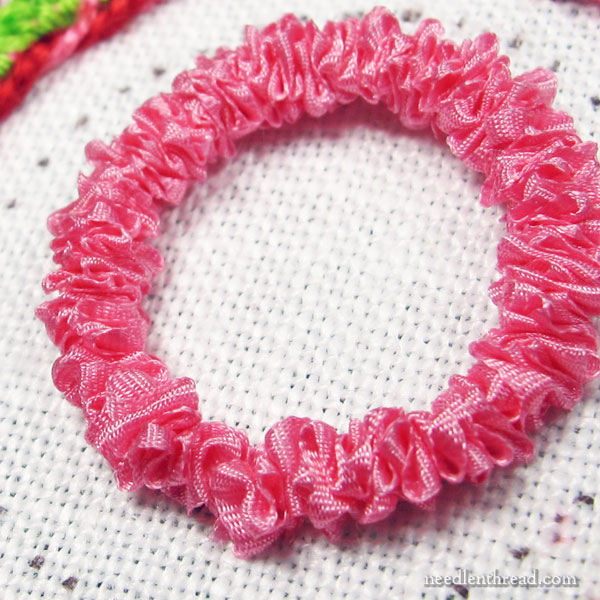
On this Christmas ornament I’m currently working on, I added a little ring of ruched silk ribbon in pink. If it were done in green – perhaps speckled with tiny red seed beads – it would make an absolutely adorable Christmas wreath!
So, here are the instructions on how to create a ruched silk ribbon wreath or ring. You can adapt the approach to lines, squiggles, waves, whatever!
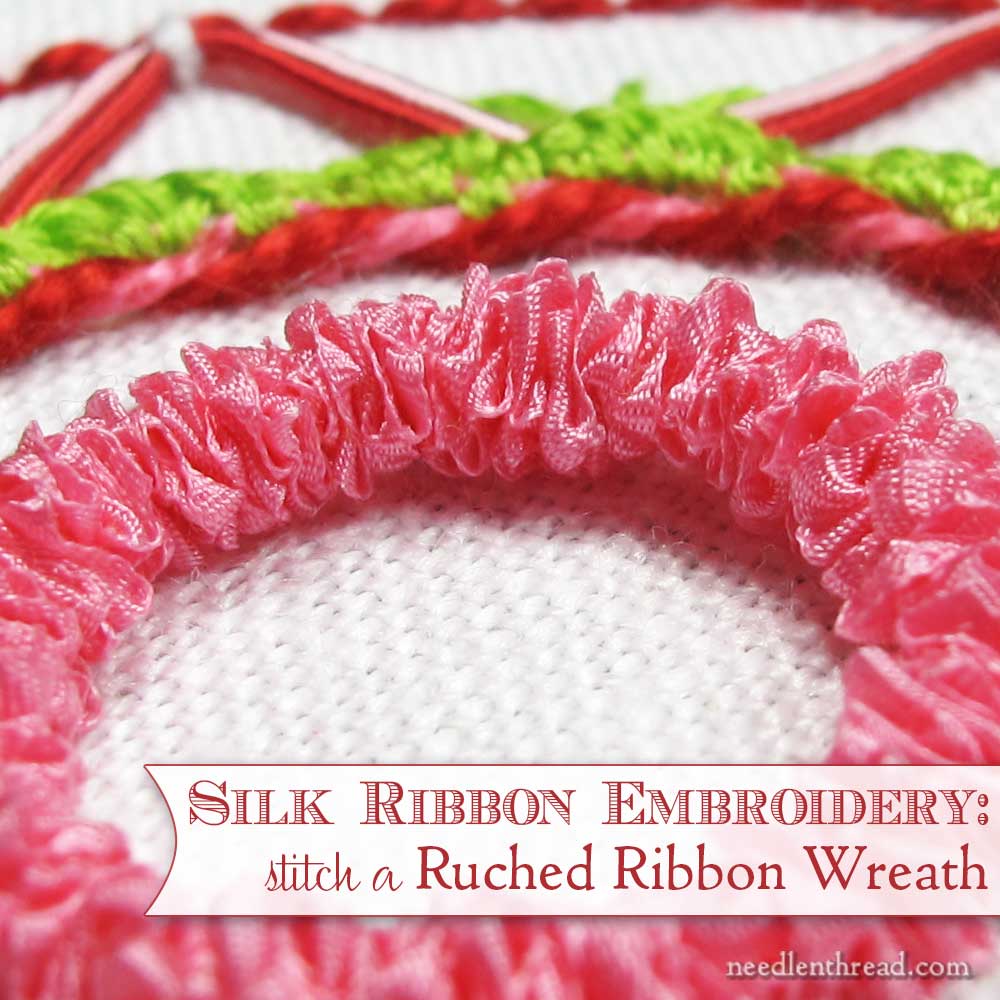
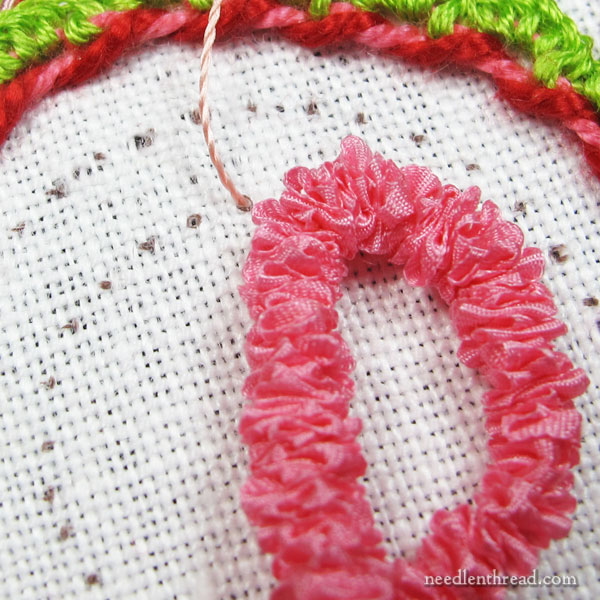
Ahhhhh! There it is! A ruffly, pink, ruched ribbon!
Ruched, by the way, is pronounced roosht – just in case you’re wondering. Like swooshed. A ruche swoosh. A swoosh of ruche. Swooshes of ruches.
Dr. Seuss could have so much fun with this.
My silk ribbon for this bit on the ornament is pretty tightly gathered. You can vary the degree of gathering, from loosely gathered to tightly gathered, to anywhere in between. This is one of those areas of embroidery where experimentation is a good idea, to get just the look you want.
I like the tightly gathered ribbon when working in a ring, because it’s much easier to control the ribbon while tacking it into a ring…
… and because the frilly gathers hide a multitude of stitchy indiscretions.
I’m working with a 4mm wide silk ribbon (by River Silks), a #9 crewel needle, and a piece of fine twisted silk (Soie 100/3) in a (sort of) matching color. You can use any fine thread – a sewing thread works great, too. I wouldn’t necessarily use regular floss – it’s thicker, softer, and not as strong as a fine twisted silk or even a regular sewing thread.
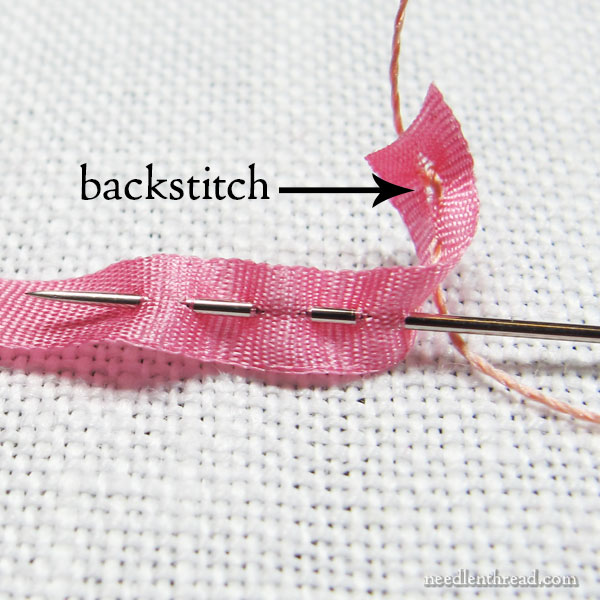
Because I wasn’t sure how much ribbon it would take to ruche my way around the ring (I don’t think ruche is a verb, but I’m thinking about making it one), I didn’t cut the ribbon from the spool. I started on the end of the ribbon with a little straight stitch forward, followed by a backstitch over the straight stitch to lock the silk thread.
I left a significant tail (3 or 4 inches) on the end of the silk thread, hanging off the end of the ribbon. This tail comes in handy when it’s time to end the ring.
Once the thread is started it’s just a matter of working a running stitch down the middle of the ribbon. You can pick up several stitches on the needle, then push the ribbon down onto the thread, then pick up a few more stitches, and push the ribbon onto the thread.
Once you have a significant amount of ribbon on the thread, pull the thread to gather the ribbon, pushing the ribbon back towards its beginning.
Occasionally, test the length of the ruched ribbon, and keep adding more gathers until you have enough ruched ribbon, gathered to the degree you want it gathered, to cover the design line you’re trying to cover.

Once you’ve gathered enough silk ribbon to cover the length of your design line (in this case, a circle), you’re ready to attach the ribbon to the fabric.
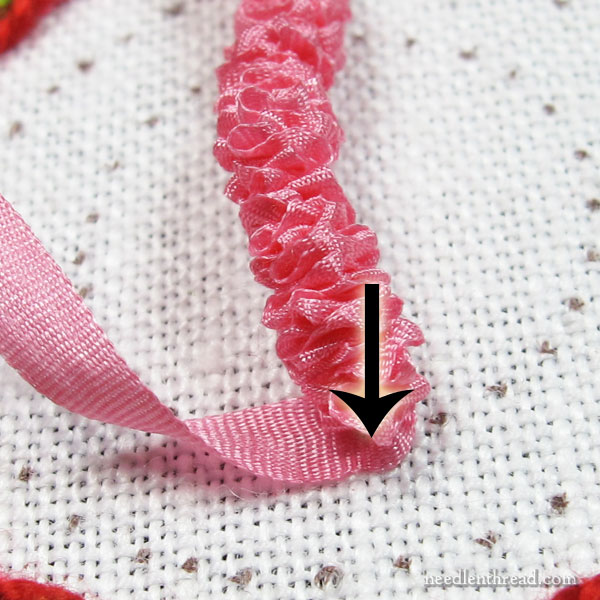
I began the attachment process here by taking the needle and working thread straight down into the fabric where I wanted to start the ring.
This leaves the rest of the ruffled ribbon dangling off the front of the fabric. It’s a lot easier to manipulate this way, so that you get a good even finish when the beginning and end of the circle meet up.
Don’t end the thread – you’ll use the same thread to tack the ruffled ribbon down around the ring.
Now it’s just a matter of attaching the ribbon around the ring.
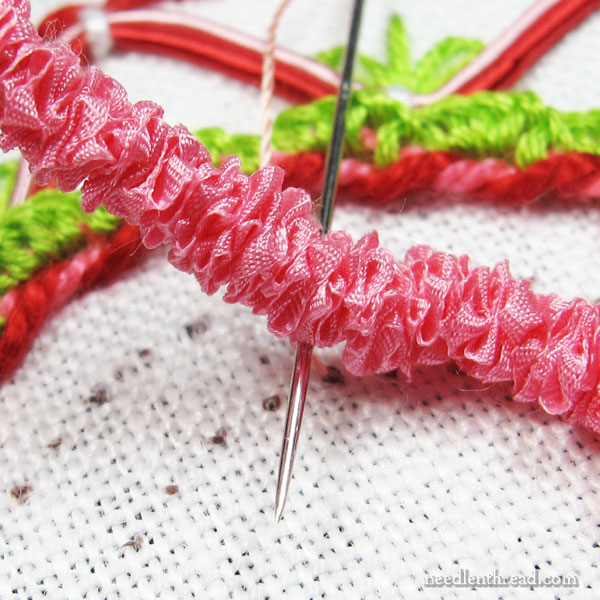
This isn’t done exactly by couching in the proper sense of couching. You could couch directly over the ruffled ribbon and wiggle your couching stitches down into the frills of the ribbon, but…
*Sigh*
It just doesn’t look as good. The couching stitches tend to crush the ruched ribbon, and the dent can be visible at every couching stitch. And we shouldn’t want that!
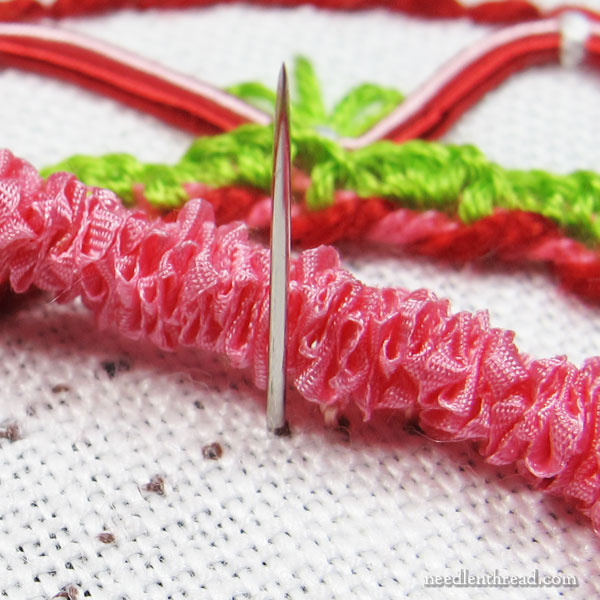
Instead, bring your needle and thread to the front of the fabric on your design line where you want to attach the ribbon. You’ll want to attach around the circle about every eighth to quarter of an inch, to create a nice smooth circle.
Above, you can see the working thread brought to the front of the fabric, with the ruched ribbon pulled out of the way.
Take your needle and thread through the base of the ruched ribbon, picking up just some of the ribbon inside the gathers. If you stick the needle into the bunch of ribbon just at the lower edge, you’ll pick up enough of the ribbon to secure it.
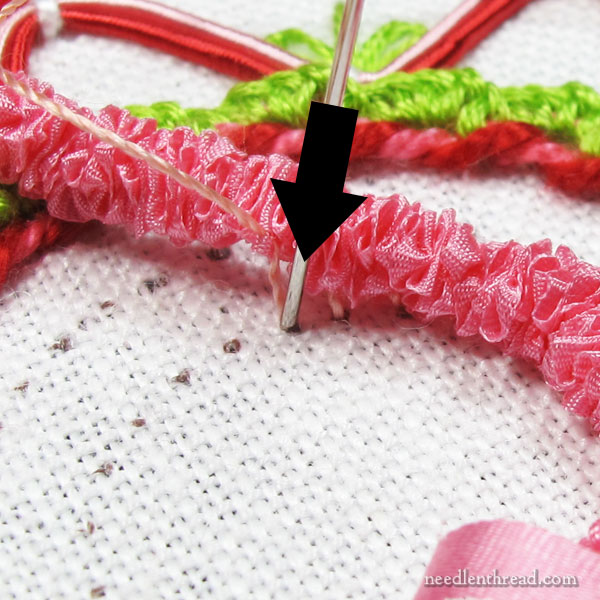
Pull the working thread through the ribbon and take the needle down into the design line right where you came up.
As long as you’re starting the stitch on that line and ending it there, and passing through the width of the ribbon ruffle, you’ll keep the bunched ribbon in the right place, on the design line.
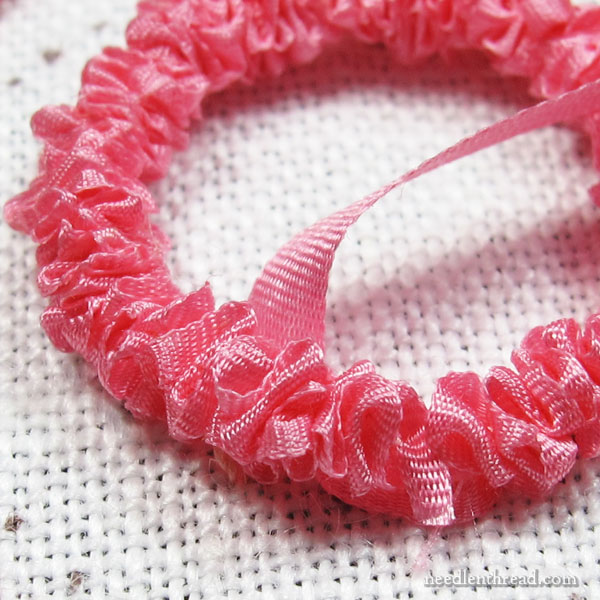
Eventually, you’ll come around to where you started.
Take the tail of the thread (remember we left a three or four inch tail at the beginning of the ribbon?) and thread a needle with it, and take it to the back of the fabric, snuggled right up to where you first attached the ring. End this thread on the back by whipping it under the backs of the stitches on the back of the fabric.
You’ll still have one working thread on the back – the one that you attached the ribbon ring with.
Snip any excess silk ribbon close up to the ring, and carefully tuck any surplus under the ruffled ring and add some little tacking stitches to hold it. End your gathering thread on the back of the fabric and cut it.
Now you can work your way around the wreath with the eye end of the needle and gently manipulate the ribbon anywhere it needs adjusting.
And that’s it! You have a gathered, frilly, silk ribbon wreath! Perty, ain’t it?
The only part that takes any effort here is the running stitch down the center of the ribbon, and it doesn’t really take effort. It just takes time. You have to gather quite a length of ribbon compared to the small length of the line you’re covering.
Keep an eye out for Part 2 of the Christmas ornament series coming up in a couple days!
In the meantime, any questions, comments, suggestions, rebukes, better methods, points that need clarifying – or any other chit chat? Leave a comment below! I’m always in a chatty mood on Mondays, so I’m up for anything!
Good morning, and thanks for once again “joining” me in my first cup of coffee for the day. Even when I can’t spend time with embroidery I still check in with you every day for your cheerful and energetic messages as well as the vast knowledge you share.
Thanks, Marilyn! Hope your first cup of coffee was a good one and that it got you charged up for a great day!
Beautiful! Do you have an idea of how much ribbon a wreath that size requires?
It took me about 24-26 inches, which is a lot, considering the small length covered. The way I did it, there was no waste.
To estimate how much ribbon you need to ruche around a circle first measure across the middle of the circle to find the diameter and times that by 3, this will give you an approximation of the circumference. you will need roughly 3 times the circumference for a tight ruche. 2 times the circumference will be enough for a looser ruche.
Thanks, Carol-Anne! I love formulas!
I enjoy all your useful information.
Thanks, Carmelle! Glad you enjoy it!
I’m intrigued by what you said about beading it. Would you bead it before gathering, or after couching? I’m seeing a Christmas tree in green ribbon, couched in a back and forth design, beaded with seed beads, in red, white, or multi-colored.
I’d bead it afterwards, snuggling the beads in among the ripples and ruffles. A tree would be fantastic!
Dear Mary
The ruche swoosh or a swoosh of ruche or even swooshes of ruches, is lovely and it looks so pretty on the Christmas ornament I love it, a question is it a different type of Silk ribbon from the smooth ribbon you can buy from River Silk, if you understand what I’m saying, even I’m confused but then that’s not unusual. A great write up on how to gather silk and how to secure it. Thanks for the information on how to gather and secure ribbon on to fabric.
Regards Anita Simmance
Hi, Anita! Nope, it’s just regular smooth 4mm silk ribbon. You can use any kind of ribbon, though….
Dear Mary
Thanks for your reply I have ordinary River Silk ribbon so that’s good to know.
Regards Anita Simmance
Cute is what my first thought was.i also enjoy your message everyday ,I appreciate how dedicated and reliable you are .God bless you.
Thanks, Diana! I find myself playing with the whole ruched ribbon idea more and more…for example, if I used a fine wire instead of a thread, could I make a stand-alone wreath, not connected to the fabric at all? I think so! But…time, you know!
This is, as usual, gorgeous.
Two things come to mind: first, you can also ruche the ribbon by making your running stitch into a zigzag along the ribbon. This makes a wider ruche, although if you don’t pull the stitches tightly you can make a zigzag ruche. Now that’s something for Dr S to conjure with – a ruched zigzag swoosh, zigzagrucheswoosh. Oh dear.
Second, if you use French wired ribbon you can pull those wires up to gather the ribbon between them. Not quite the same but effective nonetheless, and quick, very quick compared to stitching. If you want a frill you can remove the wire from one side of the ribbon and just pull the other.
Hi Mary just to say I love the way you have done your wreath it looks so easy to do as well. Thank you for all your informative advice and tips.
Thanks, Caroline! Glad you like it!
Good Morning,
I haven’t written before, but I wanted to let you know how much I love your site and look forward to all your emails. I’ve been doing all kinds of stitching since I was a little girl, but I’ve learned so much more from you! Thank you for all the great and beautiful patterns and ideas and new-to-me resources. I’m poorer than ever!
Thank you,
Linda
Pewaukee WI
Hi, Linda! Thanks for your note! I’m so glad you enjoy Needle ‘n Thread. Sorry about the strain on the finances — I know the feeling. I was bound and determined not to buy one more stitching related thing for any reason at all until 2015 (including anything to review on Needle ‘n Thread), and you know, within 24 hours of making that “resolution” (which I made four whole days ago), I bought two new books to review. So I re-made the resolution two days ago. 48 hours later, I’m still holding strong! And that’s almost a record! 🙂
Good Morning, Mrs. Corbet,
I love your ruche swoosh! Or swoosh of ruche, or swooshes of ruches 😉 It’s so cute. My question: Could this technique be used in card making?
Thanks for your very precise tutorial 🙂
Sarah
Sure! You’d just do the ribbon separate, like I did here, and pierce the holes in the card according to whatever design you’re stitching, and then attach the ribbon the same way, only you’d use tape on the back of the card to secure the thread. It’d be cute! In fact, a little ruched ribbon wreath on the front of a card would be beyond cute. That’s a great idea! And hey, you can add a little pre-tied bow onto the wreath the same way. Hmmmmmm…..ideas are churning around in the noggin…..
A little rouched ribbon wreath on the front of a card is what I had in mind! Pre-tied bow is a great idea 🙂 Thanks for the reply.
Sarah
Dear Mary & Sarah A…. thank you putting the idea for using this on cards into my head!! Isn’t it great the way one thought can grow and grow? Cheers to you both!
Yep! Sur is perty and looks very easy. Will have to try sometime, but hain’t got no time taday!
🙂
Thanks. This is a great article.
mary, wow u are sew amazing. i learned this technique in quilting, making rouche flowers to appique, but it never dawned on me to use this on ribbon for embroidery,thanks for the inspiration
That is so candy, Mary! It gave me the idea to make a matrimonial wreath to celebrate my wedding anniversary.
Thank you so much.
So lovely. Been wanting to try silk ribbon embroidery, but this is much less intimidating!