


Welcome to Wednesday! Woohoo! I’m back home from a much-needed break – and glad to be here!
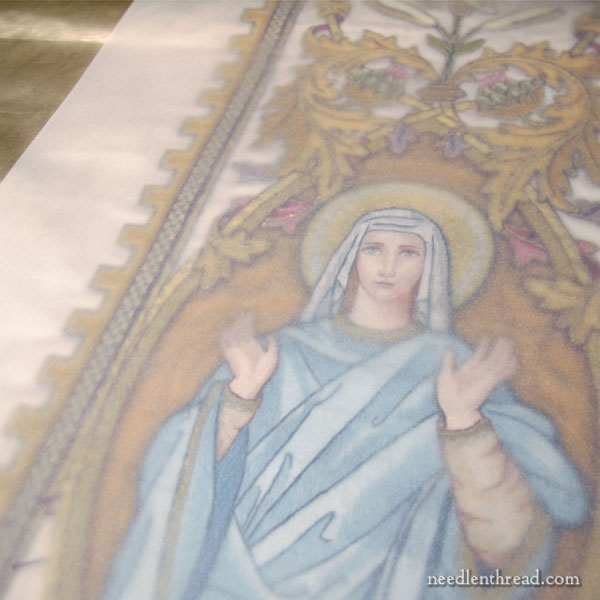
A few weeks ago, we looked at this piece of embroidery that I’m taking apart, to salvage the figures on it to put them on a new background.
This was the perfect project to turn my mind to yesterday, after a Most Wonderful, quiet, peaceful break – concentrating on it got me back into the swing of things in a very pleasant way!
A funny thing about this project: I was going to say no when asked to undertake it, but I’m so glad I didn’t! I love this kind of exploratory work. It’s enlightening, intriguing, and absorbing.
Today, we’ll look at some First Things First. Before really digging into a piece like this, there are a few preliminary steps to take and a few tools to line up.
Visual Documentation
When it comes to Absolute First Things with a piece like this, documenting the piece visually is a good idea.
As I work on the piece, I’ll need a general idea of the layout of the original frames (just in case I want to mimic them in some ways), but I also want to be able to recall specific details about the piece, should I run into anything similar in the future.
Plus, I like the overall design and certain elements of it, so getting some good visuals that will help me recreate something similar, if the need or desire arises, makes sense.
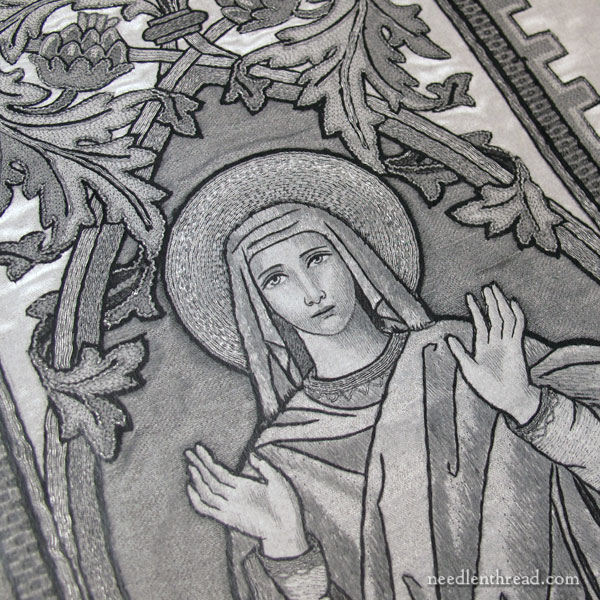
Now, there are many ways you can go about creating a visual record of a piece of embroidery like this. Photography is the most obvious. Overall shots of the piece, close-ups, and even macro shots on the stitching will all come in handy at some point for me, and so that’s the first thing I did.
I set up some good lighting and photographed the entire piece starting farther away, then getting progressively closer – focusing on the whole, then the various parts, and then finally getting up close and personal with macro shots on the notable parts, like the faces, the trim, the chain stitching, the goldwork.
Beyond Photography
Then, I started to do something that I’ve done many a time in the past: using a very light tracing paper, I was going to make a rubbing of the whole piece.
In the first photo above, I’ve pinned a light tracing paper over the image.
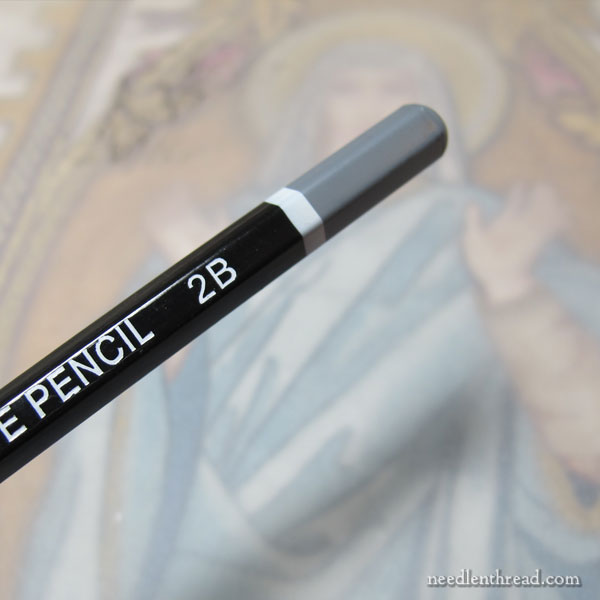
To make a rubbing, you pin tissue paper or tracing paper over whatever it is you want a rubbing of (assuming there’s some texture to the thing), and then, using a soft lead pencil or charcoal, you lightly rub over the whole thing, resulting in a fairly accurate recreation of the design…albeit a very messy one, too.
So, I started doing that. I’ve done it before to good effect – I made one for this piece of antique goldwork, for example, and then made a pattern from the rubbing.
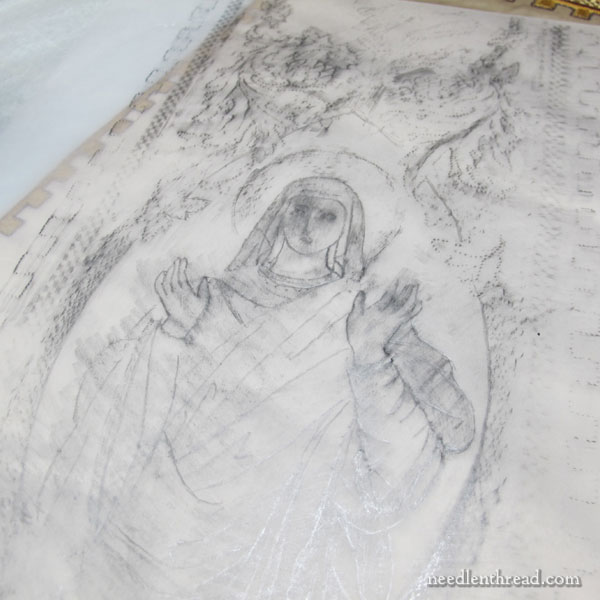
But then I remembered that I live in the 21st century.
Why go through all this mess and bother when a photocopy machine can not only do the same job, but do it much, much better?
So, I high-ho-hithered myself to a local copy shop, where I placed the piece on the flat bed of the photocopy machine and made two copies of each section – one black & white and one colored.
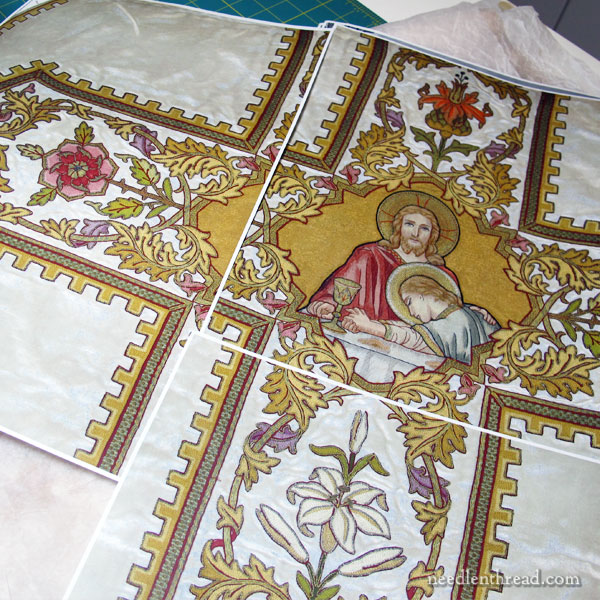
If you ever go through a process like this, you won’t regret making photocopies! They’re clean, easy to handle, easy to store, and very, very accurate.
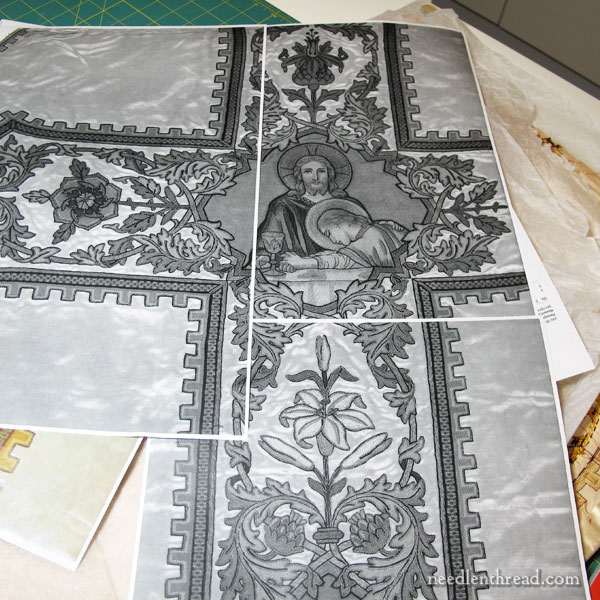
I definitely encourage you to go for both colored and black and white photocopies.
The color will give you a good idea of the color layout in the piece and offers a fair representation of the whole – although the colors are never a perfect match. The photocopy colors, in fact, are quite a bit more saturated. But that’s ok.
Black and white photocopies will give you an excellent springboard for reproducing patterns. They also provide a very clear idea of shading, highlights, shadows, contrast, and so forth.
If you can also scan the item and save the resulting scans on a flash drive or what-have-you, that’s a good idea, too. If you have to go to a copy shop to do this, it might cost a bit more, but I think it’s worth having the digital file.
So, a few photocopies, scans, lots of photos, and some notes, and my visual documentation complete!
That part done, it’s time to move on to the fun stuff!
Tools
Before beginning the work, I lined up some tools.
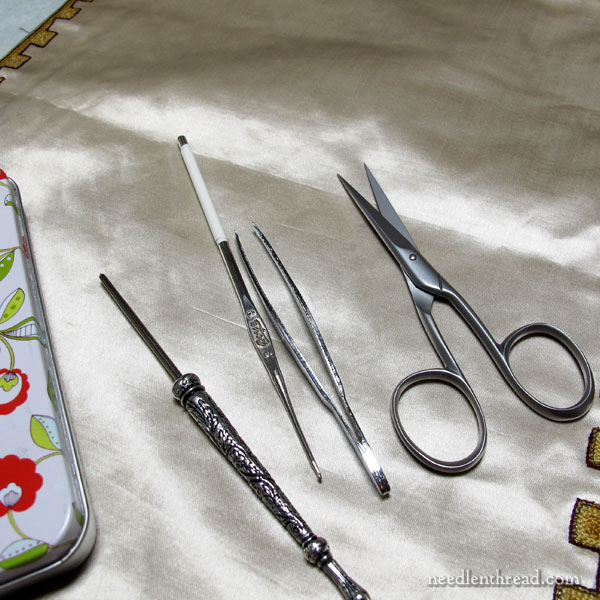
Not all the tools are pictured above, but they’re all pretty basic:
Fine, tiny scissors – to cut threads.
A fine, strong, and sharp seam ripper – to cut threads that you can’t get under with a pair of scissors. This isn’t a tool I use a lot, but I do use it here and there, where necessary. Sometimes, seam rippers can make me nervous, so I use them with extreme care on this type of piece!
A good pair of grippy tweezers (they really need to work!) – to pull stubborn threads out.
A laying tool with a blunt tip (no sharp tips!) – to hold bits out of the way, to gently pry parts when necessary, and so forth.
A tiny crochet hook – handy for scooting under things to grab a particular thread or to pull out threads.
Good lighting, a magnifier, and a digital camera or smart phone – sometimes, magnification doesn’t show you everything you want to see, so a digital camera with a screen and a playback feature that allows you to zoom in on the images you take (or a smart phone that takes decent close-ish photos) comes in very handy!
Tissue paper or a clean sheet – to lay the piece on while working and to cover it with while not.
So, with the preliminaries complete and my tools lined up, I’m ready to start. My first step will be getting to the back of the piece, which is merely a matter of removing the red silk lining.
Once that’s done, I’ll be able to start the real archeological dig into what’s what with this piece. I’ve already taken a few peeks, so I know there are a couple little surprises in store.
I’ll keep you abreast of the situation as it develops!
Questions, Comments, Suggestions?
If you’d like to join in on the conversation about this piece – if you have any questions or comments – feel free to chime in below!
Coming Up!
If you’re a cat lover (or a dog lover), I think you’ll be enchanted with what I’m going to show you on Friday. If you’re not a cat-or-dog person, but you love the art of embroidery, you’re still in for a treat!
This week, I’ll be stitching up one last sample for a soon-to-be-released ebook. I’m also working on a couple patterns and continuing with the never-ending process of workroom organization. Nothing quite like jumping back in with all three feet!
See you Friday!
Welcome back Mary!
Looking forward to seeing your new book.
Lolly (Campinas, Brazil)
Don’t you think the the rubbing gives a better impression of which are the really raised, somewhat raised, or only slightly raised, areas? That is doesn’t the photocopy seem to flatten the whole piece.. Maybe both are useful.
Hi, Sally – Yes, I see what you mean! I think if you’re familiar with the techniques, you’d pretty much know which elements are not flat on the fabric – for example, the gold wire is obviously going to stand out from the fabric a bit, etc. With this type of embroidery, except for the goldwork threads, there’s not a whole lot of dimension or even texture to it (aside from the more textured look of the chain stitch vs the satin stitch), so I don’t think that it would make too much difference.
Welcome back Mary
So very pleased to hear you had a great restful break.
Sharon
Thanks, Sharon! 🙂
When you take black and white photocopies, do you have a special setting for the brightness and contrast?
Hi, Dima – I ran a test copy first, to see how it looked, and it came out fine. Photocopy machines today are so high-tech – I think it just made adjustments for the best results automatically! So I didn’t have to change any settings at all. 🙂
Dear Mary
Welcome back I’m so glad you had a good break and I’m glad you have found the perfect project to swing back into. It looks such an interesting project and I can see that you will really enjoy yourself deconstructing and putting back together such a lovely piece. I’m looking forward to the new ebook when will it be available. Good luck with the workroom organisation. Thanks for sharing the techniques on embroidery archology and for sharing them with us.
Regards Anita Simmance
are you doing restoration work on this piece or reproducing the
pattern?
Hi, Jan – I’m salvaging the figures and putting them onto a new ground fabric, so that they can be used on a vestment. You can read the backstory here: https://needlenthread.wpengine.com/2017/06/embroidery-archeology-salvaging-ecclesiastical-embroidery.html
Mary, good afternoon! More a question than comment: both copiers and scanners have very bright lights, so I would not want to use them to document embroidery, as such bright light is said to damage fabric. However, you did for documenting this piece. Why, and were you concerend about possible damage? Just curious.
I’m looking forward to following your progress on this project. Many thanks for posting!
Hi, Carrie – thanks for your question! For the brief instant the piece is exposed, I’m not really worried about it. Remember, this is already an old piece that hasn’t really been taken care of. I’m salvaging the figures only, and they’ve most likely already had their share of light exposure. I think in most cases, unless you’re dealing with an extremely rare, ancient textile worth a lot, the brief exposure to the light on the copy machine isn’t going to make that much of a difference in the life of the piece.
I’m looking forward to what the back side will reveal about the embroidery! Your first steps are excellent and perfectly logical documentation.
I agree with the expense of getting to a large copy machine to get photo copies in both color and black and white to document the piece. Its avery good idea for documenting pieces you have created or just embroidered for the idea of future provenance of a piece.
Is that silver beauty a laying tool? That is gorgeous. I’m a firm believer in using beautiful tools, they are more pleasurable to use. Mind over matter. All except seam rippers. I go through seam rippers. There is a hole in the space time continuum where my seam rippers live, and they are all laughing at me. I store them in my button box, my cutter case, my sewing wall organizer… I’ve tried everything, and then next time I need it — that sucker is gone…. and I’m off to buy another seam ripper.
And my husband was raised by a massive sewist…. if he uses a seam ripper for something, he asks, and puts it back, and tells me several times he put it back (mainly because, the suckers disappear on me)… my late mother in law was a treasure who raised her son right. By the way — I bought a Fons and Porter seam ripper that couldn’t cut ANYTHING… that one! That’s the one that remains. I use it to poke out corners, it’s so dull.
Second — my niece is an artist, and she’s done vellum charcoal gravestone rubbings for me of some ancestors. There is some sort of spray fixative available that sets the rubbing — so it doesn’t rub off on everything. Like all these products — open the windows wide….
I am really enjoying this project. I can hardly wait for the next steps. Lots of pictures please. Thank you for sharing your work with us. I have so much to learn.
Welcome back, Mary! And thank you very much for organising those interesting posts to appear during your break. I do hope you are feeling fully restored and renewed and ready to go – you have started with a most beautiful project.
Oh this is going to be fun to follow the super sleuth! Nothing beats watching a pro going through the fine details. Woop, woop! The future lineup sounds enticing.
“but then I remembered that I live in the 21st century” – so my life!!
This is an amazing piece! Thank you for sharing. Do you have any close up shots of the three flowers? Looks like a rose, lily and passion flower? I’m very interested in seeing those in more detail. Thank you.
Hi, Mary – If you follow the first article that I linked to in the opening paragraph, that’s where you’ll see the rest of the piece up close, including the rose and the lily: https://needlenthread.wpengine.com/2017/06/embroidery-archeology-salvaging-ecclesiastical-embroidery.html
Hi Mary
I really love this piece, I often find that embroidered faces and hands come across as very heavy and can lack detail. The shading techniques here allow for some very fine and delicate features.
I was wondering if there are any books or articles you know about that go through these techniques, as I have some figure embroidery designs that I think this would be perfect for.
Thanks Brittany
Hi, Brittany – I don’t really know of any books that tackle the question of realistic shading for faces, done in this manner. I wish there were one – even an old one – but I’ve not come across anything that is detailed and instructive. But I’m always keeping my eye out!