


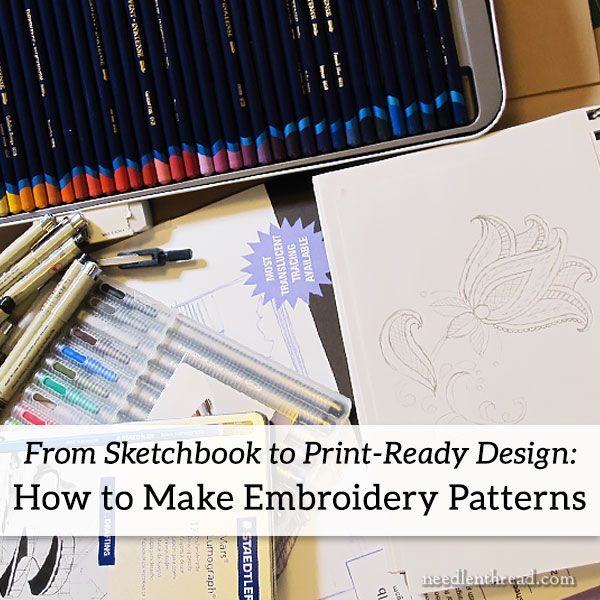
Over the years, I’ve had many, many queries about how to make hand embroidery patterns.
The question of how to make embroidery patterns isn’t usually directed to the drawing or doodling part that’s done with a pencil, but rather how to take a sketch, painting, photo, or doodle and transform it into a clean line drawing that can be enlarged or reduced in size, printed, and used as a pattern for stitching.
So, today, let’s chat about a technical topic that’s somewhat related to embroidery, even though it doesn’t have to do with the actual Stitching of Things.
We’ll look at what you need to know to create a line drawing that’s smooth, scalable, and prints a clear, precise line drawing suitable for an embroidery pattern.
If you’re drawing your own patterns for your own embroidery, you certainly do not have to go all-out technical in the production of them. A design that you’ve drawn with pencil on a piece of a paper works just fine!
In fact, I think you can get much more creative in planning a design from absolute scratch, using a pencil and perhaps some watercolors or colored pencils. A good fine-tipped artist’s pen for the final line drawing will give you a decent image to transfer. If you’re not computer inclined, or you have no desire to mess with the learning curve involved in graphics programs, then don’t sweat it! Use pencil, paper, and pen.
But if you want to create a printable, scalable, smooth drawing to use as a pattern – maybe you want to sell your patterns or include them in kits or what-have-you – then it’s helpful to produce what’s called a vector image from your drawing.
I’m not going to take you step-by-step through creating vector images from drawings. Instead, I’m going to talk about my own process, point you in the right direction for the tools you’ll need, and share some tips on what you really need to learn if you want to create vectors and things to avoid if you want to be efficient about it.
What Does it Take to Draw an Embroidery Pattern?
If you believe that you’re incapable of drawing your own patterns because you’re not an “artist,” I think you’d be surprised! If you can doodle, you can make up your own pattern.
Embroidery patterns for me come about primarily as a result of doodling in a sketchbook (or sometimes, even on a paper napkin when sitting at the table). I like to doodle, but I’d never call myself an “artist.” I don’t really draw in a highly artistic way, especially when it comes to realistic human forms or realistic animals. Flowers, inanimate objects, scenery, and stylized designs are easier for me. In fact, if I had to sketch the person sitting across from me drinking coffee, he’d come out looking like this:

(…which, weirdly enough, isn’t all that bad of a rendition…!)
Seriously, though, if you can doodle, you can draw your own original pattern. If you can’t doodle, but you can photograph something – like a scene or a flower or a bug that you like – then you can trace that photograph to make a design that’s stitchable.
Software
For software, I use Adobe products. For image and photo editing, I use Photoshop. For vector images, I use Illustrator (and I also use Inkscape – more on that below), and for publishing, I use InDesign.
I like Adobe’s products because I’m used to them and can use them efficiently. However, they’re expensive, and if you’re just starting out, I’d go with any of several free or lower-priced (one time purchase) options. For photo editing, check out Gimp (PC or Mac – free). If you use a Mac, you can try Pixelmator (about $30) or Affinity Photo (PC or Mac – about $50). For vector images, I’d go for Inkscape. It’s made for PC, but will work on a Mac if you install XQuartz as well. Inkscape is free and it’s relatively easy to learn.
You can google any of the above. All of them have good reviews, and you can find plenty of free tutorials on how to use them online.
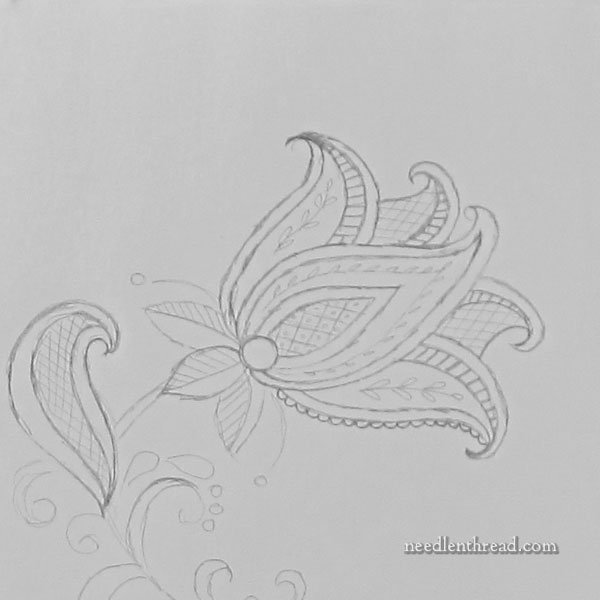
Here you have a really hazy doodle of something that could eventually turn into some kind of embroidery pattern if I were inclined to finish it. It’s just something I was playing around with one day while doodling in a sketchbook. For our purposes here, it will suffice.
Trace it with a Pen
When it’s time to turn a drawing into an embroidery pattern, the first thing I do (after drawing the thing to my satisfaction) is trace over all the main lines with a fine-tipped micron art pen, in black. If you’re using a photo of something to make a pattern, use tracing paper and trace the main lines of whatever it is you want to stitch.
Tracing your sketch with a pen gives a clearer scan to work from.
Remember when tracing that, for an embroidery pattern, you’re really only looking for the main lines of the thing and perhaps some directional lines to guide stitching on filled areas. You don’t need to trace every detail! Think in terms of what you would need, as a stitcher, on the fabric in front of you in order to stitch your masterpiece. The fewer details you can get away with, the better! Remember, you still have to transfer the design to fabric, and your design is too detailed, transferring can end up being confusing and tedious!
So, for example, if you’re creating a vector line drawing of a bird to needlepaint, you’re not going to include every feather stroke on that bird. You just want to include the main outline of the bird and the lines that indicate some kind of change in the pattern or color while stitching.
Scan It
Then, I scan the drawing and save it to my computer. It comes out as a jpg on my scanner, so I convert it to a gif in Photoshop.
Once you have a gif, you can import it into whatever program you’re going to use to create the vector image. For the sake of easy discussion, I’m talking as if using Inkscape, but if you have Adobe Illustrator or you already use their products, it’s pretty much the same approach. Illustrator has a steeper learning curve, though, if you aren’t already familiar with their products.
Things You Need to Know
The point of this article is not to teach you how to use a graphics program to create a vector image. That subject could make up a whole class series! Instead, here are the highlights of what you should look for as far as online tutorials go, or what you need to know how to do.
1. In order to start manually tracing the design, you should know how to import a gif, create new layers, change layer opacity, draw a straight line, adjust the line using the cursor and nodes, how to add nodes, delete nodes, and change node types. It’s also helpful, if your design calls for it, to know how to create a spiral curve that you can adjust.
2. To make the workflow quicker, you should know how to group lines or elements (or combine) and how to ungroup or break them apart, how to combine two nodes into one, how to break a path, how to add a new segment between nodes, how to cut segments from a line, how to duplicate, rotate, and flip elements. You should also know how to copy and paste elements from one file to another. You’ll also want to know how to change object to path and, for parallel lines, how to change stroke to path.
3. To keep your working vector organized, it’s helpful to know how to handle layers – how to raise and lower objects from one layer to another, how to merge layers, how to lock layers, how to rename layers, and how to hide layers when you need to.
4. To create symmetrical elements, it’s good to know how to draw shapes with various shape tools (circles, squares) and how to constrain proportions when enlarging or reducing a shape (or a whole grouping of lines). It’s also helpful to know how to create a one pixel (or larger) dot, for indication where beads or French knots go.
5. To ensure consistency in the whole design and to adjust the look of lines and elements, you should know how to adjust fill and stroke.
6. Finally, you should know how to size your finished design in inches or centimeters with constrained proportions (height and width), and how to export or save the image in various formats, including EPS and PDF. EPS files can be used to make jpeg images of your designs. And you’ll use the PDF for efficient printing at the actual size.
Things You Don’t Need to Know
The six points above are really all you need to know to create a decent vector image from a drawing. What you don’t need to know is how to use the auto trace feature. The auto trace feature rarely produces a vector that you can use immediately. Auto-traced elements end up requiring a ton of editing, and, since they’re often overloaded with unnecessary nodes, this can be a real pain.
It’s more efficient just to draw your own image using lines, using as few nodes as possible, and then manually adjust the nodes.
The Vector Advantage
Is it worth taking the time to change a sketch into a vector image? Well, if you’re the only one who will ever see your image and you’re doing a one-off project, then I would say no, absolutely not! But if you want the design for circulation, then yes, it’s worth learning how to create a vector image.
There are several advantages to using vector images when creating embroidery patterns, but the main one, in my mind, is that the finished product – the line drawing you create – is scalable. It can be enlarged and reduced practically ad infinitum, maintaining an absolutely smooth line without pixilation.
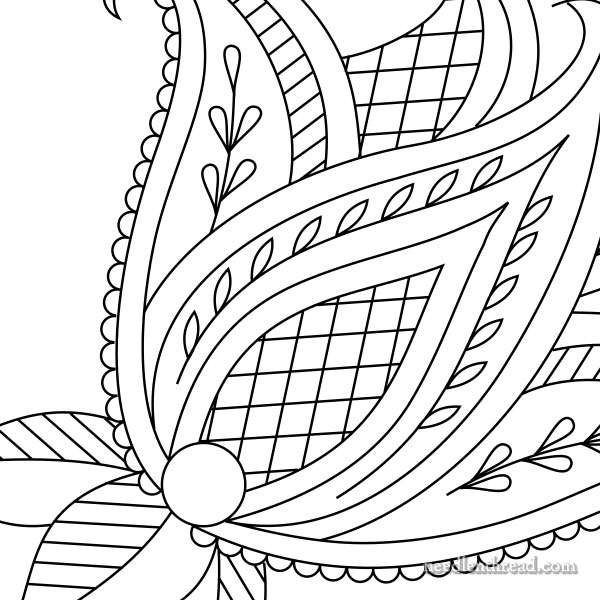
So, from the photo of the sketch above, this is the vector image I created:
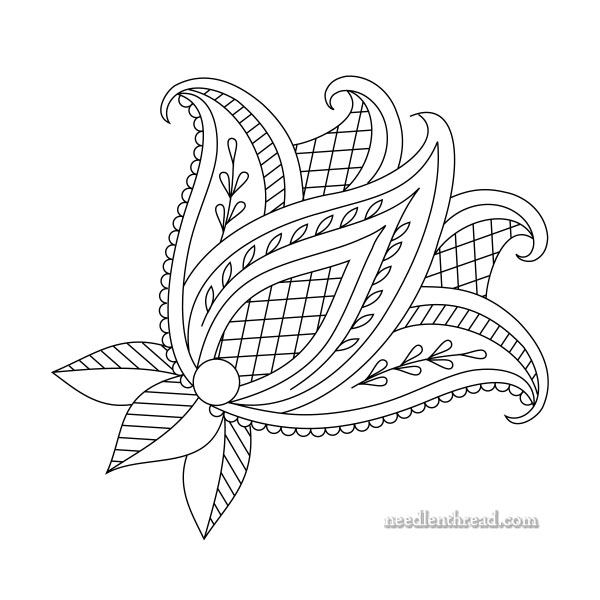
You can see that the design is made up of smooth lines without pixelation.
If I enlarge the design on my computer, it’s still smooth.
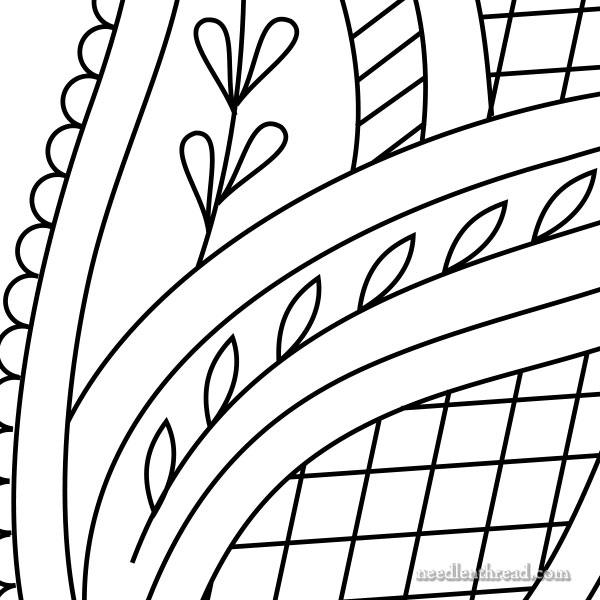
I could keep enlarging it on my computer and I’m still not going to see pixelation.
(Since the images above that you see online are jpegs, if you try enlarging them too much or you zoom in on them, you’ll see pixelation because of the jpeg format. On the actual vector image and on the PDF, this doesn’t happen.)
Over to You!
I hope this helps answer the many questions I’ve received on the subject of how to make embroidery patterns for printing. If you have other questions, feel free to ask or to join in the conversation below!
Enjoy the weekend!
Love the article lots of great information.
I would LOVE to have the featured pattern as a pdf, thanks.
Many thanks for your latest posting, Mary. I’ve downloaded Inkscape. Every now and again I run a stitch club lesson for my local branch of the Embroiderers Guild, so this will now make my pencil sketches a bit more professional looking!!!
Thank you for the extremely helpful article! It is high-level yet gives enough information to take the fear out of creating vector files. Also, the information you provide on software gives us a starting point. I appreciate your generosity in sharing information and designs to embroider!
Hi Mary. Here is what I do. I buy printable inkjet fabric sheets. In the US you can buy them at Jo- Ann Stores or Electric Quilt co. It is made of 100% cotton with a 200 count thread. Electric Q Co has sheets in 240 and a 283 satin count thread too. The sheets with an image printed on them are normally used in quilts. The size of the sheets is that of normal printing paper. These sheets are for use on an inkjet only as they have freezer paper at the back to keep the sheet stiff for printing. The heat of a laser printer will damage your printer and the sheet. For embroidery 200 count
work just fine. I always put a backing like voile or muslin, to give more body to the fabric.
You select you image from your files and and print. You can use full colour of course. After printing the sheet, peel of the backing and iron at the back to set the colour. No need to wash it. Depending on the size of the image, I add strips of fabric to the sides of the sheet to fit it properly in a hoop without the hoop damaging the printed area. I also print a photo of my image which I use as a reference.
If you have a printer that can print bigger sizes ( 11″ x 17″ and 13″ x 19″) you will find them at Electric Quilt Co. too.
If there are are any questions, I will try my best to answer them.
Have a wonderful weekend
Love Elza from Cape Town
Hi, Elza – thanks for that! The point here is more how to produce a printable line pattern or design, rather than how to print photos on fabric. But for those looking for that method, who want a full colored photo printed on fabric, these are good tips – thanks!
That is a really interesting breakdown of your process Mary, thank you for explaining! I did take a beginner Illustrator course a couple of years ago so I understand the vector process and using the Pen tool. It’s helpful though to reduce it down to the actual tools you need and eliminate those that are unnecessary. It is expensive though … I tend to buy a months access periodically … so I might check out Inkscape. If I’m familiar with Illustrator is the switchover to Inkscape reasonably intuitive or is there a bit of a learning curve?
It should be more or less intuitive. You’ll just need to familiarize yourself with the tools and layout. But, yes, if you’re familiar with Illustrator, you should have no trouble with Inkscape!
I agree with you Mary. I love InDesign + you can try before you buy. My somewhat patronising designer son told me it is perfect if you began your computer skills with Word or Publisher. It is also great fun. (I meant a son who is a designer, not a son I have designed BTW!)
LOL! Well, Phillipa, I think you can take SOME credit in the designing of him….! 🙂
That’s true – there is a decent trial period on Adobe products. I forgot to mention that! Thanks! Also, for people serious about learning how to use Adobe products (and all kinds of other software and applications), Lynda.com is an invaluable resource for in-depth tutorials. It’s not expensive at all, considering what you get.
Dear Mary
I really enjoyed reading this article about how to make printable embroidery patterns. You have added lots of information of the different products available to help enhance embroidery patterns. I just have to get to grips with the terminology and all the available computer products I have Inkscape but never really used it, I’ve played around with it but I need to follow the tutorials to get to grips with it. I think for my purposes I don’t need to buy in other computer products as I only ever use the patterns for my own use and usually only once. But thanks for your indepth input into the different available options for patterns. Thanks also for sharing your tips and techniques on the different apps which enhance embroidery patterns.
Regards Anita Simmance
Yeah, this is why I rely on using ready made patterns. It makes me appreciate even more how much you do for us, Mary.
Wendi
Thank you so much! I’m working on an idea for purses but didn’t know how to get a clean image like that.
I use a program from ACD Canvas. It is produced in both formats, but it is expensive to start up and has a learning curve (any program has a learning curve.) What I liked best about this program is it is both a vector and pixel program with a layout program included. I produce all my graphs and instructions from this one program.
Let me also say, that what works for one will not always work for another And if you have any of the Photoshop products then you should stick with them.
While I don’t plan to do this, I appreciate your willingness to share your talent and information. I love your finished design. So lovely. Makes me want to trace it from my tablet Screen! I’m stuck on a huge cross stitch project and need a break for something more relaxing and free. Thank you ; have a good weekend.
Thank you for the article. Love the drawing!
This is such good information. I actually have Inkscape on my computer, but have rarely used it and not for a long time. Do you have suggestion for a link to a good tutorial. I do not understand layers among other things. I am guilty of using autotrace too. So, just a general tutorial would work also. Thanks for all your work.
I would like to know how to create iron-on transfers; what kind of ink is used? I have hunted for 2 years with no success in finding out how it is done.
I’ve actually had good results with the auto trace feature in Inkscape, especially combined with Simplify (Ctrl + L). But it depends on the design.
I also used to have a graphics tablet, which is sort of like using a pen for input, but it isn’t compatible with my current computer. I guess a touch screen and a stylus would be a more common way to do that today.
Great advice Mary!
I use Corel’s Paint Shop Pro which is a less expensive than Adobe products and has both raster and vector capabilities.
– a good “allrounder”
You are an inspiration 🙂
Judy
I know that you were going into detail for those who might want to sell patterns, Mary, and this will not work for same, but has worked for me.
I wanted to stitch an ornament of our RV. I took the catalog book and put it on my copying machine and adjusted the size until the photo was the correct size. (Of course for any sort of distribution, including sales, one cannot use a published photo.) I put the print out on the small light table we have (window pane on a sunny day works also) and I put the fabric over the photo on the light table. I drew an outline and the details needed (tires, windows, door lines, headlights, etc.). I then had what I needed to stitch the RV – with occasional runs outside to check which color light was where.
Similarly the following year I made an ornament of our car – which the day after I finished the stitching was totaled, so I made another piece to stitch and stitched it again with the color of the (same) replacement car. The two are one ornament – front and back.
Husband got a rigid heddle loom the Christmas 2015 and had started using it in January of last year (2016). I looked online and none of the pictures of the loom were what I wanted. I took my own photo of the loom sitting in our living room, with the chair he uses behind it with my cell phone. As long as what one takes a photo is not copyrighted, trademarked, etc. one can use the photo. I printed out the photo, again adjusted it to the size I wanted with the copying machine and printed it out. This time I made changes to the printed out design – I drew a cartoon version of husband into the picture and added fabric being woven. I then transferred this to fabric and stitched it for the ornament.
Thank you for this article. I have Adobe products and have always wanted to learn how to use Illustrator. Is there an online tutorial that you can suggest?
Enjoy seeing what you do with hand embroidery!
There are some good classes on Lynda.com for a reasonable price. I like their courses, because you can mark things, go back and review them, and search for specific things you want to learn.
Mary- Your information is so detailed and generous- thank you. For those of us interested in counted techniques, the equivalent information for graphing counted designs electronically would be greatly appreciated. Best regards – Kate
Great article. I’d add that after you scan and import your drawing saved as a gif or jpg, you could use live trace in Adobe Illustrator and then hit “expand ” to create the vector image, then clean up the nodes as one does to make the line drawing smooth. But this presumes one is familiar with Illustrator.
That is one impressive doodle. I appreciate all the ‘tools’ you give us to bring our own ideals and projects to life.
Thank you for sharing your knowledge. Greatly, appreciate it!
I’ve recently started using an excellent free program called Krita, which I can recommend. It would be quite a steep learning curve if you’re starting from scratch, but anyone used to using Adobe products should find it fairly familiar. It’s available for both Windows and Mac.
I, too, use Krita, for I’ve dabbled a bit in digital painting, and I so far I think I love it best of all. I started with (a very old version of) Photoshop, then proceeded to Gimp, tried MyPaint (didn’t like it at all) and eventually landed with Krita. Lately, I installed Inkscape (because of Mary *hehe*), and I like it, too, though I prefer the “painterly” approach of Krita.
If I may give a short subjective comparison of the above mentioned programs:
– PHOTOSHOP and GIMP are rather designed as photo editing programs, though they are suitable for drawing and painting as well. Adobe products are expensive – Gimp is free and – at least to my mind – very clearly arranged and quite intuitive. There’s an online handbook that I find being very sparse, though. But you’ll find quite a lot of discussions and tutorials on Gimp in the internet (and on youtube).
– KRITA is designed specifically for painting and illustrating, it doesn’t support photo editing, but it has good vector tools, too! Like Gimp and Inkscape, it’s free under the GNU license. There’s a really huge Krita documentation online, including many tutorials, but for my liking, they are awfully disorganised and confusing and not very suitable for self-teaching. Unfortunately, Krita doesn’t seem to be widely known, at least that’s how I understand the relative lack of online discussions. If you’re already familiar with the basics of graphics programs, though, you’ll find your way around intuitively. For me, it has a specific air, it’s like coming home. 😉 (and – as opposed to Gimp – it supports my graphics tablet)
– The good thing about INKSCAPE, as I see it, is the very structured and comprehensive handbook plus some introductions, and, similar to Gimp, there’s enough information about it in the internet. Inkscape supports vector graphics (including coloring), calligraphy and the like – it ist not adapted for freehand drawing and painting nor for photo editing. For me, the worst thing about Inkscape is the unclear use of layers (coming from layer based programs, I just don’t get it).
In short: Inkscape is the most specific program with the least amount of functions (but it’s fine specifically for designers!) and the lowest learning curve. Krita does what Inkscape does plus much more, and Gimp and Photoshop are the absolute allrounders among the graphics programs, but – justifiably – the least in-depth ones.
I just received my order from Tatiana Popova. It took only 2 weeks to arrive from Ukraine. I am very pleased with the ribbon kit. She also sent another pattern as a thank you for using pal
pal ‘family and friends’ for payment so there were no charges. I can’t wait to get it started! thanks
So you have created an incredible embroidery design. Now where do you get it made into a iron on embroidery pattern that goes away when you wash it?
Years ago I saw some inject ink for the project but I did not get any. Now I want some and cannot even figure out what it is called.
Hi, Jackie – I’ve not seen ink for inkjet printers that can be used for iron-ons and washed away, but I have seen that bubble jet set stuff that you can use as a fixative for preparing fabric for inkjet printing. However, it doesn’t come off when washed. Have you tried Sublime Stitching’s Fine-Tipped iron-on transfer pens? They work great. But they don’t wash out…
Mary, thank you for such a useful article. Just what I needed in an area I find difficult to get my head round; your post was a real confidence boost.
Thank you so much for this article! Just wondering why do you edit your image as a Gif and not Jpeg?
Because a gif imports easily into whatever program I want to use to make the vector file.
Hi Mary! Just read this article because I’m trying to develop a pattern from a child’s drawing. Just a clarification on the process: After scanning it and dropping into Illustrator, do you then essentially hand-trace the image on new layers? If so, do you use the (dreaded by me) pen tool? That particular tool is still a relative mystery to me…but I’m willing to learn it. (Lynda.com is a great resource, I agree.)
Yes, you have to hand trace it. Drop as few nodes as possible, and adjust the nodes accordingly to get a smooth line.
I am trying to research how to create simple PDF hand embroidery designs to possibly sell online as downloads. I am new to all this. Do I understand from your article that inkscape can be used instead of Adobe illustrator to create patterns? I have very limited funds and I hear Adobe is expensive. Can you create PDF files with inkscape or only with Adobe?
Hi, Beth – you can create a PDF with practically any kind of publishing software and most graphic-type software that allows you to export to PDF. You don’t have to be working in an Adobe product, in other words, to save a file or export a file as a PDF. Just so you know!
Hi I am trying to find a lion Kit Head of lion to put on my sons jacket I cannot find anything. I am a good at embroidery but have always used kits–is there and easy way to do this? I am concerned about having a high quality finish–I like kits because they show what stiches look best etc… thank you
Many thanks for this information! Your emails and website are so inspiring, for any kind of needlework/sewing.
Vectoring a line drawing will be quite helpful for an appliqued quilt design I’m working on…I draw way too much by “longhand” when what I need is a repeatable way to scale, flip, rotate, etc. designs into printable files. Thank you again!
It is great to see you recommending free (as in freedom rather than beer) software, but your post is unfortunately misleading. Inkscape is definitely NOT “made for PC” unless by that you really do mean the hardware as opposed to the operating system! If the Mac version uses XQuartz, it is basically the X Windows version (because XQuartz provides a compatibility layer for running X Windows) and X Windows has nothing whatsoever to do with Windows! [I’m running X Windows and use Inkscape a lot and I can assure you that there is no trace of Windows on either this or my work machine.]
It needs a separate manager / windowing system for Mac, which is what Xquartz was (it’s outdated now). If you’re running the latest macOS, it becomes problematic because of the 32 vs 64 bit processing.
Hi Mary
When designing your own patterns do you need to copyright the pattern and if you do what is the best way to do so?
Hi, Rosann – Copyright happens automatically when you produce something. It’s a good idea to place the correct copyright information on the file. You can also register the design with the copyright office. That’s up to you. But you should probably read up on official information on copyright or contact a copyright (or intellectual property) attorney to have any questions you need answered.
Hi!
Once you have the item created in a file how do you choose stitch type and thread color?
This is completely up to the stitcher. I usually base my color palettes on color schemes that I like, and I choose stitches according to the effect I want.
Thank you for this tutorial! I’ve searched this topic several times and this is the first tutorial that really made the process make sense to me.
~ Jen
Hi, you have some great advice. However I am thrying to find a way to print the patterns I am making into cotton fabric. It seeems that there is no easy way to print on paper and iron onto fabric. If you know of some way to find this elusive process or ink I would be sooooo happy. Thank you.
This has loads of excellent info!! I made a vector drawing over one of my children’s toddler drawing and I am so happy with how it turned out. I would really like to learn how and what to include to make my patterns downloadable and available for purchase. Is there more info I can read? Please give me links. Thank you!
Hi,
I was wondering if there is a sheet I can buy to inkjet print for my wife.
Also, what is it called and where to get it.
Many thanks,
You might check hobby / craft / sewing / quilting shops, even office supply shops online, etc. Search for “printable fabric, inkjet printer” or something like that. I think even Avery makes printable fabric sheets, but I think the ones that are sold for quilting and sewing are probably more what you’d be looking for.
I am looking for line art pictures of baseball and golf to hand embroidery
You might try looking for “coloring book” patterns or golf clip art or baseball clip art.
Fantastically helpful! Thank you. I’m hoping to start the RSN Certificate and Diploma over the next year or so and the scary bit is having to create a design, especially a useable one.
This has made the whole idea just a little bit less scary.
Thank you so much for this post! It takes something that seems super complicated and makes it seem super simple and easier to manage.
Thank you so much for this insightful article. You are a wealth of knowledge. Can you tell me how to then print an image like this onto fabric in order to make several patterns? Thank you! Jane
Thank you for the above. I’m going to install Inkscape and try to make a pattern into a downloadable pattern with the idea of selling it. I guess it ‘s a steep learning curve at the beginning like most things. Can I ask how long it took you to change your sketch into the final computerized image – it’s what I might aim for one day!
Thank you so much for your article as I’ve been searching and searching for help on this. Best wishes, Susy
I think the time it takes depends a little bit on the learning curve. Once you figure it all out and get used to the tools and such, it goes a lot faster!
I have a specific design in mind and I’m petty familiar with Adobe products. Do you have advice somewhere on determining what stitches to use for my design or is that something that comes from experience? If I have to ask should I just be buying someone else’s design?? Thank you!!
“What stitch where” is a common question, but it really is something that comes with experience. If you work other people’s designs for a while, you’ll develop a knack for it after a while – or at least, it will become easier to decide what stitches to use where. Or you can just jump right in. What do you envision the outcome of your design looking like? And how can you achieve that look? It helps to have access to a good stitch dictionary, where you can see the stitches and techniques illustrated. Keep in mind that the majority of embroidery is done with very few stitches. When you see stitch dictionaries that have 200+ or 400+ stitches in them, don’t be overwhelmed. Chances are, you’ll only be working from a core of about 10 basic stitches when you’re figuring out your own designs, and when you finish the design, it’s not unusual if you’ve only used a very small number of stitches to embroider it. Of course, it depends on what type of embroidery you’re talking about…
Thank you for this article, Mary! I really appreciate the way you clearly outlined the process for hand embroidery designs. Most of what I found on the internet was related to machine embroidery. I’m looking forward to trying your method.
Great post! Thanks for the help!