


When I first started exploring embroidery with any seriousness, one of my favorite resources was this old (as in almost 100 years old) book on ecclesiastical embroidery.
Whenever I looked at that old book, I yearned to see the details of the embroidery in those black and white photos. The photos were good – but most of them were never detailed enough for me. I used a magnifying glass at one point, thinking it might give me better detail. But the detail you can see in a photo is only as good as the detail caught by the camera.
Fast forward to today. The digital camera and the smartphone have completely changed not only the way we take pictures, but also the way we view them. The high-resolution digital picture has a marvelous capacity for zooming in on the details.
And this is beneficial for embroidery explorations – but it has a drawback here and there, too, which we’ll chat about below.
Case in point: the finished leafy tree I shared with you on Friday.
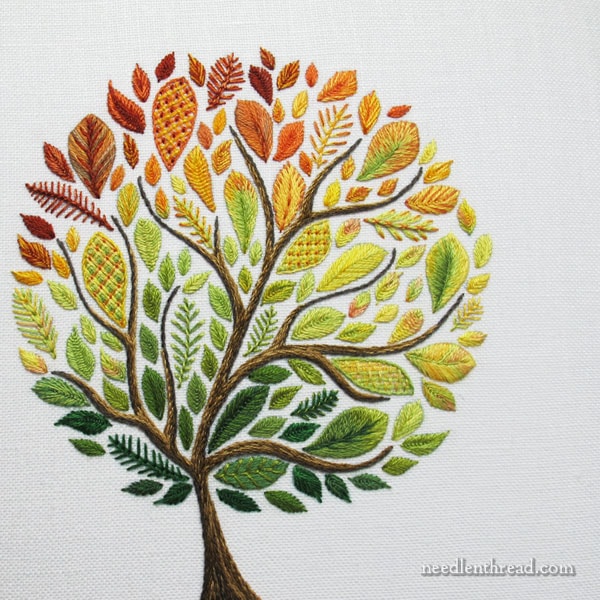
This is the photo of the finished piece that I shared with you:
It wasn’t long before the influx of email and comments on the tree brought me to a certain realization. This is something I’ve struggled with for a while on the website, but I’m never quite sure how to balance the problem.
Normally, when I post photos of embroidery on Needle ‘n Thread, on the viewer’s end, you’re experiencing the detail of the embroidery, close-up. You aren’t necessarily viewing the embroidery as the eye would normally see it.
At a regular range, the eye doesn’t see a piece of needlework in such minute detail. It sees the overall piece, and to see it in very close detail, you either have to get very close to it, look at it under magnification, or view a digital image of it, zoomed.
Realization Dawns
Several folks suggested finishing ideas for the tree – answering the “what are you going to do with it” question.
A few people suggested turning it into a family tree and stitching family members’ names, dates of birth and the like on the leaves.
Some suggested finishing the tree as a large decorative pillow for the sofa.
It was at this point that I realized that the size of the tree hasn’t really come across in any of the photos I’ve shown you.
Even if I were to give the dimensions of the tree, it’s still hard to fathom size, when you’ve been used to seeing the details of the piece.
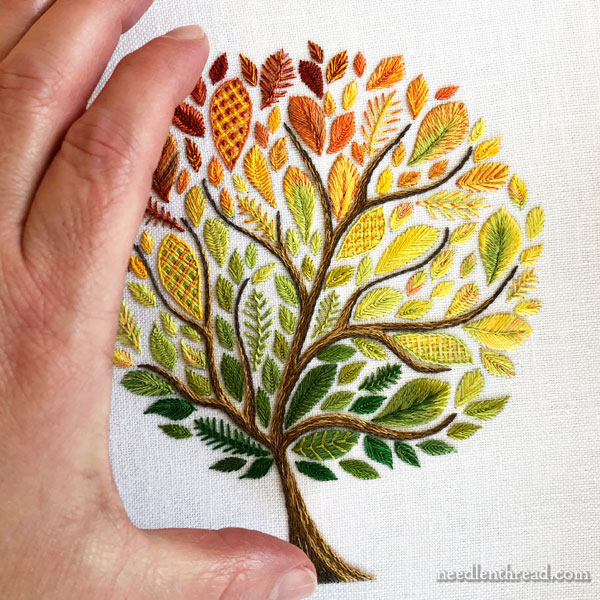
So I took a photo that might help give you some perspective on the size.
The whole tree design, including the trunk, is just sightly over 5″ tall and just over 4″ wide. Having my hand in the photo helps give some perspective on the size. It also draws you back from the embroidery, so that you can see it more as your eyes would normally see it.
So this is one drawback of using detailed, close-up images when talking about embroidery: it’s easy to lose perspective on the actual size of a piece.
Material Impressions
The other drawback has to do with the materials used in the embroidery.
If you take that photo above, with my hand in it to give some perspective on size, and you zoom in on the very same image, you can come up with a picture like the one below, which is similar to many of the images I’ve shared with you for this tree:
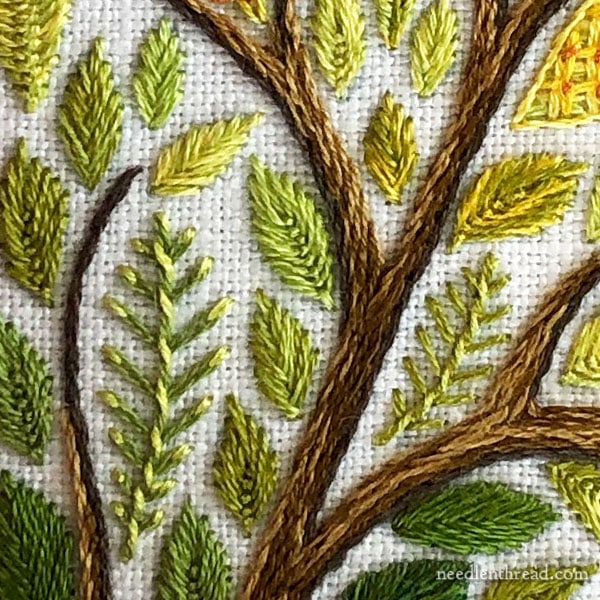
When you see a cropped image like this, which gives you a very detailed look at a small section of the photo, you might have the impression that the linen used for the project is, perhaps, a lower count, somewhat rough linen. You also might have the impression that the threads are heavier than they are.
In fact, the linen is a high count linen, and it’s smooth. When you’re standing back from the piece – check out the first picture in this article – you might see that it’s linen, but you don’t see the weave nearly as distinctly. The fabric looks smooth and solid, as it is.
And the threads? The tree is stitched mostly with two strands of cotton floss taken from the normal six. Some leaves (specifically satin stitch and long and short stitch) are embroidered with one strand of floss.
So those are two drawbacks to the detailed images we can get using digital photography and cropped images, from the point of the view of the viewer.
The Stitcher’s Drawback
There’s another drawback, and it can be a Big One, but it falls on the shoulders of the embroiderer sharing the images rather than on the viewer.
I think many of the needlework bloggers out there could attest that sharing detailed, close-up photos of needlework puts a little pressure on the embroiderer to be very precise when stitching.
This can be a good thing – for me, it is a motivation to be extra attentive when I’m embroidering – but it can also be a little discouraging, because I might not see certain “mistakes” or flaws until I edit my photos. At that point, it’s often too late to do anything about it.
And, unfortunately, if the mistake or flaw shows up in a close-up image online, viewers might raise a collective eyebrow or judge the piece (or the embroiderer’s skills) more strenuously – when, in fact, in normal viewing circumstances, they’d never see it.
On the bright side, if such “mistakes” or flaws aren’t really visible to the naked eye under normal circumstances, do they even matter? No, not really!
And on the other bright side, if the mistakes are discernible, they turn into good teaching moments. There’s nothing quite as effective when teaching hands-on, as making a mistake and showing how to fix it.
What Was Your Impression?
I’d be curious to know if you realized, before seeing the perspective photo with my hand in it, how small the tree is. Did you think it was larger? Or was that about the size you imagined it? Feel free to weigh in with your impressions in the comment section below.
For those who have asked, I’ll be releasing the Leafy Tree here on Needle ‘n Thread as soon as I tie up some other project loose ends! Keep an eye out for it in the not-too-distant future.
Oh my, I thought it was minimally 10 x 10 inches and probably bigger. It turned out beautiful. I love the green one also. Your work is so intense. Personally I never liked embroidery, but your work entices me to think about giving it another try.
LOVELY TREE
The tree s lovely and I did think it would be larger but was happy to see it is a smaller size
and really love it. Will definitely be on the look out for the pattern. A great way to use many
types of stitches and end up with something lovely.
Giselle
Thanks for this article. It is important to think about how the human eye sees things, but I hadn’t thought much about it. I have a friend who says we should all look at ourselves in photos rather than mirrors because the photos reflect more what we look like, but I think you bring up a good point, too. Photos don’t reflect size without a point of reference. I pictured the tree about eight inches high. Probably because that it what I couldn’t have worked anything smaller myself.
While I enjoy and learn from your detailed close-ups, I’ve often wondered how your embroidery looks in “real life.” What surprises me most about your leafy tree is the fineness of the linen when seen next to your hand. I never would have thought this piece measured only five inches. Lovely to see the up close images but I really appreciate the larger perspective! Thank you, Mary, for your dedication to sharing your knowledge and your work.
Actually, I never gave a thought as to how big the whole thing was. I knew they were close up pictures, but didn’t stop to think about how much they might be enlarged and some could have been more enlarged than others. If you had asked me to guess what the actual size was based on the close-up pictures alone, I would not have thought it was as small it actually is.
Felt the tree was small
I think I must have realised that the tree had to be about the size it is. You are usually quite rigorous in letting us know what material you are using and which threads (and how many strands) when you are guiding us through a project. I can totally understand how the confusion arises, however. How lucky we are to be able to take advantage of such excellent cameras (and handy, too, if — like me — it’s my phone)! I remember the days of using up a roll of film and having only one (expensive!) good shot. (Obviously not a photographer, then.)
We stitchers are our own worst enemies — critical, always critical, of our own work. Nothing wrong in striving for perfection if that’s your thing, but what good is it if it gets in the way of your enjoyment? Or worse, causes you to put away fabric, needle and thread altogether? A close up shot allows me to see exactly where the needle goes in a complicated or combination stitch, and is so helpful. If it also (rarely, Mary!!) shows a mistake, well, that’s a teaching moment, I guess, and you are an excellent teacher.
Serinde, I was just wondering about your name. Does it have anything to do with Miriel? (J.R.R. Tolkien?)
Anyway, I think it is really pretty. 🙂
– C. L. Fingristion
Hellos, C.L. Yes, it is from Tolkien — well spotted. I’m monstrously giving myself airs, of course, but the character is an inspiration on the embroidery & weaving side, if not in her personal life!
Mary, this is one of the most beautiful pieces of embroidery I have seen. To me it reminds me of the tree of life. I hope it could be a kit one day. I would frame it and place somewhere ver special.
Thank you, Mauri R
I always do wonder on the size of an embroidery but I am mostly interested in the details, in the threads and colors used, enjoying your beautiful work.
I guess I always figure that I could adjust size to what I’d want using technology and my printer.
Seeing the actual size of the tree, I know personally for myself that I would want it to be much larger – I see it being used on a larger scale like a pillow cover or framed. So much detail I’d want to see!
My initial impression of Leafy Tree was of a larger piece than what it actually is, however I could tell it was not a huge piece (for example 12”x13”) by the size of the stitching & details.
I do love the look of this enchanting piece.
No, I hadn’t realised how small the piece of work was. Perhaps putting a ruler along the base in one of the pictures would give an indication of size. Some people use a coin but if it was a US coin your overseas readers would not be familiar with the size.
I love receiving your newsletters
Linda
One way to provide a size reference is to use the reference scales like archeologists, crime scene photographers, and others use when photographing items that need that information. In addition to providing a size reference, these reference scales also help with color and lighting correction. Here is an article about using them as well as printable versions that can be downloaded: http://smallpond.ca/jim/scale/
The internet has become “the ” place to find inspiration for embroidery pieces. I agree, you can look at a finished piece and you cannot judge its size. The other problem I have is that I see a finished piece with stitches that I would like to try.However, you can’t see the stitch to identify it and most people don’t share that information with you when you see their finished project. So not only do I not know the name of the stitch but this lack of information means I cannot find a tutorial to help me learn how to do that particular stitch. This can be frustrating because I’m trying to learn new stitches and some of them are amazing to see! I do love to see what other people are embroidering, but it can be frustrating too! Thank you so much for your tutorials and your willingness to share with us. I seem to take a lot of inspiration from you and have used your website to help me “broaden my horizons” so to speak. Thank you Mary!
I did think it was much larger but I’m glad that it is smaller. Are you going to be selling the pattern of this? I would love to make it as I am a tree freak. I enjoy reading all of your post when they come in thank you. Keep up the good work you do a beautiful job.
Hi Mary- Perspective comparisons help in some cases. As a professional seamstress having worked in “invisible” re-weaving I can tell you that close-ups are NOT the “be-all and end-all” for great work. Sometimes the slightly lax strand that is finger scraped into the base cloth is the winning combination of successful execution. And THAT sort of result comes from a trained eye and experienced hand.
Wow, I totally did not realize how small the piece was. It is a beautiful tree and would look great on the outside of a bag I’m creating. It is beautiful. Thank you for showing the details and talking about how fine it is (2 strands of 6 floss) and how the linen is just linen not a heavy fabric. It completely changed my thoughts that, yes, I could do this type of work.
Hello Mary…have enjoyed your posts about the tree and marveled at all the lovely stitches, and was amazed this morning to see that it is as small as it is. Very glad we have the technology that we have today, but we do need to keep perspective in mind, don’t we! Your work is amazing and delightful. Thank you so much!
My second comment: I think this piece, this work regardless of size, is very beautiful; I love looking at it. As a painter, I know how difficult it can be to let go, and declare a work “done”. “Mistakes”, particularly barely visible ones, are often consequences of works of the hand — attestations of the preciousness of creativity, declarations of planning and work brought to fruition, and signatures. Your beautifully embroidered autumnal tree can be used for a pillow,etc., framed for wall art, entered in a fiber arts exhibition.
I thought it was about 8 to 10 inch .. it is a beautiful piece to learn different leaf designs.
I started a comment but seem to have lost it before I finished. Having the view of the finished piece in conjunction with your hand is a very important piece of information for understanding the design. It gives insight to the amount of time each element required to finish and a proper perspective on the size of the design. For those of us who like to have ‘smalls’ in reserve to balance larger projects, it proposes a surface stitchery project that looks like a lot of fun. I’m glad you are contemplating making available.
As far as what to do with it, I have two ideas: turn it into a journal cover or needle book for sharp embriodery needles or frame it to enjoy its presence in your work area.
Usually, I’m using embroidery to decorate something I’m going to wear. I rarely do it for other people any more. Most decorated object I wear is jeans. Hard to work on, sore fingers, beautiful back-round. I imagined your tree in that size range. Although I have worked larger pieces, I like this size because you can see finished results sooner. I think the tree is perfect just as it is. VERY lovely leaves. I enjoy doing leaves too. Yours are done so well that I would frame it, and add it to a collection of flora and fauna for a wall. Nice to show it off that way. Ever used different colors for back round?? Love some of the effects those different colors have on some pieces. Changes all my ideas of thread color and becomes a challenge I like.
I thought the piece was large until you put the picture with your hand next to it. To get the correct perspective perhaps you could put a ruler with your piece, to show how big it is. Some fabric manufacturers do this with their fabric swatches to show the correct perspective.
Hello Mary,
First let me say how much I enjoy your emails about embroidery. They brighten up my day.
Regarding photographs. Scale is very important. I make and sell dolls’ house miniatures and it is important to put something in the picture to give perspective to the picture. I try to do this but don’t always succeed.
One pair of very talented miniaturists use a life size object in with their photos. For example they will include a real egg in a miniature kitchen scene or an apple in a dining room. Somethings a hand will be reaching into a room with a paintbrush.
When selling online it is not unusual for miniaturists’ work to be mistaken for and purchased as the full size article.
Shirley
Wow! Now I’m REALLY impressed, seeing how small it is! It is positively beautiful.
i thought it was 10 x 10 much larger. beautiful work. when you publish it what size will you include. also can a zerox machine make the picture larger or smaller. i would want to work a piece 10 x 10. thanks
marysue c
Mary, I thought it was larger but I think I thought that because I work on larger pieces. I seldom work on something that small. I should try some of your designs as small as you make them instead of enlarging them. It isn’t vision problems or arthritic fingers — I can still do very tiny details, just personal preference, I guess. This is a very interesting self-discovery for me, thank you, Mary
Wish you would print this on linen and of course offer instructions in ebook. I love love love small projects. This piece is exceptionally lovely. Thank you for sharing.
I was so awed by the beautiful stitching and interested in your design and execution issues that I did not think about the size to the tree. I really appreciate the close up photography to help me see the details you are discussing. The size of the piece it not necessarily relevant, but it would be interesting to have a small ruler or needlework object in the photo. The size of the stitches adds something else to admire!
I would never, never ask a stitcher, “And what are you going to do with it?” To me, stitching is for the love of the art. Does anyone ask a painter what he/she is going to do with the canvases? Stitching may become used in an art application, but it remains art.
The close up with your hand was a big help to me Mary. I had an image of the tree being about double that size. Probably because I’m currently stitching a preprinted tree of life in 10″ hoop. I love the photo’s you take for us and always look forward to the emails arriving.
Thanks
Penny
This was an interesting article! I did think the tree was larger – maybe 12″ or so. Now that I know it is smaller I love it even more. I do like to see things close up to be able to study the stitches/construction whether it’s embroidery or quilting, but I would never critique another’s work. I may decide that I would do something differently but always respect other’s choices.
Wow, Mary…I had no clue this wonderful tree was so small! Thanks for your hand to put it in perspective! Nice job!
Regards,
Bonnie
Mary, I thought the piece was larger. I love to zoom in on photos to help me figure out how textile pieces are done. When I recently sent photos to my daughter of some mini log cabin quilt squares I had made, I included my thumb in the photos. I see that some on-line fabric sellers always have a tape measure along the bottom of the photo. Also, very helpful. Thanks for all of the work you do. I wouldn’t know how to do most stitches without your website.
I’ve been admiring the Tree and was definitely shocked to see how small it is. The tree is beautiful and your work is impeccable, especially with the leaves being so small! If I could produce such perfect stitches I’d want to take close-up photos, too!
I thought this was very good. I’m a beginner embroiderer, and I can get caught up with “largeness.” This lets me know the smaller is better in many cases! I am experimenting with 3 and 4 inch hoops, so this is very promising information!
Even after looking at the detailed pictures as you stitched, I imagined the tree was larger — probably about 15″ tall. Even after reading the post today, when I went back to the picture of the tree it looked bigger than it did in the picture with your hand. My mind is playing tricks.
I visualized the tree as larger, perhaps large enough to fill the width of an 8 1/2 x 11 sheet of paper. I envisioned it framed, on my wall. It’s absolutely amazing!
This was a very helpful article.
Yes, I had envisioned this tree to be 11 x 15 inches from the photos. What a surprise!
The points you’ve made about the linen used
help clear up questions I’ve had about your uses
in the past.
Thank you from freezing Southwest Trxas.
Stay warm. Spring will come eventually.
Take heart.
LOL, I thought it was larger.
Thank you for providing the perspective information on the tree embroidery. With the number of leaves and gradient texture and gradient coloring, I also thought it was larger — about 2x! I love these trees. They remind me of seasonal photos taken of a single tree except they are much more interesting because of the embroidery.
Astounded at how small it was…..your absolutely right. I have to say, I SO admire the quality of your work…..I usually find myself awe struck! I can’t imagine producing such beautiful work.
My impression was that the work was perhaps a couple inches larger in each direction, but not huge. I love that it is as small as it is.
Putting something in for scale-a ruler, or even a penny or some such will help with scale. You wouldn’t need it on every photo, but if you do a picture of the whole piece you could put it there and you wouldn’t need it for the close ups. If it’s just a single close up, you might want something for scale there as well.
Don’t worry about seeing imperfections when you zoom in. If you want every stitch perfect, use a machine. If you want life in a piece, do it by hand.
No, I had no idea of the size, and without realizing it, I assumed it was quite a bit larger.
If I recall correctly, you have sometimes placed objects like U.S. quarters in your photos to give a sense of scale. I’ve always found those quick, automatic references really useful.
Your piece is beautiful, very harmonic.
Until I saw the photo with your hand – I thought the piece was about 8 inches square.
A comment about close ups and flaws. Alison Cole has the 24 inch rule @ if it looks good to you at 24 inches away, where most will view it, you are good to go.
If you are a perfectionist and any error is visually repulsive, change it. If your friends go nose to glass with the work and comment without your request for critique – they are not your friends. Most – 98% – will be in awe of your accomplishment.
I love the tree but I do find the upper left bright orange leaf with yellow grid a
Little overwhelming.
Beautiful embroidery – near and far perspectives.
I was thinking also of a cushion/pillow and was surprised to see the actual small size of the finished embroidery in perspective with your hand in the photograph.
As you shared, we are actually working “blind” when we only see the high definition close up photographs and have no idea of actual size. Guess that’s why we need a “perspective piece” in the photo. (EG your hand in this case).
The actual embroidery was smaller than I had thought. I did understand about zooming making the fabric appear rough rather than fine also about mistakes being larger than life.
As always thanks for teaching me.
Excellent article. I am even more impressed when I see the size of your tree next tonyoir hand. It really brings it into perspective. I am still fairly new to embroidery and I appreciate seeing the close up stitches and how they were stitched. I wouldn’t even begin to see anything wrong and I agree the overall finished project is what is important. I have learned so much frkm you and only wished I had started younger. Thank you for generously sharing.
The tree seemed larger in dimensions than expected…. the picture with your hand really helped put it in perspective.
All I can say is WOW! I thought it was much larger. This is an amazing tree. The detail when realized the size is impressive.
Hi Mary,
I have always seen trees as God’s art depicting the diversity, world wide, of humans.
Each leaf is composed in a little bit different color or stitch. Each stitch is a tiny bit different. (your close up photos reveal this.) If there is a visible erroneous stitch it fits in with the imperfections of us all. (who’s prefect?) My take on your “Leafy Tree Project” is that the work and time you put in on the design is perfect and beautiful.
Embroiderers’ Hugs,
Deana : )
You like to use silk, so the daintiness makes sense. I admit I imagined it more the size of fingertip to fingertip. The pillow idea is great and could work if you use wool…
Or, as is, it can still be a great “sampler”. Imagine a seasonal series – You have done the green tree and the autumnal and the 12 Christmas trees!
I can never tell what threads you have used in a particular project. To me, they all look like perle cotton, or 6 strands. I would appreciate knowing the details of the thread type when I look at a photo of embroidery. Glad you raised the issue, because it’s been a thorn in my side since I started this hobby. Thank you!
I thought a bit larger. About 8 to 10 inches. Its amazing to me how neat and clean your edges are when so small a piece. Skill level through the roof! Nicely done.
Having been a fan for quite a number of years, I expected that it was small, but otherwise I wouldn’t have known it. Your technique is always near perfect so there is no give-away there. Linen comes in coarse and fine weaves, so no give-away there. It seems a very good idea to give some of your photos perspective just as you did here. Before you did that I was showing the tree to my husband. He made some comment that made me realize that he thought it much larger than I was sure it was. I told him that, knowing your history of fine stitching, it was probably only 4 or 5 inches tall. It’s gratifying to find I was spot on. It’s a lovely piece – so much detail. One is never at a loss for some new bit to ooh and aah over. Thanks for the delight and inspiration and just plain information your newsletter provides.
It is an interesting study in dimensional psychology. I had the impression that the embroidery was at least twice the size it is based on the detail images. However, detail images provide information a full perspective image can’t. I suppose one would include both when documenting a work.
Thanks for putting the tree in perspective. I assumed it was much larger!
Love your work!!!
It was a surprise to see the picture showing the true size of the tree. I thought it was much larger around 10 to 12 inches, on an open weave fabric sewn with heavy threads. I love the flow and feeling of the tree and look forward to the pattern.
The picture of the tree was so perfect for those of us who can’t pick up the piece and look at it and touch it. The first picture DID look like the piece was much larger than it actually is. Personally, the smaller overall piece would seem to me to be easier to stitch; a larger piece would be so much more daunting. The close up of the linen showing the weave and the intricate detail of the leaves and tree bark and then learning that in some cases only 1 strand of floss was used was for the mind’s eye a wonderful description. I love all things done by hand; I’m a quilter and knitter and crocheter and understand fully how we always “find” mistakes in our work. Unfortunately, holding a needle in my forefinger and thumb puts too much pressure on my arthritic thumb joint and therefore can’t attempt that delicate hand work. I am always thrilled and impressed by your work and even more so respect it.
This is incredibly interesting! I was thinking you were probably working in a 6″ or 8″ hoop so I wasn’t too far off but I did think it was bigger. I’m like you though – I love stitch close ups, the closer the better – but as a needlework blogger it is hard to show really macro shots because the thread looks fussy, and like you said little details you wouldn’t normally notice become huge! But you can also see the stitch tension and formation more closely. So I try and share a mix of pictures, like you usually do, some showing the whole project and some showing close-ups and different angles.
I love the idea of a family tree! But I think your tree turned out wonderfully – slightly wonky leaf and all (which you hardly notice when you look at the piece as I whole and I personally think is delightful!) – and I love the Autumn colour shading you used 🙂
Hi Mary,
well, no, I didn’t see the tree as small as it really is, but from experience (a recurrent issue, obviously) I was sure it is much smaller than I imagined. And now … I love it all the more … such a tiny, delicate, elegant beauty!
I often wondered if you could simply show a “normal” photo first, taken from a distance (preferably with some of the surroundings in it) in order to give an overview before showing the close-ups? You are right, giving the size in inches or centimetres doesn’t convey an image yet, and even with your hand or finger or a needle or whatever in the pic (which are equally huge then), my imagination still struggles, as it misses the relation to the surroundings, the room, a window, a table … And this way, the mistakes-or-flaws-thing wouldn’t matter anymore, because everyone would see, that he/she doesn’t see anything (in normal perspective). 🙂
Angela from the Ore Mountains
First I want to say your work is magnificent. Yes I did think it was much larger.
Rita
Oh wow, it’s so pretty, and so much smaller than I thought!!! I’d love for you to give a sense of scale throughout your projects, maybe putting a quarter in the pic or a ruler. It gives such a different balance to the stitches and design; for example, the airier leaves might be a bit stark on a pillow-sized project, but blend in and look lovely on your completed, small tree.
Oh wow! I thought the tree was such larger and would make great pillow top. I like it a lot though because I prefer small.
It is smaller than I expected (the tree), but that gives me hope- I could possibly complete this pattern. I love the fact it includes so many stitch types!!!
Like most others, I, too, thought the tree was bigger than it is, but that didn’t really matter. Like someone else said, I adjust the size of a project with the computer to what I want it to be, so size is not all that important.
As for what type photos to post, I will confess to being consciously frustrated sometimes on a new posting. Unless it’s a specific stitch or combination, I’m always looking for the “big picture” first and sometimes can’t find it. After some thought, I believe I’m trying to look at a project the same way I would if it was in my hand, and that would be my suggestion.
First, I look at the overall project, from a little distance. Then I bring it closer. Then I zoom in to look at the details.
So maybe photos should go the same way. The big picture, then maybe one with a hand for perspective, then the details.
Hello Mary!
Yes, posting a picture with your hand next to the tree made me realize the tree’s actual size; based on previous pictures, I certainly thought the tree was much larger! Perhaps when you offer a design (if that is what you are planning to do, and many of us hope you will do), then perhaps you should offer two sizes! A larger size that some may want to turn into a rendition of a family tree, and the actual size!
I know I am not alone in my appreciation for all you offer us, not only just fabulous designs, but wonderful teaching as well; thank you!
I am even more impressed with your work seeing the size of the tree. I had also assumed that it was pillow size. Thank you for all your sharing
I also thought the tree was larger then what it it yet even this size it shows extremely well and is so beautiful. Mary, this is one very gorgeous piece of embroidery out there. I just love it and if you have a pattern please share it with us for I am sure there are many who would love to do this. As for me, I would enlarge it just a few inches and then have it famed by a professional and put on my wall of needlework.
Thank you so much for bringing this to us and sharing it,
Sherry
This was very helpful! I thought the tree and the threads used were much larger. This really helps me on a hand spun silk project I’m working on.
About the close ups and “flaws”… we are not machines. I find it helpful that experts in the field still rip out or live with imperfections.
Dear Mary,
Thank you so much for the detailed explanation. Nonetheless, the tree is magnificent whether large or small and even more so now that I see you almost had to work under a magnifying glass! I love your newsletter and have followed and use information from it for a good number of years now. Thank you, thank you for being a wonderful guide and enthusiast. Loretta
I did not think about the size because I was so impressed with the beauty of the tree!
I realised the tree design wasn’t cushion-sized but I don’t think I got quite how small it actually was!
Thanks for the opportunity to comment. For the record, though I don’t yet embroider (quilt show, grandchildren, etc.) I read your blog daily and enjoy it immensely. I had no idea the tree was so small. None. I love to look at it – to me, an Easterner, it’s evocative and a comfort. To me, the quilter, it’s detailed and artistic. But size? I had no idea. It was as big as my mind’s eye wanted it to be – big enough to shelter under.
It’s a pleasure to see your work and your words.
Thank you for this blog. It is something I have wondered about. I love your tree and will be looking for the pattern. Be blessed, Linda
I initially thought the tree was quite a bit larger. I guess I was thinking about 8-1/2” x 11”, so I was quite surprised to find it was so small! Given the small size of this piece, I think the variety of the stitches & the detail in this tree is quite impressive! I love the stitch variety, the colors you chose, & the blending of colors from the core of the tree to the outside edges. It was fun to see this project as it developed!
My, yes I thought this tree was much larger. My guess would have been about 12″ total. I do like it when you show work with the needle as you do with demos. I think having a threaded needle just laying on the piece does help with the size perspective.
You are also right about the fabric. I didn’t realize that when looking at the close up photos it made the fabric look so much different. It makes sense but without something in the picture to see the scale you just can’t tell.
I am so glad you posted this.
Hi
I love this tree and have been eagerly awaiting the pattern so I can do it can’t wait it’s beautiful.
I thought it was slightly smaller but I’m glad it’s bigger.
Sally Kemp
I would have guessed that it was bigger than reality except that it appeared in one photo where it was compared to other embroidery, so I was able to gauge its general size: I thought it was maybe four or five inches tall. So it is actually bigger than I thought. Also, I’m used to photographing my work, so I kind of automatically adjust pictures to scale — I know intuitively how big two strands of DMC should be, and how big a smartphone can make them look.
It’s beautiful, by the way. I really like the balance of color and texture throughout. I haven’t seen much commentary about the bark, but I think that the light and shadow effect complements the rest of the tree excellently.
– C. L. Fingristion
Thank you Mary for this article. As others stated I thought the tree was bigger as well.
The article is timely for me, as well, since I started your Secret Garden project recently. I was shocked when I realized how very small the elements of the embroidery are compared to what I thought from your wonderful instructions and guidelines. One of the issues I face is determining the length of the stitches from the close up pictures. Am I making my stitches too small, too big, or just right? Sounds a lot like the Goldilocks and the Three Bears dilemma. It would be helpful to know if stitches are an eighth of an inch, quarter inch, etc. I know it depends on many factors and in instances where I’m attempting to reproduce a stitched item size of stitch helps. The same goes for long and short stitches. Is a long stitch 4 threads in the cloth and a short stitch 2 threads of the cloth, then varied from there? Just some thoughts.
I appreciate all your tutorials, instruction, musings, the depth of your research for our benefit and everything you bring the needlework community. You are a treasure.
Hi, Sharon – I think you might be relying too much on the idea of being able to “count” or use a precisely determined formula for placing stitches in surface embroidery, and especially when using something like long & short stitch. Stitch size, length, and so forth depend on so many factors – including the size and shape of the element being embroidered, the weight of the thread you’re using, even the type of cloth you’re using. It becomes second nature, in a sense, to know what size to make a stitch when you have the feel for how everything works together, and often that only comes with practice. But this point I’ve pretty much always found to hold true when it comes to long and short stitch: the stitches are much longer than you think they’d be (you should almost think of it as long and longer stitch), and to get a smooth, pleasing gradient in shading, always go much deeper into the previous row of stitches than you think you normally would. I hope that helps a little bit!
Thank you for sharing your work with us, Mary! And for all the instructions you so freely provide for your readers!!! I love the tree and all the different stitches and colors!
It is an “inspiration” for an aplique tree I am considering doing for a quilt block!
I have to say I thought it was much larger than what you showed us today! And it is even more spectacular considering
the small size!
I thought it was larger and the fact that it is smaller makes it even more impressive. I love seeing the mixture of stitches and colors. I think you did an excellent job with it!
BTW – I am never very good at judging sizes of things!
A beautiful piece of needlework. I would love ❤️ the pattern and I can see it framed.
First of all, I thoroughly enjoy your sharing of projects, ideas and thoughts. Your videos are fabulous.
I had no idea the tree was so small, thank you for that perspective.
Your bag was also beautiful.
I would enjoy doing a follow along project with , but maybe a little bit bigger, not much.
Thank you for doing what you do and your expertise.
I thought the tree was a lot bigger
WOW! I thought it was MUCH larger! It’s gorgeous!
I think the size was about right in my mind… if anything I might have thought it slightly smaller than it is.
I realized it was small. I took into account the number of squares on the fabric. It is beautiful!
Thank you for illuminating this issue. I appreciate the extra care you take to impart the true information about your embroideries. Thread type, # of strands, fabric type and of course, finished size of project are so important to know to understand how your project was accomplished.
Hi, I did not realize how small your tree was in the previous photos you’ve shown. It’s stunning, more so because of it’s small size. Your hand work is impeccable. We are fortunate you enjoy sharing your experience with us. Your writing is also so well done. Thank you, thank you, thank you.
March 4, 2019
What a beautiful tree…..
Your work is so lovely!
What i wish is that you would offer for sale this tree in a kit including the fabric and all the threads and the instructions……
Thanks from Janet K
I was amazed when I looked at the photo of the tree with your hand by it. I had imagined the tree being at least 12″ x 12″, probably much larger. Thank you for putting the size in perspective. My skill level would not allow me to do such wonderful, tiny stitching.
Hello Mary that was such an interesting article .Ihave often been surprised how small items are in reality! I imagined your tree was about ten inches square ! It’s really beautiful ,love the colours.
I had no clue it was that small! I fully expected it to be probably 3x that size. I guess watching Erica Wilson’s work on PBS may have altered my perception.
I think it’s even more amazing now.
Thank you for this post.
I thought the tree was much larger. Even with that change in perspective I did not see a flaw in your work. Even though I enjoy and work on Brazilian Embroidery I admire the quality of your work and the perfection of your stitches. You are an inspiration to me.
Mary, I loved this topic. There are so many beautiful works on your blog and Facebook group that this applies to, not to mention every where else. I am always wondering the size of what is being shown and love those who have something in the picture to give the better perspective.
I thought your tree was at least 12″square if not bigger. A shock to see your hand next to it, and I immediately had more appreciation and admiration for the small detailed work you did. And, it’s not your first tree. I was wanting to do one, but thought it would take forever, because it was big. It’s very much doable now. I think you will be getting other ideas for it now.
Thanks for a wonderful blog to get lost in and dream of things possible. Bobbi
I thought the tree was much larger. But, now, I’m impressed even more, because the detail of the leaves in smaller size is amazing to me!
I like both the close up and full view of the pieces as I appreciate both views! And often while searching the close ups I wish there was a more comprehensive view to relate to.
I had no idea your leafy tree was so small!
It is a marvelous gradation of fall colors from a brick red-orange to dark forest green. Love it. If you release this design I will seriously consider embroidering it. Especially if you also provide the colors you used. Although I might enlarge it so it could become a pillow for the couch.
It is a lot smaller and finer than I thought. The idea of using it as a family tree would be possible if the tree was blown up in size. I admit I am impressed with the beautiful colours and shading effect in the finished tree. I think it would be very effective framed as a small frame then another round it giving it a depth and a perspective.
Mary ! what an informative article with that great “aha” photo with your hand + tree. In my mind I was seeing your piece as a 12″x12″ piece – never would I have imagined it being so small with the amount of detail precision work you did to make the tree come to life. My I suggest you add a “hand” photo or other appropriate thing to bring us back to earth on the size of the pieces you are creating ? I’m really just a basic “hobby-ist” embroiderer and most of what you post is over my head but I just love reading your letters and seeing your work.
thanks
chris wachsmuth
san francisco
I agree with the family tree idea even given the dimensions of the tree itself. It would be a lovely anchor with the names and D.OB.s off the right, perhaps done in leaves carried on stylized wind gusts to show the linkage. Or even just the family surname and an established date. No matter how you finish it…it’s beautiful.
The picture perspectives was great! I thought it was much larger than it actually was.
I thought it was about twice the size. If I paid attention to the number of threads used I might have had a better sense of size.
If I’m posting something that is not finished or is quite small, I often put a ruler in the photo. My husband is a geologist and when he photographs rocks, he uses a rockhammer or a coin to show scale and I guess I picked that idea up from him.
I had thought the tree was much bigger.
Absolutely beautiful.
Very inspiring and a great teaching piece.
Thank you
Mary, your tree is absolutely gorgeous, and I like it more now that I know it’s small – I love small pieces. I think the irregularities in handmade pieces just make them more beautiful.
Oh yes, I certainly thought it was larger but I love miniature things so I’m celebrating this little masterpiece with you! A tree for all seasons.
I love your posts and am always learning something new from you. Thank you for sharing your love of embroidery with us. This is a gorgeous piece and I guess I thought it was much larger. I appreciated the detail photo and from that gauged the size to be at least 8×10. Even the photo of the full piece looked larger to me, but when you posted the photo with your hand, the actual size appeared. Perhaps you would consider adding ruler marks along the bottom of the photo, similar to what is done on quilt fabric photos. This definitely helps gauge the size of a fabric print and may help with your photos as well.
Rosemarie
I thought it was much larger, thinking it was in a 10 inch hoop. About twice as large as it is in actuality. Normally stitching that small, mistakes would not be noticed.
I was under the impression it was significantly larger – maybe 10-12″ tall. Once again, it is beautiful. It’s really good you mention not to be too critical because you are looking at a photo. That gives us novice stitchers a little permission to not stress over every detail.
I honesty thought it was about a 10×10
Dear Mary! This post reminded me of the first time that I saw the Unicorn Tapestries at the Cloisters in NYC many years ago. I had only seen them in books and in a couple of needlework kits. I entered this HUGE room where they were hung up high on the walls!! My jaw DROPPED on the floor and I am sure it was clattering away down there!! They were BILLBOARD size!!! I was simply SHOCKED!! And being able to see the details!! IF you ever get a chance to go to NYC, make sure you see this exhibit. I am still in shock and awe over 20 (?) years later! Linda
Hi, Linda! Oh yes – I love the Cloisters! If given a choice between there and the main Met, you’d see me at the Cloisters any day. The two museums I love in NYC are the Cloisters and the Frick. So much more manageable! The tapestries are large, aren’t they? Well, they were made to cover cold walls in big spaces – but you’re right, when we only see them in books, it’s hard to get a real idea of scale. One of these days, I’m going to make it to the Cluny museum to marvel at the tapestries there. *Sigh*
Now that you’ve given us perspective, I admit I thought it was rather large – cushion size for a sofa. But now that I see what the true size is, I wouldn’t mind stitching it myself once day. I’d frame it and hang it on the wall. I hope you’ll be releasing the pattern for it – it’s really lovely.
Yes, I thought the tree was probably about 12 inches high! After seeing your photo with your hand, I was really surprised! I love the project and can’t see any leaves that need changing!
I thought it was at least 10×10 or so.
I definitely thought it was bigger; at least 8 1/2 by 11…..probably bigger.
You could have knocked me over with a feather when I saw the real size.
I also am much more interested in it as a personal project at its actual size.
I thought the trip was much larger and that you were more strands of floss-not two adn one
I thought it was bigger. And I always fall into that trap when I look at embroidery designs either in books or on the web in kit from. This can lead to disappointment when the kit arrives because sometimes the sizes given are not for the embroidery itself but the whole thing, fabric and all!
Yes, I thought it was much bigger! The close-ups satisfy my need to know just exactly how you did a stitch on a leaf, but it does tend to make me think this is a much larger project. Thanks for the dose of reality!
Mary, I love trees in life, paintings and especially needlework. I can’t wait for the pattern. Actually I thought it was maybe 1.5 times the actual size. It would be nice framed or as a patch to a gardener’s smock or apron. As always thanks for the inspiration. – Frantoria
Actually did think the tree was larger. You did a great job of explaining the photography and how it affects the details. I love your website and read every one of them!
I knew you were using floss, of course, but yeah – I thought the tree was more like 8 inches! It couldn’t have been much larger, with floss, because the fishbone (?) and satin stitches weren’t loose, so the leaves couldn’t have been THAT big.
H’mmm . . . it would make a nice book-cover, at that size. Well, it’s still beautiful!
I thought it was much larger. It sure gives me a perspective of how precise you are in your stitching. Good Job!!
So glad to see its real size! I had no idea. It is adorable, and amazingly perfect. I am just delighted and inspired.
Big or small, your tree is stunning. Folks who question your craftsmanship are likely doing so in a house filled with dusty thread.
Hi Mary,
The perspective on the tree really surprised me. I thought it much larger. I agree with you that to have a feel for the size is very helpful. I also really appreciate the close-up views, as that helps me learn aspects like shading and how to obtain a sense of texture.
I do not judge. I learn. So, anything you can put out there that helps me learn and complete a better product, I hugely appreciate. I appreciate the vulnerability that the clos-ups create, but (as a former educator) I believe strongly to take advantage of teachable moments.
Thank you for all your efforts. I have already learned much from you!
Maryann
I agree with a previous comment.
Making something beautiful and learning new
techniques, investigating shapes and color
has its own rewards. There doesn’t need to be a
“what are you going to DO with it” question.
Hi Mary,
I did not realise that your tree was so small, but it is not less beautiful for it. I love the elegance of the trunk and branches. They hold the leaves together beautifully.
I constantly zoom-in on people’s work on line, not to find mistake but to learn. I like to think that nobody will judge a work by a mistake showing in a close up. Anyway, can you call it a mistake if you can’t see it when standing in front of the piece.
I wonder if sometimes the subject matter affects the perception of size also? If your piece had been a single flower for example, would we all have expected it to be a large piece? Probably not.
Hi Mary, I think you had earlier said the trees size in a former blog therefore I was not surprised on the size. I absolutely love the close up photos with detail as I can see when mine doesn’t resemble your stitching. I am still/always learning and find your style of teaching and sharing most suited to my style of learning. Thank you, I look forward to your release of the Leafy Tree.
I thought it was much bigger – 8 or 10 inches, at least. Now that I’ve seen the scale, I’m even more impressed than I already was with the level of detail you achieved in such a small motif.
When viewing the close ups, I certainly am not looking for mistakes. Thanks so much for sharing the details that hopefully will help make me a better stitcher.
I definitely did not realize the correct size of your embroidery. Thank you for all the detail photos, they are very helpful. I think that adding a photo that shows the piece in relation to something (your hand) is very useful. Thank yo for all your lessons and gorgeous work.
I used to get myself all tangled in knots making everything perfect by stitching under great magnification. How silly was I. Several years ago I was doing a class with Hazel Blomkamp. She was telling us that an embroidery must be viewed from at least an arms length to truly appreciate the work. She was right.
Of course I love to see your work in closeup detail as it helps me understand what stitches have been used but I no longer look at a magnified picture as something to critique.
I was amazed like most at the size of the embroidery. Sometimes it is this perceived size, read amount of work to be done in this busy world we live in, that prevents me from attempting something myself.
Thank you for sharing your wonderful work and ideas.
I did think it was large, at least big enough to fill a sofa cushion. And I really did think that it should be framed with family tree data entered at the back of the frame. Even now I believe this piece deserves to be bigger — it has a wonderful modern art simplicity. A perfect blend of old technique with stark modernity.
Hi Mary, when I first saw the tree in progress and completed I thought it was a large tree, seeing it with your hand as a mark really gave me a better perspective. I love the tree and the amazing work you put into it. I’m not sure about other people, but why do you have to have a purpose for an embroidery, why cant you just make something for the pleasure of making it?? I have quite a few small embroideries, no purpose except that while I was embroidering them I didn’t have to think about anything that was going on in my life, its an escape. That in itself is reason enough. Thanks for sharing your gorgeous handwork. I love the close up photos, but also the real eye view ones. Take care.
Yes, I was fooled. I thought it was at least A4 size and possibly bigger. I think framed it would be lovely just as it is. Amazing colours and details.
Love it
I thought the tree was about A4 size – just proves what you wrote about.
I am so pleased I found your website. As an embroidery newbie there’s so much great teaching and inspiration here. Thanks for all your hard work.
When I first saw the photo, I thought that the Embroidey was quite large. The photo with your hand shows the real size and I think it looks exquisite.
I must admit I thought it was much larger, about 40 cm….but now paying attention to the stitch size and the materials you had said you used, I can see how my impression was false. Oh by the way I love it, both versions Spring & Autumn & have pondered how you could do Summer & Winter versions, or maybe you have completed the Summer, so what could Spring look like.
Frankly, I was so taken with the color changes and stitches used that I never thought about the size. I am a counted thread person, so I take for granted that I would duplicate it with close precision – instead of the fluidity that embroidery demands.
Lois
I must admit that every time I saw your tree, I imagined it to be much bigger! How looks can be deceiving!! It is a lovely little tree. I am sure we have all learned a lot from watching it’s progress, it has been very interesting! Thank you for showing us.
I thought it was about twice as large. So, to my mind, it is much more approachable if and when you give us the PDF.
Thanks for all you do to enlighten us.
It’s a beautiful tree! And judging by the closeups and regular photos you’ve been sharing all along, i suspected it was maybe even a bit smaller than it actually is.
By the way, do you use a magnifier when stitching? I’m simply curious beacuse I now need to, altho I’m a bit older than you (63).
Please keep sharing your lovely work with us!
Adrienne
Hi, Adrienne – I don’t use magnification. I stitch better without my glasses (progressive lenses, mainly for distance, with a very slight reading prescription on the bottom), and I end up holding the work a little closer to me rather than farther away.
No matter the size, it’s a lovely piece ( I felt that it was this size). But depending on the overall size of the linen, I feel that this could be used as a cover for a special book.
Thanks,
Donna
I thought it was larger – pillow size. Regardless, your work is absolutely AMAZING!! Thank you for sharing!
I could tell the general size of the tree from your stitches in relation to the leaf sizes.
Also, as a lifelong stitcher, I’ve been looking at new ways to finish pieces, like your tree. I am now playing with quilting, and art quilts, and combining my stitched pieces in my fabric artwork….quilters look at their work and say “finished”…but that’s just when I can really get started!(with my stitching!)
I can see this beautiful tree framed by colorful fun fabric into a wall hanging or in a frame or pillow – family tree….anything!
Beautiful!
It turned out to be considerable smaller than I had anticipated. I was somewhat surprised when I saw the photo with your hand in it. I think you should do that more often to remind people the scale in which you are working.
I thought it was much larger. Such an informative article! Really learned a lot today. Thank you
Hello Mary,
Yes, I thought the tree was larger, perhaps to stretch over a 12 x 12 inch pre-made canvas for display. What a surprise to see the tree photographed next to your hand!
Best,
Mary M
Thank you so much for posting the picture with your hand for scale. I thought it was a much bigger project. Consequently while the tree is beautiful it seemed to me, a newbie, to be much too complicated to ever consider. When I see that each leaf is relatively small, it seems like a more approachable project. It seems like it would force me to learn a number of different stitches.
I had NO idea it was so small. I would have guessed about 12” square. The hand photo definitely changes the way I see the piece. Makes it even MORE incredible!
I have also wrestled with this. Sometimes with the close up photos I’m tempted to neaten up a stray stitch with Photoshop. One thought would be to include the needle, a thimble, or some other sewing implement in some of the in-progress photos. It is a prettier version of the penny.
We are creating a photo archive of a large collection of vestments. The individual folders have a full front and back view and then successive magnifications until you can count hairs and threads. Pretty interesting.
Thanks for all of your tutorials, by the way. Our guild gratefully rummages in your delicious pile all the time.
I thought the piece was much bigger until I saw your hand on it. I also love the piece regardless of size. The colors are amazing. Thank You so much for sharing it with me.
I thought it was double the size, perhaps 8 x 10″, especially due to the detailed stitching in the leaves.
Hi Mary,
Yes, I thought the project was very much bigger. It is beautiful! in your “How To’s I always wondered what fabric and what thread you were using? The fabric looked like it had large holes and the thread looked very interesting – twisted large yarn??
Thank you for your fun blogs!
I just discovered your amazing website recently.All of your work is “holy wow” gorgeous and the tree is no exception. I admit that size of the piece was a surprise but that only makes it more impressive!
I can’t wait to see what’s next!
Best Wishes,
Jan
Thanks, Jan! Welcome aboard! 🙂
My son works in miniatures as a hobby and in his community when photographing designs, the artists drop a penny somewhere discreet in the photo to give a sense of proportion. So, a penny for your thoughts?
Dear Mary
This version of the leafy tree I prefer I love the vibrant colour threads you have used which shows the leaves better and all the different stitches it is lovely. I thought it was that size as you always state how big the design is. I can imagine that you would have to be careful with your embroidery because you are going to show them on your blog but I haven’t seen any flaws or mistakes in your work when you show them to us online. Thanks for sharing with us your thoughts on perspective size and photography.
Regards Anita Simmance
That’s so interesting. I’d have guessed it was a bit larger but not huge – maybe 6″ or so? But that’s only because I know you tend to stitch fine pieces on smooth linen and with one or two threads. If it had been from someone else, I might not have known.
I thought it was larger…especially after seeing the detail on the leaves! Beautiful!
Yes, before this photo I thought this to be a much larger work. Thank you for giving a reference for it’s size.
I thought it was 1.5 to 2 times larger than it is. I suspect the size of the hoop I’ve been using had some influence.
I have the opposite problem. I work on pieces that are normally two foot by five, and post pics as I go along, but the scale of thing is hard to grasp. ~Even my students, who see me working on the thing at class, will come face to face with one or other of the beasties and say, “oh, I thought he was bigger/smaller when I saw him on the blog”
I think it’s great!!
I had no idea that your embroidered tree with leaves was as small as your hand. I thought it was about pillow-size, 12×12 or 16x 16, perhaps.
Fascinating!
I hadn’t really considered the size of the piece but just admired the stitching and design. I stitch with a magnifying glass and a friend keeps reminding me to step away and look at the piece from a distance, so now I position my stand so I see it from a distance when I walk into or out of the room. I normally take photos regularly of what I am stitching and find these are a good guide to how the piece looks overall. That’s also how I usually end up seeing a mistake or an area I’m not really happy with. Closeups, like my magnifying glass, can be misleading though.
Love your articles, always learn from them.
I love this tree! I thought it was much larger. I actually like the fact that it’s smaller. Not sure why! lol! I think a quote or saying might be nice with it.
Thank you for sharing all that you do it really gives me inspiration. I’ve only just recently gotten back into embroidery after many years of counted cross stitch. I forgot how much I enjoy it!
I admit I did think I was bigger and sighed when I found out the actual size. When you publish it as a project to buy, I will be on it like a child to candy floss, but the challenge, to improve my needlework will be considerably more erm challenging! And I’m sort of cheating, I have a 4x lit magnifier. All that does, so far, is show my mistakes in glorious detail. But that tree is beautiful and I’m really looking forward to it.
I am far from your level of stitching but it is disheartening to find my own mistakes when I crop and image of my work. Seeing others that have flaws/errors, makes me feel like I’m not a failure – completely.
Very good perspective on the cropped/detailed photos vs. how the stitched piece looks to the naked eye. I thought the very thing you hit on – the cropped photo – the threads looks thicker than actual and the fabric looks like stiff aida.
Wonderful information – thank you.
I thought it was larger. Not disappointed that its smaller tho. Actually, it makes it more doable for me. Larger projects tend to not get completed. Lol…
Bonjour, serait il possible d’imprimer ?
Merci d’avance
Brigitte Barthélemy
Hello, Brigitte – What would you like to print? Please let me know!
Love your tree and understand the problem of perspective. My problem with perspective is figuring how to embroider it, e.g shafts of light from the sun. I’ve done it incorrectly, I think, with the shafts wider at the edge of the project to points in the middle. My question to myself – is what happens in the middle? The only thing I can think of is to stitch the sunshine as a shimmer. Still thinking, any ideas?
This project is a shopping/travel bag quite large, roughly 45”x 46”front and back, 20” sides and bottom. It depicts Japanese umbrellas amongst the trees with a path running from side to side and shafts of sunlight. The embroidery is freeform sashiko/boro. I don’t have the discipline for formal embroidery, have done it but I have to change something!
Sometimes it helps to sketch it out if you’re unsure of where shading and highlights should fall. If you have the image already – especially if you have it on a computer – it might help to change it to a black and white image, so you can really see where the shadows and highlights are falling.