


Good morning, and happy Friday! Today, we’re going to continue the saga of reframing an embroidery piece that we started talking about last week, when I showed you this botched frame job.
On Wednesday, we looked at Part 1 of the reframing process, and now we’re going to finish that up.

Hopefully, between these two articles, you’ll pick up some framing tips for your own embroidery work and gain confidence in preparing your own work for framing.
If you frame a lot of work, knowing how to prepare it can save you possible frustration and a whole lot of money.
Custom framing is expensive, and if you can cut out the prep work, your frame job will be a little less expensive.
Better yet, if you can find a non-custom frame – or re-use an older frame – you can drastically reduce the cost of framing all around by doing the whole job yourself.
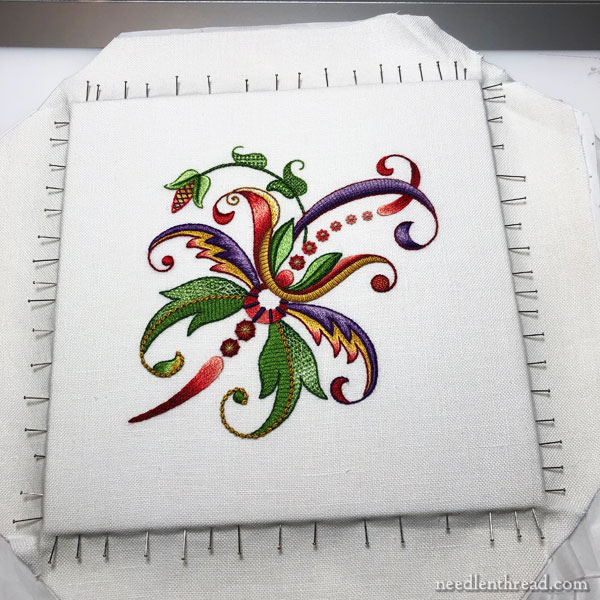
As I mentioned at the end of part 1 on this job, I use a light pad underneath the piece to help me measure the placement of the blocked and damp-stretched embroidered over the foam core backing.
A clear ruler with measurement lines marked on it (like a quilter’s ruler or some drafting rulers) will help you determine where you want to place the finished embroidery on the mounting board, and accurately space it from both sides.
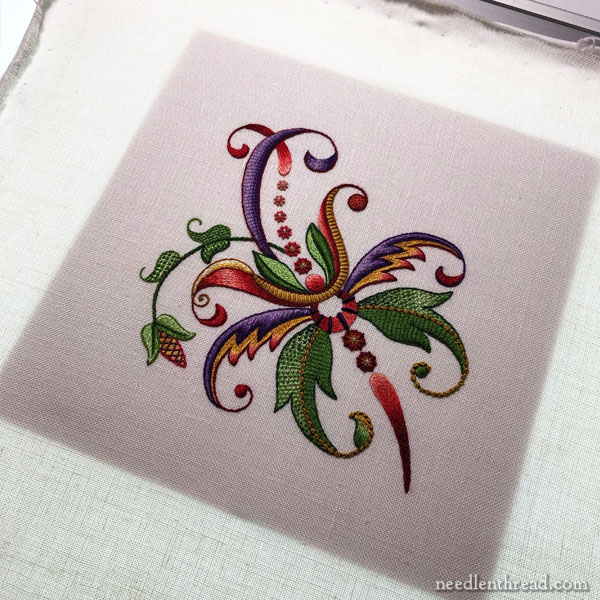
In fact, I did not center this piece exactly. I tried it centered, placing it in the frame and matting, and, to my eye, it looked slightly wrong. So I floated it about 1/8″ from dead center towards the top, which looked better to me.
Sometimes, “dead center” is not the best placement for a piece of needlework – especially one like this, which suffers from a lack of “grounding.” It’s a floating element, and dead center didn’t really do it. You don’t want it so off center that you notice that it’s off – with too much recognizable white space to one side or another, but nudging it just a wee bit off dead center can improve the framed effect.
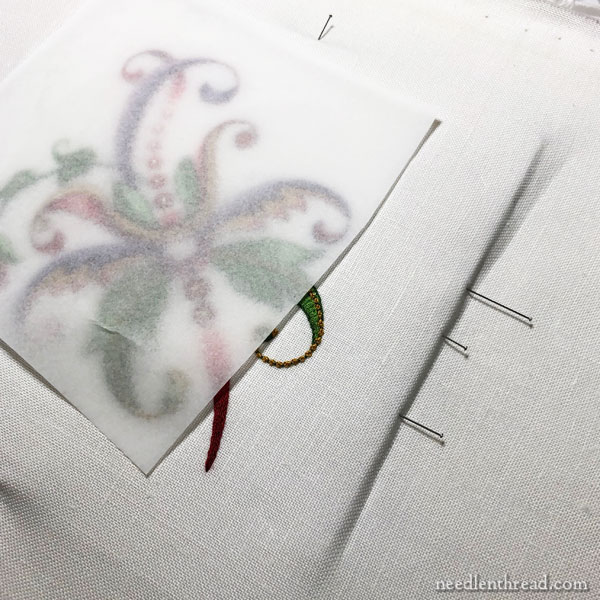
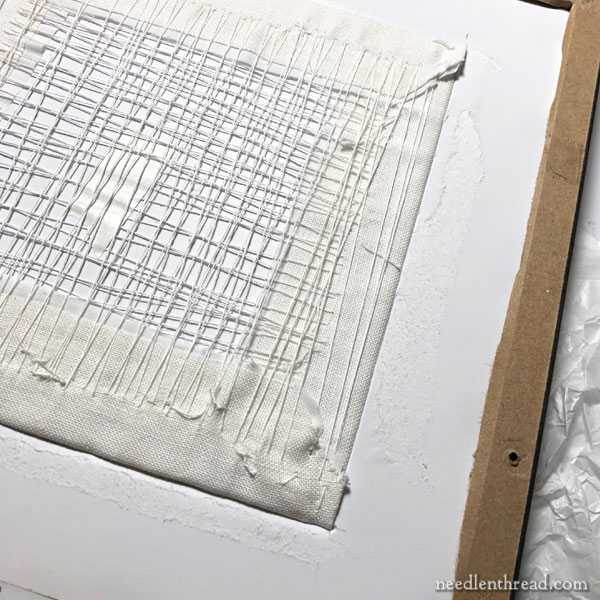
With the piece placed how I wanted it, I took fine, stainless steel lace pins and pinned the four sides in the center to hold things in place.
The pins slide through the fabric and into the side of the foam core board.
I used a piece of tissue paper over the top of the embroidery while I worked, so that my hands weren’t all over it.
I strongly recommend, if you’re doing this type of thing, to cut your fingernails. Fingernail marks are not always noticeable right off the bat, but if your fingernails are long and you’re getting leverage on the pins while you’re holding the work in place, those little areas where your fingernails come into contact with the linen – even if they don’t dig into it or the backing board – can leave little moon-sliver hints of handling all over the fabric.
I know this, because I’ve done it, and I’ve noticed it too late.
On the bright side, if you have one of the mister bottles that I mentioned in the previous article, you can spray the finest mist of water on the pinned work without its penetrating the linen to the foam core board, and this should eliminate such marks.
You could also go so far as to work with cotton gloves on, but I didn’t have any on hand (chortle), so I just covered the top with tissue paper as I worked.
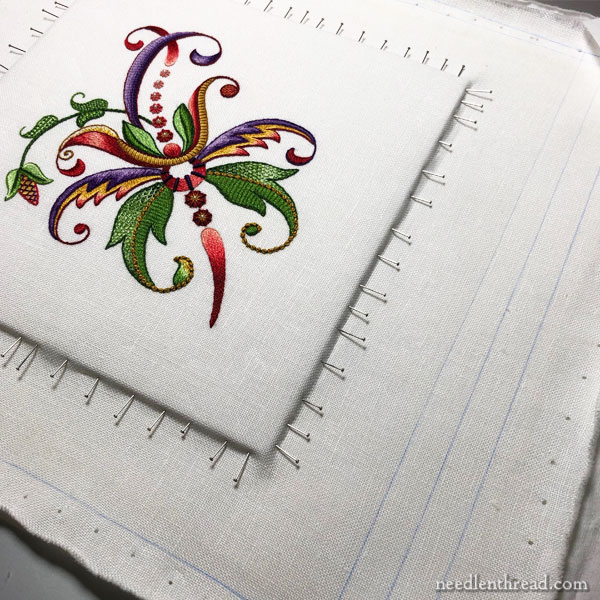
Once you’ve got the piece anchored on four sides with pins, fill in all around! Go as close to the corners as you can.
And be careful as you place the pins. You want to slide them straight into the side of the foam core, without their angling up or down and splitting through the outer layer of the board (and especially not into the fabric on top).
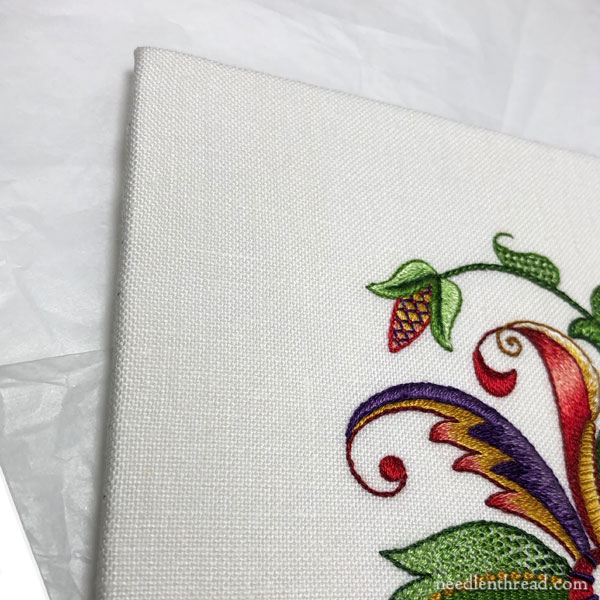
Then, I took a ruler and I measured and marked my trimming lines and I cut the excess fabric off.
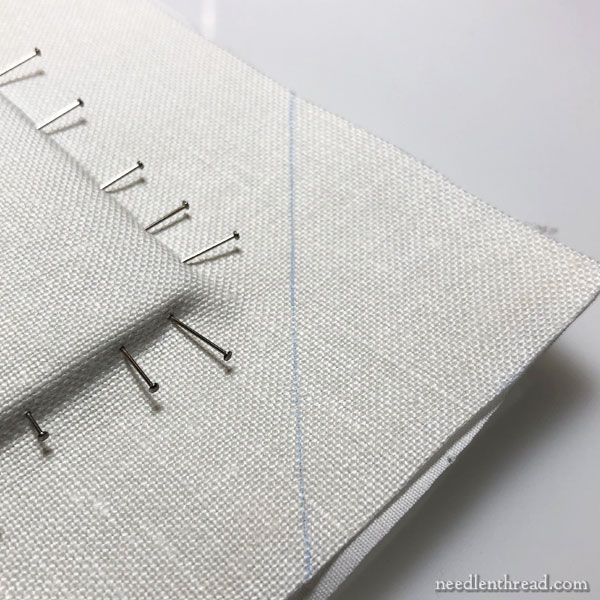
With the excess fabric cut away, I measured the corners and cut the excess fabric off there, too, preparing them for mitering.
As it turns out, I didn’t miter the corners, and I’ll tell you why below.

Under the area where I trimmed the corners for mitering, I also trimmed out the backing fabric just right in the corner, to eliminate some of the bulk on the corners.
So, here we are, ready for the next step.
And this is where I’ll tell you about mitering the corners. I tried mitering the corners, but they were very bulky, and I could see that the piece wouldn’t fit into the already cut foam core board behind the matting in the frame.
I could have trimmed that cut out of the foam core board (which you’ll see in a photo below), but once you start trimming things like that, you can get yourself into a whole boatload of mess.
So, instead, I took a path that reduced some of the corner bulk on the prepared embroidery piece, so that it would fit securely in the foam core board already situated behind the matting in the frame.
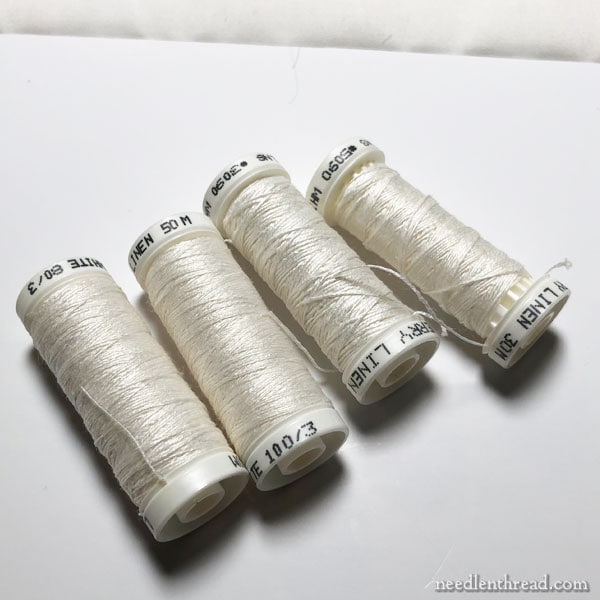
I fetched a few spools of linen thread. I use Londonderry Linen thread for several things, besides stitching. One of them is dressing a slate frame. The other is lacing the back of embroidery.
Why linen thread? It is not prone to stretching, like cotton is. It’s not going to give as much as cotton would over time, or when there’s a change in humidity or whatnot. Linen thread is strong and it is mighty.
I used the size 30 for most of the lacing, but I ran out right towards the end and had to switch to 50.
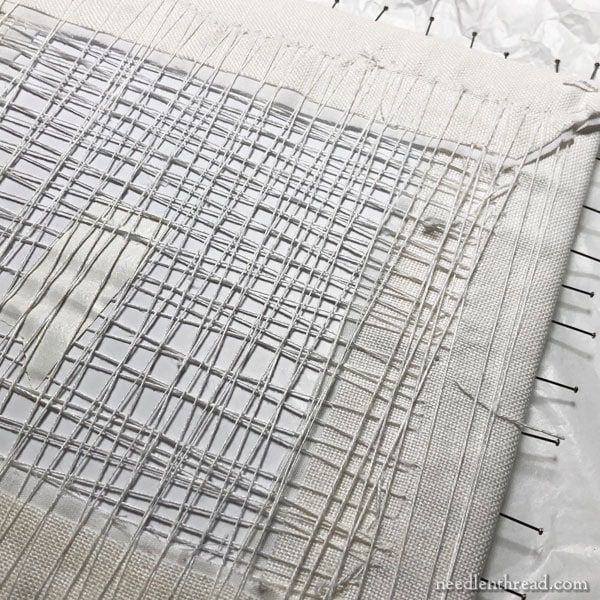
So, yes, I laced the heck out of the back of the piece. I may have overlaced it.
This could have been some kind of deep-seated emotional response to the previous botched frame job, I reckon. (Well, that’s my excuse, and I’m sticking to it.)
Anyway, lacing is just a matter of pulling two opposite sides as close together as possible, and then moving on to the other two opposite sides. I use a herringbone type movement when I lace the sides.
There’s a piece of tape in among the lacing there. I was interrupted by the phone while working through the first layer, so I stuck I stuck a piece of tape on my thread, and somehow, I didn’t notice it until I was almost finished with the second layer. Given the proximity of all those lacing stitches, I couldn’t pick it out without disturbing too much, so I left it.
Anyway, I lace from the middle with a very long piece of thread and then I go back to the middle and lace the other half of the side, using the tail of long thread. Then, I work those threads a bit – like you would a shoe lace – to tighten them up before finishing them off in the edges of the linen by making several small stitches.
Sometimes, I have to change threads, so I do the same thing – I finish them off with several small stitches in the sides of the linen and switch to a new thread, starting it the same way. In any case, the idea is to work the lacing so that the fabric is nice and evenly taut all around.
When the lacing is finished, out come the pins!
Everything should remain good and taut and sharp.
Examine the embroidery well at this point. Make sure any stray pieces of fuzz or thread or what-have-you are removed. Make sure any beads or similar embellishments are as you want them to be when the piece is in the frame. Be overly scrupulous about all of this.
Also, examine the inside of your frame. If the glass needs cleaning from fingerprints, now’s the time to do that. Make sure there’s no fuzz or thread bits inside the frame.
If you have a mat on your work (I have a double mat, which eliminates the need for spacers between the glass and the fabric), you should also have a piece of foam core board in the frame, with a hole cut in the center behind the mats, where the embroider will fit.
And that’s what I have here. It’s a good snug fit, and this is why I didn’t want to miter the corners on the fabric around the foam core board.
If all is ready, shove the piece in place! (Ok, no shoving…)
Examine it from the front, from all angles, and make sure everything is as you want it to be.
Be overly scrupulous about this, too!
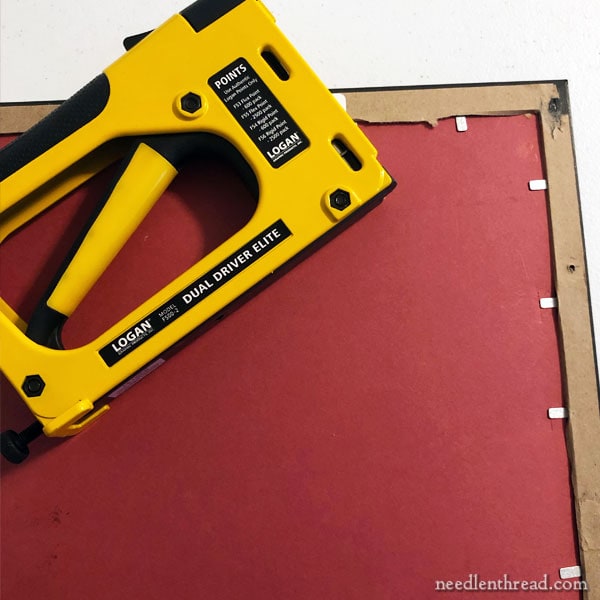
Now, place a mat board backing behind the work and drive framer’s points into place, to hold the backing.
There are lots of great tools for driving in framer’s points. I like this particular one from Logan – it’s on my Amazon recommendation page under Tools & Accessories. It shoots rigid or flexible points, and it’s very easy to use.
I use rigid points. Flexible are fine for photos and paper art work, but with needlework, there’s more stuff in the frame, so I like the rigid points.
Normally, I’d use white mat board here. The framers used red. The other side of the red mat is white, so I’m not really worried about it. It’ll be fine.
My last step is to paste the dust cover on the back – that’s the brown paper backing – and to screw in the wire hanger attachments on each side of the frame.

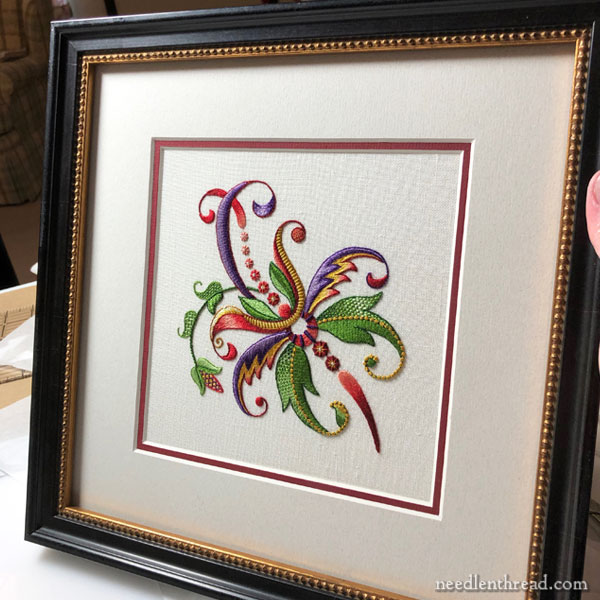
And here’s a final shot, in regular lighting again, taken from the side so that you can see there are no ripples. Hurray!
For those who have asked if I’ve gone back to the frame shop yet or who have advised all kinds of livid reactions, a couple points:
I live in rural Kansas, and the frame shop is not close by. I don’t have a chunk of day to do that right now.
That’s not my way of doing things, anyway. I’ll be in touch with them, and in a professional and calm way, I’ll discuss the initial job and hopefully, give them ideas for better frame jobs when it comes to needlework. I’ll also send them the links to my articles. But raising hell of any sort doesn’t help any situation. There’s enough vitriol in the world without adding more over something that, in the scheme of things, is mighty insignificant. It’s certainly not worth disrupting my own inner peace – or theirs.
Will I use them again? Of course not. I’ll just stick with my own methods. I think framing is fun, anyway – when I have time for it!
Have a great weekend! If you have any questions about framing, feel free to ask them below!
This article includes an affiliate link to my Amazon Recommendations page. Purchases made through that link result in a small commission for Needle ‘n Thread at no extra expense to you. Thanks!
Very well done indeed and most informative! Thank you. I agree with sending the framers links to these two articles. Excellent lessons for us all.
I do not understand the lacing from the middle and I cannot determine from the picture that you go to the middle and then go back. Do you lace like the horizontal all the way across and then lace the vertical to the middle?
I enjoy your pieces very much – have to admit I’m a counted thread gal. I took a piece to a framer and when I picked it up, then had actually laid the piece in the frame so I asked them if I took it and did the prep work, would they put it back in the frame for me and they did. It looks really good. By the way, this was in El Dorado, KS.
I go to the middle and leave a super long tail. You can start on the edge – I’m just used to starting things like this in the middle.
Wonderful framing and detailed information. I agree with your ways of doing business.
I have found a new mister which truly provides mist and not globs. I have arthritis in my hands and spritzing cause aches. I found that you can purchase battery operated misters. I used mine for spraying a product for making my hostas and lilies taste yucky to deer. The mist produced is very fine without the pain of repeated squeezing of the trigger. I purchased mine on amazon.com.
Ellen – A battery-operated spray bottle sounds wonderful! Would you supply a link for the type you use. There are so many on amazon – I’d like to buy one that’s been ‘tried and tested’. Thanks!
Hi Mary,
So happy for you to have the beautiful finish you looked forward to. Love all your tips on how to prepare for the frame all the way to the end. If you happen to do one where you are mitering the corners for framing or for a needle book or whatnot I would love a refresher on that too. I may have missed it; where do you buy the Londonderry linen thread? Thank you so much for sharing.
Needle in a Haystack in CA carries it.
Thank you for such a detailed lesson!
I am still interested to know about your use of backing fabric. Till you described it in your first article about this job, I’d not heard of doing that so hoped you would cover it in a reply or in your two articles on reframing, but I do not see it. What is the purpose, how do you attach it, what material is good to use and what sort of weave–gauze, tight weave, or something else, etc. Thanks.
Here’s an article: https://needlenthread.wpengine.com/2016/07/all-about-lining-embroidery-ground-fabric.html
I have done my own framing for years since I worked for a needlework magazine and learned the basics. I have always laced my stitching as you did, though they did not because of time constraints. My one question is about ending the thread when you lace. I take several stitches to make a bar tack and then stitch over that. However, it always loosens up at the end somewhat, no matter how hard I try to keep it drum-tight. Do you have any hints or suggestions?
Stitch into the ends several times like making backstitches. That holds them.
Sounds to me like you could start a nice side business framing needlework! Lovely job! ; )
Looks beautiful! How fortunate that you knew how to do the job correctly; it would have been a pity to have been stuck with a poorly done job. Kudos to you for having the wisdom to save your energy to use in a positive way!
No questions – just wanted to say your framing is perfection. It looks a thousand times better and I hope the frame shop takes your input seriously.
Very Beautiful ! When I do my lacing I use un-waxed dental floss. And for the backing I use 1/8″ acid free fome- cor. It will not absorb moisture like a mat board can. Dust cover on the back ? use double sided tape around the edge of the frame, stick your dust cover on and use a special hand held blade that will smoothly run against the edge of your frame and trim the paper perfect to the edge. Love your blog !!! Thank you.
Bravo, Mary! Interesting to see what is involved in a meticulous framing job for needlework. Good idea to send the article to the original framers. I can see that they didn’t have a clue as to what was needed when they approached framing your piece.
Mary,
Thank you so much for your detailed description. I found, that I have been doing this myself for years. One difference, once I have my needlework mounted on the foam core, I take it to my local Hobby Lobby or Michaels and ask them to drive in the points and back the work with brown paper. They will also add hooks and wire for hanging. I have been very happy with their work over the years, no matter what city I was in.
I am a Michaels certified custom framer (currently working in HR, and I miss my Michaels job!) and we were told in no uncertain terms that we do NOT trim pieces unless we are dry mounting a print or photograph. It was sometimes hard to deal with the bulk on the back of a stitched piece, but there are ways (like Mary’s lacing) that make it work and look pretty. We always used 1/8″ archival foam-core and stainless steel pins; I used to redo crooked stretch jobs because it bothered me so much, and because I really enjoyed making things straight and nice. We didn’t cut a hole in a foam-core, but used a boxing technique to stabilize the mounted embroidery (basically, measuring and cutting strips of foam-core that were securely mounted between the frame and the piece to keep everything in place). I once did a large wool crewel piece from the 1970s with four mats! The bulk of the piece plus the mats meant it stuck out farther than normal from the back of the frame, so we used a canvas mounting technique with S-brackets screwed into the frame to hold the piece in. Because the piece was big enough, we also laced across the back using the brackets and wire to be sure it wasn’t going anywhere! And then we backed it with archival paper and mitered the corners. That was one of my favorite pieces to assemble!
I’m particular enough that, even though I know the level of training at Michaels and Hobby Lobby frame shops, I’ll probably stretch and mount my own pieces and then let them assemble everything.
I think sending links to your articles to the Frame Shop is a good idea. I like to think that the shop would reimburse you its framing costs. That would be the ethical thing to do. I think if the shop followed your steps for framing, it would probably have to charge a fair bit more for the job, since there is obviously more time involved in the process.
The piece looks fabulous now. I was mortified with what you found when you opened up your frame job from the framer. When you showed the second picture with better lighting the ripples in the fabric were truly unacceptable, as was the off centered placement. Thank you for taking us through the proper steps when handling needlework.
Excellent job.
It looks simply amazing, Mary! You are so good at it I wonder you ever have (professional) framers touch your projects at all. Thanks so much for sharing all the steps.
Thanks for the framing tips, Mary. Those two articles are really helpful.
Where do you buy the Londonderry linen thread? And what size would work best for lacing a large piece?
Needle in a Haystack carries it. I like 30. I think they also have or can order an 18 weight, which is great for slate frames.
Beautiful job. Now you can send it off to France knowing everything was done right. By the way, Fantasia is one of my favorite pieces of your work; you’re always an inspiration.
Bravo Mary — again beautiful piece. How long did it take you to do the framing? Your instructions and directions are so clear, I just might give it a go. Also, I do appreciate your attitude about going back to the framers. I am not one to subscribe to many things that come up on the internet, but for some reason when I first started reading your newsletter, I felt good about it — felt good about not only what you said, but how you said it. Peace of mind, peaceful heart. Thank you. I always look forward to your next piece.
Counting blocking & stretching (but not drying time) probably 2.5-3 hours. Yep. Shoulda done it myself in the first place! LOL!
Your embroidery looks beautiful re-framed! Beautiful work all around & great instruction for us! So sorry you had to go through this, though.
Beautifully done! And how you plan to deal with the frame shop is a shining example of equanimity; thank you for sharing that.
The framed piece looks a thousand times better. Thanks very much for sharing your technique for matting and framing. It will be a wonderful resource when I need to prepare my pieces for framing. Have you ever framed mono-canvas? Several items in my stash are done on mono-canvas and that is extremely bulky. Do you know an alternative technique that might work?
The nice thing about mono canvas is that it sort of “self finishes”within one square of the edge, so you should be able to trim corners pretty close for mitering .
Great Job! It is beautiful and I know you are really happy with it now.
Yes, you are correct about not getting “back” at them.
Thank you for sharing.
Very nice job re-framing and thank you for the final comment on how you plan on handling the “professional” frame company that botched your beautiful embroidery piece. I was impressed with the classy and professional plan and you are right, there is enough vitriol in the world without adding to it and they didn’t seem too receptive anyway when you original re-contacted them regarding the issues you had. I was floored when you showed the piece you pulled out from the frame. That is absolutely unacceptable and unprofessional. It looked like a toddler did it. Hopefully you will get a full refund, especially if you send a copy of your ‘fix’ was how it should have been done in the first place. Realistically when I used to do Cross Stitch, the reason I paid a pro was because of the matting. I always had weird sizes so you couldn’t go ( mind you this was pre Hobby Lobby or Michaels) get a frame in a store and I always wanted a custom mat, something I could not do myself. Good luck and your framing and of course embroidery looks stunning!!
Mary,
Your framing is way beyond professional!!
I want to ask you how much of the lacing you show here is really your response to the bad framing job. I ask this because I don’t want your readers to get discouraged from trying this method. Because it looks like it took hours to lace. In fact, I have just “taped” the edges in the past to secure the back of the piece. Heaven forbid! But I see the benefit it doing it the right way from the beginning. Thanks for turning a horror story into a success.
I don’t think there’s anything wrong with taping, using archival framers tape, but I prefer lacing. The lacing on this didn’t take me an hour.
Mary,
Bravo! What a masterful tutorial you have just gifted to us on the proper framing up of an embroidery piece. I’ve learned so much from it and know I can refer back to it on your site when need be. Your careful and very thoughtful evaluation about not confronting the original framer with their unprofessional job and their misleading statements to you about the way they go about framing such a piece is admirable. There’s way too much hostility out there in our society and although this unnamed framer deserves your honest criticism and a return of your money you put this experience into a worldview perspective of where this unfortunate experience belongs in the grand scheme of things. My respect for you runners over. Thank you for your sharing of your artistic gifts and knowledge.
Marcia
Beautiful job! And I, too, tend to overlace my pieces but I think it is bec I want to err on the side of caution and longevity. This turned out beautiful, Congratulations! Couldn’t agree with you more in regard to giving the shop ‘what for’ on the lousy frame job. Life is too short. Again, congrats!!
A related question. I ordered the mister off your Amazon Recommendations page. How do you open it up? Tried twisting top off bottom. Will go neither clockwise nor counter clockwise. There is an arrow at back center bottom of top piece. Pinching & turning at arrow or below arrow does not budge anything. Feels like gripping hard & pulling apart might work but also feels like I would break something. Am I missing something? Or is this a defective mister I need to return. Please help me figure this out. Thanks.
Mine untwists – just a single turn. Lefty loosey – twist to the left. Unless they’ve changed the product, it really should just twist off!
I also bought one of the misters and it opens very easily by untwisting.
Great mister, by the way. I’ve been needing one for a while and had never gotten around to looking for one. Thanks, Mary!
WOW – the re-framing job is so much better than the original job.
You did an amazing job on this; sad that you paid someone else to do it and then had to re-do it yourself.
However, I’m sure you would have been unhappy with the picture every time you looked at it.
I am wondering if you got the reframing done in time to get the embroidery shipped?
Is it still going to be in the book?
Enjoy your how-to articles. It interesting to see how someone loves embroidery as you do creates your projects.
I am not a person who does embroidery, yet I enjoy creations of those who do.
Thanks for your talent,
Diana
Yes! It’s going out this coming Monday!
Mary, you did a beautiful job! Thank you for the thorough explanation. I think I would try that myself. I can see how time consuming doing it the right way is, but definitely worth it for such a fine finish!
I admire how you handled this situation. I could feel your frustration and regret but you righted the problem on your own. I believe it does not help anyone to cause a scene and react in anger over a wrong. Of course, the shop should be told of the problem and then be educated on how the framing job could have been accomplished more professionally. (Perhaps they don’t do as many fabric pieces as they lead you to believe – perhaps there was an assistant with not much experience in handling fabric who performed the work – a whole range of possibilities of things that went wrong.) But teaching the shop the correct way would be more beneficial than ranting and raging about a botched job and a professional relationship could be established that might be beneficial to both of you.
Good for you! The peaceful way is always the best way!
I’m interested that you lace over foam core. I was always taught to lace over acid free mat board which I’ve always done. You end up with a thinner finished item. glad for the review about not mitering
It makes little difference, unless you’re really concerned about the thickness of the piece. The foam core is also archival. What I like about foam core is the ease with which you can push pins into it, to hold the fabric in place.
Be aware that there is archival and just plain foam core. The one is more expensive, but worth it. Both come in 1/4″ and 1/8″. I’d use the 1/4″ as it would stay rigid. The framer could cut the board you mount on out from what goes around the outside edge with acid free tape on the back to hold it in. The framer would also need to cut around the “hole” just a wee bit to allow space to slip the mounted piece into.
Thanks for all the on formation on framing a piece of embroidery. My question is about preping a piece of needlepoint (on canvas) that is stitched to the edge with a 2 inch canvas margin. I want to float this OVER/ON TOP of the mat. Any further suggestions to keep this from becoming too bulky?
Much better! BTW, I particularly love the shading in the red part of the central U-shape.
And yes, sending the framers your articles is FAR better than any kind of rant.
Hi Mary, when it comes to attaching the embroidery to the foam core board do you always need to lace the work or can you just pin it with fine small pins?
Heather
You can pin it with stainless steel lace pins. There are plenty of folks who do. After you pin piece, you still need to situate the excess (though trimmed) fabric. Normally this is done with an archival framer’s tape on the back of the foam core.
That framing job is just beautiful. I wish I could do it half so well. You might mention the reason for the spacers; it is very important. I perish the thought of some of the pieces I’ve done in a past lifetime in total ignorance that have definitely not stood the test of time: foxing, mildew, sagging, etc. Frame as if you want it to last a lifetime; somehow it’s around forever.
Beautiful work on the redo. I noticed blue lines on the fabric after you had pinned it, was this to help with trimming the fabric, keeping it squared up or something else? Thank you.
Those are my trim lines – I changed my mind a couple times. 🙂
Do you have any idea how refreshing your “way of doing things” is – calm, professional, not adding to the vitriol in the emotional environment? I am sure you do not see yourself (out of the mainstream in rural Kansas) as the Lady Liberty holding up her torch. But your kindhearted resolve to not add to the rancor or the world looks a lot like Lady Liberty to me. Kindness with a congruent heart, between word and action. Needless to say I love your beautiful needlework, helpful advice and directions, but today it was your voice that brought tears to my eyes. Way (way!) back in college I met a student who spoke of coming to this country as a boy, from post war Europe. He spoke with awe about a US soldier who gave him a chocolate bar and a blanket. He was a young man, settled in the US by then. Still, his voice broke as he spoke of the kindness and caring of the US soldier. Liberty carried a torch of a better way of being in the world.
Today, you showed that Americans can hold up the behavior of a better way of behaving in the world. Your needlework is beautiful, but it only reflects the substance of the person creating it! Thank you for being YOU, and showing your light. Again, you show the light of who and what you are. We are all better for it!
Sorry I read again and saw the answer!
Mary,
Coming to the end of this post, the third and last in the Frame Saga, I honestly feel the same joy and relief as when I come to the end of a Jane Austen novel. Thank you for sharing this story, and your insights along the way. I’m looking forward to an Epilogue when the French book is released.
June
What do you use for backing fabric? How is it attached to the embroidery fabric?
“There’s enough vitriol in the world without adding more over something that, in the scheme of things, is mighty insignificant.”
Is this too long to stitch into a sampler? Better yet, we should turn this into a meme and plaster it with wild abandon all over the internet.
The information on framing is interesting and useful, but this will be my personal lesson for today.
Considering some of the samplers I’ve seen with many repeats of the alphabet in different designs and some lengthy bible verses, no it’s not too long 🙂 At least not in my opinion.
What a beautiful re-do that you did! You are probably right in doing it yourself and not stressing over their “not caring” attitude.
In fact, you have the ability to do much better work than they did!
I will remember this when I run into an issue! (never happen for this Type A Scorpio) but de-stressing a situation is really the way to go!
It is a beauty!
The reframed piece looks just lovely! Well done, Mary.
Hi, Mary! Nice job on the framing! I have not gone to the extreme of cutting away backing fabric to lower the bulk on corners, but it certainly does the job well. This is one reason I love your blog & site: you always go the extra mile to do the job well, but you don’t plod through unnecessary steps “just because;” there’s always a good reason for your choice of method.
I would like to see a closeup photo of the stitches you take as you finish the lacing. I usually tie a knot, but I think stitches would put a more even tension on the fabric. Also, I have often run into tangles when I use super-long thread for lacing, and I would like to know how you avoid that problem.
Thank you!
Hi, Mary – I avoid the tangles by going slow and the stitches are just three or four little straight tacking stitches right around each other to anchor the thread.
I just want to say Thank You for handling the situation the way you have. I want you to know that not only do I respect and enjoy your talent, but really liked the way you handled your framing situation.
Hello Mary,
Thank you for sharing how to frame embroidery pieces with your readers. Where can I get the linen thread? I love the linens fabric that you used for embroidery. Where do you get your fabrics?
I have several embroidered pieces that I would like to frame myself to save a lot of money.
Thank you for your great emails.
Londonderry Linen thread is available here in the States through Needle in a Haystack in California.
The linen I used on this piece, I’m afraid, is no longer manufactured, but it comes from the line called “legacy linens” from Access Commodities, and Needle in a Haystack also carries all their linens.
And now it looks beautiful.
I am so glad that the original framers had not trimmed or damaged the piece in any way.
Such an education, watching you resove this–and so beautifully! And your sense of decorum is equally exemplary!
Great tutorial on framing needlework. I have a piece that would really benefit from this type of attention.
Most interesting following your framing. Framers can be very unprofessional at times. Particularly when a prized photo slips because of bad adhesion lack of care.
Kind regards from Australia
You already have the tools you need to frame your work, and as you know foamcore’s inexpensive. All you need is your custom frame, glass and mat. Have you considered just having the frame made, mat and glass cut, and doing the framing job yourself?
Of course, your next step is to buy a mat cutter. I don’t know if they still make them, but there’s one you can buy that is not the full frame, just a hand held thing. Using an under board, C-clamps and a steel ruler you certainly CAN cut your mats at home and they’ll be as nice as the ones made in a shop.
Mary, A job well done! I need to remember to your steps for good blocking and lacing on my next piece of embroidery. I always laced my crazy quilt pieces. But I guess I trusted my framer to do the correct steps on my embroidery pieces. Now I’ll wonder if he did the right procedures?
Mary you did a wonderful job. When I had my wisdom teeth out a nerve was damaged and I lost all sensation in one side of my mouth, jaw, chin, etc. I was a nurse and the other nurses all said I should sue the Doc, however as I told them, I was clearly told that there might be problems and I acknowledged that I understood the risks. I most likely could have still won a lawsuit and gotten some big dollars, and even though I had some corrective surgery, I still have problems to this day especially when having dental work done. Certainly not like what you went through, but as you said basically, your inner peace is more important. For me, I knew I could not in all good conscience, try to say that I didn’t understand the informed consent I gave, blah blah and whatever else some lawyer would want me to lie about. That is not how I live my life! That would bother me far greater than the continuing mouth problems. Some things are better left behind for the most part.
Again, congrats on a superb job of framing that you did!
It looks beautiful… Regarding your comments on the centering of this specific piece, it is good to know that we can off-center the work if the overall “look” is right. Thank you for this tip.
The Londonderry thread – do you carry? Where can I purchase?
When stretching, do you use any special knots? I don’t know if their bulk would show.
Did you put a piece of foam over the foam board? Don’t recall that you did this.
I have two pieces needing framed so your emails are very timely for me.
Thank you!
Hi, Laraine – A lot of people frame their work with padding between the needlework and whatever mounting board they use. I don’t. I mount straight onto the board, with no extra padding, as I prefer this look. No, I don’t use any knots when I lace. I use tacking stitches. And the Londonderry Linen thread can be ordered from Needle in a Haystack in California. Hope that helps!
Thanks Mary for bringing us up to date. Needless to say it looks so much better now! Not to say spectacular
I was interested in what you said as well about returning to the framers. From my personal point of view, I’m glad that your approach will be more even tempered and learning centred when you are next in that area.
I’m often being told to be ‘more assertive’ as if it’s a hat I can just put on at will! But generally speaking, with poor services, I am usually able to find the right approach that leaves me feeling like my true self and a certain degree of satisfaction at having been able to express my dissatisfaction.
I’ve always held as one of my core values, the idea that I should treat people as I wish to be treated. And if that tenet was used more widely, life might be better in some wise. Needless to say, like everyone, I’m far from perfect and often make mistakes but like my sewing, guess, I’m a work in progress
Keep up the fantastic work, I value your blogs on so many levels…
I really enjoyed this article about how to rectify an unsatisfactory framing. The finished piece is such an improvement. I am really pleased about the added thin inner red mat board,I dont recall seeing that on the first pictures. As usual excellent descriptive notes and lovely clear photos.
Mary, I can fully understand the pain you went through when you saw the ripples on your newly framed embroidery. But I am really inspired by your thinking and the way you handled the whole thing and the way you rectified a professional’s bad job! Thank you from the bottom of my heart for all you teach us❤️
You are such a nice person. The next time I’m incensed over poor service, I hope I can remember your approach.
Very interesting articles and a good save of a difficult situation. I’ll remember the standard of “not disrupting my (or anyone else’s) peace” whenever possible. A hint on the backing: to make it nice and taut dampen the brown paper before you glue it down. When it dries it will shrink slightly and make a nice, neat back.
Thanks, Peggy! Will do!
You did a beautiful job re-framing this piece. And I’m so happy you’ve decided to take the higher road in handling this botched framing job. 🙂 Well done!
Good day Mary, you did it again, providing all of us with pearls of wisdom! On the techniques and on the behaviours. I have never though to use a light pad to help in the positioning of a piece of embroidery for framing, great idea, I have also never heard of 18 weight linen thread for slate frame. What an informative post it will be my go to as refresher (mind you, a lot of your posts are my go to for refreshers)! On the behaviour side, you are a very classy lady, a model to follow, turning a problematic situation into a learning opportunity. Thank you for all and enjoy the weekend.
Thank you for such an informative lesson on framing a piece of embroidery work. I’m sure that this method would work well for other forms of art. I’m currently planning to frame a piece of punch needle embroidery for a show and really don’t want the cost of custom framing.
Your approach to handling the problem with the framer is most commendable and sensible…better for your blood pressure and theirs. It can be a learning experience for them and perhaps help to improve their service to future customers.
How thick is the foam core board?
Is this normal mounting board?
The work looks wonderful now.
About an 1/8″ or perhaps 3/16″. It’s not super thick, but it isn’t as thin as mat board.
Even in photos, your work is much better. I bet the difference is huge in person. Thanks for the tutorial on how you re-did this.
Did you change the orientation of the needlework, or is it sitting on the side in these photos? Or was the photo (or needlework) rotated in the “before” shots?
I changed the orientation.
Your reframing is perfect, removing the detractors of the original job. It has the added benefit of dyi instructions. I feel confident enough to try framing my own work.
I also think your solution regarding the previous unacceptable job is inspired—and inspiring.
Sandy
Hurst, Texas
PS: I followed your link and purchased the spray bottle which produces a fine mist. It is exactly what I have been wanting for years. (I have the rejects to prove it.) Thanks for putting all your followers onto it.
Turned out so much better. Congrats! Hang it proudly.
definitely the right thing to do, both reframing and how you intend to handle the talk with the framer. Poor job on their part all around.
Instead of lacing, have you ever used double mat board instead of foam core, covered with muslin glued to the back, then sewn the needlework onto the muslin? Very time consuming (and you didn’t have time I know) but does give a nice finish.
My favorite framer has just retired. Guess I’ll be framing more things myself now.
Thanks for a wonderful site – always enjoy reading it. Susan
That’s an interesting idea. I’ve never tried it, but I’ll keep it in mind in the future! I like lacing, though. It has always worked well for me.
It looks terrific, Mary! I do hope that they read your two re-framing blogs.
I’ve done framing, professionally but mostly for my own work, for lots of years. I learned early on that it’s best to leave a bit more matboard or art at the bottom of a piece. The eye sees equal on all sides as less at the bottom. So, Mary, you were visually correct to move your piece up a bit.
Hi Mary
With that experience of framers…… might be better to a) either find another one then, or b) just get them to cut you the frame and glass and mount and do it yourself!! Ooh, just thought of another one c) go on a framing class and do the whole lot yourself like I did!!! It looks MUCH better now you’ve re-done it though!!
Hello Mary. This is a beautiful job done! Thanks a lot for sharing your work and the so precise tips.
One question : when you lace the back, do you go through the 2 fabrics, linen and backing, or only the linen?
Thanks!
Both!
Glad you were able to sort it out. Sure, there’s no need to be rude or bolshy with the shop staff, but they do need to know they did a bad job so they can (hopefully) improve.
What sort of glass do you use. I have just had an original art work framed with what is meant to be non reflective archival glass. When I got home and unwrapped it I was disappointed to still have reflections. Have they given me the
wrong glass?
I’m unsure what to do. The reflections limit where I can place the art work in my house.
I think if you look up museum glass, you’ll find what you’re looking for. There’s still the possibility of reflection, depending on light sources. There’s such a thing as “non glare” glass, too, but it has (so it seems to me) a kind of texture to it that makes it utterly awful for needlework. Well, I don’t like it anyway. I think the best choice when framing needlework is museum glass, which cuts down on the UV light that reaches the framed work, plus it also cuts down on glare.
I’m really sorry the frame shop let you down, but delighted to learn your techniques.
I’m a novice stitcher, but have finished a few pieces that need some sort of framing. Still working up the nerve, but at least that gives me the time to assemble the right bits and pieces. 🙂
Fabulous work on your part! Thank you for taking the time to show this to us and so ably teaching us how to ‘do it yourself’. I’ve been enjoying your column for years. Would you like me to send a link to the “framer” for you? Best wishes!
You did a beautiful job of re-framing this piece! Thank you so much for your informative post and photos! And I agree with your planned approach for dealing with the framing shop. Confrontation is difficult for me too, but they do need to know about how disappointing their work was too you (and all of your readers). Hopefully you will get a refund and they will learn some framing and customer service skills!
Thanks for these great articles. You experience mirrored mine. I had taken a piece to be framed and particularly chose a shop that said they had experience in framing archivally. I spoke at great lengthen with them and it appeared we were on the same wavelength. The piece came back to me and looked great so I never gave it any more thought. We moved to a new home in Germany and the walls (lightweight composite concrete) were still releasing moisture though I didn’t know that until moisture appeared behind the glass. I removed everything to dry it out and discovered to my horror that it had been mounted with strapping tape.
I learned how to mount and frame from that experience. I wish I had had your great tutorials. My resources were articles.
I never confronted the framers either but I never went back to them or would have recommended them.
Dear Mary, what a delight to see your embroidery given the framing treatment it deserves! It’s one of the best ‘before and after’ stories which always has a feel good factor. As does your gracious response to the botched framing job. You were entitled to feel miffed, but it’s true that expressing it unreservedly usually results in very little of value. ‘Turning the other cheek’ is an old principle but it still holds true. And while I’m glad to hear you will be sharing a considered response with the framer, peace is definitely at a premium in this world and worth prioritising. Wise words, Mary!
Mary, it turned out beautifully! Were you able to send it off to France after all?
Yes, I was! The sad thing – it arrived with a small chip out of the frame. After all that….! But they were able to photograph it just fine – and the chip is small enough that, should they photograph the whole framed piece for the book, they can photoshop out the little spot. I am thankful the glass wasn’t broken and that the piece survived otherwise!
I’m so pleased! As you say, at least the glass didn’t break.
What’s the title of the book and when will it be available?
Congratulations on a beautifully framed embroidery and on being chosen to have your exquisite work showcased.
Hi, Linda – I don’t know the title of the book yet. It celebrates the 200th anniversary of Au Ver a Soie threads, and it is coming out some time next year. Thanks very much!
Thank you for your wonderful website. I’ve been following you for years and send all my hand working customers here. One question on this framing that I’ve read through twice and not seen is what do you use as the backing underneath the needlework piece? Would these instructions differ for needlepoint?
Hi, Vanessa – I have the embroidery fabric backed with a cotton batiste for further support while stitching. But that would not be necessary or even advisable for needlepoint. As far as what the fabric is mounted on – that’s covered in the first article. It’s archival foam core board.
In 2017 you wrote an article on framing with pins, and no lacing, just taping the excess fabric on the back of the foam core. Here, you lace then remove the pins — is this way better? Or are they equally good?
I learn lots from your posts — even the projects I’m not interested in doing!
I prefer lacing and removing the pins. It just seems to be a much more solid practice. 🙂 It’s easier to tape, though, and you can do it – just make sure you’re using archival framer’s tape.
Thank you so much for all of this necessary information on framing needle work. I have been doing my own for awhile, it is very trying and I tend to put it off until I have a number to do and it will take days. My point is if you do the work and want the best framing for it to last and stay in place the work has to be inspected afterwards and than you see if they have done as required. That should not have to be done. However, framers need and want the work but many are not into caring or learning the proper way for lasting needlework. Hope you listeners take heed.
So, as I understand it … as the layers go …
— glass
— double mat boards
— layer of foam core with the embroidered piece “dropped” into the hole which has a larger opening than the inner-most piece of mat board
— the “poster board” to “seal it all up”
And finally
— the craft paper sealant layer.
Correct?
Yes. In the frame, yes, that’s how it works, from front to back. The embroidery is on a piece of foam core that fits in the opening.
Anyway, I lace from the middle with a very long piece of thread and then I go back to the middle and lace the other half of the side, using the tail of long thread. Then, I work those threads a bit – like you would a shoe lace – to tighten them up before finishing them off in the edges of the linen by making several small stitches
I copied this part of the above because I didn’t quite understand it.
I am new to embroidery and was told about your site. So much information. You’re amazing and thank you for sharing.
I know you are taking a break for the holidays. Enjoy.
Thank you,
Robyn
Start in the center with a very long lacing thread, pulling the thread through to about the center of the length of thread. Lace one half of the thread to the left or right of center, out to the edge, then lace the other half from center out to the edge. Then tighten like your would shoe laces, working from the center out.
Hi Mary,
Do you have any advice about float framing embroidery? I’ve searched high and low to see how finished mounted embroidery is attached to the backing board without using adhesives and have yet to find any suggestions.
Thanks for reading,
Lorna Lattimore (Scotland)
Well, can the backing board be covered in cloth, and then the embroidered piece tacked on to that? This could work. Are you opposed to adhesives for a specific reason? While some adhesive approaches might be a bad idea, if you’re using the right adhesive, then it’s not necessarily “bad” to use them.