


Woooohooo! Today’s the fun color day with Autumn Fire! We get to do two things that I just love doing, when it comes to embroidery:
1. We’re going to work with silk thread; and
2. We’re going to manipulate color.
If you’re just joining in, Autumn Fire is part of the Stitch Snippets series here on Needle ‘n Thread. This is a series of a stitch-along projects that develop here on the website and are available as PDF downloads for members on Patreon.
Although the first round of materials kits sold out, I’ll have more available in the near future. We’re just waiting on a couple key supplies.
Last week, we talked about design transfer and embroidering the trunk and branches of the tree. This week, we’re adding the fiery foliage.

I’ve chosen Soie d’Alger silk for this project because stranded, spun silk is an excellent introduction to silk thread. It comes in a very familiar format, since it’s not that different from working with DMC stranded cotton in concept and approach. There are seven individual strands of Soie d’Alger in one piece of the thread as it comes off the skein, rather than the typical six you see in DMC or other stranded cotton.
We’re also going to be working with a very basic method of manipulating color.
The threads in the kit are lettered (A, B, C, D, E, and G) to make it easier to explain the combinations as we work through this part of the project. If you are working from your own thread stash, you’ll be able to follow the thread directions more easily if you also apply the same lettering system to your threads.
A & B are the browns (DMC 898 dark brown and DMC 434 light brown) that we used on the trunk of the tree.
The other threads are all Soie d’Alger, according to this list:
C: 2123 – green
D: 544 – bright yellow
E: 614 – burnt orange
F: 634 – bright orange
G: 2924 – red
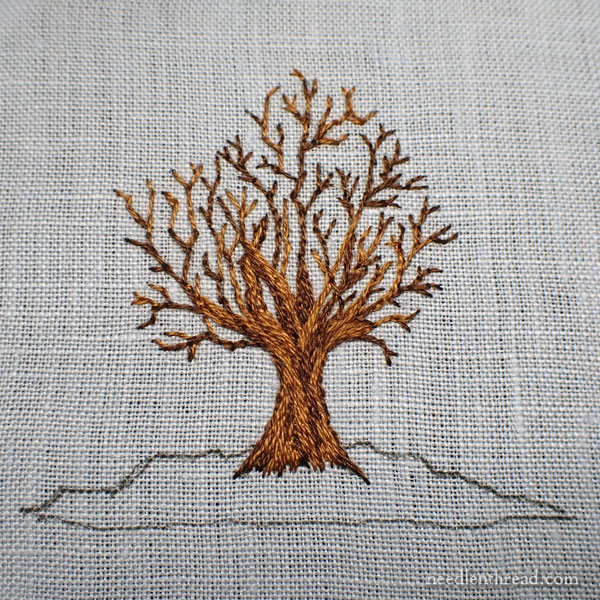
By the time you finish last week’s lesson, you should have a bare tree. If it doesn’t look perfect, don’t worry about it.
When I look at this trunk and branches, I see many things I could have done differently, but I also know that I’m going to cover up a lot of this with leaves, so anything I don’t particularly like isn’t going to be that noticeable. I’m pleased with the overall shape, and that’s what matters here the most.
(A note about fabric: I stitched many samples of this project and photographed them along the way. Every sample was different, and every sample was on a different type of fabric. The progress photos I’ve selected for this article are on a different ground fabric than the fabric included in the kit. These were the clearest photos, because this much duller fabric photographed better for me. Please don’t be confused by the difference in the colors of fabrics. The threads are all the same.)
Cutting the Silk Thread
The silk threads in the kits are provided in one meter lengths. A meter equates to just short of 40 inches. You will not use this much thread – or even half this much thread – for any of the silk except the green.
When you cut your piece of thread provided in the kit, cut each meter length into thirds. Each third will equal around 13″ long. This may sound very short for a piece of embroidery thread, but it is a good length for working with spun silk.
Because spun silk is a soft silk, it’s best to work with short lengths of thread so that you aren’t embroidering with thread that becomes dull or fuzzy as the thread wears down.
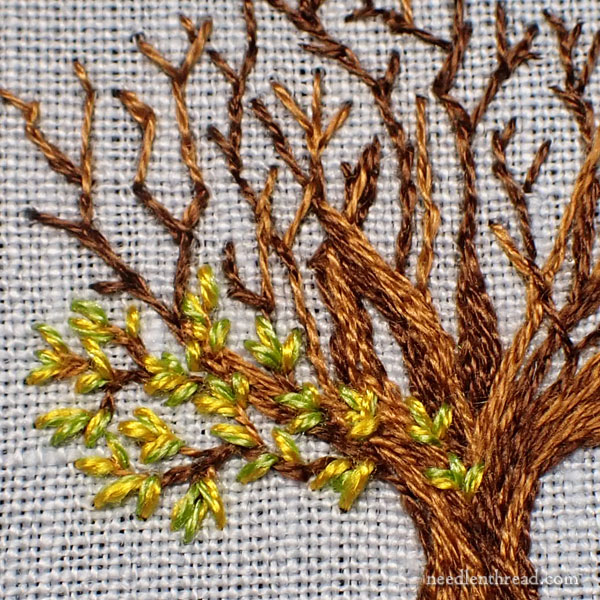
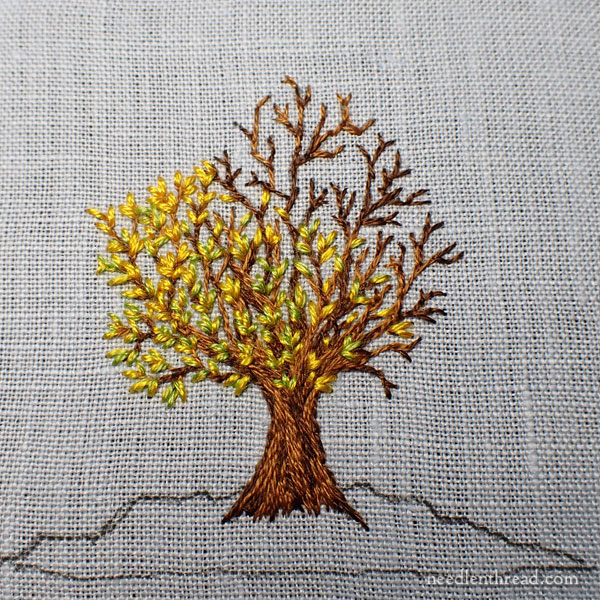
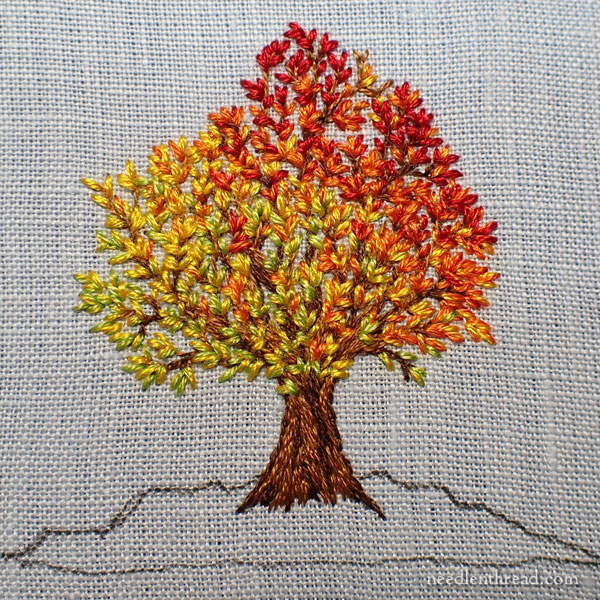
We’re going to start the foliage on the lower left portion of the tree. Imagine an autumn tree that’s not quite completely through its color change, and that’s what we’re going to try to accomplish.
We’ll start with some green that’s mixed with yellow. Use one strand of C and one strand of D in your needle at the same time. Will call this combo C-D.
The leaves are simply straight stitches, about a scant 1/8″ long. Try to give the impression of leaves that are “round” rather than “long.” If you make the straight stitches too long, the leaves will look too big (and long) for the tree.
You can definitely vary the length of the leaves, fitting in some smaller and some slightly larger leaves, but most of my leaves were in the 1/8″ range, sometimes just slightly under, but rarely over.
Group the straight stitches in two’s and three’s for the most part. Occasionally, to fill in along or over a branch, you might have more than three grouped together. And occasionally, on a branch or at the tip of twig, you might find that one stitch suffices.
Notice that I’ve stitched on the branches and at the top of the trunk area, too. Feel free to cover up parts of the heavier branches as you add leaves. Stitch your bunches of two’s and three’s right in the center of branches, or off to the sides (but still on) branches.
Normally, the stitch direction should follow a natural growth direction. Think of the beginning of the branch or the twig (where it comes off the tree or off a larger branch) as the growth origin, and slant your stitches more or less towards that direction. Sometimes, it may make sense to point them in another direction but for the most part, they’re going to “point” towards the origin of growth for the branch or twig.
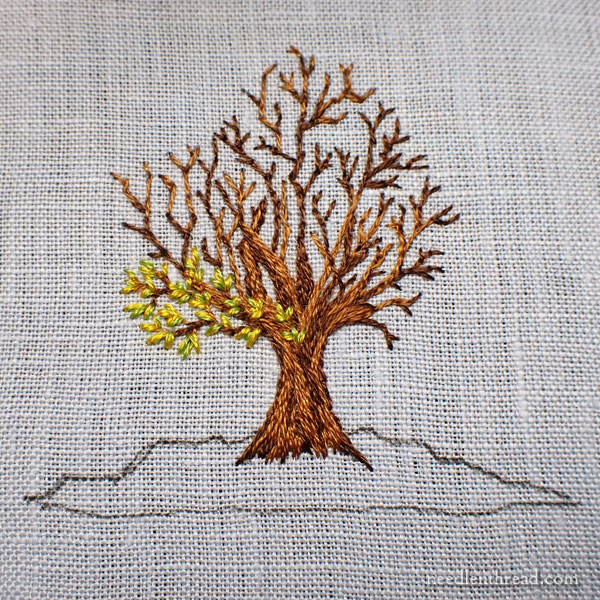
If we step back from the tree, this is what it looks like at this point.
Parking Unused Thread
Now, we’re not necessarily finished completely with the C-D combo. We will likely work in a few more C-D stitches in a bit. But I want to move on to the next color.
If I still have some C-D in my needle, I want to save it for later. To do this, I bring the thread to the front of the fabric somewhere out of the stitching path (maybe bring it up in the hillock below the tree), to keep it out of my way, but to allow my to go back and use it up a little bit later.
This is called “parking” your thread. As you move from color to color, if you have usable thread remaining on your needle, park the thread out of the way by bringing it to the front (so it isn’t getting tangled in the back), out of the way of your stitching path.
Later, when you want to touch in a little more of that color combination, you can pull the thread to the back, thread your needle, and stitch with the remaining thread.
Note: The green is the least used color on the tree. I only used two or three separated strands out of the seven, from one third of the meter, in green on my tree. Go easy on the green on the tree, because you’ll need the majority of the rest of the green for the grass. Don’t use more than three strands out of one-third of the whole meter.
The next color is D-D. That’s two strands of yellow in your needle.
In the same manner for stitching the leaves, fill in a little bit of D-D within the C-D branches, and then move further upward on the tree with D-D. You can also stretch the D-D leaves over the lower right side of the tree.
As you fill in leaves with D-D, remember to stitch next to and on the branches, over the twigs, and so forth.
If you have leftover C-D, this is when you should pull in some green and yellow stitches into the D-D area as well.
This will help create a more natural, gradual color change. Otherwise, your tree may end up, visually, having very distinct chunks of color.
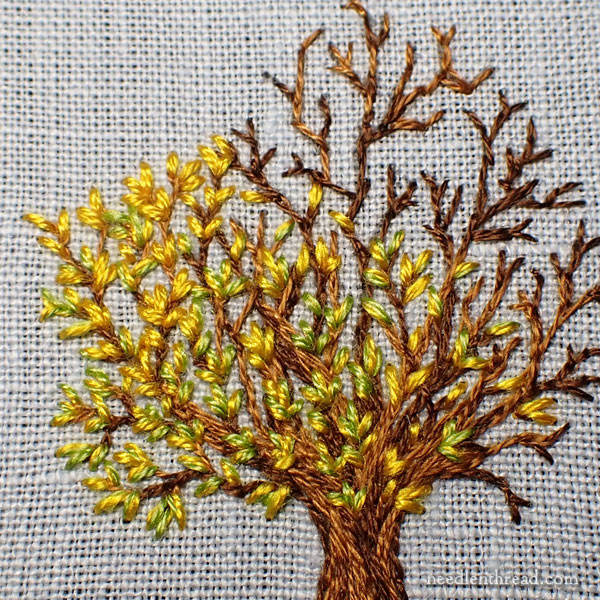
Stepping back from the tree, this is where we are, with colors C-D and D-D.
It looks like the tree is almost full, but there is still plenty of room for more color!
We’re going to follow this process of adding a new blend, bringing a little bit of the new blend into the previously stitched area and bringing a bit of the previous blend into the newly stitched area, to fill the rest of the tree.
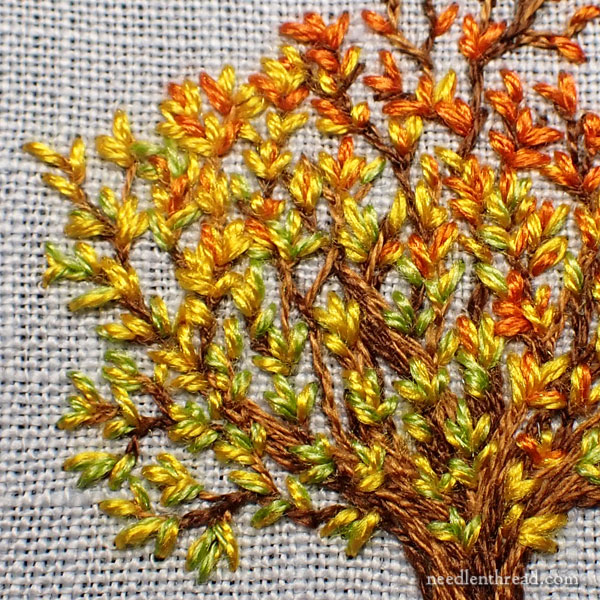
The next blend is D-E (yellow and burnt orange). Work a very few stitches in the C-D area, a few more stitches in the D-D area, and then a better coverage of D-E above the D-D area.
You can pull in a little bit of D-D to the new D-E area, scattering in the D-D here and there. If you still have any C-D parked on your project, you could pull in a couple stitches of C-D into the D-E area as well, but it isn’t necessary. Still, if you have some leftovers, it doesn’t hurt!
Then, switch to E-F, which is burnt orange and bright orange in the needle at once, and follow the same routine.
Stepping back from the tree, here we are.
At this point, we want the tree to develop a good head of orange and red, so you don’t need to pull too much yellow (D-E) in. Just a little bit!
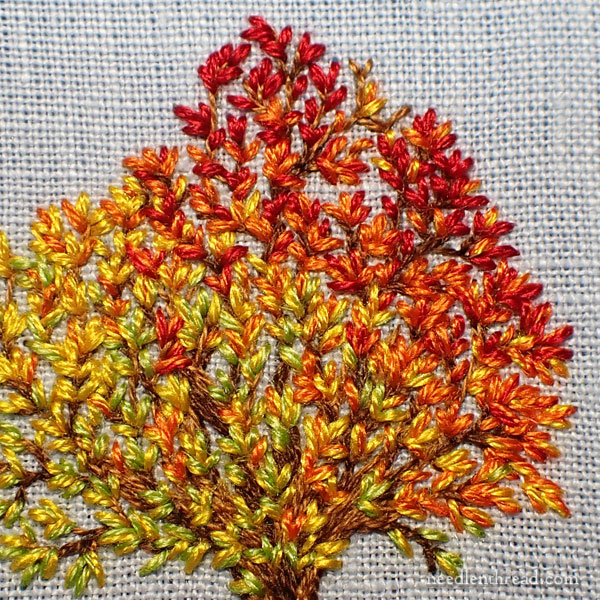
Now, it’s F-G in the needle (bright orange and red), followed by G-G (two strands of red) at the very tip of the tree.
Notice that I pulled a tiny bit of yellow up to the top of the tree – just a couple randomly placed stitches. I also left a twig or two bare at the top of the tree.
Stepping back, here we are!
Squint
As you’re working along with this, it doesn’t hurt to pull the embroidery a good arm’s length away and squint when you look at it.
When you squint, you’ll get a better idea of whether your colors are blending into each other and overlapping, or whether they’re blocking themselves off in chunks.
The key is to avoid obvious chunks of color. Even at the top of the tree, where red dominates, there should be a hint of that bright orange in there. And the middle parts of the tree should have tiny bits of orange and red touched in, as well.
Mmmmm mmmmm mmmm. I do love fall foliage!
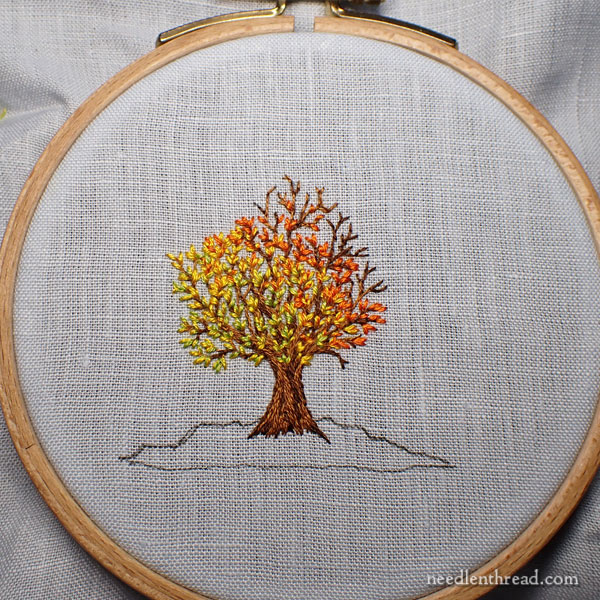
The tree will look even more vibrant on the blue fabric that’s included in the kits.
This is the version that I worked on on the kit fabric:
It’s a little more sparsely stitched, and the color gradation to the orange-red happened more quickly on this particular version. Later on, you’ll see a better photo of it, finished in the frame. But it gives you an idea of the vibrance of the blue that typifies an autumn sky.
Coming Up
For members on Patreon, you’ll find the downloadable PDF for this installment of Autumn Fire available a little bit later today.
In the next installment of Autumn Fire, we’ll stitch the grass, and then it’s just a matter of finishing for framing. It’s a quick little project!
We’re packing up the studio right now, still awaiting the completion of some construction work at our new location but trying to get everything sorted so that when we can finally move in, it’ll be as quick and painless as possible.
Anna and I are both plugging away on goldwork, too. She’s a bit farther ahead than I am. I’m trying to get the next Stitch Snippet finished and ready to go for you, too.
And we are still waiting some kit components for Autumn Fire, for those waiting for kits. When they arrive, you’ll be the first to know!
Hope your week is going well!
Really enjoying this project, so lovely and a great result for such a quick project. Also, really love the advice to squint – such a brilliant idea to test the blending of colors! Hope your move is smooth and painless.
I’m wondering which needle is best to use with the silk thread? I’m sorry if it’s already indicated in the instructions, I can’t seem to find it there.
Both needles in the kit can be used with the silk. Since you’re working with two strands, though, I’d use the larger of the two.
I found it helpful to stitch the grass before the leaves. That way I knew I wasn’t going to run out of green thread, and I could just pop a few leaves onto the grass as I finished stitching a particular color of leaf in the tree.
This is SO beautiful. But I’m a sucker for gorgeous fall colors…
I have an old smocking project I wish to frame after adding a fall tree on it with some leaves. Do you have any ideas of how I can do this to the smocking piece? Thanks, Pam