


Let’s have a little bit of fun with an embroidery stitch today, shall we?
It’s been a while since I’ve done a Stitch Fun! tutorial here on Needle ‘n Thread, but we’ve got some exciting plans for stitch tutorials for 2026, so I thought I’d start playing with stitches a bit to prepare for that.
For those who don’t know, Stitch Fun! is a series of embroidery stitch tutorials here on Needle ‘n Thread, wherein we explore various approaches to stitches, composite stitches, and stitch combinations, just for the fun of it!
Included in the 2026 plan is the addition of a collection of “Stitch Printables” available for members of the Needle ‘n Thread Community on Patreon. I’ll be sharing the step-by-step tutorials as handy downloadable and printable PDFs for members. If you’re a member, you’ll find an expanded version of today’s tutorial available as a downloadable PDF.
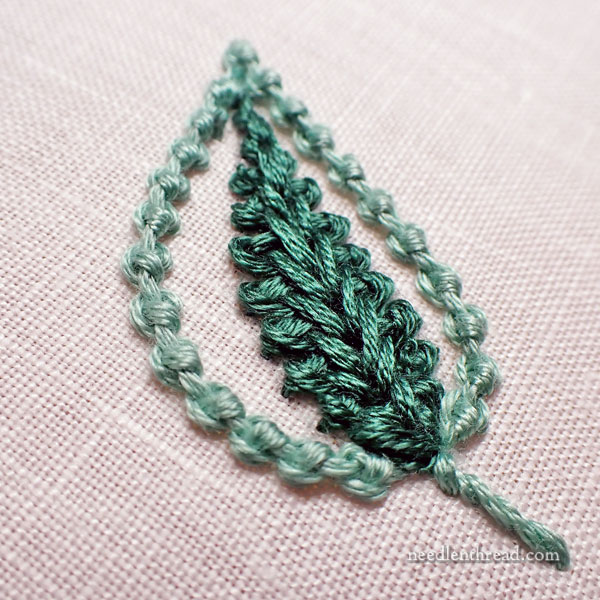
This particular stitch request came from a reader who sent in a screen shot of the end result of a video, asking me if I know what stitch was used on the leaf in the image. Ironically, it was the third request for the very same stitch!
The video they saw apparently moved along at a rapid clip, leaving them a little lost in the progress steps.
So they asked the same thing: do you know what stitch this is? And can you tell me how to do it?
Well, you’re in luck – I happened to recognize this particular stitch.
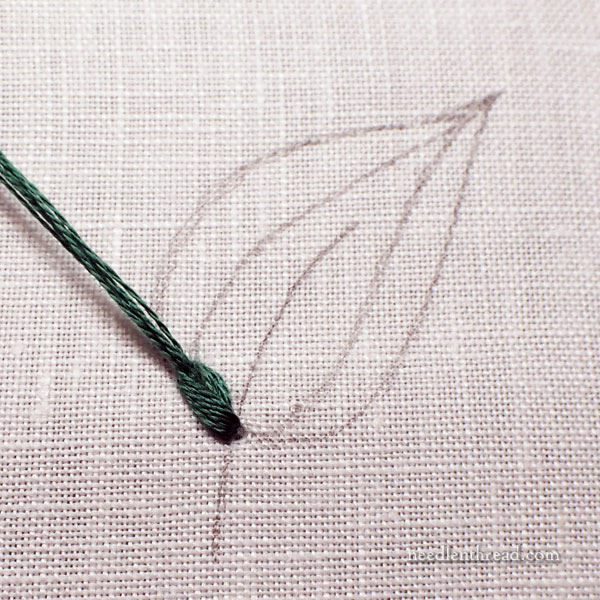
I broke out a piece of scrap linen and some thread. Linen is pretty much my go-to fabric, because it’s forgiving, it’s lovely to stitch on, and I have a lot of scraps!
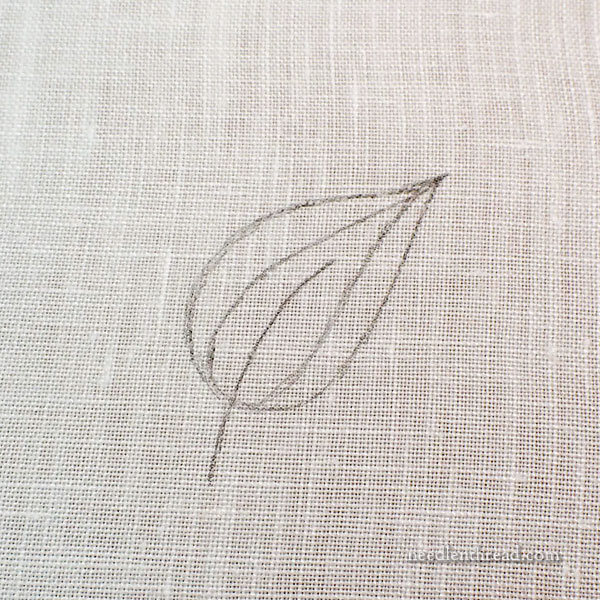
For this tutorial, I drew a leaf free-hand onto the linen, using a mechanical pencil. The leaf is about 1 7/8″ long (from tip to the end of the stem), and about 7/8″ wide at the widest part.
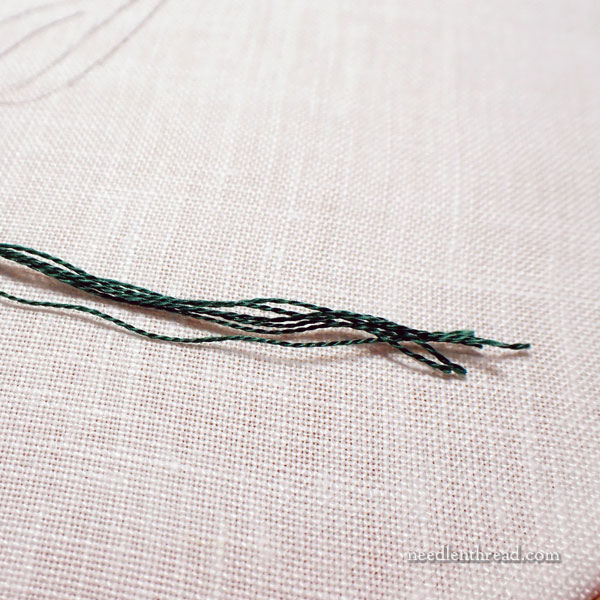
I’m using DMC stranded cotton – all six strands, which I’ve stripped and put back together (you can read about that here) – and a #5 needle.
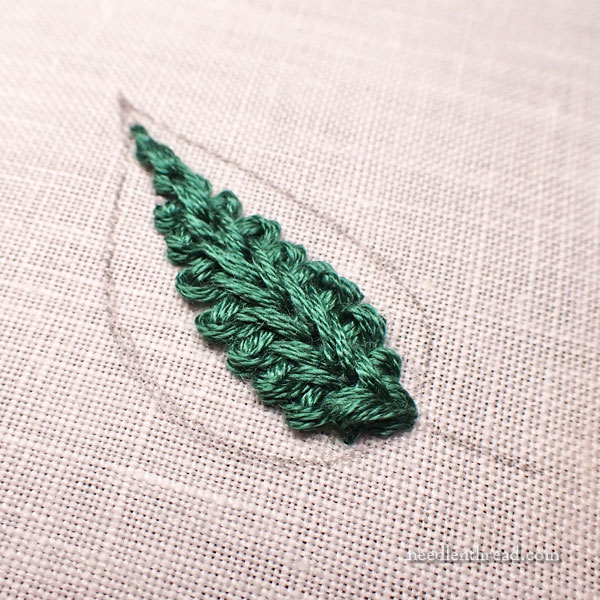
I’ll be filling the area between the inside double lines of the leaf with Spanish Knotted Feather Stitch, worked very close together.
If you are not familiar with Spanish Knotted Feather Stitch, you will find a video tutorial for it here. In the video, the stitch is worked “open” – that is, it is spread out. The video will help you understand the general movement of the stitch.

Begin at the center base of the leaf, bringing your needle and thread to the front of the fabric.
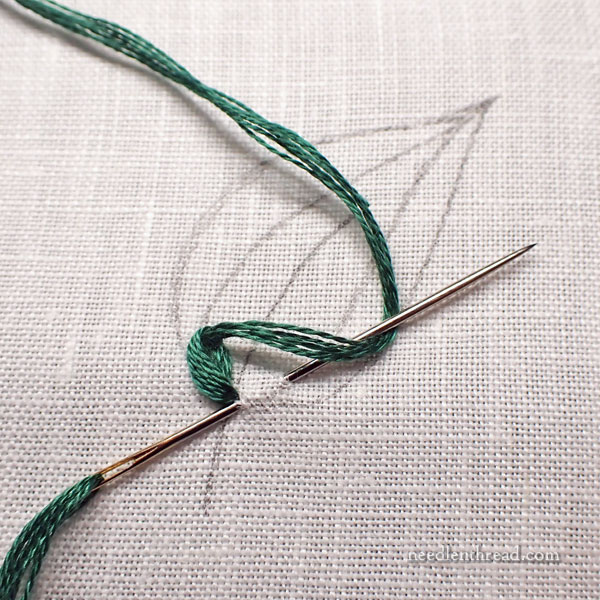
There’s a slight modification in the start of the stitching, due to the fact that we’re filling a leaf shape. The start will be slightly different from the “open” version of the stitch.
So I’m beginning with a barely twisted chain stitch.
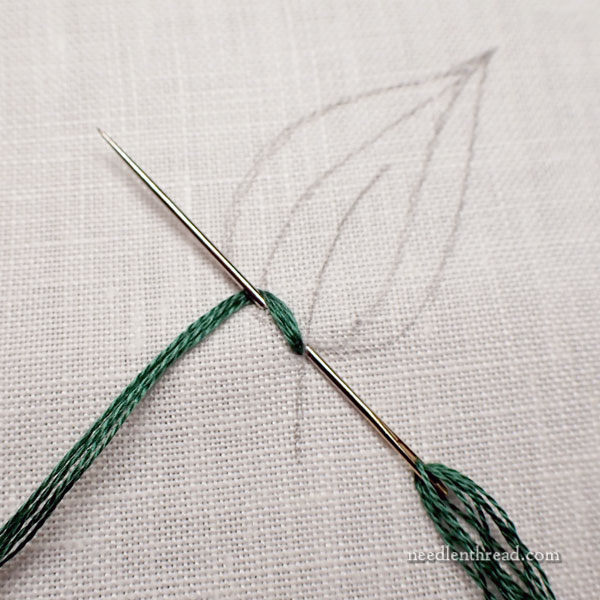
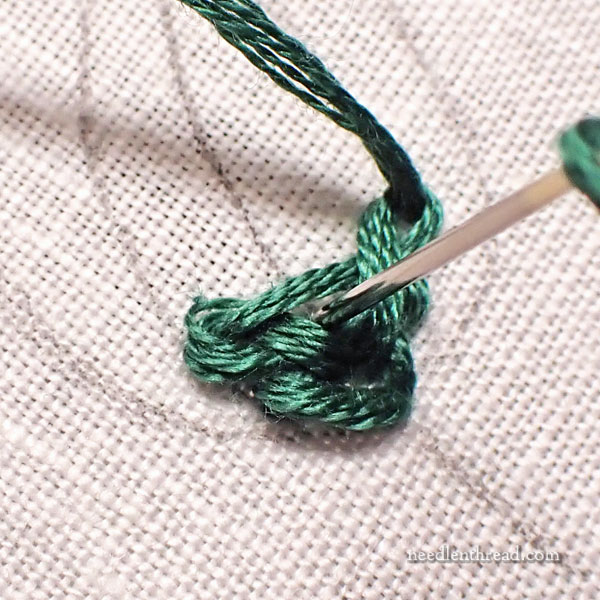
Take your needle down into the fabric just to the very right of where you emerged with the working thread to begin the stitch, and scoop up a stitch-length of fabric (in this case, about 1/4″, maybe slightly less). The stitch should extend up the outside design line of the area we’re filling, as shown in the photo above.
Pass the working thread over and under the needle, in the configuration in the photo.
This is how you achieve a twisted chain stitch, although usually a twisted chain stitch is a little more pronounced because those ends are not as close together as they are here.
Pull your needle through to tighten up the chain stitch, as shown above.
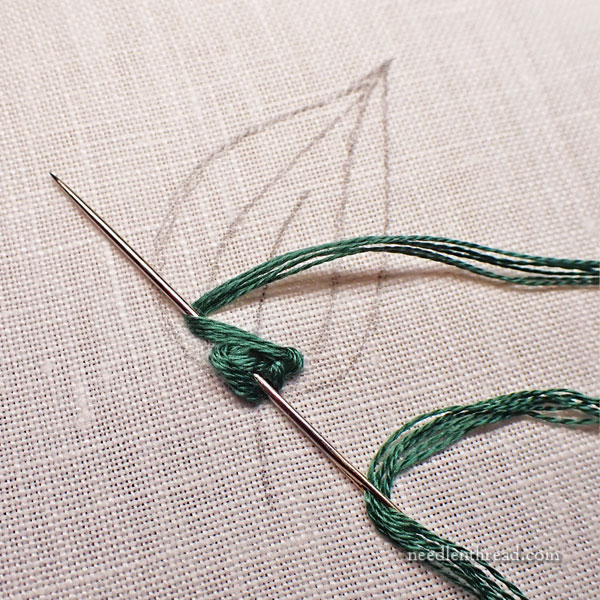
Now, you’ll create the same configuration with your needle on the opposite side of the base of the leaf, and then you’ll bring the working thread across the needle and wrap the working thread under the needle, as shown above, to make a twisted chain stitch.
This will also create a kind of horizontal stitch across the width of the leaf shape, when you pull through to make the next twisted chain.
So pull through to tighten the stitch, just as you did with the first twisted chain.
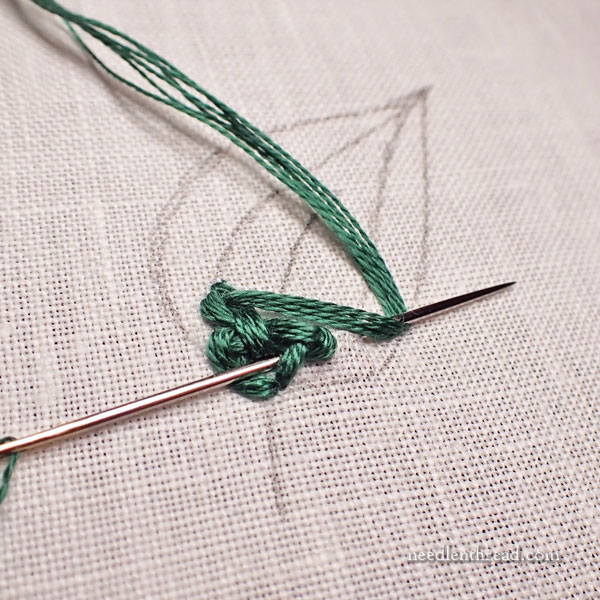
Now it’s just a matter of working your way up the leaf shape, alternating from side to side just as you did with the first two stitches.
You’ll take your needle down into the fabric on the center line of the leaf, below the horizontal stitch that formed in the last movement, and in the little “V” or elbow that the two chain stitches formed.
Keep reading – you’ll see this clarified again below!
Scoop up enough fabric to make the next stitch, coming out on the outer design line just above the previous stitch on the left side, as shown above.
Then pass the working thread to the left, over the needle and then under it, as shown above.
Pull through to tighten the stitch.
Take the needle down into the center, where you just started that last stitch on the left, and this time, work the same type of stitch out to the right, passing the working thread over from right to left, passing over the needle and then back under it, to form the twisted chain.
In the photo above, you can see where the needle is going down into the fabric for the third pair of stitches.
The entry point is on the center line of the leaf, below the horizontal part of the last twisted chain stitch, and kind of nestled towards the base of the “V” formed by the previous two stitches.
From here, scoop up your fabric to begin the next stitch on the left.
Continue up the leaf in this manner, working alternately from side-to-side, until the leaf is full.
When you get to the tip of the leaf – or close to it – just end your last twisted chain by working a holding stitch over the twisted chain right at the tip of the leaf.
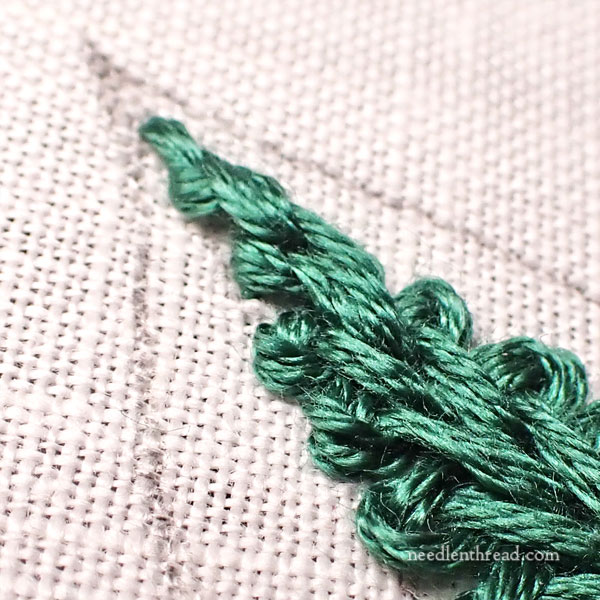
This is the same way you end any chain stitch, but you may need to make the holding stitch a little longer than normal, to fill up to the tip of the leaf shape.
In concept, this filling is relatively easy, as you are simply alternating from side to side, working twisted chain stitches up the center of the leaf, beginning each twisted chain on the center line, inside the triangle formed by previous stitches.
You’re somewhat restricted to the width you can make the leaf that you want to fill. The side stitches can get rather floppy if your leaf design is too wide. The chain stitches won’t hold themselves in place well if there’s too much distance between the sides of the leaf.
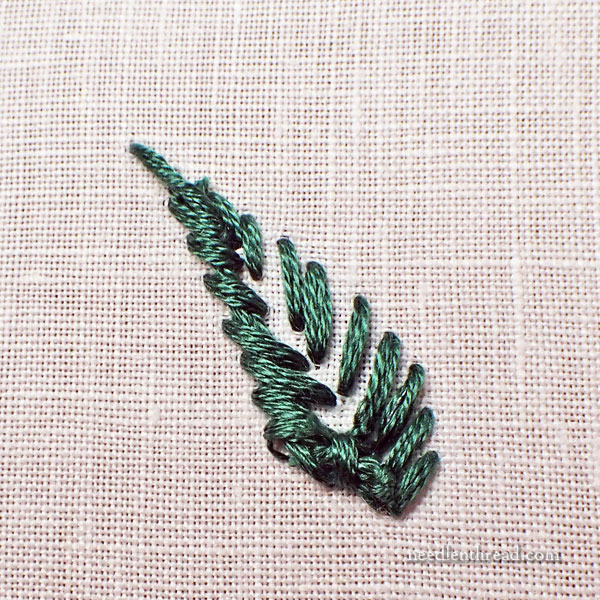
This is what the back of the stitch looks like, for those who want to know.
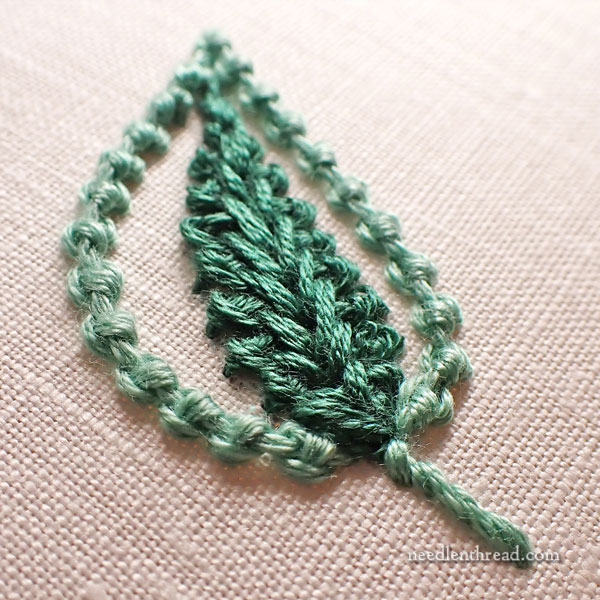
To fill out the leaf, I added an edge of Palestrina stitch. The texture plays well with the texture of the Spanish Knotted Feather Stitch.
The stem is simply stem stitch.
This approach to filling a leaf shape would look great in any heavier thread on a larger leaf. The finer the thread, the less definition the stitches will have (and the smaller the leaf must be). I think this approach works well on large, bold elements, but would not work as well on smaller, delicate leaves.
For more Stitch Fun tutorials, feel free to visit the Stitch Fun index, which you’ll find listed under “Tips and Techniques” in the main menu.
Happy Wednesday!
Mary,
Thank you so much for explaining this lovely stitch with the long name. Your version looks exactly like the mystery picture and the Palestrina border is a wonderful addition. I am excited to go grab out my needle and give it a whirl! Another enjoyable post! 🙂
I’ve been away for awhile. I love the pdf I received as a Patreon member. I used to copy and paste into a Word document which wasn’t very fun. When trying a new brand of floss I buy two or three greens for a leaf to see if I like it before buying more colors so I was thrilled with the pdf format and the design both. Thank you
Hi, Sandra! I’m so glad you like that feature! We have more of it coming in 2026!
Thanks much for this. I was trying to do this, and had my overs and unders backwards, big mess. This fixed it.
I absolutely love this! Thanks so much for such an amazing explanation!
Hi, Thank you for your very helpful stitches.
I used to embroidery stitch as a child. I am now 76!!!!
I had some mental issue’s over the last few years, and one day thought what did I love to do as a child, so here I am
doing embroidery like there’s no tomorrow.
But I am disappointed as I am certainly not that great!!! As a child I did win awards at local show in Aust.
I am now in New Zealand.
Could you recommend how I can improve my stitches, and what is a great book to purchase??
I have Sue Spargo books, A-Z books. Find the SP books hard to follow.
Colleen in New Zealand.
I think the A-Z books are an excellent choice!!