

Good morning, happy Monday, and welcome to Lesson 2 in our Blackberry stitch-along, in which we stitch the leaves.
If you are a member of the Needle ‘n Thread community on Patreon, you have received this lesson last Friday, in a handy downloadable & printable PDF format. If you haven’t picked it up yet, hop on over to the community page on Patreon.
If you are just joining us in this series, you can find previous articles for this project in the Project Index here on Needle ‘n Thread.
There is a LOT of information in this lessons, so we will dive right in. Please remember to read through the instructions completely – at least once – before you begin!
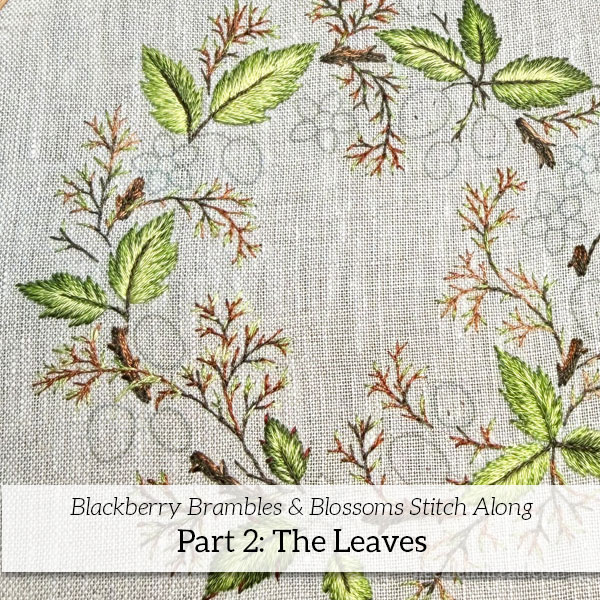
The leaves on BB&B are embroidered in long and short stitch using all three shades of green: 472 (light), 470 (medium), and 936 (dark); 154 (dark plum) and 498 (dark red) for accent stitches on the leaves, and 3021 (dark brown) for some of the veins on the leaves.
The leaves are worked in long and short stitch (more or less – it’s a simplified approach), with either two threads or one thread in the needle at a time. You can make your own choice between two threads or one thread, but note that all the leaves on my samples start with two threads in the needle. We will discuss why below.
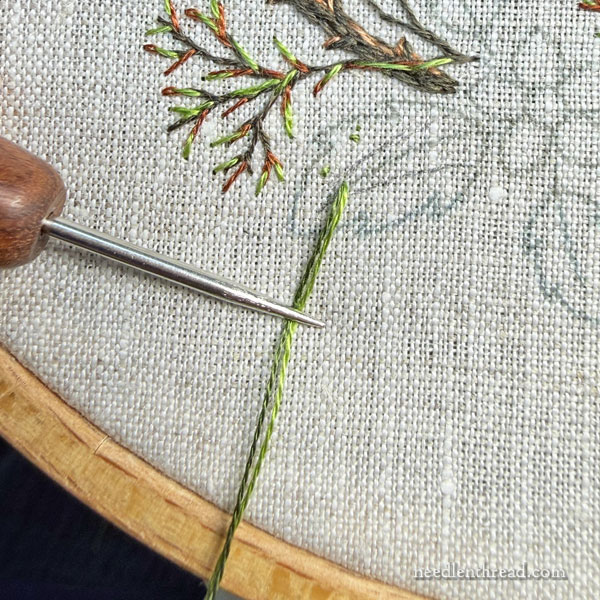
Because all the leaves begin with two strands of floss in the needle, it is very helpful to have a laying tool or similar on hand to keep the threads parallel to each other for each stitch. The shades of green stay a little more distinct if you can manage parallel threads when stitching with two strands in the needle at once.
If you don’t know how to use a laying tool, this video tutorial will help you out. If you are a looking for an affordable laying tool, this mini awl works great.
I started with a large leaf in any cluster on the wreath, using one strand of dark green and one strand of medium green in the needle at one time.
I sketched in some extra lines in the center of my leaf, on each side of the vein. This is so that I remember to cover at least that much of the leaf with this first layer of color. Those lines are not entirely necessary, but if you are just starting out, it can be helpful to have guide lines at first. Use a pencil (I use a .05 mechanical) to sketch in any extra guides you might want or need.
For the first layer of color on each leaf (the outer layer of color on the leaf), bring your needle UP inside the leaf to start all your stitches, and take your needle DOWN on or just a hair over the design line. I always try to make sure that, when I’m going down on the design line, I’m covering that line completely.
With this fabric, and using two strands in the needle, I do not find it necessary to split stitch around the outline of the leaf to get a clean edge. In fact, you don’t need a perfectly smooth edge on these leaves, but you’ll get a smooth enough edge, anyway, with two strands.
You can see that I’m using a laying tool to keep the threads parallel as I prepare to take the first stitch.
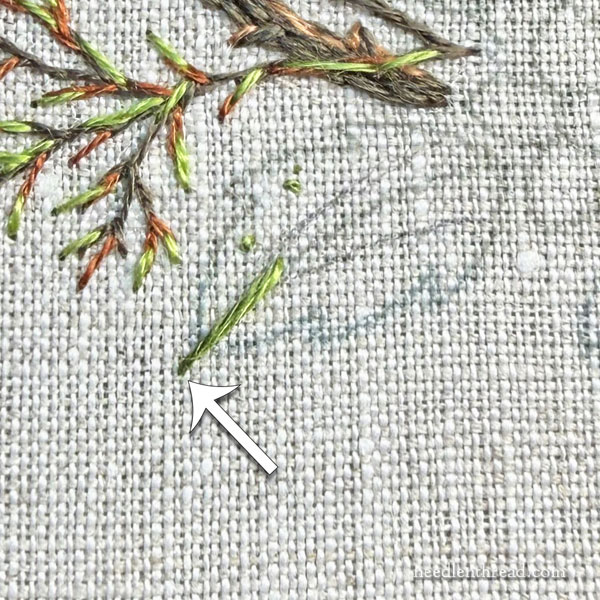
This first stitch covers about 1/3rd the length of the leaf. Notice how long it is, and notice that this stitch at the very tip of the leaf extends well beyond the design line that marks the tip of the leaf.
If you want your leaves to have nice, sharp tips, extend this first stitch about 1/8″ beyond the design line at the tip of the leaf. If you end the stitch right on the design line (like all the stitches next to it), your leaf will look blunt.
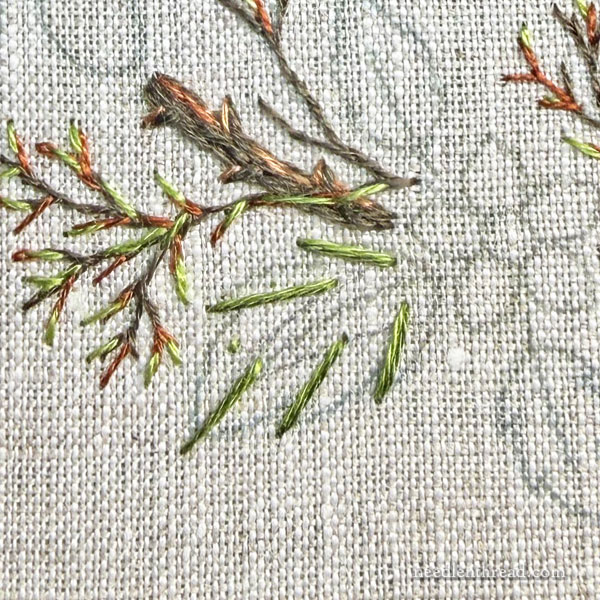
Start by stitching in what I call “directional” stitches. The stitch direction on a leaf should be towards the “growth point,” for this type of embroidery. The growth point on a leaf is the center base of the leaf, about where you imagine the stem would be connected.
Work around the leaf and stitch in these long, straight lines. I worked them where the sharp jagged “barbs” on the sides of the leaves are located.
These stitches will help me keep the slant on all my other stitches consistent.
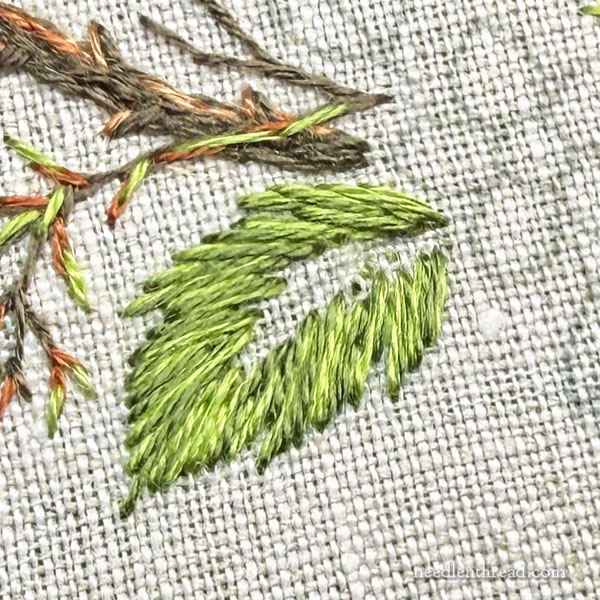
Now, still working from inside the leaf to the outside edge to complete this outer layer of color, fill between the directional stitches to create the first layer of color. Try to keep the direction consistent. Occasionally, you may have to “sneak” a stitch in to fill a gap where you might have to shift direction slightly. This won’t be noticeable once the second layer of color is added.
You don’t have to obsess over an actual “long and short” pattern here. Some stitches can be longer than others or shorter than others, but it doesn’t have to be a precise long-short sequence. That will come more into play in the next layer of color.
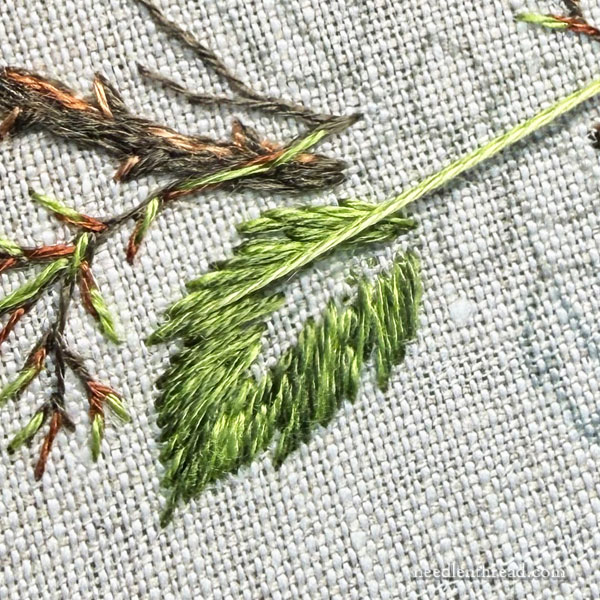
Now, switch to one strand of medium green and one strand of light green in the needle.
For the second layer of color, this is where the long-short sequence matters most.
Begin some of the stitches closer to the outer edge of the leaf, coming up underneath the previous stitches and splitting into them, and then taking the needle down on the center vein line.
These stitches that originate near the outer edge will be your longest stitches.
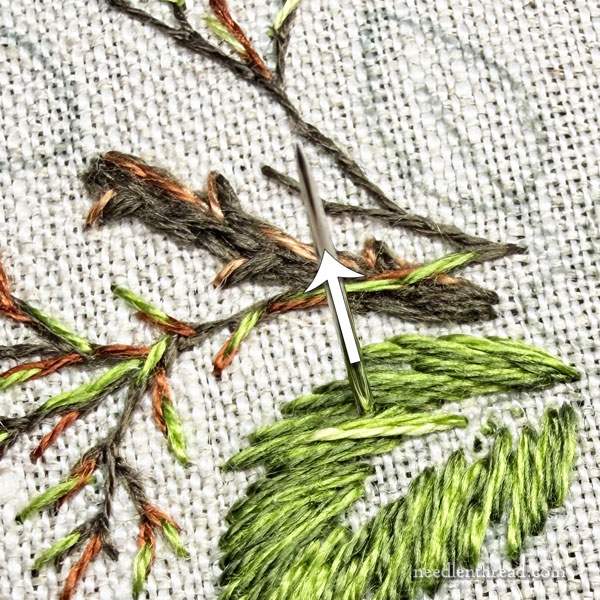
Vary the length of your stitches, always ending on the center vein for this layer, and beginning your stitches at various lengths, so that the beginnings of stitches do NOT line up next to each other.
If the beginnings of the stitches on the second layer line up next to each other, it will form a visible ridge of color and the colors won’t blend well.
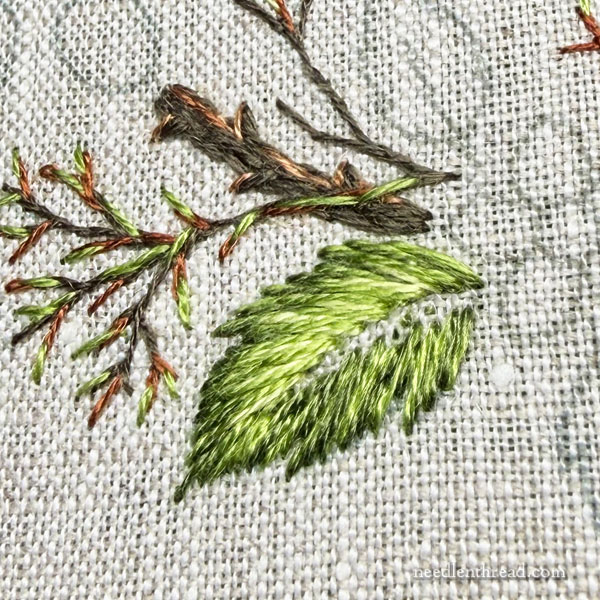
As you fill the second layer of color to the center vein, try to maintain the original angle or slant of the first layer of stitches.
Finish one half of the leaf and then work the opposite half.
When you are finished with the leaf, switch to one strand of dark brown and work a stem stitch line down the vein.
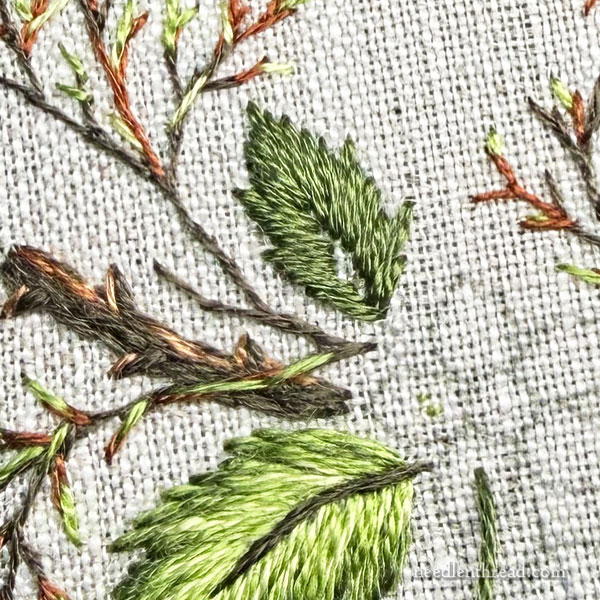
On the smaller leaf here in the sample above, I began with two strands of the darkest green in the needle.
Because it is a small leaf, I ended up filling most of the leaf to the center vein line. There is a small gap where I worked one or two shorter stitches that didn’t cover to the vein line – this doesn’t really matter, as it will be covered, but just note that on some of the small leaves, it might be easier to work the first layer of color to the center line of the leaf.
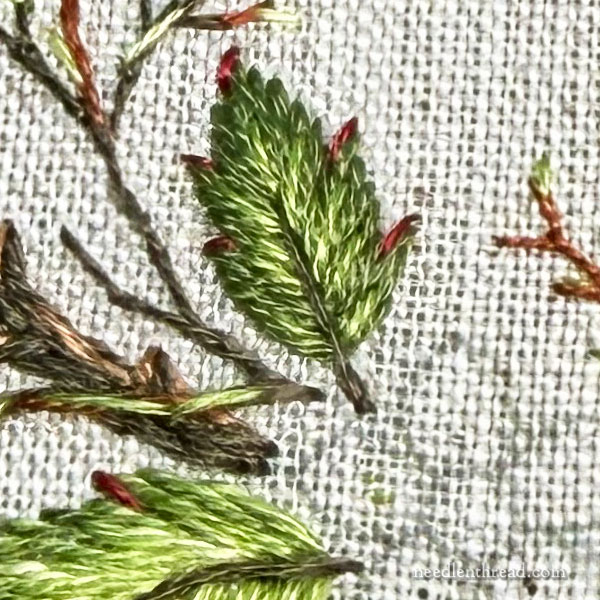
Then I switched to one strand of dark and one strand of medium in the needle, and I worked in the second layer of color.
This layer is scarcely worked – I didn’t have to solidly fill with it, as I did with the bigger leaves. Instead, I just “sketched in” a few longer stitches, originating near the outer edge and coming down on the center line of the leaf, and maintaining the original angle of the first layer of stitches.
Then, I switched to one strand of dark brown and worked the vein in stem stitch.
Finally, for all the leaves, switch to one strand of dark red or one strand of dark plum and work small straight stitches in the little jagged “cuts” on the sides of the leaves. You can also add a tiny stitch at the tip of the leaf, too, on one side or the other.
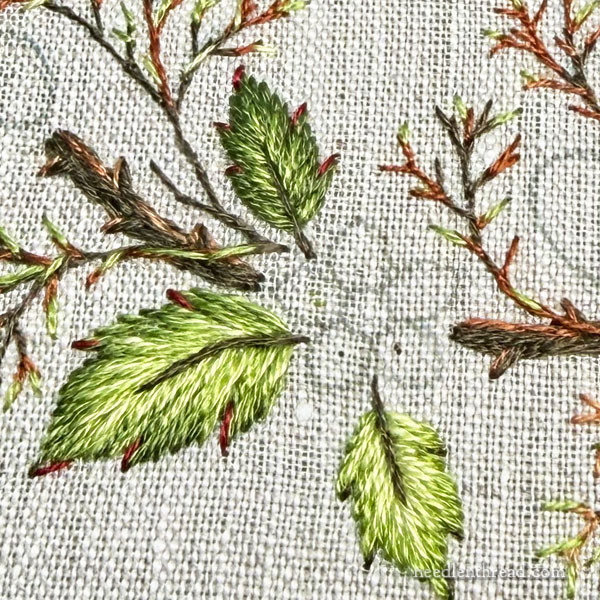
For the lower leaf in this cluster above, I worked the outer layer with one strand of medium and one strand of light green in the needle.
The second layer of green is ONE strand of light green in the needle.
One or Two Strands on Second Layer
On the largest leaves, using two strands in the needle for the second layer of color will help you fill the leaves more quickly.
However, I found that two strands for the second layer on the smaller leaves was really too heavy. I had consistently better results on my smaller leaves when I used one strand for the second layer.
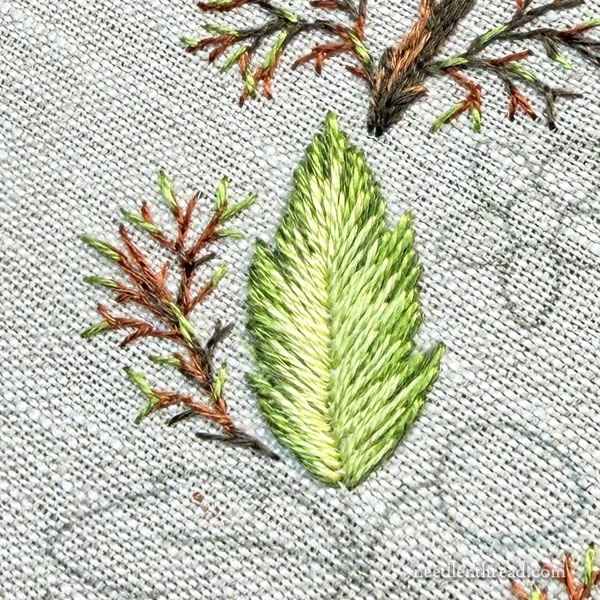
On many of the larger leaves, I also only used one strand for the second color. The leaf above is an example of that. The lightest green in the center is worked with only one strand. It took longer to stitch the leaf, but overall, the leaf is much smoother, with a brighter, almost glowing green.
Notice, too, that some of the long0-short pattern isn’t perfect, and that here and there, the angle of the stitch might be slightly off, when viewing up close. Don’t sweat over this. Pull your work back a distance (at least three feet) and look at it. If you don’t notice anything amiss, it’s likely just fine!
For all leaves, I used two strands for the first (outer) layer of color. This helped define the edge and fill the leaves more quickly.
Mix Them Up!
To achieve variety in the leaves, mix your greens up.
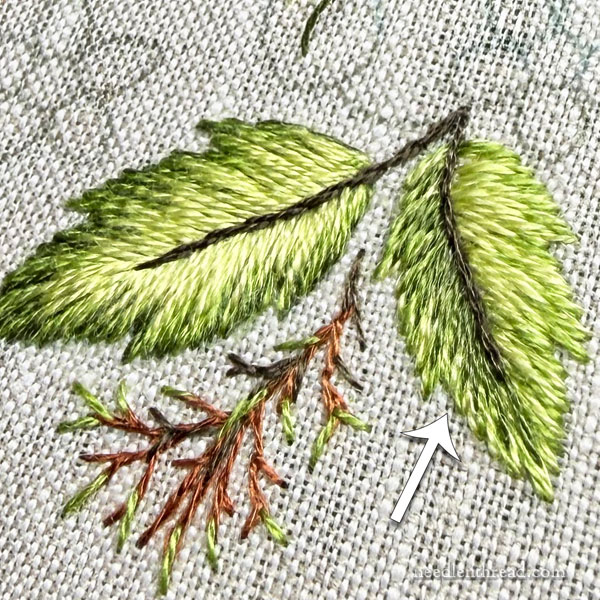
If you look at the leaf on the right, above, the outer edge of the leaf (first layer of color) is one strand of light and one strand of medium in the needle.
The inner, second layer of color on the RIGHT side of that leaf is the lightest green (one strand).
The inner, second layer of color on the LEFT side of that leaf is the darkest green.
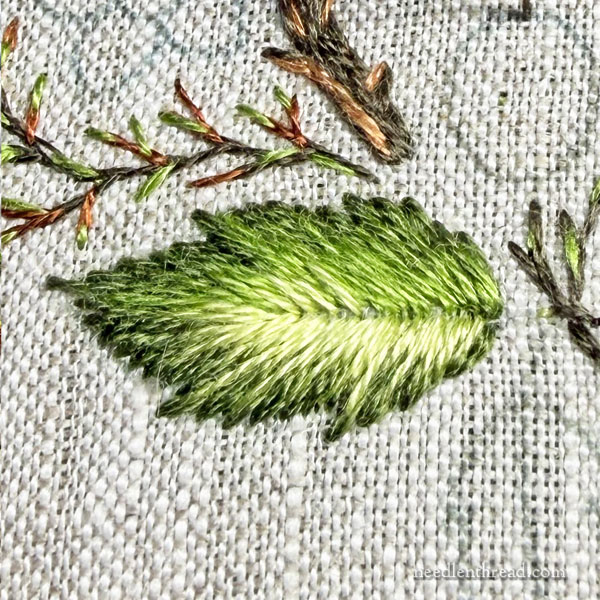
On the leaf above, the outer layer is one strand of dark, one strand of medium, around the whole leaf.
The second, inner layer on the top half of that leaf in the photo is medium green (one strand). On the bottom half of the leaf, the inner layer is the lightest green (one strand).
Then, I took the lightest green and I worked about 4 stitches in the top half of that leaf, to the left towards the tip. You can see them in the photo above.
So right there, I have three layers of color – I just “sketched in” four stitches in the lightest green, spaced apart from each other, to bring the lightest green over the inside of that part of the leaf.
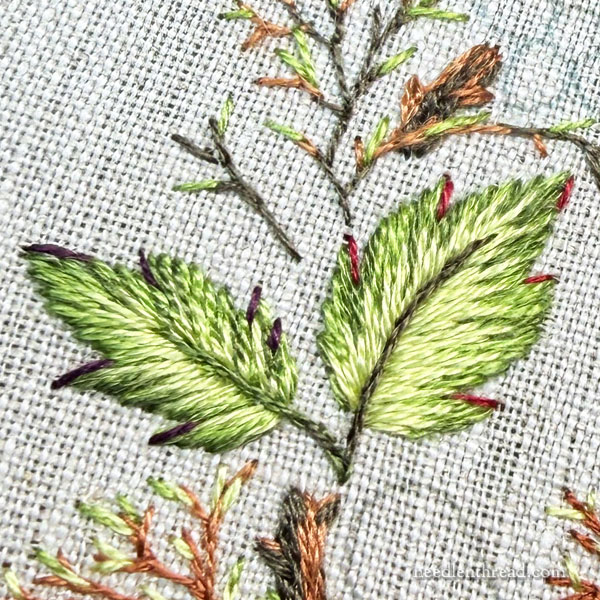
On all the leaves, use either the darkest green or the dark brown (one strand of either) to work the center veins in stem stitch. The leaves above have dark green center veins.
And then, on all the leaves, use either the dark plum or the dark red to add the little straight accent stitches at the jagged cuts on the sides of the leaves.
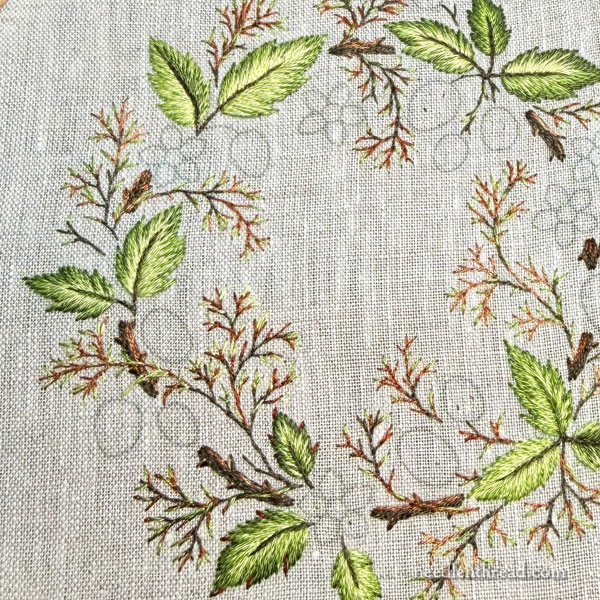
Work your way around the wreath, filling the leaves.
Balance
Try to keep the notion of balance in mind.
If you end up stitching some very dark leaves only in one spot on the wreath, the eye will be drawn to that area of the wreath. So try to vary the intensity of the greens around the wreath in a balanced way.
You want the leaves to look natural enough – you don’t want absolute uniformity among all the leaves – but you do want a sense of balance in shades across the overall image, so that the eye isn’t drawn to any one particular dark spot.
Looking for More?
You can find the previous installments of this project listed here in the Blackberry Brambles & Blossoms Project Index.
Later this week, we’ll be talking a bit more about transfer methods for embroidery designs. I’ll show you what’s up in the studio. And I’ll share some other project progress with you!
This is so pretty!
I’m wondering, realistically, is it possible to use a laying tool when you don’t have an embroidery stand, especially on such a small hoop? I’d really like to try this, but I’m not in a position to buy the kind of stand I’d like just now, and while I can make French knots work well enough without one, I have a hard time thinking through how to make a laying tool work for me.
I use a laying tool with a hoop held in my hand now and then, but it definitely isn’t the most convenient way to use one. Normally, they’re used when you have both hands free. Still, I will sometimes hold my hoop with my pinky and ring finger wrapped around it, while manipulating a laying tool with my thumb and index finger (forefinger).