


A laying tool is an instrument used in hand embroidery to help keep multiple strands of thread that are being used at one time, flat and parallel. It can be used for a number of stitches, but I use it especially for satin stitch when stitching with multiple threads. It’s also used extensively in Japanese embroidery (the tool is called a tekobari) to stroke flat silk, and in cross stitch and needlepoint as well. Pretty much any needlework technique that involves a smooth-lying stitch made from multiple strands of floss would benefit from the use of a laying tool.
The laying tool that I’m using in the following video is made from stainless steel. It’s got a perfectly smooth shaft that narrows to a sharp point, so the tool can be used effectively as a stiletto, too. You can find laying tools made of wood, bone, plastic, and metals of various kinds, and they all range in price, depending on what you’re looking for. And, for the stitcher who likes to accessorize (hey, who doesn’t like to accessorize?!), you’ll find laying tools that are decorated with beads, gold filigree, silver handles, carved handles, and on and on.
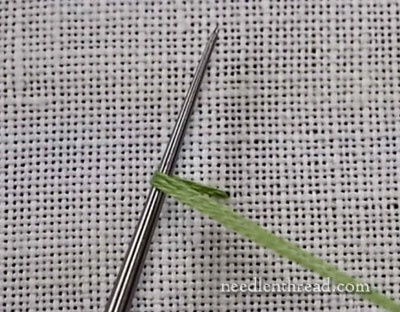
But, when it comes down to it, you can also just use another needle as a laying tool. It won’t be as comfortable and easy to hold, but it will work. Choose the largest needle you have in your supplies and use it in the same manner as you would a laying tool. The larger the needle, the more comfortable it’ll be to hold.
The one regret I have about the video below is that I was stitching from top to bottom of my work. It’s easier to use a laying tool when you stitch from the base of your work upwards, although this isn’t always possible. But if you’re working from the base upwards, keep in mind that you have less of a chance of gouging your previously worked stitches.
I hope you find the video useful, and that you enjoy the pleasure of beautifully finished stitches through the use of a laying tool.
For e-mail subscribers, please visit the tutorial on How to Use a Laying Tool on Needle ‘n Thread, if you’d like to view the video.
So what about you? Do you use a laying tool?
I’ll try not to bombard you with too many videos in the upcoming days. I’m getting a few sorted out, so I can do some cleaning up on the website over the upcoming holidays. I hope they don’t bore you! But don’t worry – I’ve got some other stuff coming up as well… including my favorite subject – Thread Talk!
Enjoy the weekend!
Looking for inspiration & information on hand embroidery?
There are all kinds of reasons to sign up for the Needle ‘n Thread daily newsletter! Check them out and sign up today!
If you like what you see on Needle ’n Thread, if you want to be a part of keeping the website thriving (and free of annoying network advertising), why not become a patron on Patreon? Check out my Patreon page here, where I’ll occasionally add special needlework bonuses for patrons.
If you shop on Amazon, you can support Needle ’n Thread without any extra expense to you by visiting my Amazon Recommendations page here, where you’ll find books and sundries for the needleworker available on Amazon.
Thank you for taking the time to produce that video.
Using a laying tool now makes perfect sense! I have never used one but I can certainly see how useful one can be.
Hello Mary,
I always use a laying tool. I learned it during my cours for Japanese Embroidery, and now I’m using it by almost every embroidery.
It is very usefull, if you have learned to use it, and the stitches are more smoother together (smoother is not the correct word, but I could not find a better word in English.Dutch is my native language)
anna
Hallo Mary’
Dank voor je mooie beelden en voorbeelden. Het lukt mij echter niet om de video voor naaldwerk te openen. Dat spijt me zeer. Riet
Hi Mary!
This was a great video! I have heard about a laying tool but never saw one or saw how it was used. Are these available for purchase in the embroidery section of a sewing/craft store? I have never noticed that particular tool!
I love your videos, I learn so much I feel like I am one of your students! Thanks for all of your work in putting these videos and information together.
Hi, all – Thanks for your comments! It’s a great little tool, isn’t it? It really does make a huge difference in multiple-strand stitching.
Cheryl – I don’t think you’d find one in local sewing / craft stores. I’ve never seen one there, either. If you have a local needlework shop, you’ll probably find one there. If not, you can check out different shops online and find a whole range of types. Nordic Needle, for example, has a large selection of all different types, decorative, plain, and so forth.
Thank you that is really helpful…always wondered what those long tools were used
for other than cratching your head that is LOL:-)
Mary: Don’t ever worry about “bombarding us with too many videos” – they are wonderful and I’ve really enjoyed looking through your older ones (I discovered your website a few weeks ago).
One thing I noticed in watching this video – your thread “popped up” a little between stitches. Shay Pendray published a tip many years ago where she explained how to prevent this from happening, because it might affect how your stitches look in the final product: Keep tension on the thread below the cloth until you have completely pulled the thread up for the next stitch. Once you have “set the thread” by pulling the thread tightly at the top of the fabric, it will usually stay set.
Also, you might want to add that using a laying tool pretty much requires placing your work in a standing frame because you need both hands to work the needle and the laying tool.
Thanks again for your fantastic website! Janet
Thanks, all, for your comments!
Janet, thanks very much for the extra tips – they are quite useful! I love Shay Penray’s laying tool…. it really is the best little thing in my toolbox.
Jayashree – it’s an excellent tool. You’ll find it really easy to get used to!
Irene – Heh heh. I tried a trolley needle (for those not familiar with one, that’s a short laying tool that goes on the tip of your finger, held on by a kind of thimble thing), but it’s one thing I can’t seem to resolve to get used to. I end up poking myself in the face with it!
Karen – Thanks for your enthusiasm! I’ve only done a bit of Brazilian embroidery proper… but the stitches used in BE are those that are the same as those used in regular surface work. It’s more a matter of materials like threads and the style of design, than being a different type of embroidery. The big thing to get used to with BE is that the threads used are usually rayon, which are z-twisted, so any stitches that rely on the twist of the thread for the look of the stitch (like stem stitch and even bullions) are done the opposite way. If you teach yourself the stitches required to produce any particular work of Brazilian embroidery, then I bet you can learn on your own! Go for it!!
Susan – Yes, a knitting needle works great as a laying tool. I’m not sure the puppy-chewing is essential, but it definitely marks the laying tool as yours! That made me chuckle!
Tomi – Wow. I’m glad you’ve taken up embroidery again! That’s why I started the website, and it always makes me happy to hear that people are picking up needlework again!
~MC
Thanks for sharing your techniques. I have never used a laying tool but now I can try.
I have a trolley needle that I use on small count cross stitch. My only problem is I tend to use both hands while stitching, one on top, one below to work the needle. So I only use my trolley needle when I’m working on a particularly tight, difficult area. I can’t stand to have all those bunched stitches.
I adore the videos. I should take some time and go through them all. So much to learn.
Mary,
Please DO bombard us with more wonderful videos! I cannot describe how helpful they are. Just seeing the stitches being done in real time is so much easier than trying to read them out of a book! It’s inspiring!
I look forward to your newsletter every morning and am eager to start on my sampler of stitches!
I used to do a lot counted cross stitch, I was self taught and never thought of gridding out my fabric. Such good advice–wish I’d had it 20 years ago when I was doing my stitching daily. I used to put my babies in a front-facing carrier and looked over the top of baby’s head to do my stitching. They would watch contendedly for hours! It got a little crowded on my lap when they grew into toddlers, though!
Do you do any Brazilian embroidery beyond boullion roses? We had a short demonstration at our SAGA meeting on Monday and I am very intrigued and want to learn more. Unfortunately, the classes are an hour and a half away!
If I am stitching for my own projects (I work in restoration of American colonial-era embroidery)I always use a laying tool. Generally I use the end of a highly-polished wooden knitting needle, broken off (OK, puppy-chewed), about 4″ or so. But if it’s not immediately at hand (dropped, rolls under my chair), I use a large needle which I have threaded through the eye and have hanging from my needlework stand.
The knitting needle, though, has just the right finish to provide the perfect amount of ‘drag’ to quickly and reliably do the job. I thought when I first started using it that maybe the finish would wear off but I’ve been using it now for almost 14 years (dog birthday yesterday, easy to remember)and it still works beautifully, whereas with the sewing needle it takes more attention to make sure all fibers are aligned.
Mary,
Never too many videos! I enjoy each and every one, and have learned so much. It is because I was searching for an online video for a certain embroidery stitch that I happened upon your site. And what a lucky day that was! I now am happily doing embroidery again, after having left it many years ago. Thank you for all your efforts, Mary!
Tomi Jane
Mary
I agree with all above….Please, Please keep doing the vidoes. They are a great help to me,one who has just started and new to embroidering. Your web site has been a blessing :)…Thanks
Fredi
Thank you so much for the video Mary.I will be using a laying tool for satin stitch and long and short stitch from now on…it must make such a difference to the way the thread covers the fabric.
Janet N says that you need 2 hands free in order to use a laying tool. Can you please confirm this?
I want to use one, but have had no sucess with stand alone frames – it’s hand holding for me! But with my interest in needlepainting, I’d like to be able to use one.
All the best,
Hi, all – thanks again for the comments.
Alison – actually, funny you should mention it. I cut the video short – I had actually stitched another section without a laying tool, but it seemed superfluous at the time, so I edited it out! Darn!
Yes, Megan, you do need both hands free to use a laying tool, since you stitch with one hand and hold the tool in the other. If you don’t have, or don’t use, a stand, you can always sit at a table and rest your hoop or frame on the edge of the table. That works, too.
Gail – The kitties would not like the trolley needle, I bet! I would imagine it’s just a matter of getting used to it, but admittedly, I never bothered to. I don’t really like having things on my fingers when I stitch – even thimbles bug me, but they’re useful for really tough stitching (through leather, for example).
~MC
Hi Mary,
Thanks for the clear demo. One thing that might be helpful to show would be a comparison of satin stitch done without the laying tool next to stitching with it. That would help us see how effective using the tool can be.
I’ve used one on occasion. Also made the mistake of grabbing whatever is handy. I will say this – make sure whatever you are using is SMOOTH! Wood can splinter, needles can have plating that is cracked/chipped, etc. I’ve also used the same needle I’m stitching with if working a small project. Often the thread is long enough that I can bring the needle around to the front and use it as a laying tool, while pulling on the thread from the back. While trolley needles are a nice idea, they are too dangerous for me. It’s bad enough when I poke myself (almost got my eye with it once) but I’d really be upset if I poked one of the kitties!
Merci Mary!
Je vous écrit en français vous traduirez vous sinon avec le traducteur il ne passe pas
merci pour tout ! Viviane de Marseille ,Provence.
Hi Mary:
Love your video. For some reason, my sound on my laptop has quit (and I have yet to pursue fixing it), and since I’m a little reluctant to do private internet surfing at work – especially when there is sound involved, I watch your videos without being able to listen. I miss your commentary, but your demonstrations are so clear and precise, I feel that I have learned the basics anyway, even if I may be missing the tips.
I love accessories, and will either be sanding down a cooking skewer or something the next time I try a satin stitch.
What I couldn’t quite follow, but am interested in understanding is Janet Noble’s tip. I can’t visualize the problem and therefore can’t understand the fix, can you or Janet elaborate?
Great post, as always!
Hi, Wendy! Janet’s talking about keeping tension on the stitch after you pull it through, until you bring the next stitch up, in order to keep the stitch from shifting after it’s been put in place. I’ve never really had any huge problems with the stitch shifting or bouncing back up enough to displace the threads laid by the laying tool, but if it is a problem, all you need to do is hold on to the thread from below, after you’ve pulled the stitch through from the top, and then release the tension, after you’ve taken the needle back up to the front. It’s worth trying out, if you find your stitches shifting between taking the next stitch, but if this doesn’t happen to you, then I wouldn’t worry too much about it. Hope that helps!
~MC
Dear Marymentor:
Boyoboyoboyo ! Thanks so much. My next trip to JoAnn Fabrics will include a laying tool purchase. No more lumpy bumpy twisted satin stitching?…….YAY YAY…..Judy in Pittsburgh
Hi Mary,
I enjoyed this video – I recently bought a laying tool but had difficulty using it!
My question is, is there benefit to using the tool when using a single strand of thread? If the thread is thicker than a single strand of floss – say, floche or wool, would the tool make a difference in crewel projects or when satin stitching a monogram?
I agree with everyone else – we can never have too many videos! I especially like the videos that demonstrate using frames, hoops, etc. -“tools of the trade.”
Thanks so much,
Terry
Hi, Terry – A good question! With one strand of anything, I don’t see too much of a benefit to using a laying tool. The exception would be something like Japanese silk, which comes off the spool in “one strand” but the strand is made up of lots of tiny “suga” which are all tiny individual strands of flat silk. I could see using it in cases like that – where the one strand is made up of tiny strands, and not meant meant to be twisted together. But with floche, stranded cotton, pearl cotton, and the like, the single strand (made up of plies twisted together) is meant to have that twist to it. I’m not sure if that makes sense….???
Hi, Mary! Wow, great video! You’re becoming a pro, no question about that! 🙂
I never used a tool like that, it reminded me of those Japanese sticks girls use on their hair… which I got as a gift, and now I found another use for them! 🙂
Will it come the day when we’ll see your face in one of Needle’n’Thread videos? 😉
Hi, Samanta! Good use for the stick! As for the face… well, now. I wouldn’t want to scare everyone away!!!!!!!! :-0
I purchased a porcupine quill thinking ‘why not use this as a laying tool’ – even though a dear person gave me a handmade one and it’s beautiful.
I was using my bare fingers to do the job a laying tool does. I knew laying tools existed but didn’t know how to use one then finally I made the connection. They are not available in France. Not one website that sells embroidery supplies sells any. The closest I found was the UK supplier Mace & Nairn, then I ralized I could use something I already have in the house: a cable needle used for knitting cables. I will soon verify how suitable it is.
I don’t do embroidery with threads, I am more into seedbeads, but this webpage keeps me reading it ;). Well and all those small “secrets” are very helpfull. I’ve been using large needle as this tool, when I am dealing with too twisted nylon thread – if you do not “help” it than it wil definatley make a knot.
I liked the video,but from what I read could please do one where you show different colors or patterns so you don’t gouge the previous stitches.thank you
very good I like you thank you very much for you lesson in ligne
Thank you I did not ever want to learn embroidery because I thought it was too hard seeing your short clear videos I am going to learn through your site….
Cheers
Liz
Thank you, Mary. Your videos are absolutely the best! I was not familiar with the laying tool, but now is a must have. Thanks again.
I just love it site and its so nice tat I can llearn different stitches . I have a problem with some stitches some videos r not showing. The place where videos is there it shows blank place.like as I opened laying tool there is just information about laying tool but there is no video . Plzhelp
Quando è giusto usare questo punto? Perdoni la mia ignoranza! grazie Cordialità stefania campagnuolo
When is it right to use this point? Forgive my ignorance! thanks Friendliness stefania campagnuolo
traslate Google !
That looks like the Teko-bari. I LOVE this tool. I have used them for many years and actually have around 6 or 7. The original version of this tool is limited to what is left unsold in shops as they updated the tool recently. The updated version works pretty much the same as the older one and is very comfortable and easy to use. If you are a perfectionist, you got to try it. You won’t be sorry.
I received as a gift a handmade laying tool and I love it, especially that her father made it.
My needle work has been pretty lax almost to extinction, but do remember how relaxing it was/is when using this tool.
Using it is like having someone stroke your hair.
Hi, please, I can’t see the video….
Thank you for sharing.
I recently saw your post with your new laying tool/awl and I had to research exactly the purpose of this litttle tool.
I appreciate your instructional videos and all the information that you provide to your readers!
Thank you and Happy New Year,
Would a laying tool be beneficial if you use the sewing method for doing the satin stitch? Thanks.
I am left handed and have a difficult time trying to reverse instruction from right handed examples and right handed teachers. Where can I find instructions, books, etc for left handed stitchers.
Yvette Stanton’s Left Handed Embroiderer’s Companion would be helpful. Here’s a link to my review: https://needlenthread.wpengine.com/2009/12/left-handed-embroiderers-companion-by.html
I read your article about Floche threads and wonder if they need a special pattern? I’m new to embroidery and want to make a floral embroidered purse with cotton/linen. I don’t have a pattern yet and can’t find one specific to Floche. Thanks
Hi, Maureen – No, floche doesn’t require special types of patterns. It’s just an embroidery thread that is about equivalent to using 1.5 strands of floss. So, it’s not has heavy as two strands of DMC floss, but it’s not as fine as one strand. It also has a soft twist and a much more beautiful luster, compared to stranded cotton floss.
merci pour ces explications très utiles!thank you!
Thank you for your library of video stitching techniques
You have taught me so much
Thank you for sharing your knowledge
The video regarding laying tools is missing
HI, Mark – the laying tool video shows up fine on this end. You can also find it on YouTube, here.