


The fishbone stitch is an easy hand embroidery stitch that works great for creating filled leaves and petal shapes. You can use the stitch for other applications, too, but the fishbone stitch is most often seen as a filling for leaves. This is because it creates a satin-stitch-like filling, with a natural spine down the center.
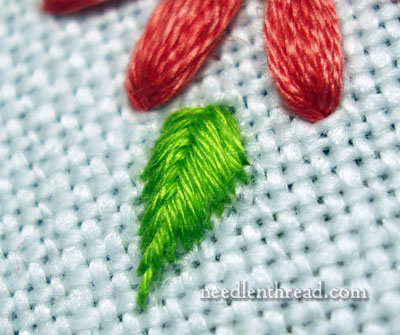
In the photo above, you can see the fishbone stitch used to create the green leaf. The thread used for that leaf is cotton floche, a wonderfully soft hand embroidery thread.
Fishbone stitch works well with any type of thread, really. In crewel embroidery, it works really well with wool, and you’ll find that the stitch fills up the space rather quickly when you’re using a heavier thread like wool. With a finer thread (such as a single strand of cotton), it will take a little longer to fill the shape, but the result will be a smooth surface, almost like a satin stitch, with a self-forming spine down the center of the area.
To keep the angle of the fishbone stitch correct, when you enter the fabric on the design line, enter very close to the previous stitch. When you take your needle down into the fabric in the middle near the spine, move a bit farther away from the previous stitch, so that your stitches lie parallel. This is demonstrated in the video.
Here’s the video for the fishbone stitch:
If you’re looking for other embroidery stitches to play around with, you can find plenty of embroidery how-to videos here on Needle ‘n Thread!
Looking for inspiration & information on hand embroidery?
There are all kinds of reasons to sign up for the Needle ‘n Thread daily newsletter! Check them out and sign up today!
If you like what you see on Needle ’n Thread, if you want to be a part of keeping the website thriving (and free of annoying network advertising), why not become a patron on Patreon? Check out my Patreon page here, where I’ll occasionally add special needlework bonuses for patrons.
If you shop on Amazon, you can support Needle ’n Thread without any extra expense to you by visiting my Amazon Recommendations page here, where you’ll find books and sundries for the needleworker available on Amazon.
We do it in a bit different way. The very first stitch is the same. After that we pull the thread up from right then put the needle down from left and take it up again in the middle before the thread goes down. I dont know whether you can understand from what i have written. 🙂
I’ve got a couple quick questions
How do you tie this stitch off? and, is it suitable to do a circle (i.e. to fill in a monogrammed ‘o’)?
Hi, BT –
I think it would work to fill an “O” if you are careful with compensating as you work around the curves. To tie the stitch off, you’ll notice that, on the back, you’ll have a leaf, too. Run the threads under the leaves there, and then hitch them into the threads by taking a couple backstitches through the threads (not through the fabric).
Hope that helps!
MC
This is the only herringbone stitch I found. It didn’t help any that I haven’t sewn in so long I couldn’t remember the name of the stitch! But I can now continue with my project. Thank you!
Thank you so much for this tutorial. I’ve been looking for this for so long. I’ve been trying to teach my granddaughter to embroidery for a 4-H project, I’m mostly self-taught, but I wanted to teach her the right way. Your stitch tutorials are marvelous and so helpful. It is great for us because we can see what you are doing and don’t have to rely on what we think someone’s description means. Thank you again.
SarahD
I appreciate the step-by-step, the close-up view, and the commentary. The videos on this website are very well-done. Thank you!
I greatly appreciate your step-by-step video tutorials. Your teachings are very clear and helpful even for someone who does not know any hand embroidery at all. Thank you so much.
Ayona
dear mary i wish i have time to do some embroidery you have nice patterns. thank you for sharing your work with us. i like craft verymuch
Hi Mary!
I just happened to stumble upon this treasure of yours! Wow! You have done a marvelous job! I have been looking to learn embroidery for some time time now, but could get the right guidance. After looking through your detailed blog, I think I can go ahead with my pursuit. Thanks again for sharing your knowledge with the world. Keep it up!
-Su
Hi Mary. Thanks for the great tutorials! I love to embroider but have’nt been doing too much lately.Visiting your site has certainly inspired me!!Will definitely start now!
Hi Mary. Approximately how many stitches per inch for the fish stitch?
Hi, Susan – It depends on a few things: the type of thread you’re using, the size of the area you’re trying to fill, whether or not you want a “closed” fishbone stitch (like in the photo on this post – the leaves are fishbone) or a more “open” look by separating the stitches. You can’t necessarily count threads per inch with surface embroidery the same way you would for counted work. Overall, it really depends on the look you want. If you want it to fill the area solidly, you work the stitches close together but not overlapping, like you would with satin stitch.
Hope that helps a bit ~ MC
Good morning!
Thank you very much for this clear tutorial.
V/R
Amber
Hi Mary, Thanks for these video tutorials are very well explained. So if you are eager to learn these so Beautiful Embroidery. Hugs from Bogotá Colombia.
Thank, you very very much my teacher mary
maynay aap ki side say kafi stitches try kiya hany your teaching style very easy i like it.i hope you make more stitch thank you
Thanks,for the vidieo demostertion i like stithing i want to knwo more about hand stitching.please send me brocher
thnk u sooo much 4 d tutorial….i learned to embroider wen i waz in grade 5 n again in grade 8 bt den cld nt cnt due lack of tym n studies..bt nw i hav strted again n dis video really helped me….m really grateful to u n ur tutorial videos…
I haven’t embroidered since I was very young and would just like to get back into it again as I am very close to retirement and would love to just embroider for my grandchildren…I do know I need some tutoring since it’s been so long…what would you recommend? I have watched one of your videos here and was just awed by the detail…Thank You Irene Rousseau/rousse33614@gmail.com
Hello Mary
Thank you very much for this new video. All your videos are so clear and helpful.
I love theses pictures they are beautiful
Quick question (sorry feels as is I’ve been asking quite a bit lately…Ty for you’re responses).
How would you change threads out on this stitch when you come to the end of your thread and have more leaf etc., to fill? Thank you.
Happy Sunday
V/r,
Tracie
Hi, Tracie – you can just end the stitch in the middle of the leaf (or whatever shape) when you go down into the fabric. Then end the thread, and start a new one on the other side of the area, and pick up where you left off.
I’m just adding some embroidery to my daughter’s plain cardigan and wanted to do some leaves in this stitch so I thought I’d drop by for a reminder as I haven’t used this stitch much. Thank you very much for your video.
Glad it came in handy!
Well that’ll teach me to skip the end! I’ve been trying to get this stitch for tiny-ish leaves and I kept running into the same problem. My stitches started going horizontal and squishing each other. Then I realized how much farther down you were going and you even mentioned it in the video.
Thank you
Thank you so much for the awesome tutorial!
Gostaria de adquirir apostila com todos os pontos. Como faço para adquirila?
O brigado Mary Corbet, adoro seus bordados.
pode enviar para mim todos os bordados passo a passo adoro aprender,
Abramo Carlos Salvi
Thanks, I so enjoy yall your expertise and for sharing all with us. PGH
Could you please tell me what gauge/mesh of linen you use in your video.
I have a question about how to manage the fishbone stitch if the leaf is curvy, and the curve is NOT the same on the left and right side of the leaf. I have a very hard time keep the stitches on the large curve side from overlapping each other. If I drop down far enough on the center stem line to prevent the overlap, I run out of space at the bottom of the leaf before the fishbone stitch is done. Additionally, I find that the stem part (where the stitches overlap) tends to “drift” over to the side of the leaf that has the larger curve. I hope this makes sense! I can’t find a way to attach a picture to show you the problem. If you have any tips on this process, I would really appreciate it. Thanks, Judy
Hi, Judy – is there a line drawn down the center of the leaf? If you draw a line to make out what you want the curve at the center of the leaf to look like, and stitch just to each side of that line, it will help map the curve down the center. Also, when you get to the base of the leaf, if there’s no more room for the fishbone, just work long satin stitches to cover up the rest of the base.
Just watched the fishbone tutorial again. I was just scrolling down in an idle moment.
You know Mary I don’t know why anyone would buy a ‘how to do book’. Apart from patterns, any stitch that a newbie or an old codger like me wanted to know or learn you have it all, or will if just asked.
I do love my books as they are really eye candy and calming before bed. But buying a manual why bother. I am sure Mary Corbet will have a most thorough and simply explained method for any stitch. Plus other great things.
If I haven’t said before and I am not worried if I have. You are a most caring and sharing person and I more than greatly appreciate your wonderful tips and hints and where to get, input.
I do hope your new shop and education centre for the young thread enthusiast is a great success.
Kind and sincere salutations to you
Martha May
Shucks, thanks, Martha!! 🙂
Thank you for sharing. I are a wonderful teacher.
I never see your replies, but Mary your instructions an enthusiasm to say nothing of your amazing skill, which for me is equal to RSN here in England is amazing. thank you
🙂 Thanks, Margaret!
How many times can I say thank you for the video on making a leaf, Thank you, I thank you 10,000 times for the video, I can now make a beautiful leaf. I will watch every video I can get from you. and when you tell it in your own words I truly understand
, thanks, thanks, thnks.
Thank you for sharing this post. It makes it easy to follow learning the stitches. very clear pictures.
I absolutely love the instructional videos but I do wish that Mary would show, not only how to anchor the last stitch, but how to start another thread, the same color or a different one, it makes no difference. Even if it were just in the text that would be good — included in the vidos would be even better.
Hi Mary,
I would love to see your full set up with some photos or video of you at work on a small project. Is there anything like this on your website?
I really love your content, thank you.
JeanL.