


Palestrina stitch is a magnificent stitch to add to your hand embroidery repertoire! I love this stitch! It’s just fun to work. You can work up a great stitching rhythm with it.
Palestrina stitch is also knows as “twilling,” a technique used here in the Midwest (and spreading in popularity) to embroider designs on quilt squares.
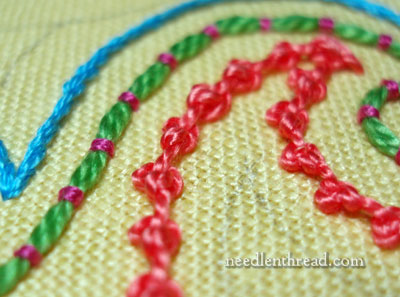
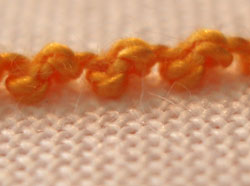
The line produced in Palestrina stitch is bumpy! Evenly spaced along the line are knots that have one little arm that extends slightly, and which, when exaggerated, gives a barbed look to the completed stitch.
To create a filled area with Palestrina stitch, you simply work rows of it next to each other, alternating the placement of the knots, and creating a highly textured filling. You can work the first row from left to right, then come back from right to left (either turning your hoop over or working the stitch backwards), or you can work all rows from the same direction. One thing I have noticed when using Palestrina stitch as a filling, though, is that the knots do look slightly different when worked from different directions. It doesn’t ruin the look of the filling at all, to have the alternating rows also reflect the directional change – but you should practice with it to see which look you like better.

You can also add beads to a line of Palestrina stitch. Beaded Palestrina stitch can add a whole new level of color and sparkle to your embroidery!
You can also vary the look of the Palestrina stitch by working it on a diagonal (instead of using straight stitches in line, as I do in the video). When you work your knot around a straight stitch worked diagonal to the line you are covering, the effect is much like a buttonhole stitch that has a knot at the anchoring point. You can further alter the look of the stitch by increasing the length of the “arm” of the first wrap stitch. After watching the video, play around with the stitch to see what you can do with it!
In the video, I’m working on linen, using perle cotton #5. You can work this stitch on any fabric, though, and with any thread, really. The finer the thread, the finer the line. It takes curves well, too, by the way!
Enjoy the video!
Do you want more inspiration & information on hand embroidery?
There are all kinds of reasons to sign up for the Needle ‘n Thread daily newsletter! Check them out and sign up today!
For more video tutorials for hand embroidery stitches, please visit the the How-To Hand Embroidery Videos here on Needle ‘n Thread.
If you like what you see on Needle ’n Thread, if you want to be a part of keeping the website thriving (and free of annoying network advertising), why not become a patron on Patreon? Check out my Patreon page here, where I’ll occasionally add special needlework bonuses for patrons.
If you shop on Amazon, you can support Needle ’n Thread without any extra expense to you by visiting my Amazon Recommendations page here, where you’ll find books and sundries for the needleworker available on Amazon.
I REALLY wanted to hear the narration on this stitch. I turned my own volume up as high as I could, but I can’t make out your words. At least I can see it ok.
Hi, sequana – try the volume control in the lower right hand corner of the video screen. Sometimes that needs to be adjusted, as well as the volume on your computer. If that doesn’t work, let me know, ok?
Thanks!
Wow, thank you so much. I’ve been trying to make sense of still pictures of how that stitch is done for two days!
Brilliant video, thank you.
Hi! I love all your videos and go back and watch whenever I need help on a stitch. This is the best. Thank you
I am glad you like them, Nora! I plan to have some more coming up in the future!
Thanks!
Dear Mary Corbet,
I would like to kno if palestrina stitch and coral stitch are the same. If not what is yhe difference between these two.I really appreciate the wonderful ,unselfish work you are doing .
No, the palestrina stitch is not the same as the coral stitch. I’ll actually have a coral stitch video up by next week! They’re similar, in that they make a line of knots, but they aren’t executed the same way, and the knot on the coral stitch is smaller.
really I enjoy this stich. I’ll try to work with it .Tanks.
I was using only chain/stem to do the lines. Now this is a very good stitch to make a difference
thank you for such a clear explanation of this stitch, I was able stitch along with you which made it so easy.
Thank you, this is a terrific demo.
so glad I found your site
jill
I'm so happy to see this stitch. I'd never saw this stitch before.
Some patterns or book on this subject are some place ?
Thanks for all
dear mary corbet..
i fall in love with the picture of this stitch.. i'll definitely gonna try to make one of these.. thank you very much for sharing all of the videos.. i really love them.. i'm a rokie on embroidery, but your videos make it easier for me to learn.. 🙂 thanks again.
hugs,
jane
I just came across your site when looking for the Palestrina stitch. I learned to embroider as a little girl sitting next to "nonna" (grandma). It has been a while since I've embroidered this particular stitch….it was GREAT to see it in simple video terms. Thank you for taking the time and creating all these helpful videos. It is appreciated!!! So happy to have found your site, you have been bookmarked!! Looking forward to viewing all your videos out there.
Thank you so much!!
Bern
Mary, The link online illustration of Palestrina stitch at Mani di Fata – is broken.
Love the videos, as I’m just learning to embroider, these videos are a wonderful learning aid.
Thanks, James – I couldn’t find it on Mani di Fata, so I deleted it. Thanks again! ~MC
I have finally found what I want to use as an outline stitch on my Family Sampler! Thank you for the video on the Palestrina Stitch. All of your videos are so easy to follow. Thank you for providing these informative tutorials.
Thanks, Mary! I’m glad you like the videos! I’ll be updating quite a few of them soon – same content more or less, but better resolution! Can’t wait!
~MC
Dear Mary,
Thanks for the video. I have to admit I have never seen that stitch. Curious as to the name Palestrina.
Mary forgive me for this question which is unrelated, but years ago someone sent me the directions for embroidering with our using a knot on the back. It involved making a loop on the back and them pulling the floss through I think. It worked liked a charm, but its been ages since I used it and have since forgotten it. Are you familiar with a method such as this?
Thanks for all you do.
Maggie
Hi, Maggie – Yes – you can do this when your stitching requires two strands of floss. Instead of stripping two strands from the bunch, strip one very long strand and fold it in half. Thread the loose ends through the needle, then come up in the fabric, leaving a loop on the back, then take a tiny stitch into the fabric, and also pass through the loop on the back. This makes a little “hitch” that holds the thread. You can also do it the opposite way, going down into the fabric, leaving the loop on top, taking a tiny stitch and back up, then through the loop to catch it, then a tiny stitch back down again. With surface embroidery, you’ll want to make sure you do this in a place where you can cover your tiny stitches. It’s a method used more often, I think, in cross stitch when using two strands of floss, but it can work in surface embroidery as well.
Hope that helps!
~MC
Mary, thanks so much for that video. I have struggled to learn that stitch for quite some time and you make it appear so easy.
Can’t wait to give it a try once again.
Karen
Thank you for the great video. I happened to see a project in a quilt shop in Stillwater OK. I loved it. I wanted to see it done and you created a wonderful How To Video.
I have been looking for some time for a stitch to use on our Family Sampler that I designed to outline the name of our dear little baby who died at 13 months of age. I wanted to make it different from the names of our two sons – ages 42 & 36 This has proven to be the perfect stitch. Thank you Mary, for all the tutorials. They are so precise and easy to follow.
Hi,
I am so grateful to you, I knew the stitch very well back when I was studying home economics and its been like 12 or 13 years since that time. I had completely forgotten it and surfed tirelessly to find a good demonstration.
Thanks again, now I am able to do it again.
This is such a wonderful site! Thank you so much for posting these videos. This makes it crystal clear!
I am working on a candlewicking embroidery pillow and didn’t know how to do the twilling stitch (candlewicking). The instructions that came with the pillow weren’t much help, then I found your site. Your video of the palestrina stitch is exactly what I needed to finish my pillow! I just reversed the instructions since I’m left handed and it works like a charm!
Thank you!
Love your site. I have recently started embroidering, and your site is my go-to one! It has everything! I love this stitch. I’ve been using stem, but like the looks of this much better.
Great stitch, great video…Thank you!
Really interesting stitch. Thanks.
I have tried to view videos of Palestrina stitch but cannot get the video. Can I do something else to get it and other videos of stitches? I dont have trouble viewing other videos, just these.
Hi, Jean – Thanks for letting me know! They’re working on this end. What type of device are you viewing them on? If it’s an iPod or iPad, they may not come up, because of the old video formatting. I’m working on replacing all the old videos, and should have them finished over the next few months.
If you’re working on a regular computer, you might need to upgrade Flash on your computer to view them.
Can’t wait to get them all updated to newer formats – that’s my Big Job over the next few months.
MC
Mary:
Palestrina stitch looks a lot like the “twilling” stitch. Is it? Also, I have been trying to get the video to watch how you do this stitch but it doesn’t seem to want to go for me. Am I doing something wrong?
Thanks-
I love your information. I am someday coming to your home town to meet you! I am going to use one of the stitches you sent recently to put branches on a tree. Thanks!
Hi, Collette – I guess this is a very late reply to your comment on the Palestrina stitch video. Yes, it’s the same thing as “twilling” stitch. Also, now that I’ve replaced the old video with a new one, it should work a lot better! ~MC
Thanks for the video on “twill” stitch. A lady tried to give me a quick lesson on a trip recently, but good to have a reference available.
I did this stitch a few months ago, got caught up in other projects, and am now about to finish the designs I started…with your help. I’ve just watched your First Rate video for a refresher and am good to go! Thank you so very much for your clear and easy to follow directions.
Happy Stitching,
Kathy
loved the video! thanks, it saved my project
hey
can you tel me which type thread we hav to use for this??
reply please
This is perle cotton….
can you show me how to draw a sketch on our dress to make the embroidery
don’t have a word yet..but searching..one thing though..u r spoiling me….
I enjoyed watching your tutorial. Never heard of the stitch, but I enjoying watching, learning, and creating. I look forward to seeing all your tutorials and start on creating. You are a blessing. Many thanks.
bonjour .pouvez vous me montrer la vidéo du point quadrillé. merci.
Many thanks for the instructions! I’m going to try the Palestrina stitch!! And I’m also going to try French knots (I’ve never been able to do them successfully. Your directions seem very clear and I have great hope. Dmm
Love your tutorials.
Thank you for these instructional videos. I am not very good at embroidery but these are very easy to understand and follow along.
i have a hard time getting neddle threw unlees is is light material.i found flour sack towels. but would like to use heavyer stuff. want needle sould i use. i like the top needle that make it easy to pop thread on. all the sites dont show nothing about what kind of needle or material to use. i have had to use a pliers to get it threw. and i was sore. can you help . edna from idaho
Hi can u teach the second stitch in the first picture
Hi, Miriam – that’s couching. You’ll find a video tutorial for it here: https://needlenthread.wpengine.com/2006/10/couching-video-tutorial.html
I`d forgotten how to do this stitch and have been trying to find it again. Many thanks for your very clear and easy to follow instructional video
Glad it came in handy! I love, love, love the Palestrina stitch – it’s so pretty!
I love your tutorials on “how to” stitching. Could you also give the option of printing “diagrams” of the stitches? My work area and computer are in separate rooms. It would help if I could have something nearby as a reminder reference.
Thank you, Jean
Your how-to tutorial for the Palestrina stitch is great! I ordered Roses des Neiges from The French Needle & the Palestrina stitch is the stitch used for the main part of the design so I was stumped even though there is a stitch guide! I just needed to see the stitch actually being created to see exactly how to to do. Thanks!
Another Thank you from me! Last night I was up to the final part (aside from hemming) of a project in whitework from a class I took in March. there it was Palestrina Knot stitch. I looked at the diagrams, tried a stitch, and swore. I then made the decision the stitch was evil.
In the better light of day, I gathered some practice materials and set off here. Once again the clarity of your instructions (even with no sound) means I have success.
I knew my main issue was I couldn’t see how the stitch was done in relation to the line I wanted it to sit on. Thank you, thank you, I can now finish that project the way the instructions suggest.
(I was considering doing something else)
I am trying to do the twilling stitch. When you go under the thread the first time is the thread over the needle or under it? I know the 2nd time you go under the needle is over – correct? Thank you.
Hi, Darlene – twirling is the same thing as the Palestrina stitch. You don’t go over the working thread with the first pass, just the second. Hope that helps!
Do you have videos for left hand people? I have not found any yet this is for embroidery stitches
Thanks
JoAnn
Learning a lot from you! Thank you so much. Very clear instructions, easy to learn. May God’s blessing be upon you!
Mary, what needle, size etc. are you using in the Palestinian stitch video?
Thank you very much. I like your video, it is really easy to learn the Palestrina stitch.
Keen to learn palestrina stitch in joining 2 pieces of material together
Thank you so very much Mary for showing me this stitch. I am teaching myself embroidery having decades of counted cross stitch I decided I wanted to learn something new and this is just fabulous. Embroidery is at times so confusing on how to do these delicate stitches.
Sherry McLaughlin
In the video for the Palestrina stitch, what size needle was used? I love a needle with that size of an eye. Thank you. Ali G.
You’re seeing the needle and thread fairly up close in those videos. But when working with perle cotton, I’m probably using a #3 crewel needle. This size would be way too big for regular embroidery floss, unless you’re using all six strands at once.
Hi Mary,
I LOVE your site. Can you tell me (there is so much I get confused) what fabric you use in (for instance) the Palestrina stitch. What count and material. Thanks so much for all your trouble and the clarity of your explanations.
Lia
Hi, Lia – I usually use linen for pretty much everything I’m using to demonstrate on. Surface embroidery is slightly different from counted thread work – the linen does not have to be even-weave, so it isn’t necessarily sold by the thread count. 🙂
You are amazing thanks and I am so glad I found you
I’m reminded over and over again how much I value your how-to stitch videos! I think they are the very best! And I thank you so very much!
Thank you for these wonderful pictures and videos!! I’m learning so much from you!!
Would you consider doing some stitch alongs? I would love to take part in one with you
I’ve been running about four stitch-alongs a year, for the post three years, right here on the website. We’re in the middle of one right now. 🙂
Your work is so beautiful, the instructions are thorough and is so inspirational!
Thank you so much for sharing your gift with us!
This is such an amazing resource!!
I only got the basics when learning from my mom but it’s so cool to see the names of everything and so many stitches I’ve never seen before!! Excited to try so new stitches!
Thank you! Your tutorial videos are amazing. I’m finally making some of the stitches – especially knotted ones – successfully. Thank you!!’