


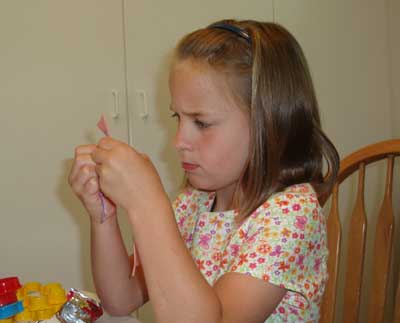
I’ve begun working up my samples for my summer embroidery classes, which are looming in front of me and I, unprepared! I cheated a bit on this one – my 7-year old niece was my test subject! I had her come over and “help” me. She embroidered while I …. helped her!
Actually, except for the first two stitches of each new embroidery stitch, and a couple “fix ups” here and there, my niece did the whole thing on her own, which was good because I saw that it is an easy enough project for my youngest group of kids (8 & 9 year olds).
Now, it isn’t going to go quite this way in class! We started by selecting colors – but the bookmarks with designs already on them and coordinating threads will be ready for the kids when then get to class. They won’t have to labor over choices of colors of felt or thread, or over design! I know it sounds a bit restrictive, but trust me. The slowest process of teaching kids is not actually teaching them to stitch. It’s helping them make choices on colors or designs. To move the classes along this year, this decision-making has more or less been eliminated. On their last project that they work, the kids will have some lee-way, but by then, they’ll know what stitches they like and their little hearts will already be set on their favorite color schemes.
This is how our little test session went:
First, we picked out two coordinating colors of felt: pink and periwinkle. Emma wanted pink and green, since they are her “favorite” colors, but the green just didn’t go. So she “settled” for the periwinkle, which is actually a very pretty color.
Then we picked out four colors of thread: periwinkle, light blue, yellow, and green.
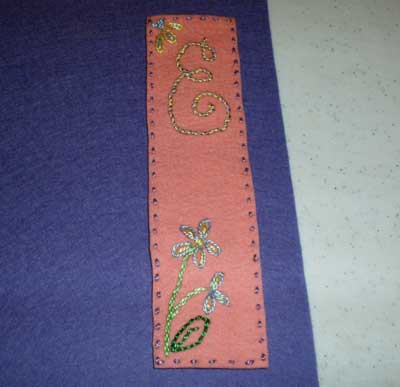
Then “we” decided on a design. Emma wanted an “E” for Emma (“It should be in cursive!”) and some flowers.
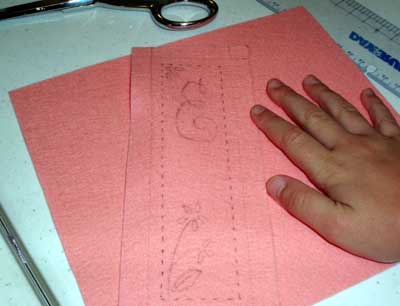
So that’s the design we settled on. The running stitch border is marked out in even stitch spaces, which is a good thing to do for children who are just beginning to stitch. It takes more time to mark out the stitches, but they get the hang of even stitches much better if they begin with specific stitch markings.
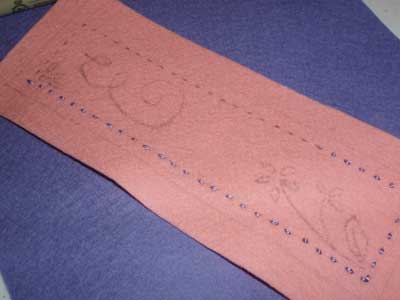
The running stitch border was worked first.
We’re using #5 perle cotton for all the stitching. It’s much easier, when working with kids, to use embroidery threads that are one strand, that don’t have to be stripped and put back together again.
She worked stem stitch for her flower stems, and I was rather impressed! I showed her only two stitches, and she did the rest. When I showed her the stem stitch, I didn’t pull the thread all the way through, but I left a big loop hanging down, so that she could see where to put the needle in, and so that the working thread remained below the needle. I told her to make sure her thread hung in a Big Smile, and that’s how she’d know it’s in the right place. And it worked – she remembered, and I didn’t have to correct anything on those lines. Good job!
Yep, it took concentration!
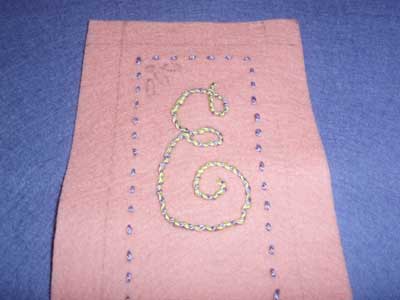
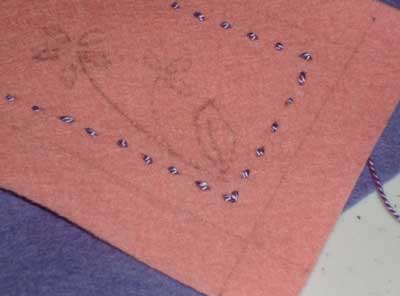
The “E” was worked in backstitch in periwinkle and whipped over with light yellow. There’s a bit of wobbly stuff going on there. Kids get uptight when stitching, and will often compensate for their awkward motor skills by making their stitches too small. It takes a while for them to get the hang of spacing, and even then, it isn’t necessarily easy. Some of the backstitches were too small and a little cock-eyed here and there, which led to a wobbly whipped backstitch. But you know what? She’s 7 years old, and it’s the first time she’s ever done this! So under the circumstances, I was pretty pleased!
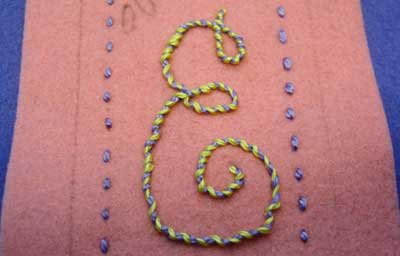
You can see the wobbles a bit better here.
The leaf was worked in plain backstitch. I was duly reminded, “Don’t forget to draw a line in the middle of the leaf.” Of course! Every leaf has a line in the middle!
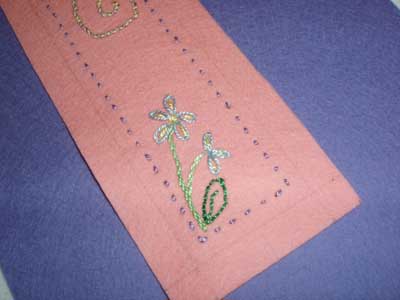
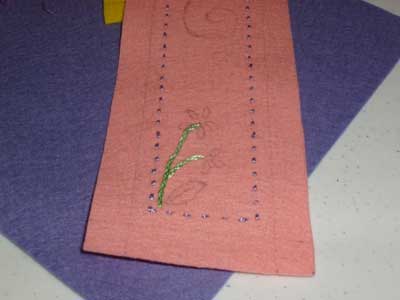
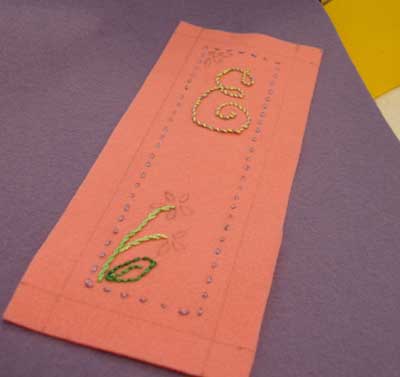
The lazy daisies took a little more work (by the time she was working on those, she wasn’t saying, “This is SOOOO easy!”). Missed loops and a couple knots on the back slowed it down a bit, but the end result was very good! She stitched the petals in blue with a yellow straight stitch in the middle.
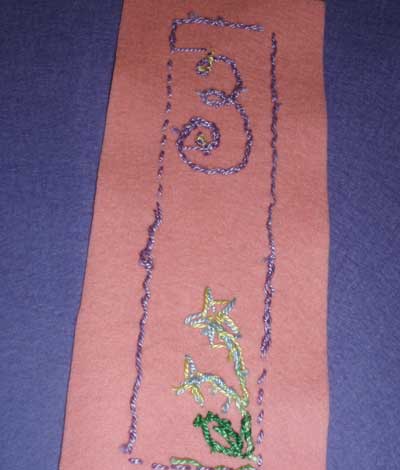
All in all, the back is not bad! She got the hang of starting and stopping threads without knots without a problem, but the wrapping and weaving through the back threads did cause a little bit of build up. Still, not bad!
Perhaps I should skip my trimming story. It was not meant to be trimmed quite so close to the running stitch border, but… well, I’m a lot like my dad when he goes out to trim the hedges. A little more here, a little more there, a touch here, a snip there, until the hedges are gone! I didn’t have my rotary cutter and mat available, so I just eye-balled it. Remind me to get the cutter and the ruler out!
We had a good time, actually – I told her stories from books I had read when I was a kid
, and she told me stories from books she’s reading now. And we both persevered for four hours. Close to the end of the four hours, I tried to teach her the French knot, but that was pushing it! So we called it a day!
I’ll be taking Joey’s advice and fusing this to the second layer of felt, then using scalloped scissors, if I can find some, for a decorative edge.
This is a nice project to work with a little kid, so if you’re looking for something fun to do this summer with one of the kiddos, try it!
Fabulous! That was a great read, Mary! Thanks for sharing!
That bookmark came out great! Kudos to Emma! -Jeannine
This is awesome. Considering the fact that she is just 7 years old, I think your niece did a great job. The instructions with photos really help. Thank you so much, Mary. This indeed is a great project to start with young kids.
She did really well. I’m going to put my thinking head on for a design for my son to do, not sure he would be into flowers. A great idea
That was wonderful! And her stitching is perfect wobbles and all!
I also noticed the premarking stitches helps too, in fact I had done it on a 6/7 year old and when she moved on to not needing them she had nice even (for a 6/7yr)stitches than the older sibling (10) who didn’t get the marked stitches! LOL
Oh and I agree on having premarked and selected threads for faster time too, very smart, and I’ll have to remember that next time I’m going to teach a kid.
Well done Emma.
I agree, periwinkle is such a lovely shade of blue but I’m biased as it’s my favourite colour 🙂
What size is the book mark?
2″ x 6″
I love this. I want to incorporate hand embroidery into my children’s sewing classes and you have helped very much with this tutorial.
Dear Mary,
Please advise on the marking tool you used on the wool felt bookmarks. I am learning to embroider so I can teach my eleven-year-old granddaughter. Your website has been very helpful. I do not know what to use to draw the design on the felt. I have a Dritz Blue Mark-B-Gone pen but it does not show up on all felt colors.
Sincerely,
Mary Hanley
Hi, Mary – If you’re using lighter colors of felt, Sublime Stitching’s fine-tipped iron-on transfer pen is a great way to iron on designs to felt. They don’t work on dark colors, but they work on brighter and on light colors. Other than that, you might try a dressmaker’s “chalk” pencil in a darker color. Bohin and Sew Line both make them with different colors of lead. The problem with using pens (markers) is that the ink doesn’t necessarily absorb quickly or at all, and it can smear off. You can also use a pencil with a softer lead. Also, if you hold a pencil at a low angle and pull it along the felt, it’s easier to get a marking. You’ll probably have to experiment a bit to find something that works well for you.