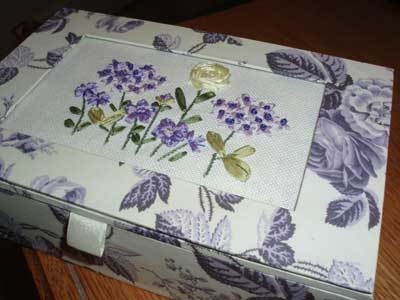
This past weekend, I had a million things to do, and that awful sensation of not knowing where to start. I couldn’t start my next Big Embroidery Project, because I didn’t have one Big chunk of time to get things set up. So I took up a little embroidery project instead – a small silk ribbon embroidery kit that finishes as a little keepsake box.
This is a Bucilla ribbon embroidery kit. A friend gave me a slew of these kits (well, three or four), in case I wanted to use them for my summer embroidery classes. They actually do make great prizes – I gave one as a prize last year. But I thought, for the fun of it, I’d work one up to see how thorough Bucilla kits are.
Bucilla is a well-known name in needlework kits, simply because they’re everywhere. You can find them at any local hobby or craft store. But I don’t know much about their actual quality, as I’ve never used one of their kits. So this was an adventure (in a low-key kind of way!), and it was something to do late at night, without having to dig out a big project.
This is the finished product – a fairly sturdy keepsake box, topped by a little silk ribbon embroidery design.

The pros of the kit:
1. I like the idea of the box. It’s pretty, it’s sturdy, it has a magnetic closure, and it’s useful.
2. The stitches are super-duper simple stitches, accessible to any beginner, and the stitch diagrams in the instructions are clear.
3. The project is small enough to be completed in one evening.
4. The overall finished product is attractive.
5. The kits are relatively inexpensive. In fact, for me, they were free (thanks, Amy!). They were bought on clearance, which is always a good way to pick up little projects inexpensively.
The cons of the kit:
1. The fabric is too small, and it’s kind of cheapy fabric. If it is supposed to be hooped up, as directed, the beginner might wonder how to accomplish that. You’d have to sew extra fabric around it if you wanted it to fit in a hoop, unless you had a three inch hoop. A four inch hoop is too big, even. I worked it in hand, which isn’t so easy with ribbon embroidery, French knots, and so forth.
2. The print of the design was a little off center. This is noticeable when the piece is finished and mounted on the box.
3. There wasn’t enough light purple ribbon, but there was enough dark purple, so I just substituted that.
4. They used simple stitches, I guess with the beginner in mind. But there are ribbon stitches that are equally simple that would have been more attractive for some of the flowers. The bunches on each side of the spider web (pale yellow) rose are ok, but not that attractive. But I will grant that they are simple – they are cross stitches with a French knot in the middle.
5. For the spider web rose, they specified the light yellow ribbon, with the spokes worked in the same color floss. Strangely enough, there was only dark green and dark purple floss. No pale yellow in the kit. I could have used the dark green – and probably should have – but instead, I used the ribbon for the spokes.
6. Mounting problems: they supply on the box two borders of double-sided sticky tape (already on the box – you just remove the top strip). The inside border is where you mount the fabric, and after you’ve stretched it and mounted it on this sticky tape, you are supposed to trim the fabric straight along the edge of the tape. This would be done easily with a ruler and a rotary cutter (carefully – you don’t want to slice the box through). But they didn’t specifiy that. I started with scissors, but it was a messy job. Then, the outside mounting strip is for the window covering of the top of the box. It doesn’t work. The top would not stay stuck, even when I piled some heavy books on top of the box to press it down. So I resorted to Elmer’s glue, and glued it on. For good measure, I also glued the edges of the fabric. Then I wiped any excess off with a damp towel, and I piled books on top of the box overnight for it to dry. That worked.
7. Finally, you can see the pattern of the box behind the fabric when it’s mounted. If you’re expected to put a lining behind that, they should specify!

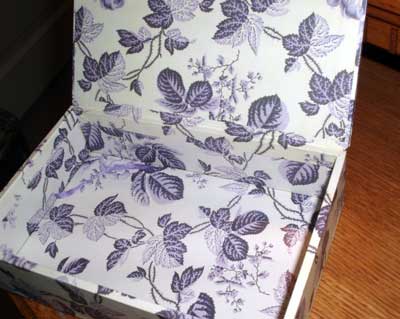
That’s the inside of the box.
Despite the longer list of cons, I think it was a good Quick Project. I’m happy to have the box and the other kits, which I’ll work up over a couple evenings. They’ll make great prizes for the kids’ classes!


Thanks for the kit review – it is good to know both the pros and the cons. Which brand of kits do you like the best? I’ve only used one kind – the old crewel Elsa Williams kits. I worked several of these kits because of the quality of the material and the yarn, as well as the fact the stitches weren’t difficult!
Good review. The box looks really pretty in the photos. Of course, it *is* purple so how can you go wrong? 🙂
How big is the box (just approximately)?
Hi, Terry – I’m not too familiar with kit brands, I’m afraid. I like the Fleur de Lis (Anchor) table linens, but I’ve only worked part of one of those, so I don’t know about thread quantities and so forth. I love Tanja Berlin’s kits, but they aren’t “name brand” kits available in stores – just through her website.
Margaret – the box is about 7 x 4 maybe, and about 2″ deep. It’s a good size for storing some threads, or maybe embroidery scissors…
If you guys like table linens (Of course you do… They are so pretty… lol) You should look for Rico Designs. Not sure if they have them outside of europe though. They are really fun, but sometimes run out of thread. They use simple stitches as well as anchor thread. Happy stitching.
The box is very pretty! Too bad the production of the kit isn’t under better quality control, though no flaws are visible to my eye, in the finished product.
I don’t have much experience with kits. Most of the stamped pieces that I’ve gotten are old enough that if they ever did come with measured quantities of floss, the floss is now long gone.
I have gotten a few brand new stamped linen pieces from Fairway and from Dimensions. I was disappointed to find that compared to vintage stamped pieces, the fabric used for these newer pieces is so thin and flimsy. It’s such a shame that quality is just not as much of a priority as it used to be. 🙁
-Jeannine
Hi Mary, thank you (and Amy) for the critique of the kit.
Many years ago, an English company broguht out the Needlework collection – a series of partworks that build to a complete collection of needlework skills and projects. Each partwork had a small kit on the front with materials and threads. Ih ave to say, I learned that utilising the material provided was not a good idea, for some of the same reasons you found with your kit here. Not enough thread length or threads; missing colours and inferior material that wasnt large enough. Now I am very careful buying kits and usually buy larger amounts of the same material – just in case!!
its soooo superb i like this.
Please give me the instuction for how to make this
Hello Mary,
I just have one question, is there a special way to start and end the ribbon in ribbon embroidery?
I hope you will explain this, it will be very helpful to know it from an expert like you.
Thanks
Weekend Embroidery Project: Silk Ribbon Kit
i would love to know where to get a kit like this, i am very new to embroidery and would love to learn to do this, thank you so much for your website….Kathie
Hi, Kathie – I bought that on clearance at Michael’s about three years ago – they were getting rid of them. I doubt they carry them anymore, but you might check Michael’s craft stores or Hobby Lobby or JoAnn’s fabrics. One of them might carry something similar. ~MC
Hello Mary, Could you please answer my question? its just above Kathie Buaya’s comment. (Comment no.8)
Thanks
Hi, Smita – I don’t have any tutorials on ribbon embroidery in particular on Needle ‘n Thread. You might want to check Di van Niekerk’s website – she has many beautiful ribbon embroidery tutorials on there. Here’s a link: http://www.dicraft.co.za/blog/ Hope that helps. ~MC
question: I am a beginner ribbon embroiderer. I know most of the stitches from when my mom taught me embroidery…love the craft. At any rate, what is the easiest appliance to use for my embroidery. I have hoops of all sizes, but want to start working on larger projects that require a larger frame. what do you recommend? Is there something out there that doesn’t require me ‘tacking’ the fabric down?
Thanks so much for any information you can give me. I love your work!
I have enjoyed your how to stitch videos. I have been working on a cross-stitch piece for #@$% years and what motivated me to finally work on finishing it was the thought of learning new embroidery stitches to “gussy up” the design. So far I have 27 different stitches worked into the design and I have 3 more I will be using to finish it. Thank you for your very well explained and demonstrated stitch videos. They have been a gift to me.
Susan