


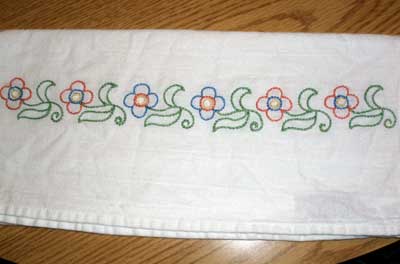
Slowly but surely, some completed summer embroidery class projects are still rolling in – this one is the kitchen towel with the flowers along the edge. In preparing a photo or two of the embroidery on the towel, I realized it presented a good opportunity to point out some tips on using the stem stitch.
I want to make it Really Clear that I’m not “picking on” the embroidery on this towel. Who could deny that, whether for a semi-beginner (this is done by one of the girls who has taken embroidery class before) or one who’s been stitching a lot longer, this towel is really well done? The stitching is very nice, the color choices are great, and I like the way she alternated the colors on the flowers in pairs.
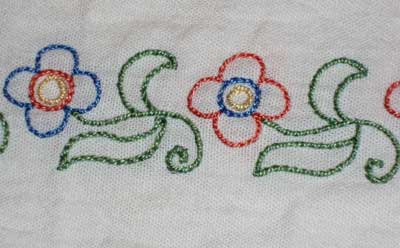
I should have taken a photo of the back of this towel, because it was really impressive – very neat, no straggling threads, very tight lines that kept the threads from showing from the front.
I think she did a great job on the towel! Still, in looking at it, I found a “teaching point” to demonstrate something about the stem stitch. If you ask the embroiderer what stitch she used to embellish the towel, she would tell you “stem stitch.” But between you and me… she didn’t! She used a combination of the stem stitch and the outline stitch!
And here’s the teaching point: stem stitch and outline stitch are not the same stitch – but they’re easy to get confused, especially when you’re working around curves, or changing directions on your lines.
Take a look at the embroidery a little closer – I wish I had a better shot, but this’ll do to make the point!
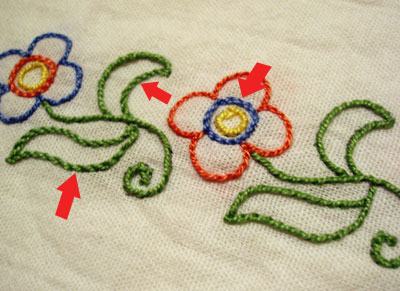
The red arrows point to the stem stitched lines in this piece. Notice how they retain the visibility of the separate threads, while creating that rope-like overlap of the stitches? That’s the signature of stem stitch. Just about all the other lines and curves you see in the towel in that photo are outline stitch. The individual “S’s” are not clear – the line is a bit more “solid” looking as far as the thread goes.
So, how do you achieve the “signature” stem stitch – what is required to produce that look? Here are some tips:
Assuming you’re working with S-twisted thread (that’s just about any standard cotton floss, and most twisted silks)…
1. If you are moving from left to right along your path, always keep your working thread below your needle.
2. If you are moving from right to left along your path, always keep your working thread above your needle.
3. Turn your hoop as you stitch, to keep the direction consistent, so you don’t get confused on the whole left-to-right, right-to-left thing. If you turn your work, you can pretty much always work from left to right (for right-handers) and right to left (for left handers).
4. When you take curves, it doesn’t matter so much if the working thread is on the inside of the curve or the outside – what matters is the direction in which you’re stitching and where your working thread is, in relation to where your needle comes up. So make sure you’re applying the rules above – and, if you’re worried about the stitch moving into the curve because you don’t have the working thread to hold it back (because you’re coming up above your stitch), take smaller stitches, and you’ll be able to take the curve fine.
So othere are a few quick pointers on stem stitch. The stitcher who worked the towel above just confused the “above the working thread” or “below the working thread” thing as she changed directions stitching. It’s funny how such a small difference in placement can change the finished look of a stitch, isn’t it? … well, that all goes back to thread twists (S-twist vs. Z-twist)…. but we’ll save that for another day!
To see the stem stitch worked out, check out the Stem Stitch Video Tutorial in my Video Library of Stitches, where you’ll now find a whopping 50 stitches to learn!
Interesting. I’m trying to teach myself the various stitches using your video tutorial library. I can see the great value of attending a class, however, since I may be doing some stitches incorrectly (or mixing them up) despite the wonderful video instruction.
You mentioned in this post and others about the importance of keeping the back of the fabric neat. Why is this important? Any chance of your posting pics of “good” and “bad” examples of this at some point?
Mary, thanks so much for the photos and the explanation. Just seeing the two stitches side-by-side like that makes it so very much clearer.
Mary, your videos are always very clear and easy to understand. I’m interested though to see that you work “sideways” to the way I was taught here in Australia. I still work my stitches correctly, but stem and outline and chain to name a few are worked away from me with the needle coming down towards me. I wonder why the differences, is it regional do you think? How to English people and Europeans work their stem stitch? I’d love to know. Perhaps it’s like the differences in knitting, Continental knitters often tuck the left needle under their arm, some people throw the thread with their hand off the right hand needle etc.
Another little thought, was the stitcher of the beautiful towel left handed? I have a few left handed “students” who have difficulty with stitches, even though I have an reference book for left handed stitchers with illustrations showing hand and hoop positions.
Thanks for sharing this lovely work,
Hooroo,
Christine in Sydney Australia
http://missmuffettwo.blogspot.com/
Thanks – brilliant
I struggled with stem vs outline for a long time and I confess I have never quite been able to remember the “above and below” rule, which I’ve never seen presented as clearly as you have just done, Mary.
I finally came up with this rule: in stem stitch, the stitches ALWAYS form overlapping or linking z’s (zzzzz) regardless to the direction you are looking at the stitching. I don’t know if that makes sense to read, but the pic with the red arrows shows this phenomenon pretty clearly. Outline stitch shows s’s (ssss). . . if you can see the individual stitches at all.
I guess that doesn’t sound so simple when I write it down, but it has worked very well for me and helps me tell the stitches apart even when they are under different names like (crewel, cord, narrow satin stitch, etc)
-Christiana
Wow, I could take a lesson on how to keep the back looking so nice and neat from your student, Mary!
Christine, I’m in the states, the New England area, and I often work stitches the way you do, the line of stitches more up and down rather than sideways, working the stitches away from me.
– Jeannine
OMG! I have been doing it wrong! Thank you for this lesson. There’s so much to learn. I wish I could find an embroidery class. Books are good, videos are better, but there’s no substitute for an actual real live teacher.
Thank you – these subtle points are things that I would otherwise ‘get’ only years later!
I’m a little confused. I thought I was doing backstitch and looking at your videos – and this article – it seems I’ve been doing stem stitch. Which I thought was a modified satin stitch. Is the only difference between backstitch and stem stitch the direction you sew?
Thank you, thank you, for your intricate, clear articles. You have accelerated my learning enormously over the past few weeks!
Hi Tessa – I suppose if you’re thinking the top of the fabric vs. the underside of the fabric, you could say that stem stitch and backstitch are just opposites. When you work a stem stitch, a backstitch forms on the underside of the fabric, and when you work a backstitch, stem stitch forms on the underside of the fabric. Stem stitch, when stitched correctly, looks a lot like a rope, while backstitch looks like a fairly plain line made of little dashes that fit right up next to each other.
Hope that helps!
Hi Mary,
Thank you for the feedback. I will go back to my work tonight and look carefully! I’ve only been embroidering again for a few months (after a semester ~ 20 years ago) so am very new.
Your feedback and your amazing, detailed information is very valuable! Thank you so much.
Tessa
I am absolutely brand new and stem, outline and back stitch are my only ones so far! So glad you confirmed that back stitch and stem stitch are opposites. I’d been thinking that for a while but then thinking “it can’t be THAT simple”. I just wish I could have Mary living round the corner!
Dear Mary
I have a project I am about to start on and it assumes I know how to do ‘encroaching stem stitch’ – help, I do not know, can you give me any assistance please? Thank you Annie
Hi, Annie – my guess is that they are taking about rows of stem stitch (probably in different colors or shades?) that are ended in such a way as to create a jagged edge, and then the next rows of another color pick up from where the jagged edges end, so that the color change looks more natural. I’ve not heard that called encroaching stem stitch, but usually when a stitch encroaches, it means that it forms kind of a comb or tooth-like edge, so that one layer of color or stitches fits inside the previous “teeth” formed by the previous color. Hope that helps a little! -MC
I still have problems with curves in stem stitch! I think it’s where my needle is coming up. Does it come up in the middle of the preceding stitch or right at the end?
Thanks!
Hi, Blake – you might want to watch the stem stitch video, here: https://needlenthread.wpengine.com/2006/10/embroidery-stitch-video-tutorial-stem.html That should help. There are a bunch of other tips and techniques articles for stem stitch listed on that page, too.
I am left handed and usually my stitches are consistent unless I have had a left right brain flippy thing and nothing goes well. I can do the stem and outline stitches but there are moments I have messes. Help?! Please.
Stem stitch vs outline stitch was very helpful for me, as a beginner. Question, in general, is it advisable or necessary to outline each flower in a design with multiple flowers?
It really depends on the embroidery technique you’re using to fill the flowers, Anita, and it depends on where and whether or not the petals overlap other petals. Without seeing a design, it’s difficult to say how I’d interpret it in embroidery. Sorry!
Thank you Mary for your comment. I am new at Embroidery so I am floundering. I have another question… I have an embroidery design book and when I iron the design transfer, it comes out normal in spots and too light in other areas no matter how long I iron it. Do u have any suggestions
Hi, Anita – this usually has to do with the iron you’re using, I think. I invested in an iron without steam holes, and it seems to work better and more consistently with iron-on transfers. This is the one that I have: http://amzn.to/2Cs300O It works really well with iron-on transfers!
Do have any videos showing how to use the stem stitch to outline completed a satin stitch element?
Best,
Rebecca
Mary, this article is really interesting & helped to clarify for me the difference between the two stitches.
If stem stitch (or outline stitch) is to be whipped, does it matter which direction the whip stitch goes – is there a “right” way?
You’ll see that one direction of whipping the stem stitch carries it across the twist, while the other direction goes with the twist. If you go with the twist, I think the thread you’re using to whip the stitch can get lost. I generally go across the twist. It depends on what direction you’re stitching in, whether to go from right to left under the stitches, so just try each direction, or look at it “in your head” while you’re looking at your embroidery, and you’ll see which one will carry the whipped thread across the twist rather than with the twist.