


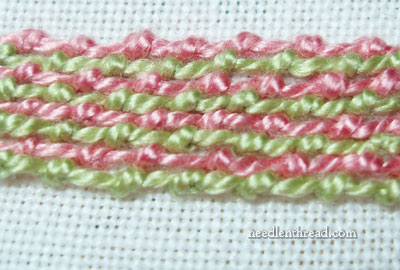
The coral stitch, also called the coral knot stitch or coral knot, is a line stitch made up of knots. The knots created by the coral stitch can be spaced close together or far apart, depending on what you want your line to look like.
The coral stitch is worked from right to left for the righty and left to right for the lefty, although in reality, it can be worked from either direction with either hand, especially if you stab the stitch (taking the needle all the way to the back of the fabric and pulling through) instead of sew it (working from the front only and scooping up the fabric with each stitch).

The coral stitch is a kind of “self-couching” technique – you’re basically tying down the working thread with the working thread, by forming knots over the thread.
You can work the coral stitch on straight or curved lines. The stitch looks best when the knots are evenly spaced.
You can also use coral stitch as a filling, by working rows of coral stitch close together within the area to be filled. To do this, you stagger the position of the knots, so that they fit between the knots on the line before.
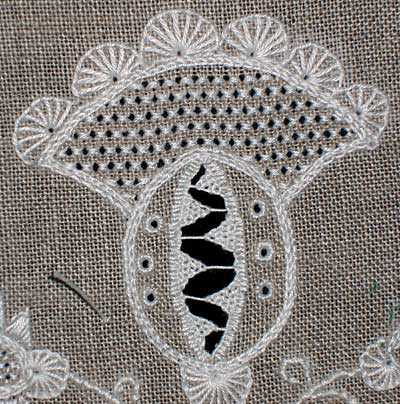
Coral stitch is an integral part of Schwalm embroidery, a type of whitework that employs coral stitch and chain stitch to outline areas of drawn and pulled thread fillings.
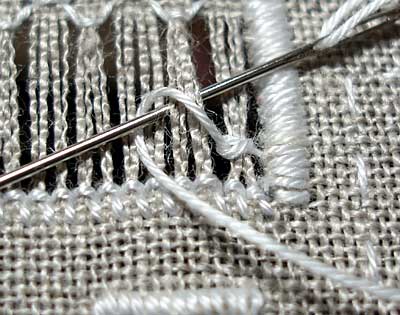
The coral knot can also be used in drawn thread embroidery, to gather threads into bunches.
Here’s the video:
Do you want more inspiration & information on hand embroidery?
There are all kinds of reasons to sign up for the Needle ‘n Thread daily newsletter! Check them out and sign up today!
If you’re looking for more embroidery stitch instruction, feel free to check out the collection of hand embroidery videos here on Needle ‘n Thread!
If you like what you see on Needle ’n Thread, if you want to be a part of keeping the website thriving (and free of annoying network advertising), why not become a patron on Patreon? Check out my Patreon page here, where I’ll occasionally add special needlework bonuses for patrons.
If you shop on Amazon, you can support Needle ’n Thread without any extra expense to you by visiting my Amazon Recommendations page here, where you’ll find books and sundries for the needleworker available on Amazon.
Thanks for another great tutorial, Mary. My favorite part of the video was the little “huh” you uttered when discussing the name of the stitch 🙂
Hi, Joey – yep, that was one of those “I just said something really dumb” moments!!
Wonderful, as always! I can’t wait to share this with my readers. I’ve schedule a link to your blog to post tomorrow, early afternoon (Central US time). Keep ’em coming!
Denise
http://needlework.craftgossip.com
Thanks, Denise! I appreciate the link!
Another great video, Mary! Thank you!
I like this stitch. Not long ago I, in order to practice various stitches, created quilt blocks with large heart shapes, and then filled in the hearts with all sorts of different stitches, in a crazy quilt sort of fashion. This was a great stitch for outlining the hearts. I love the chain of little triangle shapes it creates. – Jeannine
Mary – I didn’t think it was a “I just said something really dumb” moment … rather it seemed to me that something made you stop and think, that’s all … a very human moment which I love.
Thanks, Joey! Someone suggested to me that I use a “script” when I do the videos, but that just doesn’t work for me. It sounds too…. artificial and formal!
Oopsie! My bad, Mary! It was the Pearl Stitch that I was talking about that made the little triangle shapes, outlinging the heart that I did. Sorry about that!
-Jeannine
Thankyou Mary. I’ve just spent half an hour getting confused by a book.
Occurred to me that you might have a video on it, and voila! And I understand now!
Look out for it’s appearance in my sampler shortly. I’m going to use it as a filling, as well as a leaf vein.
Yay Mary!
Hi Mary
It is a great video but how can we use this stitch as a filling
Hi, Zenia –
As a filling, you work the stitch in close rows, alternating the placement of the knots. Hope that helps!
MC
Mary, I would love to learn more about embroidery fabrics in the future. I love your blog. I learn so much.
I agree with all dixiea said.
thanks for all the tips Mary.
Thanks, Gals – hopefully, over the Christmas break, I can work up a few posts on embroidery supplies! That's "part" of my plan, anyway!
hello Mary,I am very happy to found your videos.
Thanks, thanks, thanks and regard from Gaby
http://www.flickr.com/photos/meine_patchworkwelt/
bonsoir
je viens de trouver votre site ou je n'ai vu que de belles choses pour m'instruire !
il n'y a pas longtemps que j'ai appris quelques points de broderie,mais souvent dans les livres c'est difficile de comprendre.
et là avec vos vidéos c'est magique on comprend tout de suite ce qu'il faut faire,même si il faut recommencer plusieurs fois avant de faire le point parfait !
alors merci mille fois,je vous met dans mes favoris,et je reviendrai vous voir.
bon week-end à bientôt
sandynette
Hi Mary. You were wonderful. But I tried it and I have a small issue. Whenever I am starting this stitch, it looks like one of the running stitches and when I am continuing with the same stitch it doesn’t go in the straight line it automatically goes lower. I am left handed.
Oh, and also, when I am starting it, it doesn’t make a knot. 🙁
It works now, never mind the two other comments. Thanks for your video.
Mary,
Thank you so much for your embroidery tutorials.
I have enjoy learning new stitches.
Alba
Thanks Mary for the simple clarity of this tutorial. It is very helpful to a beginner embroiderer. I also love the work you are currently showing – alphabets and secret gardens. You most thoroughly demystify the process involved in embroidery yet develop an understanding of its artistic dimensions. I love it. Eve
I know this is an old post but I wanted to thank you for leaving this video up so that people can still access it and learn new stitches. I’ve just used your video and this stitch to make a border around a thimble pip that I am embroidering.
Thanks I found your site last year (2014) and have used it many times. Most helpful and clear instructions!
Ilona Pietermaritzburg KZN South Africa
Thank you. I learned basic embroidery when I was a young girl. I have taken it up again and want to learn more. Your website and the video tutorials are wonderful.
I love these videos of how to do the stitches. I am a visual learner and it helps me so much. I can take a sample piece and do the stitch as you do it. Thank you so much you don’t know how much this helps me as a visual learner.
Holy moly, I think you finally demystified this for me.
The best instructional videos I have ever seen. Thank you very much.