


On a current project, I’m embroidering some satin stitched red berry thingamabobs. I have no idea of they are accurately depicted as far as Mother Nature is concerned, but, in bright red, they go well with the spray of evergreen and pine cones around them. I had a little misadventure with some satin stitching, so I wanted to show you the problem and the solution.
First, the problem: The berries are not huge, but they’re a decent size at their widest point (perhaps three quarters of an inch on the larger ones, at most). Satin stitch is not meant to be used on very wide spaces – I’d say an inch to an inch and a half should be the longest span of satin stitch, and even that might be a bit too much, depending on the thread and what you do underneath the stitching.
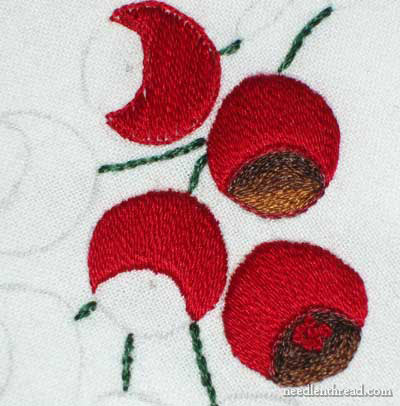
Here are the berries in question, relatively close-up. I’m not so keen on those darker centers, but since they aren’t the issue, let’s just ignore them for now!
So far, three berries are fully satin stitched. The top left is outlined and padding stitches have been worked perpendicular to the direction of the top satin stitched layer that will be worked next.
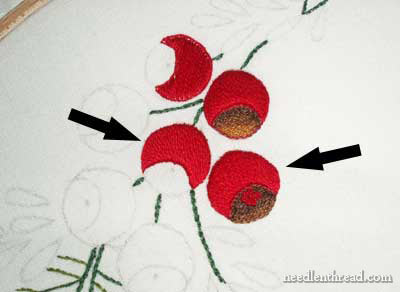
The arrows point to the berries in question, which, from far away, don’t look so bad.
But, when you get really close to the one on the lower right, you can see here some ridges in the stitching. Not too attractive. Besides being ridged, the stitches seem a bit loose. On the berry to the left of this, you can also see a bit of ridging in the satin stitching.
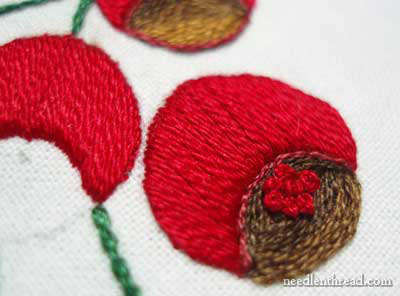
This berry, however, is fine. And it has the longest length satin stitching. Longer lenghts of satin stitch are usually the cause for ridging in stitches – because the stitches are longer, the tension cannot be maintained as well, especially if the fabric loosens in the hoop. And once the fabric is out of the hoop, with long satin stitching, you really risk your stitches flopping apart altogether.
So how is that solved? What’s the difference between the two berries on the bottom where ridging is evident and the longer berry on the top, where the stitches lie perfectly smoothly?
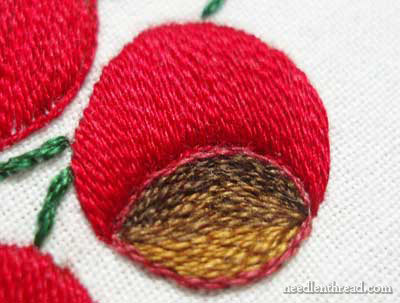
The difference is in the padding. For most satin stitching, at least one layer of padding is essential, especially if the stitch is half an inch or longer (using regular floss). The more space the stitch needs to cover, the thicker the padding should be. The padding not only provides lift underneath the satin stitch, but it also provides friction for the satin stitching threads and a stable base for them to rest on.
In the lower two berries, I used one strand of floss for the split stitch outline underneath the satin stitching, and one strand of padding, worked inside the split stitch outline, perpendicular to the satin stitched layer.
One strand on the padding was not enough; it was a weak, skimpy foundation for the satin stitches.
On the top berry, I switched to two strands for the padding stitches, and the increase in density underneath the satin stitches helped them lie better and filled the space in undereath, so that, once the tension is removed (that is, the hoop is taken off), the satin stitching will still look terrific. On the other berries, the satin stitches will shift, because they aren’t well padded.
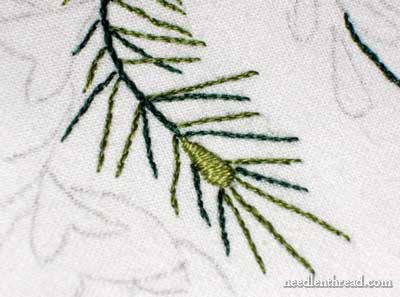
On very small areas of satin stitching, like the light green pod in the midst of these evergreen needles, little or no padding is required. In fact, I did outline the little pod, and I worked a scant filling with one strand of floss longwise down the pod, then satin stitched over it. But on a tiny space like that, I could’ve gotten away with not filling it at all.
Another tip on the satin stitching: use one strand of floss. Yes, it takes longer, but the secret to nice satin stitch is zero ridges – a perfectly smooth surface. If you use two or more strands of floss, they’ll twist on each other and then won’t lie perfectly flat, parallel to each other. You could use a laying tool, which would help smooth two or more strands out, but even then, you get a slight bunching in the hole where the threads emerge. Satin stitch generally just looks better when one strand of floss is used.
Many stitchers are intimidated by satin stitch. “I can’t get mine to look smooth.” “My edges are messy.” I hear this a lot! It’s not a difficult stitch; generally, it’s just a matter of practice while following a few tips:
1. Stitch the outline of the area you are satin stitching in split stitch. Why split stitch and not backstitch? Read this article comparing split stitch to backstitch, and you’ll see! When you stitch your satin stitch, take your satin stitches just over the split stitch line. This split stitch line will help keep your edges straight, and will barely lift the satin stitch up off the fabric. Don’t angle your needle back under the split stitch line before going back into the fabric. Just go straight down into the fabric just on the other side of the split stitch line.
2. Pad your satin stitches at least lightly. Work the padding stitches perpendicular to the direction of the top layer of satin stitches. If you are doing two layers of padding, stitch the first layer in the same direction as your satin stitch, stitch the second layer perpendicular to the first, and then your final layer (the satin stitch) will be perpendicular to the second layer of padding.
3. Use more padding layers or thicker thread for padding (or even felt, depending on what you’re embroidering!) for larger spaces of satin stitch. When you pad the area, you don’t have to take the thread all the way across the back – you can come up right next to where you went down in the fabric. However, when you do your satin stitching, the satin stitch should carry all the way across the back of the area you’re covering, in order to keep the correct tension on the thread.
4. Use only one strand of floss for the final satin stitching layer. Make sure you carry your thread across the back of the area you’re covering.
I hope these tips come in handy for you. Satin stitch is worth practicing! It really is a beautiful stitch!
Thanks a lot for the wonderful explainations and photos.
Pierrette =^..^=
Thanks a lot, Mary!
Yes it’s a beautiful stitch, but I have never tried it intimidates me…perhaps now I’ll try taking into account your advices.
Once more, thanks! You are unique
Thanks a lot, Mary!
Yes it’s a beautiful stitch, but I have never tried it intimidates me…perhaps now I’ll try taking into account your advices.
Once more, thanks! You are unique
Mary, a couple of questions.
Have you ever tried thread with a high twist (maybe coton a broder) for padding? I haven’t but was wondering if this type thread might not flatten out as much as floche or floss.
Also, do you recommend beginning your satin stitch at the widest part of the design?
And btw, I think you “thingamabobs” looked gorgeous!
Cissie
Hi, Cissie!
Thanks for the excellent questions. In fact, I may have to edit the post to address one of them: Yes, I always start my satin stitching in the middle of the area to be stitched, work to the edge, then go back to the middle, and work to the next edge. It isn’t always necessarily the widest part of the design… Starting in the middle helps establish your stitch direction. I think it also allows you to distribute your stitches more evenly as you approach the edge.
Concerning the padding — coton a broder is actually a relatively low twist thread. It works great for padding, but I wouldn’t normally use it to pad an area that I’m stitching with DMC stranded cotton, simply because I wouldn’t waste my coton a broder that way – stranded cotton is a lot cheaper! But if I were stitching with coton a broder, I’d pad with it, too – although sometimes, if I’m short on coton a broder, I’ll pad with the same color of regular stranded floss and do the satin stitch in coton a broder over that!
I probably wouldn’t pad with a really high twist thread if the thread were any larger than the top satin stitching thread. For example, I wouldn’t pad my stitches with perle cotton #5 or #8, and then satin stitch with one strand of stranded cotton. It probably wouldn’t make that much of a difference, but somehow, I picture bumps from the twisted thread. I haven’t tried it – but I might, just to see!!
Anyway, stranded cotton is pretty inexpensive, so I usually use it to pad under silk (stranded silk, like Soie d’Alger) and under regular stranded cotton, and occastionally under floche or coton a broder. But I’ve never used any of the higher-twist threads as padding underneath any of the above listed threads.
Hope that answers your questions!
Thanks for the comments, all! Meri, don’t be intimidated by satin stitch – just try it!! I think you’ll like it!
I don’t *think* I’ve seen anything about padding satin stitches in any of the embroidery stitch books I have. I’ll have to check them out again, and put a copy of this with them if they don’t.
thanks for the tip!
Gail
Thanks so much, Mary. I always seem to have trouble with maintaining a slanted stitch direction. It wants to straighten out as I approach the edge. Maybe you could address this!
Cissie
I think the berries look really good Mary!…very like Yew berries.I was intrigued by this article, as I’ve never padded my satin stitch…but then,I’d rarely do a stitch longer than three eighths of an inch.I’ll definately experiment with padding as it opens up more options, though for folk who are intimidated by satin stitch,I’d suggest starting without the padding at first.I’ve also never been able to use a hoop, so just hold the cloth with my other hand,and it seems to help with the tension and with placing the stitch.Great to get your techniques Mary!Charlie.
Thankyou so much Mary – that’s brilliant advice!! I’d noticed the problem myself but didn’t have a clue why it happened.
Thankyou for that invaluable advice Mary – the reason why we need to do something instead of a pure directive is always great to have.
This is really excellent advice. Thanks for putting it up. I start my satin stitch in the middle too. I thought that was a “rule.”
Wonderful advice, as always, Mary! I’ve scheduled a link to this post to go live on my blog Thursday morning (Central USA time), Nov. 27. I hope it brings you a few extra visitors.
Denise
http://needlework.craftgossip.com
H, Emily –
Thanks for your comment!
Well, when price is no object, and when the piece isn't going to go through the washer (this flour sack towel would probably be washed…), I like Au Ver a Soie's Soie d'Alger for satin stitch. It's a stranded (spun) silk. But there are LOTS of other threads that work magnificently for satin stitch – from coton a broder, to buttonhole silk, to various wools. But I do like working with Soie d'Alger!
Best regards,
Mary
Thanks so much for the info and for the quick reply!
I've never worked with Soie D'Alger. It seems that it comes in 5 meter skeins and is 7 ply. Can those plies be separated? I'm just trying to figure out how many skeins of Soie D'Alger would be equal to one 150 yd. skein of DMC Floche and I'm having some difficulties. If the Soie D'Alger can be separated, then I could get 35 meters [38 yards] per skein and so, yardage-wise, I'd need about 4 skeins of Soie to equal one skein of Floche, but how does the coverage differ?
I think that I'll probably use Floche for a project that I'm planning, but I'm wondering how much of a cost difference there would be if I used DMC stranded cotton for the padding stitches and Soie D'Alger for the satin stitch. I know that there's no way for you to answer that, although if you could tell me if that would even be kosher, that would be great.
Any advice would be much appreciated!
Thanks again!
Hi, Emily –
Yes, Soie d'Alger is stranded – there are 7 strands in each thread, and yes, they can be (and usually are, for surface embroidery) separated. One strand (made up of 2 plies twisted together) is about the same size as one strand of regular DMC embroidery floss (which has 6 strands per thread). The cost is quite a bit more for the silk, once you figure the yardage and the coverage. One strand of Soie d'Alger will not cover as much ground as an equal length of floche.
Yes, I have done that before – used a similar shade of DMC floss for padding, and stitched over that with the silk. It works fine, and there's nothing wrong with doing that at all. It is quite common to see less-expensive padding under more expensive outer layers.
Hope that helps!
MC
Ur thingabombs r so beautiful….can u give me the whole design
I knew if I came here I’d find what I needed. Thanks for the great information. Can’t wait to try it.
Brenda
fantastic!!!!!!I loved it.
My mother is going to use the satin stitch, but wanted to know what threads to use?
Thanks for the tutorial and for such clear explanations!
By the way, those are yew berries and branches; my parents have them as hedges in front of their house. Poisonous, but pretty. The berries are very soft and cup-shaped, so they’re hollow. They get a brownish inner lining, and that’s what the brown is in your stitches, not a cap 🙂
Thank you, Mary, for explaining this so clearly. It will be really useful.
Would you, one day, please be able to help with long and short stitch? I am fine when working along a straight line, but life is never quite so simple and we need to curve our stitches round to make all sorts of shapes. I will soon be working on a hedgehog’s body in long and short stitch, and I have never mastered how to do it neatly when there are bends and curves in leaves, animals, etc. it would be very much appreciated.
Best wishes, Marian.
Hi, Marian – here’s a whole sampler with nine lessons that covers long and short stitch: https://needlenthread.wpengine.com/2009/08/long-and-short-stitch-lessons-index.html
Mary, hello!
A question: do you or is it common historically to mix cotton and silk threads for an embroidery project ?
Hi, Milla –
Historically, silk, wool, and linen thread were the most commonly used threads before the 1800’s. Cotton as a sewing thread didn’t really come into its own until the early 1800’s. So, before the early 1800’s, you wouldn’t often see sewing or hand stitching done with cotton, anyway. And it wasn’t until the late 1800’s (1890) that mercerization of cotton came about. Mercerization is the chemical treatment of cotton that gives it a sheen. Before that, cotton threads were matte, with no sheen. Mercerization allowed cotton to take dye better (expanding color choices of threads), and gave it a nice sheen, making it a suitable and affordable substitute for silk.
So embroidery cotton is a relatively “new” thing – what we know as embroidery cotton (cotton thread with a sheen in a range of colors), wasn’t really around before 1890. If a person could afford to embroider in silk, then they embroidered the whole of whatever they were embroidering in silk. You don’t normally see the two fibers mixed in historical pieces.
Whether or not you choose to mix them now is up to you! I don’t do it in any “serious” embroidery piece, although I have been known to pad silk (the threads underneath the top of layer of silk, used to lift satin stitch) with cotton now and then. For one thing, the two fibers age differently. Cotton will lose its sheen (and often will fade in color) before silk does. The sheen of silk is natural – it is part of silk – so over time, it’ll always have its sheen. Cotton, though, only has a sheen because of a chemical process, and it loses its sheen over time.
Hope that helps put the cotton / silk question in perspective!
~MC
Hello Mary, thank you very much !
Little hints make ALL the difference.
Yikes! …a newbie stitchers question:
I’m working on a geranium leaf on an embroidery pattern from the French Needle. It calls for a satin stitch fill but there are leaf vein lines to be done in back-stitch on the leaf as well. Are the veins stitched after (on top of) the satin stitched leaf…and if so, how do I figure out where veins are since the blue pattern lines will be hiding under the satin stitch? Or do I do the back-stitched veins first and then do satin fill between them?
Thanks!
Hi, Sandy – I’d probably work satin stitch from the side to the vein, on both sides of the leaf and then back stitch down the center resulting gully. Hope that helps!
Perfect! Thanks so much for your quick reply…and I have to also thank you for your amazing website – you’ve made the beauty of embroidery seem so accessible for even novice stitchers!
Sandy
Glad you enjoy it, Sandy!
Yew berries!
Thank you Mary for your wonderful website. I recently started doing ecclesiastical work for my parish, and I dont think I could have learnt satin stitching without you. I love the detailed explanation/instructions. I have a question- when satin stitching adjacent sections, do we need to outline once or twice the common line separating the sections? If I do it just once, I would cover it while placing the final satin stitches of one of the sections, and then would the other section look awkward not having an outline edge to go over for the final satin layer? If I do it twice, do I need to leave a fine space between the adjoining outlines for the final satin layer to go over? Thank you so much in advance.
It depends. Is one section supposed to sit above the other, visually? Then stitch the one that sits further back first, without using an outline on the adjacent line. Then stitch the foreground section, using an outline on the adjacent line.