


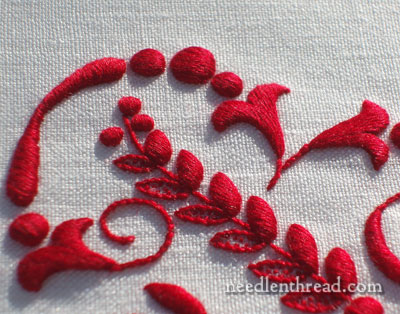
So, you’re venturing into a stitch or technique that requires a padded outline underneath the stitch…
For example, you’re working a satin stitched monogram, like this one:
Or you might be working a leaf shaded in long and short stitch, like this one:
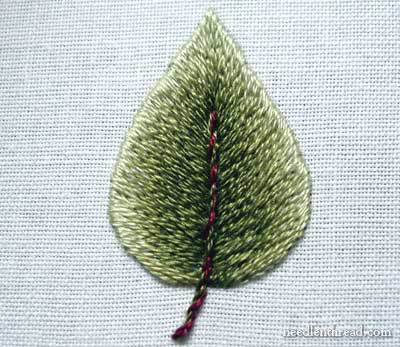
You want the edges clean and straight and slightly raised, right? To achieve this, the instructions will usually require the embroiderer to split stitch an outline around the element, and then to embroider just over the split stitch line. Rarely do such instructions call for a backstitch outline.
There is, believe it or not, a reason for this. We might think the designers are conspiring to drive the embroiderer nuts – after all, it’s a whole lot easier to backstitch a line rather than to split stitch it.
With backstitch, you’re working each stitch movement from the front of the fabric to the back, and you can see exactly where your needle’s going. With split stitch, you’re working the stitch movement from the back to the front of the fabric, coming up blindly somewhere in the middle of the previous stitch, in desperate hope of splitting it!
Split stitch can be hard to do. It takes practice. But there’s a reason for split stitch, and all those designers that call for it as an outline underneath an embroidered element really do know what they’re doing, and they’re not out to drive you mad.
I promise.
Backstitch vs. Split Stitch – They’re Different
Let’s look at the reason why we use split stitch for outlining underneath an embroidered element, instead of backstitch.
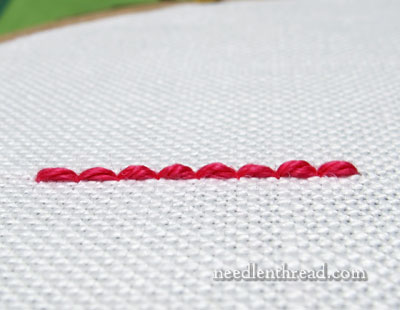
This is a backstitched line, seen from a side angle. Think: Compressed Loch Ness Monster.
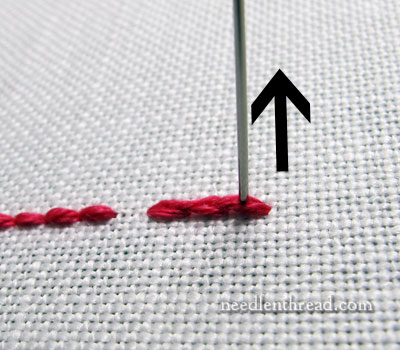
When working a proper split stitch line, each previous stitch is split by the needle coming up from the back of the fabric and through the stitch. This upward movement pulls the fibers of the previous stitch up with the thread as it passes through and raises the previous stitch up with the current stitch.
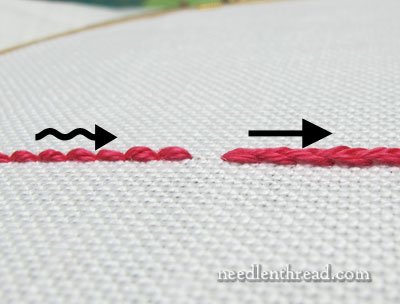
See the difference in the surface of the two stitches? The backstitch on the left is bumpy. With the split stitch, each stitch creates a bridge between it and the previous stitch. The stitches morph into each other. And the resulting surface of the line of stitches is smoother than the backstitch. The “bridges” of the split stitches will support a smooth, clean edge for the satin stitch or long and short stitch that follows.

If you turn your fabric over, you’ll discover another reason to prefer split stitch to backstitch. On the back of the fabric, the backstitch creates a bulky line. It actually creates either a split stitch line or a stem stitch line, or a combination of both, depending on where the needle entered the fabric in relation to the threads on the back.
The split stitch creates a much less bulky line of small running stitches.
So, on the back of the fabric, you’re not going to get as much bulk and build up when you begin working your satin stitch or long and short stitch over the split stitch line. This allows the embroidery on the front of the fabric to lie flatter on your finishing surface.
A Compromise: Split Backstitch
If the split stitch is just too difficult to manage, you can compromise and work a split backstitch, by splitting the stitches from the top instead of blindly from below.
The result isn’t quite the same as regular split stitch – the line will dent slightly, and the resulted split stitches will be more open, but it’s a good compromise between the split stitch and the backstitch, if regular split stitch is too harrowing.
Practicing the Split Stitch
But it doesn’t hurt to try to get the split stitch down. Try it first with softly twisted, slightly heavier threads like floche or coton a broder, or with a really thick, softly twisted thread like DMC 4 Retors Mat, which is what I’m using in the photos above. A softly twisted thread is much easier to split than a heavier, tightly twisted thread like perle cotton.
As you take each stitch forward in your split stitch line, pull gently on your working thread from the back of the fabric to keep that stitch down on the surface of the fabric as you bring your needle up into it. This will keep the stitch in place, making it easier to split.
Once you get used to splitting the stitch from below using a thicker thread, then move on to a finer thread, like one strand of floss.
Splitting Between Two Strands of Floss
I know what you’re thinking! Why not just use two strands of floss and come up right between the two strands?
Well, splitting between two strands of floss is not quite the same as regular split stitch, because you aren’t really splitting a thread. You’re parting two threads and coming up between them. So taking that route won’t really get you used to splitting the single thread that’s often required for outlining.
Give it a try! As with any stitch, ease comes with practice.
Your Thoughts?
What about you? Any insights into how you outline elements to pad satin stitch or long and short stitch? Any argument for backstitch? Any tips on making the split stitch easier? We’re all ears! Feel free to leave a comment below!
Thanks so much for this tip, Mary. I have been doing various kinds of needlework for many years, and the best part of reading your blog is discovering the answers to questions I didn’t even know to ask! This entry is a perfect example.
Happy New Year!
Ahh, you always stimulate my stitching-thinking process… and I always have something to say… (although I seldom do leave comments :0)
Well, for outlining I definitely would choose split stitch over backstitch! Even without seeing your reasonable pros. But my preferred techniques would be outline stitch or stem stitch.
With split stitch, it bothers me that to do it the thread should be thick enough and the thickest thread I can tolerate is perle #8, well maybe 5… Usually I work with mouline and split stitch with #25 is impossible, right?… So what bothers me is that the thread becomes kind of vulnerable because it is split, you know…
Hi, Lily – Thanks for your comment!
Hmmmm… I’m not sure if we’re talking about the same kind of outlining? I’m talking about the outlining that goes underneath satin stitch or long and short stitch to pad those stitches and raise them up. So you don’t actually see the outlining when the whole piece is embroidered, because it’s under the satin stitch or long and short stitch. I’m not talking about outlining that is seen on the surface when the work is finished (for example, line stitches used for stems, borders, etc.) For line stitches that are visible on the surface of the work after it’s finished, I prefer stem stitch, too.
But the reason stem stitch and outline stitch are not ideal for this type of padding / outlining underneath satin stitch and long and short stitch is that they work up into a wavy (like interconnected S’s) line. It’s more difficult to get a smooth satin stitch edge over that type of line. It’s not that it can’t be done, but it makes achieving a perfectly smooth edge on the satin stitch or long and short stitch filling much more difficult.
Split stitch has been used for centuries in surface embroidery in single, small threads. Think of all the figure embroidery with split stitched faces and clothing – these are done with very fine-sized threads. Long and short stitch shading (like the type done by Trish Burr, Tanja Berlin, etc.) is all done with split stitch, because long and short stitch is simply staggered split stitch worked in rows. For this type of embroidery, we work with a single strand of regular cotton embroidery floss or a single strand of tiny silk. This type of shading and embroidery is probably the most common use of “split” stitches. If you’re familiar with Helen Stevens’s embroidery, she uses Piper’s silk, which is a very tiny filament silk, and her stitches are split, too. As for the regular split stitch, I use it all the time with floche (which is much finer than the perle cottons), with all weights of coton a broder, with single strands of regular floss, and even with tiny strands of filament silk. I’ve never seen it make the thread vulnerable or break or anything like that. Here’s an example of split stitch using floche (for lettering). https://needlenthread.wpengine.com/2009/11/hand-embroidery-lettering-text-8-split.html It works great for fine text!
Thanks again for commenting!!
~MC
Mary – Thanks for the great photos showing the difference between backstitch and split stitch.
I’ve been doing crewel embroidery using crewel yarn and have started doing split stitch around the edges to get a sharp edge. My question is should the split stitch be done with the same type of thread/floss/yarn that will be used for the covering stitches? Since I’m not padding the rest of the shape on the areas done in satin stitch, the outer padded edges create a little bump. On shapes that are shaded with long and short stitch, it isn’t a problem. Thanks for your insight!
Hi Kris – if you want to forego that raised edge altogether, you can satin stitch without an outline, but the outline does make it easier to achieve a smooth edge. I like the little raised edge, but if you don’t want it, you don’t have to split stitch at all. Or, like you suggest, you can use a finer thread – a matching floche or regular cotton floss, for example, and that will minimize the ridge. Hope that helps! – MC
G’day there Mary,
I don’t think I have a problem with it. At least I don’t remember ever not being able to do it easily enough. This isn’t a boast, mind, but I think I might be one of those lucky people who are just able to do that sort of thing. When my granddaughter was 2 & 1/2 yrs I gave her lacing cards and without instruction she went down through a hole and without turning over the card she’d poke the lace straight back up the next hole from underneath, without looking underneath, and continued to do so. She was just always able to do it. Her pre-school teachers were surprised this last year when she had just turned 3 because she was able to thread the macaroni pieces onto the big plastic needle, takes a proper stitch through the hessian and continue on like that when apparently it takes quite a bit of practice and perseverance for children that age grasp the concept and then carry it out. Please don’t think I’m boasting. Other’s have their special ‘can do’s’ and this just came to me because of this post’s subject. Don’t worry, she makes up for it other ways. Because she’s tall for her age and is able to grasp some concepts so easily and is deft with her hands I sometimes think she’s a bit ‘slow’ with other things but have to remind myself that she’s only 3! And she’ll never be allowed to think herself too clever because her parents are very ‘down on the farm’ (literally too) and she revels in it.
I learnt interesting and necessary facts in this post. Not like Saltbush Bill’s wife in an old Australian outback cartoon, where she stumped him with logic (well what else could it be?) by saying “You and your facts. You’ll have to give me more than facts to convince me”! Haha.
Thank you Mary and Cheers, Kath
Thanks for the excellent explanation Mary and the clear photos about these two different stitches. A very helpful tip indeed!
I’ve been split-stitching since I was about six. In fact I used it as a decorative stitch in a book cover we were making in school aged about seven and the slightly ignorant teacher told me I shouldn’t use it because ‘It isn’t a proper stitch’. Must have been a VERY basic book she was working from! Anyway, as I learnt it so young it’s never dawned on me that it was a difficult stitch to do, but I’d also never stopped to think about why it was the stitch of choice for edging under silk shading, so that was really interesting – thanks for the insight!
You wont believe it, but I just experienced this yesterday! Perfect timing, thanks Mary.
Merci Mary pour ces explications très claires.
Je comprends mieux la différence de ces points et leur utilité.
Bonne année à vous et à vos proches.
Michèle
Thanks for this lesson Mary. I’ve been getting ready to try Trish Burr’s kit and a little nervous about split stitch. Would you believe, I’ve been embriodering for 60 years and never done this before…so again thanks for the explaination.
Split stitch is hard? I never knew! I’ve used it often on many things. And it does work well to put a border on something.
Hello mary,
i’m very happy about today’s post because i have learnt a new lesson. I do the split stitch very often and i find it very very easy, but i did not know it was used as an outline and only after reading the comments did i understand the difference between the outlinings. Thanks for the knowledge you have given everyone. Take care
Dear Mary
I love it when you show stitch comparisons and through your photos you can certainly see the difference between the stitches, I don’t have a problem with split stitch the only problem arises when I use more than one thread and I have to be careful to split the stitch and not go between the threads. I always use split stitch when I outline an element as its smoother and less bulky as shown in your photos.
Thanks
Regards Anita Simmance
Mary, thank you for such detailed reply 🙂
Yes, we did mean different kinds of outlining… (blushing here) ; and it doesn’t matter if the thread is ‘vulnerable’ if it is going to be hidden after all…
But I’m glad to hear that split stitch is possible with almost any thread (except metallic probably 😀 ) … if you say it can be done – it can be done. (Floche is very nice, but not widely available). I suppose being used to blunt needles I forgot that one can perhaps use millinery needle for fine thread. I love fine embroidery and I like to try different stitches, so hopefully my horizons are a bit wider after this deep discussion 🙂
Thank you.
I was taught another reason to use split stitch for outlining–it’s tighter to the fabric and more secure. The longer stitches on the back of back stitch give it wiggle room and it is harder to maintain your outline when stitching over it. I hadn’t thought of your other very good reasons to use split stitch. Split is one of the stitches I use all the time.
Excellent explanation!! The split stitch seems to give a “harder” edge under the satin stitch — I always figured because each stitch is less wiggly because it would be like each backstitch being stitched in the middle. (don’t worry if you don’t understand what I am saying…. it is the way I visualize!!) That stable edge gives one something to work against and slant the needle behind. Oh yes: Happy New Year everybody!! Still working on my resolutions as suggested by your previous post! Keeps me on my toes! Thanks Mary.
What an incredibly informative, insightful, and succinct explanation…once again. Thank you so much, Mary. You are THE goddess of embroidery!
Hello Mary!
I have tried needle painting (the long and short stitches),but it’s hard to split a strand of floss!! Am I doing something wrong? Please help!
Try pulling gently on the working thread to hold the stitch right next to the fabric while you bring your needle up. That might help. It may also be a question of eye sight. Can you see the thread clearly? If not, consider a better craft light or even a magnifier… MC
Thank you very much for this post. I am returning to embroidery after a long hiatus and love, love, love your website. I am currently working on your short and long stitch tutorial. Ok, how do you split floss? I can barely see the two strands. Do you have hints specifically for floss. Thank you again for maintaining such a robust site. Judith
Hi, Judith – if you’re having trouble seeing the floss to split it, you probably need to use a magnifier, or at least check to make sure you’re using a good light. When working on long and short stitch, good light and (if you need it) magnification are important. There are different brands of craft lights combined with magnifiers – like the Dublin craft light – that work well. If you have a needlework shop in the vicinity, the best thing to do is test them in the shop, to find one you like. Hope that helps! -MC
These are two of the hardest stitches I have ever tried to do. No matter how hard I try to follow the instructions the result is always wrong. I need backstitch and split stitch for dummies. Why are the easiest (seemingly) stitches so hard?
Louise
Hi Mary, as I’m sure you already know, in Mountmellick embroidery we tend to use chain stitch to pad underneath satin stitch (and buttonhole stitch etc). The reason why we use chain stitch is because Mountmellick embroidery is supposed to be chunky and high relief. Chain stitch pads quickly and thickly.
I usually outline the shape first, making sure the stitching sits *just* inside the outline of the shape so that the edge of the stitching sits on the outline. This means that the whole shape doesn’t get larger. Then I continue stitching inside that outline, spiralling inwards towards the centre, so that the whole shape is padded, not just the outer edge.
Additional layers of chain stitch can be worked on top of the first layer, making the padding even higher.
Chain stitch padding is thick, firm and extremely stable. Exactly what we want for Mountmellick embroidery. 🙂
Yvette Stanton
Vetty Creations, Sydney Australia
Author of “Mountmellick Embroidery: Inspired by Nature”
http://www.vettycreations.com.au/me.html
The reason I don’t like using split stitch for outlining is because it doesn’t feel like a solid line. When viewed from above it appears wide then narrow then wide etc. I don’t feel like I’ve a clearly defined edge to follow.
Thanks for your explanation Mary. I have used split stitch on one small project & didn’t have a great deal of problems with it.
However,I do have a question for you. How long should the stitches be & do you always come up through the centre of the stitch or can it be a bit off centre? Just wondering for the next time I use the split stitch.
Thanks Mary & Happy New Year.
Linda A. , Ontario, Canada
Thank you for your suggestions. I found I was using too large a needle! When I want down to a 9, I am getting a much better stitch.
I like the results of the split stitch – especially with the cleaner back. But wouldn’t you get a cleaner back if you use a running stitch instead of the back stitch if you cannot master the split stitch.
I’ve always use split stitch and had never considered using back stitch. Good to know it was the right decision.=) (I got *something* right for a change….!!!)
Hi, I am the communication chair for my local embroiderers’ guild chapter and I am doing our newsletter. May I use the things from your site in our newsletter as long as I give you credit and provide the link? Let me know as soon as possible, thanks!
Hi, Christine – thanks for your inquiry. I replied via email with specifications….
I have used a split stitch as my *go-to* filler stitch and outline stitch for years! I could never really explain why I like it better and why it sits better on my embroidery. From now on, I’ll just point to this article!
Thank you!
That was very helpful. Thank you so much.
Thank you so much for this explanation of the split stem stitch. I am learning how to needle or thread paint with a single strand of embroidery floss. I thought about using two strands but you explained why that wouldn’t be correct.
Could I use a chain stitch if a split stitch is a challenge I have not yet overcome?
Thank you for your time,
Ana
If you’re using it as an outline underneath satin stitch or long and short stitch, chain stitch would not work as well. Instead, try the split backstitch – it would work better than chain stitch and is a little easier than regular split stitch.
I must be one odd duck because I find back-stich much harder to make look pretty than a split-stitch. That was the first stitch I learned and by far it’s the easiest one for me.
This is really eye opening. Split stitch for me.
Thank you so much…. very helpful..
wow. your tips are so valuable. thanks sooooo much!
Just to say Thank you for every word I learned it from you ❤❤❤
I felt that I never stitch right before …. ❤❤
Very useful analysis of backstitch vs. split stitch. Now I know why and when to use one or the other. Thanks!
I’m stitching on 22 count linen and plan on using a satin stitch for the Times New Roman alphabet I have to use. Each letter is 10 threads tall. I don’t think the letters will look good if I cross stitch the letters because of the ragged edges. I also thought of using a stem stitch. Is using a satin stitch the best to use?
Thanks, Patricia
I think it depends on the thread you’re using, how much coverage it gives, etc. Your best approach is to test your theories and see what effect you like best.
My experience with split stitch was guillotining the thread – it was too awkward!