


Today’s article is the continuation of yesterday’s Long and Short Stitch Shading, Lesson 2. We’ll be looking at the larger box in Element 1 on the Long & Short Stitch Sampler. This box is stitched on the diagonal, so it’s a little more difficult than yesterday’s vertical stitching.
If you’re just joining in on the Long and Short Stitch lessons, you can visit the Long & Short Stitch Lesson Index to see a list of already published lessons and articles in this series.
Once you’ve worked through the first box in Element One on the sampler, it’s time to move to the second box, which is the larger of the two boxes. This second box is set behind the first. Often, in needlepainting (long and short stitch shading), the elements farther back in the design are embroidered first, but we’ll make an exception with these boxes! The first box was easier to stitch, so that’s why we started with it.
Materials:
1. Project in hoop or frame
2. #9 or #10 crewel (embroidery) needles (I’m using #10)
3. DMC Colors: 814, 347, 349, 351, 353, 745, Ecru – note that 3855 (darker yellow) isn’t used on this box
4. Small, sharp embroidery scissors
Procedure:
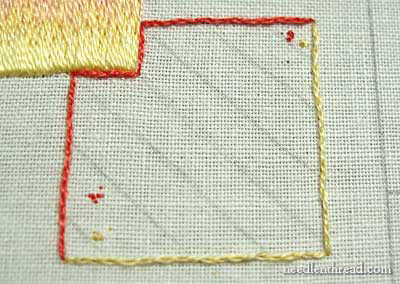
Begin by stitching a split stitch line around the box. Start on the left side and stitch up the left side and across the top of the box in the salmony-red 351. Stitch down the right side of the box and across the base line in yellow 745.
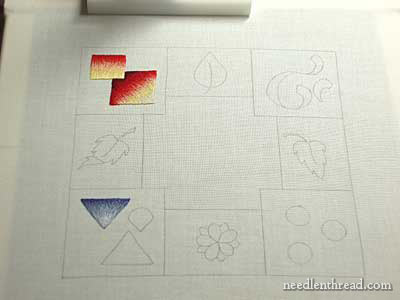
When you’ve finished split stitching the lines, go ahead and draw in your diagonal stitch direction with a pencil. Take a look at the diagram below:
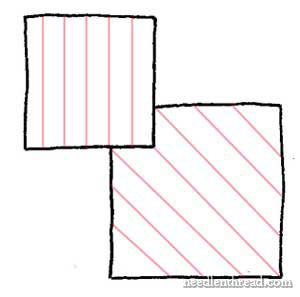
The pink lines in the boxes above indicate the direction of stitching. Notice that on the second box, the direction is diagonal instead of vertical.
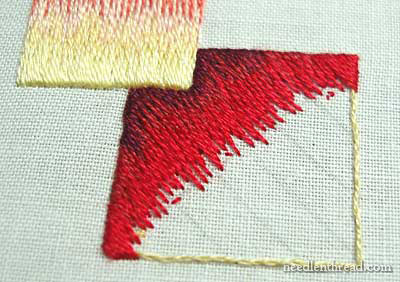
The first row will be stitched in the top left corner of the box, just underneath the smaller box. The first row is worked in dark burgundy (814). In the diagram below, you can see the basic shape of the first area to be filled:
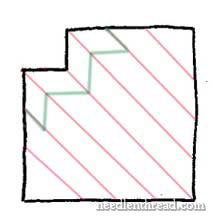
Following the same directions from yesterday’s post – the first part of lesson 2 on basic long and short stitch – work from the center point (just under the corner of the top box) towards the top line. Mark in your directional stitches before you begin – this will help keep you on the diagonal.
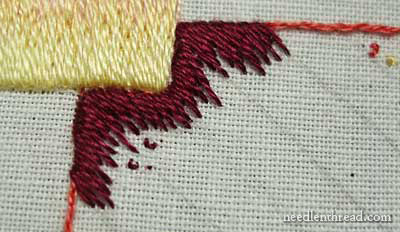
Then stitch from the center point to the left side of the box, following the direction of your diagonal lines and filling in between your directional stitches.

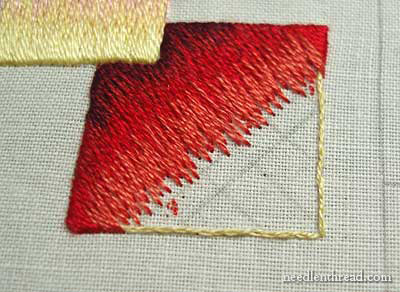
The second row is worked in dark red (347). Bring your needle up in the center of your first row, splitting the stitches as you learned in yesterday’s lesson. Work from the center to the top line of the box, marking in directional stitches and filling in between them.
Move back to the center and work to the left side of the box, filling in the second row.
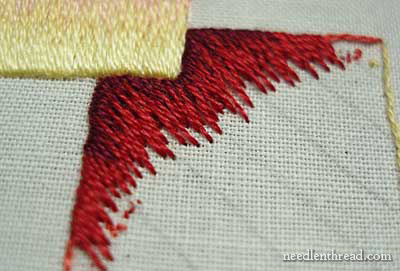
The next row is worked in bright red (349). Begin in the center and work to the top line and then back to the center to the left side of the box. Here, I began in the center and worked first to the left side of the box. (You can work in either direction first…)
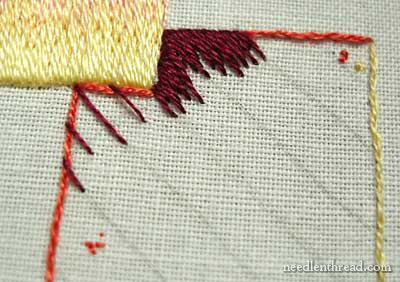
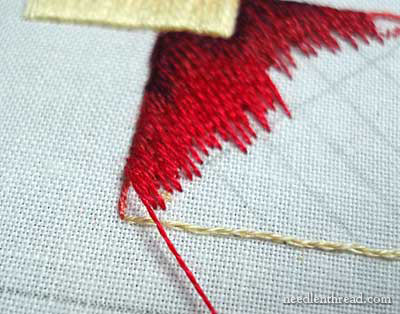
When you get to the point that your long stitches would cross over the split stitch line at the base of the box, cross over the split stitch line and fill in the rest of the corner with satin stitch.
You can see that the last few stitches in the corner here are worked in satin stitch. You may not arrive at this point working the third row – you might not get here until the fourth row of stitching – and this is fine. It depends, you see, on how deep you stitch each row of stitches. But whenever you arrive at the point where your long stitches are going to cross over the corner, go ahead and cross the split stitch line, then finish the corner off with satin stitch.
This is the completed third row.
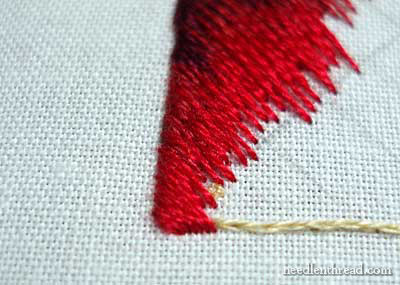
The fourth row is worked in the salmony-red (351). Again, as you come to the point where your long stitches want to cross the corner, go ahead and cross the corner and fill the rest of the area by working over the split stitch line toward the corner.
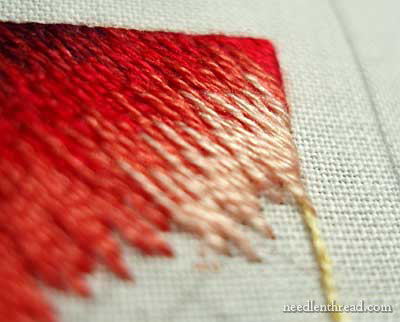
The fifth row is worked in the lighter salmon (353), and, as you work, notice that you will be filling quite a bit over the split stitch line on the right side of the box and on the base line of the box.
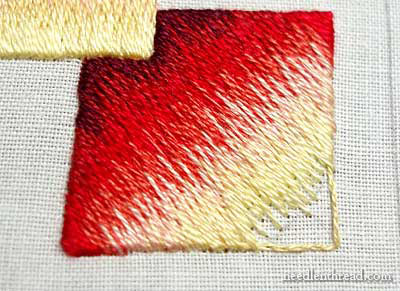
Work the sixth row in light yellow (745) in the same method.
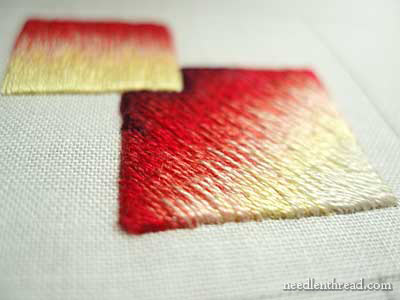
And, finally, work into the corner of the box in Ecru.
Voila! You have finished stitching inside the boxes!
Next lesson – filling in an angled area that begins broad and works to a tip (triangles).
Long & Short Stitch Shading Lessons – Related Posts
Lesson Two, Part 1: Inside the Box – Basic Long and Short Stitch (with three-part video tutorials)
INDEX of Long & Short Stitch Lessons
Frustration! Any time I cross the edge, it pulls in and makes the edge ragged looking. Ideas? Maybe go further beyond the split stitch rather than right against it??
Hi, Pam – try to ease up on your tension! If you go further beyond the split stitch line, you loose the purpose of the line, which is to give you a crisp "lifted" edge. Try slanting the needle into the fabric towards the middle of the box as you go into the fabric, and don't pull too hard, just enough to make the stitch lie down.
MC
I guess I'm just going to have to give up and realize that in my world there is NO SUCH THING as a straight edge….:( Tried everything and nothing works.
These lessons are so helpful!Thanks for all the pictures as I have dial-up and would never get the videos to run – mores the pity! One question – Why must I go from the center to one side or another with longer stitches and then fill those in, and then do the same to the other side? Why can't I just start at the edge and work my way across, doing the long and short stitches at the same time after putting in my directional lines? It seems to me that it wastes a lot of thread, especially if you were using silk.
Also, I am still not receiving your post to my email box although I have re-signed up for it twice!
Karen
Hi, Karen –
Thanks for the questions!
Working from the center to the edge helps keep the angle of stitches correct. This is especially important once you start working around curves and angles and so forth. It doesn't really waste too much thread – the elements are pretty small…
Ahh – the e-mail newsletter! You'll need to add me to your contacts or your approved list… or check your spam folder! If you happen to have an aol address, I have a perpetual problem getting through to aol addresses. The problem might be solved by adding me to your contact list. Did you receive the confirmation e-mail? Check your spam folder for it. You have to confirm the subscription before the e-mails will come regularly.
Thanks again for the questions!
MC
Dear Mary……this question is VERY important to me so I hope you can find the time to respond. At this point in my "needlework experience" I have always used cotton and have yet to use silk thread. Since my "shading" work turns out so clunky….is it because shading is more successfully done with SILK ? ? I sure am reading your instructions very carefully and am grateful for them and the ongoing photos. They really help. Thanks so much. So should I expect better results with silk as opposed to cotton ? Judy in Pittsburgh
Hi, Judy!
I'm using cotton. I like the look of silk better with this type of stitching – the sheen is much niver and it just looks prettier, I think – but for practice, cotton works fine. And it looks nice, too. I'll have the triangle lesson up early in the week (working on it today), and you'll probably find that you like your results on the triangle shape better. The colors of blue blend better, and shading to a tip definitely looks better than shading across a square.
Don't fret over the thread. I wouldn't invest in silk for a practice project!
Hope that helps!
MC
I have just this week found your website and spent many hours pouring over your excellent information! I have started my long-and-short project, but am wondering if you can help me find a source for gold needles? I am allergic to nickel and begin to itch after a while of stitiching. I have gold tapestry needles, but the store has gone out of business. Also, the videos are great – especially for "show me" learners!
Hi, Janice –
DMC makes gold-plated needles. You can see a list of them here:
Gold Plated Needles from DMC
I don't think DMC sells them directly on their website, but Nordic Needle carries them. You'll find them here:
Nordic Needle
I've never used Schmetzneedles, but they have some gold ones listed on their website, too:
Schmetzneedles
Hope that helps!
MC
Since I am not pleased with my work, I took a peak at some of my embroidery books that show how to do stitches: They all say that I should alternate my long and short stitches and that the longs should all be the same length and the shorts should be evenly stitched as well. This would be so much easier – Why are you teaching this differently? Does it really matter? In one example the colors of the threads chosen did most of the shading work for you. Hope that make sense to you!
Thanks for all the help,
Karen
Hi, Karen –
Well, it depends on what book you're reading. While some books instruct on long and short stitch in exactly that method (and I would say that probably most do, especially if they only present a simple diagram), others – books and instructors – work with a much looser method, like the one here.
The difference is in the look you're trying to achieve. Especially on a "straight line" (such as working a square), alternating with a rigid, absolute long-short-long-short in uniform lengths will produce a very formal, systemmatic looking filling. And that's ok, if that's what you're looking for.
But since most long and short stitch shading is done to mimick a natural and gradual color change – for example, in flowers and animals and so forth – the variation in the length of the long and short stitches helps to achieve this.
Some designers / authors that I can reference who use a more "relaxed" method (rather than the uniform long-short in all cases of shading) would be, for example, Tanja Berlin, Trish Burr, Clare Hanham.
Yes, it's true that the only line that really varies length (especially if following a more rigid approach) is the first, and then the rest of the lines are pretty much made up of the same length of stitches – this holds true, even with the technique I'm demonstrating, more or less, if you want to do it that way. Personally, I'm not too rigid about that.
When we move into the triangle, you'll find that the rigid long-short, long-short doesn't work as well, because we're working on two angles that converge. You end up having to sort of tuck in stitches to make the shading work.
But if you like the long-short-long-short of uniform lengths, by all means, you can stitch it that way! As long as you're getting the results that you want!
Thanks,
Mary
Hi, Mary! thanks for the lessons, these are so helpful. Can you show me the back of your long and short stitches, i want to know please.
Thank you.
Regards,
Radha.
Hi, Radha –
Sure, I'll try to remember to include the back in an upcoming lesson. The back looks pretty much like the front, with the exception of a few cross threads here and there.
MC
Hi,Mary!, thank you, thank you so much. You have a kind heart.
God bless you.
Radha.
Mary,
I want to thank you for this wonderful website that is so very informative and helpful. I have always enjoyed cross-stitch and did a fair amount of it years ago. A few years ago, I began doing embroidery and though I haven’t done a lot, I would like to do more of it. After looking around your site and several others, I have decided to move forward with crewel embroidery and have ordered the book, Crewel Embroidery: A Practical Guide. I decided to go ahead and do this Long and Short Stitch lesson to practice. I have just complete the first box. For the most part, I am pleased with the outcome. However, I am noticing a slight bunching of the fabric and am wondering how to avoid this. Does it have to do with the type of fabric (I am using a light cotton weave fabric for practice.) Or does it have more to do with my stitching…pulling the thread too tight, etc. Thank you for any tips you might have regarding this!
~Silvana
Mary. THANK YOU for you wondeeul videos. I have tried the Long and short sticth on the small box 2 times..each time took almost an hour and they were only about 1 1/2 in. That shows how much of a beginnerI am.THe 2nd was a little better than the first!/
I just read he post from the Cewel stitcher. I make Hand embroided flowers and such..much much smaller than crewel.
Am I barking up the wrong tree>??
I’m using silk thread to practice with, so i can’t see how it would be for crewel.
Lastly, do I understand that you Split he thread on the rest of the rows??
I want to really be able to do this, but..I hope it isn’t way beyond my ability.
Thanks again for your wonderful videos.
Florence
Hi, Florence – Yes, you split the threads when you come up into the previous rows. Silk thread is a lot finer than crewel wool, so right off the bat, your pieces will be a lot smaller (or you will use a lot more thread to fill up larger images). You’ll find, when working with wool embroidery threads (I recommend Fine d’Aubusson, Renaissance Dyeing wools, or Heathway), that long and short stitch fills up very quickly and it is a very forgiving stitch – you can make “repairs” very easily, because the thread fills up the spaces better and hides a lot! If you’re after the look of crewel, then maybe you should try the technique with wool threads. I think you’d find it a lot easier! Hope that helps! ~MC
What kind of needle threaded do you use I’m using a standard one with a wire but my thread breaks most of the time. I always use bees wax first
Thank you
I meant needle threader
Hi, Lois – I don’t really use a needle threader, but I know the little wire ones tend to be a bit chintzy. DMC makes one that has a flat metal hook on each end (different sizes on each side) that might work better for you.
Fantastic thank you so much for this I’m literally just getting in to embroidery and know nothing apart from I love the idea of making a flower pitcure, they look so beautiful these lessions are brilliant it’s took me days of searching to find this article and I’m so glad I have I will be buying my surplies later to day can,t wait to get started on this sample piece thank you so much again for spending the time to make this for us begginers
Is there a pdf for this lesson? I can’t find it — I downloaded all of the other long and short stitch lesson pdfs but I’m missing this part of Lesson 2.
Thank you so much,
Mellie
Hi, Mellie – no, there isn’t one for this lesson, but you can always print the article from your browser. You can view it in a more print-friendly version by clicking the “hamburger” (short stack of lines) in the top left edge of your browser’s URL address bar. If you click on those lines, the article will pop up in an easy-to-read format – and you can print that from there. Hope that helps.
These boxes were really helpful. The shading instruction is really very, very helpful. My first square is a bit odd because I was so wrong about sizing, but I think I ignored the instruction on size for the second and it went much better (because I did something much closer to what the instruction actually meant as opposed to my imagined 3/8″ sizing).
That’s not to say my results are exactly good. I don’t have the right threads, my edges are definitely not straight and one of my squares got skewed! Stitching over the split stitch line has helped me in the past, but I can’t seem to get the hang of it this time. Not sure if that’s because it’s a straight line? Or something else? At any rate, I shall concentrate on the insides and pretend the outsides will take care of themselves.
Your instructions are one of the best I’ve seen, but for the visual learner, like myself, a more step by actual step is needed. Iam having a difficult finding the exact technique for doing long and short stitch on rounded corners, like on a flower petal.
Please advise.
Great lessons! Does it matter how long the stitches are? If your shape has 6 colors in the shape, they stitches may have to be shorter to fit all colors in and if there are only three colors the same shape would be filled with longer stitches, is this right? I have one book the says the long stitches should be 3/8 inch long, but that could be a problem. So is the a best length for the stitches?
Thank you!
Kathy
The smaller the shape, the more difficult it is to fit in a LOT of shades – you’re better off keeping the stitches smoother by making them longer and using fewer shades than to try to cram in a lot of shades into a very small shape, using stitches that are too small, because then you lose the painterly effect and end up with “chunky” looking stitching.
I can’t really say your stitches should be “this” long or “that” long, because it does depend on the project, the type of thread, the design and shape, etc. But normally you get better results if your stitches are generally longer than you might initially be inclined to make them. And the deeper they go into the previous row, the more gradual and the smoother the result.